Table of Contents
Advertisement
EN
Embossing Starter Kit
About the Embossing Starter Kit
By using the embossing tools with the cutting machine, you can create embossing by pressing a pattern into the material* for either a
recessed effect or, by flipping over the material, a raised effect.
Use this kit to create custom embossed projects.
*
Use paper and metal sheet only for the material.
Important Safety Instructions
CAUTION
• Do not cut the metal sheets with the cutting machine, otherwise the blade may break or the machine may be damaged.
• Do not trace or rub your hand or fingers along the edges of the metal sheet, otherwise injuries may result.
Precautions
Do not insert any object other than the embossing tools into the embossing tool holder.
●
Do not cut while using the embossing mat.
●
Do not fold or bend the template sheet or scanning support sheet.
●
If the adhesive strength of the embossing mat is reduced, lightly wipe it with a wet wipe (preferrably alcohol free), for example, to
●
remove any dust or dirt. After wiping the mat, be sure to allow it to dry. If the mat becomes wet, its surface will become brittle.
If material can no longer be attached to the embossing mat, replace the mat with a new one.
●
If the template sheet and scanning support sheet become dirty or damaged, replace them, otherwise scanning may be affected.
●
Without peeling the embossing mat off the cutting mat, affix the protective sheet for the cutting mat before storing the mats.
●
Do not throw away the backing after peeling it off the scanning support sheet; reattach it before storing the sheet.
●
Do not store in a location exposed to direct sunlight, high temperatures or high humidity.
●
Use in an environment between 10 °C and 35 °C (50 °F and 95 °F).
●
For detailed instructions on using the cutting machine, refer to the Operation Manual supplied with it.
●
The contents of this document are subject to change without notice.
●
The screens in this manual are for illustration purposes only and may differ from the actual screens.
●
1
Version 0
Advertisement
Table of Contents

Related Manuals for Brother ScanNCut DX Embossing Starter Kit


Summary of Contents for Brother ScanNCut DX Embossing Starter Kit
- Page 1 Embossing Starter Kit About the Embossing Starter Kit By using the embossing tools with the cutting machine, you can create embossing by pressing a pattern into the material* for either a recessed effect or, by flipping over the material, a raised effect. Use this kit to create custom embossed projects.
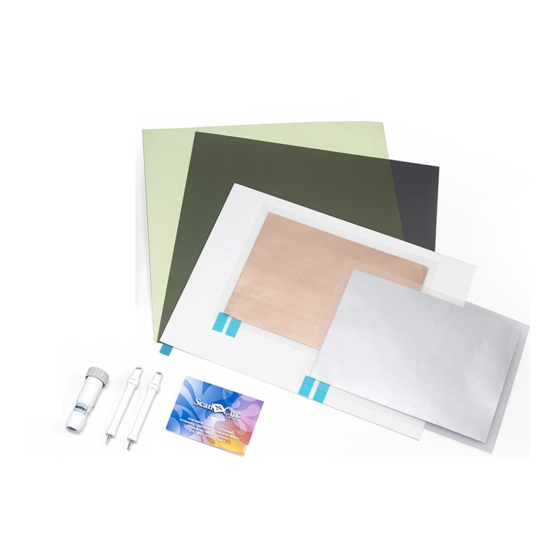
- Page 2 Accessories After purchasing this kit, check the contents. Name Embossing mat 12" × 9.5" (305 mm × 241 mm) Template sheet 12" × 12" (305 mm × 305 mm) Scanning support sheet 12" × 12" (305 mm × 305 mm) *1 *2 *3 Metal sheets with self-adhesive protective sheets (silver and brass) 7.9"...
-
Page 3: Activating The Embossing Function
Activating the Embossing function on the CanvasWorkspace machine From a computer, log in to CanvasWorkspace. Touch "Premium Functions" on the settings screen. (http://CanvasWorkspace.Brother.com) • New users should create a free account. Click at the top of the Web page. Click <Premium Function Activation>. -
Page 4: Retrieving The Embossing Pattern On The Machine
• With line embossing, only use paper with a thickness of 0.5 mm or less or metal sheets with a thickness of 0.2 mm or less. • The procedure for metal sheets uses genuine Brother metal sheets. With the tab on the embossing mat at the bottom left,... - Page 5 Retrieve the pattern on the machine, and then feed in the Select "Emboss" on the preview screen. mat and touch to scan the material. • Flip asymmetrical (mirror image) patterns to create the embossed effect on the front surface of the material. •...
-
Page 6: Region Embossing
"Create template" to begin creating a template. • To perform the initial setting again, refer to the FAQs in Brother Solutions Center (http://s.brother/cfoag/). • In order to create region embossing, a template must be made. - Page 7 Attach the material to be embossed to the low tack Use the Auto Blade (Black Holder) to cut the template adhesive mat, and then follow the on-screen instructions sheet. to scan it. • Follow the on-screen instructions to complete the procedure. •...
- Page 8 Fold the template in half along the cut dotted line, and Feed in the mat, and then scan according to the on-screen then attach the template to the mat so that the fold is instructions. From the LCD display screen, select an area aligned with the bottom edge of the attaching area of the so only the lines to be embossed will be detected.
- Page 9 Select "Emboss" on the preview screen, select the tool to Touch , and then specify the embossing pressure. be used from the displayed screen, and touch the "OK" key. Embossing Pressure Material Thickness 1.5 mm tool 3 mm tool Paper (thick) 0.25 mm •...
-
Page 10: Troubleshooting
However, if the offset is too small, embossing cannot be completed correctly. 3. The material tears. • If the material tears, decrease the embossing pressure. If you need additional help, the Brother Solutions Center offers the latest FAQs and troubleshooting tips. Visit us at "http://s.brother/ cfoag/".