Table of Contents
Advertisement
Advertisement
Table of Contents

Related Manuals for Verizon 5G Home Router


Summary of Contents for Verizon 5G Home Router
- Page 1 User Guide Verizon 5G Home Router...
- Page 2 Federal Communication Commission Interference Statement This device complies with Part 15 of the FCC Rules. Operation is subject to the following two conditions: (1) This device may not cause harmful interference, and (2) this device must accept any interference received, including interference that may cause undesired operation.
- Page 3 Use of another adapter could result in damage to the unit. The following power adapter is qualified for use with this Verizon 5G Home Router. This unit must be powered by FSP, model FSP120-AWAN3-W or equivalent UL listed power source rated @ output 54Vdc, Minimum 2.0A.
-
Page 4: Table Of Contents
Table of Contents CHAPTER 1 INTRODUCTION ....................... 1 ........................1 ACKAGE ONTENTS ........................ 1 YSTEM EQUIREMENTS ........................... 1 EATURES ..................... 2 ETTING TO NOW THE OUTER CHAPTER 2 CONNECTING THE ROUTER ....................4 ....................... 4 ETTING UP THE OUTER ......................4 ONFIGURING THE OUTER ...................... -
Page 5: Chapter 1 Introduction
Chapter 1 Introduction This chapter includes a list of items included with the Router, the minimum system requirements for using the Verizon 5G Home Router, and an overview of the Router’s features. Package Contents The product package should contain the following items: ... -
Page 6: Getting To Know The Router
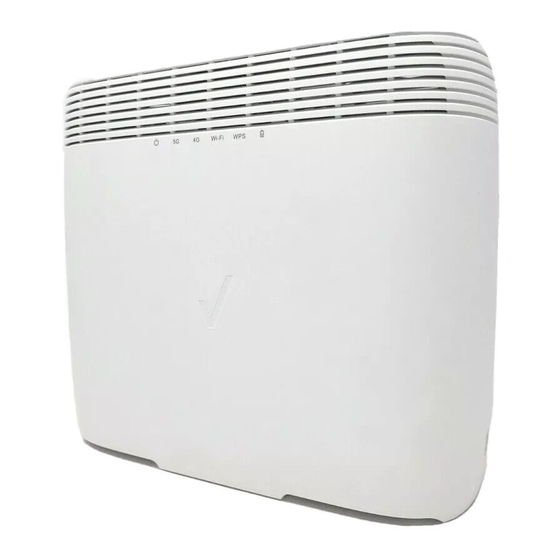
Getting to Know the Router This section contains a short description of LED indicators on the Router’s front panel, and the ports and buttons on its rear panel. Front Panel/LED lights The front panel of the Router features six LEDs. Power LED The Power LED indicates the Router’s status. - Page 7 Rear Panel Power Button Press this button to turn the Router on or off. Note: It is essential to keep the power button on to enable the VoLTE feature and E911. If you turn off the Router by pressing the power button, be sure to wait for approximately five seconds before turning on the device again.
-
Page 8: Chapter 2 Connecting The Router
Chapter 2 Connecting the Router This section describes Router set up and configuration. Setting up the Router Unbox the Router, AC adaptor, and power cord. Connect the AC adapter to the power cord. Plug the power cord into an electrical outlet, then connect the adapter to the power jack on the back of the Router. -
Page 9: Connecting Other Devices
Connecting Other Devices The Router can connect to other devices via Ethernet and via wireless connection. Ethernet 1. Take an Ethernet cable and plug one end into one of the Ethernet ports on the back of the Router. 2. Plug the other end of the Ethernet cable into an Ethernet port on the device. 3. -
Page 10: Home Page/Main Section
Note: The red cross on the battery icon indicates that battery level is below 25%, or no battery is inserted. 2. Drop-down menu The drop-down menu includes selections such as Admin Settings, My Verizon, Restart 5G Home Router, and Sign Out. Admin Settings The Change Admin Password section enables you to change the Admin password that is used to sign in to the Router’s administration website. - Page 11 My Verizon You will be directed to My Verizon, where you can manage your account online. With My Verizon, you can also pay your bill, check your usage, swap SIM cards, and view your order status. Restart 5G Home Router To restart the Router, click the drop-down arrow and select Restart 5G Home Router.
- Page 12 6. Parental Controls Parental Controls enable you to block certain websites by entering their web addresses. 7. Help Click on the link provided here to access the Verizon Wireless website, where you can find the support and the resources you need.
-
Page 13: Chapter 3 Setting Up A Wireless Network
Chapter 3 Setting up a Wireless Network Click the arrow “>” on the bottom right side of the Wi-Fi column to enable or disable the 5 GHz Wi-Fi, 2.4 GHz Wi-Fi, or Guest Network. Wireless Status There are two ways to change Wi-Fi status. The first is to slide the Wi-Fi switch in the Wi-Fi column to the right. -
Page 14: Ghz Wi-Fi
5 GHz Wi-Fi Slide the Enable 5 GHz Wi-Fi switch to the right. The switch turns blue to indicate that the selected Wi-Fi is turned on. To turn off the Wi-Fi, slide the switch to the left. If 5 GHz Wi-Fi is not turned on, the Guest Wi-Fi on 5 GHz will not work. Wi-Fi name (SSID) The Wi-Fi name (SSID) is the name of the wireless network broadcasting from this system. - Page 15 be disabled. Wi-Fi network encryption Select one security method from the drop-down menu. The encryption types include None, WEP-64, WPA2-Personal, WPA-WPA2-Personal. Max Wi-Fi devices 5 GHz The maximum number of Wi-Fi clients allowed on the Router using 5 GHz Wi-Fi. The highest value for this field is 128.
-
Page 16: Gh Z W I -F I
2.4 GHz Wi-Fi Slide the switch to the right. The switch turns blue to indicate that the selected Wi-Fi is turned on. To turn off the Wi-Fi, slide the switch to the left. If the 2.4 GHz Wi-Fi is not turned on, the Guest Wi-Fi on 2.4 GHz will not work. Wi-Fi name (SSID) The Wi-Fi name (SSID) is the name of the wireless network broadcasting from this system. - Page 17 Max Wi-Fi devices 2.4 GHz The maximum number of Wi-Fi clients allowed on the Router using 2.4 GHz Wi-Fi. The highest value for this field is 128. Channel This specifies the frequency the radio uses to transmit wireless frames. Select a channel from the list of channels or choose Auto to allow the system to determine the best channel to use.
-
Page 18: Guest Wi-Fi
Guest Wi-Fi Slide the Enable Guest Wi-Fi switch to the right. The switch will be blue when the guest network is enabled. Wi-Fi name (SSID) The Wi-Fi name (SSID) is the name of the wireless network broadcasting from this system. In order for devices to connect to the local network over a wireless link, they must select this network name from the list of detected wireless networks in the area. - Page 19 Select the band to be used. Max Wi-Fi devices 2.4 GHz The maximum number of Wi-Fi clients allowed on the Router using 2.4 GHz Guest Wi-Fi. The highest value for this field is 128. Max Wi-Fi devices 5 GHz The maximum number of Wi-Fi clients allowed on the Router using 5 GHz Guest Wi- Fi.
-
Page 20: Chapter 4 Connected Devices
Chapter 4 Connected Devices This section displays information of LAN connected devices, including the connection type, IP address, host name, MAC address, and whether the connected devices are restricted or not. Devices connected to your router The function presents a list of devices that are currently connected to your router as well as the information of these devices, including the names, MAC addresses, connection types, and whether the devices are restricted or not. -
Page 21: Restrictions
slide the Block Device switch to the right. The switch will be blue when the feature is enabled. Restrictions You can specify a period of time during which the selected device will be blocked from connecting to the Router. To add rules, click Add Schedule. Schedule Name Type the name for the schedule in this field. -
Page 22: Chapter 5 Configuring System Settings
Chapter 5 Configuring System Settings You can select different settings for the system here. General Information The General Information page in System Settings provides device information on the Router, including the device name, IMEI, model, and more. To access the General Information page, click System Settings on the front page of the administration website. -
Page 23: History Log
History Log The History Log page provides various activity records of your Router. To access this page, click History Log on the General Information page. History Logging Use this switch to turn the History Logging function on or off. Category Use the drop-down menu to select the type of log you wish to export, then click the Export Log button to export the log. -
Page 24: Phone Settings
Phone Settings The Phone Settings page covers settings for a landline phone connected to your Router. To access this page, click Phone Settings on the General Information page. When the TTY (teletypewriter) setting is enabled, you can use your phone with a TTY device to assist with hearing impairments. -
Page 25: Backup & Restore
Backup & Restore The Backup & Restore page covers functions for backing up/restoring the settings on your Router and resetting it to factory settings. To access this page, click Backup & Restore on the General Information page. Backup Settings Click the Backup button to backup your current Router settings to your computer. Restore from Backup Click Browse and select the file on your computer which contains the backup settings you wish to restore, then click Restore to restore the settings. -
Page 26: Lan Settings
LAN Settings The LAN Settings page includes settings to configure advanced LAN settings (e.g., IP address, Subnet mask, DHCP, etc.) for your Router. To access this page, click LAN Settings on the General Information page. LAN Configuration In this section, enter the desired info in the following fields: Router IP address Specify a range of IP addresses the Router may assign to devices. - Page 27 DHCP Start Address Specify the address that starts the range for the pool of IP addresses in the same subnet as the router. DHCP End Address Specify the address that ends the range for the pool of IP addresses in the same subnet as the router.
-
Page 28: Apn Settings
The APN Settings page enables you to configure the Access Point Name (APN) for your Router. To access this page, click APN Settings on the General Information page. Verizon APN This filed shows the Router’s APN, which is not editable. Restrict Background Data This feature will be automatically enabled if the current data usage exceeds the threshold defined by the user. -
Page 29: Port Forwarding
Port Forwarding Port Forwarding can be used to open certain ports of a device to communicate with an Internet service. To turn on the Port Forwarding, slide the Port Forwarding switch on the bottom right of the General Information page to the right. The switch turns blue to indicate that the function is turned on. - Page 30 Application The created rule name will be displayed here. Port From This shows the value of the start port. Protocol This shows the protocol selected for the corresponding port forwarding rule. IP Address This shows the local server’s IP address. Port To This shows the value of the end port.
-
Page 31: Chapter 6 Using Parental Controls
Chapter 6 Using Parental Controls By creating Internet access policies, Parental Controls allow you to control and monitor Internet access. Parental Controls can be activated on the Home page by sliding the Filters switch in the Parental Controls column. You can also enable or disable the function after you enter the Parental Controls page. - Page 32 devices that are currently connected to the Router and their MAC address. Select the device that you want to block, then click Include. The devices that appear on this list will be not be able to access ALL the websites listed in the Websites section.
-
Page 33: Chapter 7 Help
Chapter 7 Help Click on the link provided in this chapter to access the Verizon Wireless website, where you can find the support and the resources you need. Verizon Wireless: Support https://www.verizonwireless.com/support/5g/home/... -
Page 34: Chapter 8 Troubleshooting
Chapter 8 Troubleshooting This chapter contains a list of issues frequently encountered by users. Possible solutions and techniques to address the issues are also provided. How do I remove the battery cover and put the cover back on after I replace the battery? Step 1: Press down on the battery cover. - Page 35 How do I restore the Router’s defaults settings? There are two ways to restore the Router’s default settings: A) Use the tip of a ballpoint pen or a straightened paperclip to depress the “Reset” button on the back of the Router for at least ten seconds. B) Go to the System Settings column on the Home screen and access the Backup &...
-
Page 36: Appendix: Specifications
Appendix: Specifications Product specifications Wi-Fi 2.4G 802.11b/g/n MIMO 2 × 2 5G 802.11 a/n/ac MIMO 4 × 4 5G 802.11 ac MIMO 4 × 4 (backhaul) 2.4G/5G DBDC, WPS CAT 6 (Rel.10), Band 2/4/5/13, FDD Supports downlink inter and intra 2-Carrier Aggregation Memory DDR3: 256 MB ×... - Page 37 Relative Humidity 8% to 95% non-condensing Shipping and Storage Temperature –20°C to 85°C Shipping and Storage Relative Humidity 5% to 100%...