Lenovo ThinkPad User Manual
Usb 3.0 secure hard drive
Hide thumbs
Also See for ThinkPad:
- Personal systems reference (137 pages) ,
- Hardware maintenance manual (101 pages) ,
- User manual (100 pages)
Table of Contents
Advertisement
Quick Links
Advertisement
Table of Contents

Related Manuals for Lenovo ThinkPad


Summary of Contents for Lenovo ThinkPad
- Page 1 ThinkPad USB 3.0 Secure Hard Drive User Guide...
- Page 2 Seventh Edition (August 2018) © Copyright Lenovo 2011, 2018. LIMITED AND RESTRICTED RIGHTS NOTICE: If data or software is delivered pursuant a General Services Administration “GSA” contract, use, reproduction, or disclosure is subject to restrictions set forth in Contract No. GS-35F-05925.
-
Page 3: Table Of Contents
Appendix B. Trademarks ..25 Delete the user password(s) ..Lock the secure hard drive ..© Copyright Lenovo 2011, 2018... - Page 4 ThinkPad USB 3.0 Secure Hard Drive User Guide...
-
Page 5: Chapter 1. About The Secure Hard Drive
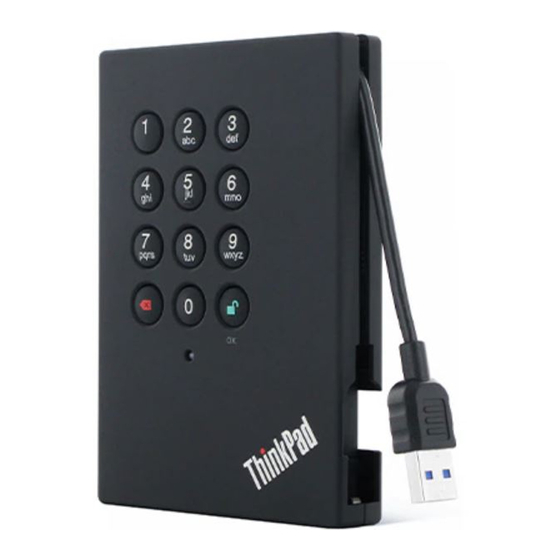
Chapter 1. About the secure hard drive This chapter provides product information about the ThinkPad USB 3.0 Secure Hard Drive (referred to as secure hard drive). Product description The secure hard drive is a portable, light-weight, and high-speed USB (Universal Serial Bus) 3.0 standard option that offers high-level data security. -
Page 6: Overview
• Confirming a new password Integrated USB cable You can connect the secure hard drive to your computer using the integrated USB cable. For more information, refer to “Install the secure hard drive” on page 3. ThinkPad USB 3.0 Secure Hard Drive User Guide... -
Page 7: Chapter 2. Install The Secure Hard Drive
To install the secure hard drive, do one of the following: • Connect the secure hard drive to a USB 3.0 connector on your computer as shown. Figure 2. Install the secure hard drive using the integrated USB cable © Copyright Lenovo 2011, 2018... - Page 8 Figure 4. Install the secure hard drive using the USB 3.0 Y cable When the initial connection is established, the status indicator is on in green then turns blue and green alternately. ThinkPad USB 3.0 Secure Hard Drive User Guide...
- Page 9 Figure 5. Overview of the USB 3.0 Y cable Additional power supply connector Main connector USB receptacle connector Chapter 2 Install the secure hard drive...
- Page 10 ThinkPad USB 3.0 Secure Hard Drive User Guide...
-
Page 11: Chapter 3. Use The Secure Hard Drive
In administrator mode, you can perform many administrative operations, such as changing the administrator password, creating up to four user passwords, deleting all user passwords, and setting the auto-lock function. The secure hard drive is locked in this mode; therefore, it cannot be recognized by the operating system. © Copyright Lenovo 2011, 2018... -
Page 12: Exit Administrator Mode
Then, depending on your operating system, the indicator stays in green or turns red. You can choose whether to disconnect the secure hard drive or not. Note: It is not recommended to exit user mode when the secure hard drive is transferring data. ThinkPad USB 3.0 Secure Hard Drive User Guide... -
Page 13: Password Management
Password management This section provides information about managing your administrator password and user password. Change the administrator password To change the administrator password, do the following: 1. Enter administrator mode. See “Enter administrator mode” on page 7 for more information. 2. -
Page 14: Add A User Password In User Forced Enrollment State
+1 for five seconds until the indicator blinks in red. 3. Input the current user password, and then press . The indicator turns green for three seconds and then blinks slowly in green. ThinkPad USB 3.0 Secure Hard Drive User Guide... -
Page 15: Delete The User Password(S)
Notes: If the indicator blinks in red, go back to step 2. This problem is caused by one of the following reasons: • You wait longer than 10 seconds before inputting the new user password. • The current user password is incorrectly input. 4. -
Page 16: Hibernate, Suspend, Or Log Off From The Operating System
3. Press +9 and the indicator blinks slowly in green. Set up a new administrator password and confirm your administrator password. Then the secure hard drive needs to be initialized and reformatted. ThinkPad USB 3.0 Secure Hard Drive User Guide... -
Page 17: Initialize And Format The Secure Hard Drive After A Complete Reset
Initialize and format the secure hard drive after a complete reset A complete reset of the secure hard drive will erase all information and partition settings on the secure hard drive. You need to set up the administrator password and then initialize and format the secure hard drive after a complete reset. - Page 18 ThinkPad USB 3.0 Secure Hard Drive User Guide...
-
Page 19: Chapter 4. Optional Functions
Then the secure hard drive enters the read-only mode until you change it into read and write mode. To return the secure hard drive into read and write status from administrator mode, do the following: © Copyright Lenovo 2011, 2018... -
Page 20: Set Up The Minimum Length Of The Password
By default, the self-destruct password is disabled. To set up the self-destruct password, do the following: 1. Enter administrator mode. See “Enter administrator mode” on page 7 for more information. 2. Press 7+4 and the indicator blinks three times in green. ThinkPad USB 3.0 Secure Hard Drive User Guide... -
Page 21: Set Up Brute-Force Attack Protection
Note: If you want to set up a self-destruct password in administrator mode, go on with step 3. If you want to set up in user mode, press to exit administrator mode and input the user password to unlock the secure hard drive, go on with step 3. 3. -
Page 22: Set Up The Indicator Blink
1. Enter administrator mode. See “Enter administrator mode” on page 7 for more information. 2. Press 0+4 to turn off the indicator blink. 3. Press 0+3 to if you want to turn on the indicator blink. ThinkPad USB 3.0 Secure Hard Drive User Guide... -
Page 23: Chapter 5. Quick Reference For Button Combinations
• 7+9: read-only off • 7+8: remove the user password or self-destruct password • 0+1: set forced enrollment • 0+3: turn on indicator blink from standby mode • 0+4: turn off indicator blink from standby mode © Copyright Lenovo 2011, 2018... - Page 24 ThinkPad USB 3.0 Secure Hard Drive User Guide...
-
Page 25: Chapter 6. Troubleshooting
A: Ensure that you have administrator privileges. You can use only the Windows administrator account to initialize, partition, or format the secure hard drive in administrator mode. Q: Why could the operating system not be started from the secure hard drive? © Copyright Lenovo 2011, 2018... - Page 26 Q: Why could I not change the password in user mode? A: The administrator password can be changed only in administrator mode. Ensure that you use the user password to access the drive. ThinkPad USB 3.0 Secure Hard Drive User Guide...
-
Page 27: Appendix A. Accessibility Information
Appendix A. Accessibility information Documentation in accessible formats Lenovo provides electronic documentation in accessible formats, such as properly tagged PDF files or HyperText Markup Language (HTML) files. Lenovo electronic documentation is developed to ensure that visually impaired users can read the documentation through a screen reader. Each image in the documentation also includes adequate alternative text to explain the image so that visually impaired users can understand the image when they use a screen reader. - Page 28 ThinkPad USB 3.0 Secure Hard Drive User Guide...
-
Page 29: Appendix B. Trademarks
Appendix B. Trademarks LENOVO, the LENOVO logo, THINKPAD, and the THINKPAD logo are trademarks of Lenovo. Windows is a trademark of the Microsoft group of companies. All other trademarks are the property of their respective owners. © 2018 Lenovo. © Copyright Lenovo 2011, 2018... - Page 30 ThinkPad USB 3.0 Secure Hard Drive User Guide...