Advertisement
Advertisement
Table of Contents

Related Manuals for Craig CRT728C

Summary of Contents for Craig CRT728C
-
Page 2: Fcc Information
FCC INFORMATION: This equipment has been tested and found to comply with the limits for a Class B digital device, pursuant to part 15 of the FCC Rules. These limits are designed to provide residential protection against harmful interference in a residential installation. This equipment generates, uses and can radiate radio frequency energy and, if not installed and used in accordance with the instructions, may cause harmful interference to radio communications. -
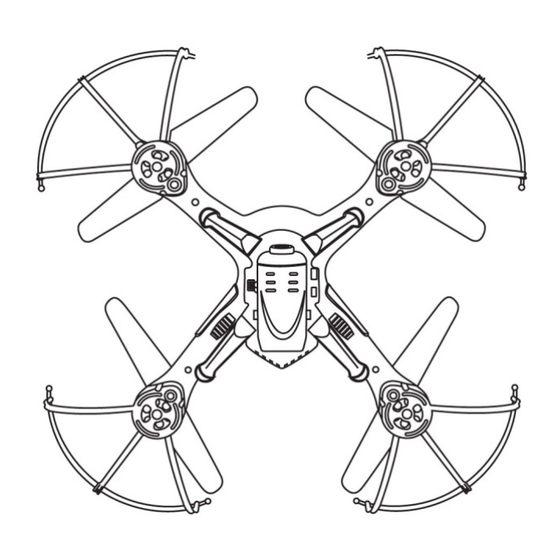
Page 3: Location Of Controls
LOCATION OF CONTROLS: Main Unit: Blades Camera Module/Battery Door Camera Connection Cable of Camera Connection Jack of Camera Blade’s Protectors Landing Gears Battery Compartment Battery Connection Cable/Jack 10. Micro SD Card Slot... -
Page 4: Remote Control
REMOTE CONTROL: Power On/Off Button Power On Indicator Left Joystick/One Key Take Off - Landing Button Right Joystick/One Key Emergency Stop Button Headless - One Key Return Button 3D Rolling Button Speed Selection Button Counterclockwise Fly Trimmer Clockwise Fly Trimmer 10. -
Page 5: Battery Recharging
PREPARATIONS: Assembly the Landing Gears to the Main Unit: The unit has 4 Landing Gears, insert it to the corresponding mounting holes on the unit before use as illustrated below: Battery Recharging: The unit has a DC 3.7V Li-ion rechargeable battery. Recharge it before first time use or when it is drained as follows: Connect the small plug from the supplied USB Connect Cable to the jack from the Battery Connection Cable. -
Page 6: Battery Installation
BATTERY INSTALLATION: Main Unit: Open the Camera Module/Battery Door by slide it out then lift up as Fig 1 below. Connect the Connection Plug from the Battery to the Battery Connection Jack from the unit as the Fig 2 below. Install the battery into the battery compartment. - Page 7 Remote Control: Looser the screw on the Battery Door by a screwdriver (not included) as Fig 1. Press the tab then lift it up to open it as Fig 2. Install or replace the batteries by three (3) AA size batteries (not included) into the battery compartment as the polarity markings in it as Fig 3.
-
Page 8: Micro Sd Card Installation
MICRO SD CARD INSTALLATION: The unit is support to take photos/videos then store in a Micro SD Card (not included). Insert a Micro SD Card into the Micro SD Card Slot with contact fingers face to bottom side as the illustrated below: Notes: Insert the class 4 (or up) Micro SD Card (Up to 32GB) into the Micro SD Card Slot with... - Page 9 5. Slide the Left Joystick upward; then downward; then release it immediately to pairing the Remote Control to the unit. When paired, the Power ON Indicator on the Remote Control and the decorative LED lights on the unit will stop blinking. Then: Slide the Left Joystick upward twice to start flying and rising.
- Page 10 To shut off the unit (or take out the battery to recharge), landing it and wait the blades completely stop turning as instructed earlier. Open the Camera Module/Battery Door then disconnect the Battery from the Battery Connecting Plug. To shut off the Remote Control, press the Power On/Off Button to turn off the Remote Control.
-
Page 11: Troubleshooting
TROUBLE SHOOTING: SYMPTOM: POSSIBLE CAUSE POSSIBLE SOLUTION Remote Control not The batteries are drained. Replace by new batteries. functioning Batteries wrong installed. Reinstall the batteries as the polarity marking inside the battery compartment. The unit not workable The battery had Connect the battery to the unit as not connected to the unit the “PREPARATIONS”... -
Page 12: General Specification
General Specification: Power Source: Unit:......... Supplied DC 3.7V, 380mAh (1.406WH) Li-ion rechargeable battery. Recharge by DC Remote Control:........DC 4.5V, 3 x AA Size Batteries (Not Included). Effective range of Radio Control:..Up to 100 feet in open area Radio Frequency:......... 2.4GHz Sensor of Camera:........300k Pixels Capture Modes: Photo:...