Advertisement
Advertisement
Table of Contents

Related Manuals for Ryobi RBS904


Summary of Contents for Ryobi RBS904
- Page 1 RBS904 350W BAND SAW WITH WORK-LIGHT OPERATOR’S MANUAL...
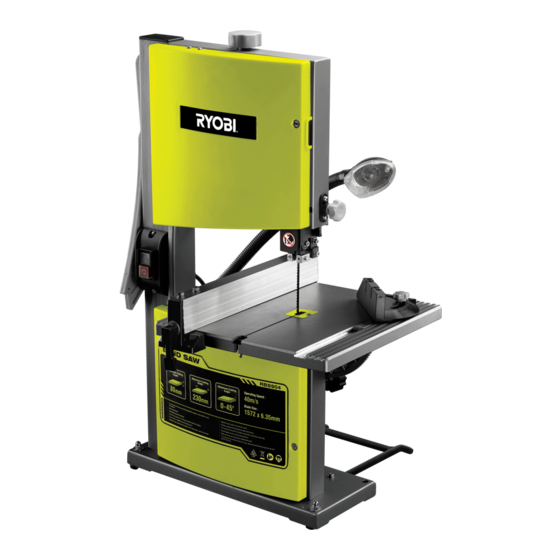
- Page 2 DESCRIPTION 1. Blade tension knob 57. Upper blade guide support 2. Cover locking screw 58. Blade guide 3. Tracking view window 59. Blade guide set screw 4. Work light 60. Blade guide screw 5. Blade guard 61. Lower blade guide support 6.
- Page 3 Fig. 1...
- Page 4 Fig. 2 Fig. 4 Fig. 3 Fig. 5...
- Page 5 Fig. 6 Fig. 7 Fig. 8 Fig. 9...
- Page 6 Fig. 10 Fig. 14 Fig. 11 Fig. 15 Fig. 12 Fig. 13 Fig. 16...
- Page 7 Fig. 18 Fig. 17 Fig. 19...
- Page 8 Fig. 21 Fig. 20 Fig. 22...
- Page 9 Important! It is essential that you read the instructions in this manual before operating this machine. Subject to technical modifications.
-
Page 10: General Power Tool Safety Warnings
etc., all tools should be disconnected from power GENERAL POWER TOOL SAFETY WARNINGS source. ■ Avoid accidental starting. Be sure switch is off when WARNING plugging in any tool. When using electric tools, basic safety precautions ■ Use recommended accessories. Consult should always be followed to reduce the risk of fire, operator’s manual for recommended accessories. -
Page 11: Special Safety Rules
personnel if the grounding instructions are not ■ Replacement parts. All repairs, whether electrical or completely understood or if in doubt as to whether the mechanical, should be made by a qualified service tool is properly grounded. technician at an authorised service centre. ■... -
Page 12: Specifications
blade has stopped. or with lower voltage. For voltage, the wiring in a shop is as important as the motor’s horsepower rating. A line d) be sure blade is installed with teeth pointing down. intended only for lights cannot properly carry a power tool e) maintain proper adjustment of the blade tension, motor. -
Page 13: Blade Guard
BLADE GUARD PUSH STICK Protects the operator from coming in contact with the Always use the push stick to feed the workpiece until it is blade. clear of the table. BLADE GUIDE ADJUSTMENT KNOB LOOSE PART LIST Use the blade guide adjustment knob to adjust the blade guide assembly up and down, and to keep the blade Item Description... - Page 14 go through holes in the saw base and material the saw is WARNING being mounted to. If machine bolts are being used, make If any parts are damaged or missing do not operate this sure bolts are long enough to go through holes in the saw base, the material being mounted to, and the lock washers product until the parts are replaced.
-
Page 15: Operation
table lock lever. blade teeth in the centre). If not, adjust the tracking until the blade is on both tires. ■ Using an adjustable wrench, loosen the jam nut. ■ Rotate the upper wheel by hand in a clockwise ■ Turn the adjusting bolt until the bolt just touches the direction for a few more turns. - Page 16 work so it will not pinch the blade. For example, a piece WARNING of molding must lay flat on the saw table. Workpieces To avoid blade contact, adjust the blade guide assembly must not twist, rock, or slip while being cut. to just clear the workpiece.
- Page 17 play. ■ With the mitre gauge in the mitre gauge slot, rotate the gauge until the desired angle is reached on the ■ To avoid accidental blade contact, minimize blade index scale. breakage, and provide maximum blade support, always adjust the blade guide assembly to just clear ■...
-
Page 18: Maintenance
NOTE: The blade may need to be turned inside out if the of the saw. teeth are pointing in the wrong direction. Hold the blade ■ Verify that saw blade is tracking correctly, then slide with both hands and rotate it inward. the thrust bearing forward until the bearing is within ■... -
Page 19: General Maintenance
adjusted or replaced. WARNING ■ Remove the screw and washer then pull the brush off. Before performing any maintenance, make sure the tool ■ Place the new brush in the groove. is unplugged from the power supply and the switch is in ■... -
Page 20: Troubleshooting
TROUBLE SHOOTING PROBLEM CAUSE SOLUTION Motor will not run. 1. Problem with ON/OFF switch 1. Have worn parts replaced before or power cord. using band saw again. 2. Motor defective. 2. Do not attempt any repair. Have tool repaired by a qualified service technician. - Page 24 Techtronic Industries (Australia) Pty. Ltd. Level 1, 660 Doncaster Road Doncaster, VIC 3108, Australia Techtronic Industries New Zealand Ltd. 18-26 Amelia Earhart Avenue Mangere, Auckland 2022, New Zealand...