Table of Contents
Advertisement
Available languages
Available languages
ATTACH YOUR RECEIPT HERE
Serial Number ________________________________ Purchase Date _________________________________
Questions, problems, missing parts? Before returning to your retailer, call our
customer service department at 1-877-447-4768, 8:30 a.m. – 4:30 p.m. CST,
Monday – Friday or e-mail us at customerservice@ghpgroupinc.com.
70-10-559
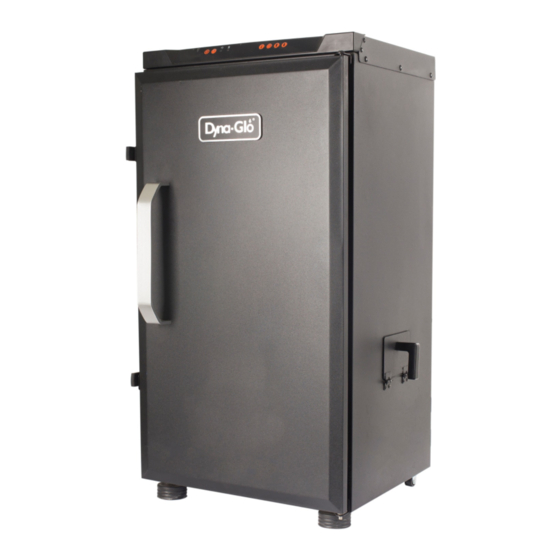
Vertical Electric
Digital Smoker
MODEL #DGU732BDE / DGU732BDE-D
1
Français p. 26
Español p. 52
UL 1026 - sixth edition, 2012
Electric Household
Cooking and Food
Serving Appliances
CSA C22.2 No. 64-10
(reaffirmed 2014)
Household Cooking and
Liquid-Heating Appliances
FOR OUTDOOR
USE ONLY
Use only with Class A GFI
(Ground Fault Interrupter)
Rev. 12/7/16
Advertisement
Chapters
Table of Contents

Related Manuals for Dyna-Glo DGU732BDE


Summary of Contents for Dyna-Glo DGU732BDE
- Page 1 Vertical Electric Digital Smoker MODEL #DGU732BDE / DGU732BDE-D Français p. 26 Español p. 52 UL 1026 - sixth edition, 2012 Electric Household Cooking and Food Serving Appliances CSA C22.2 No. 64-10 (reaffirmed 2014) Household Cooking and Liquid-Heating Appliances FOR OUTDOOR...
- Page 2 DYNA-GLO VERTICAL GAS SMOKER ® ® DYNA-GLO VERTICAL ELECTRIC DIGITAL SMOKER STOP!
-
Page 3: Table Of Contents
TABLE OF CONTENTS Safety Information ...........................3 Package Contents ...........................8 Hardware Contents .........................9 Preparation Before Assembly ......................9 Assembly Instructions ........................10 Operating Instructions ........................13 Tips On Smoking ...........................19 Care and Maintenance ........................21 Troubleshooting ...........................22 Replacement Parts List ........................24 Warranty ............................25 Assembler/Installer: This instruction manual contains important information necessary for the proper assembly and safe use of this appliance. - Page 4 SAFETY INFORMATION IMPORTANT SAFEGUARDS READ ALL INSTRUCTIONS, PRIOR TO USING THIS SMOKER • DO NOT use this product for anything other than its intended purpose. It is NOT intended for commercial use. It is NOT intended to be installed or used in or on a recreational vehicle and/or boat. •...
- Page 5 SAFETY INFORMATION • DO NOT touch hot surfaces. Use handles or knobs. • To protect against electrical shock do not immerse cord, plugs, or thermostat control assembly in water or other liquid. • Close supervision is necessary when any appliance is used by or near children. •...
- Page 6 SAFETY INFORMATION Ground Fault Interrupter • Since 1971. the National Electric Code (NEC) has required Ground Fault Interrupter devices on all outdoor circuits. • If your residence was built before 1971, check with a qualified electrician to determine if a Ground Fault Interrupter protector exists. •...
- Page 7 SAFETY INFORMATION WARNING To avoid serious injury: • While cooking, the smoker must be on a level, stable, noncombustible surface in an area clear of combustible material, including long or dry grass. • The use of alcohol, prescription or nonprescription drugs may impair the user’s ability to properly assemble and safely operate this appliance.
-
Page 8: Package Contents
PACKAGE CONTENTS PART DESCRIPTION QUANTITY Smoker cabinet assembly Rear handle Door assembly Door handle Wood chip access door handle Cooking grates Water bowl Wood chip box Wood chip box support Grease tray... -
Page 9: Hardware Contents
HARDWARE CONTENTS (PRE-ASSEMBLED) M4 x 35 mm M5 x 12 mm Screw Screw Qty. 4 Qty. 3 4 M4 x 35 mm 1 M5 x 12 mm screws (BB) are screw (AA) is pre- pre-assembled in assembled in the the door handle wood chip access (D). -
Page 10: Assembly Instructions
ASSEMBLY INSTRUCTIONS Remove the 4 pre-assembled M4 x 35 mm screws (BB) from the door handle (D) and attach the door handle (D) to the door assembly (C) as shown. Tighten the screws. Hardware Used M4 x 35 mm Screw Remove 1 pre-assembled M5 x 12 mm screw (AA) from the wood chip access door handle (E). - Page 11 ASSEMBLY INSTRUCTIONS Remove the 2 pre-assembled M5 x 12 mm screws (AA) from the smoker cabinet assembly (A). Insert the 2 screws into the rear handle (B) and into the threaded holes in the smoker cabinet assembly (A). Tighten the screws. Hardware Used M5 x 12 mm Screw...
- Page 12 ASSEMBLY INSTRUCTIONS Place wood chip box (H) on the wood chip box support (I). Insert the wood chip box support (I) into the smoker cabinet assembly (A). Note: The wood chip box must be on the right side of the smoker cabinet (A), directly below the wood chip loader, as shown.
-
Page 13: Operating Instructions
• Do not use abrasive oven cleaners, steel wool or metal brushes to clean porcelain grates or smoker body. They will damage the finish. • Replace damaged part(s) only with Dyna-Glo certified replacement parts. Do not attempt to repair damaged parts. - Page 14 OPERATING INSTRUCTIONS Safety Guidelines • Refer to the “Troubleshooting Section” on Pages 22 and 23 for operational problems. • DO NOT open the smoker door while operating unless it is necessary. Opening the door will allow heat to escape and prolong the cooking time. •...
- Page 15 OPERATING INSTRUCTIONS Using the Meat Thermometer: The meat thermometer measures the internal temperature of the meat and is useful for indicating when food has reached the recommended temperature for safe consumption. Refer to the chart on Page 20 for proper food temperatures. For proper placement, remove the probe from the holster and push the end of the thermometer towards the center of the thickest part of the meat.
- Page 16 OPERATING INSTRUCTIONS Cooking with the Smoker: Using the Time Button ( ) Display Range: 00:00 – 24:00 hours. Plug in the smoker and press the Power button ( ) once (a beep should occur). Press the Time button ( ) to display "00:00". The hour side will blink on and off. Press the "UP"...
- Page 17 OPERATING INSTRUCTIONS NOTE: If appliance is powered on and left unattended for 19 hours, the appliance will automatically turn off. The control panel temperature reading may fluctuate plus or minus 10-15° F (5-8° C) as the appliance cycles to maintain correct cooking temperature setting. Seasoning the Smoker (Before Initial Use) To season your smoker, follow these steps WITHOUT the use of food: Place desired flavoring woods in wood chip box and fill to 3/4 full.
- Page 18 • Do not use abrasive oven cleaners, steel wool or metal brushes to clean porcelain grates or smoker body. They will damage the finish. • Replace damaged part(s) only with Dyna-Glo certified replacement parts. Do not attempt to repair damaged parts.
-
Page 19: Tips On Smoking
Pairing wood chips with a specific type of food will depend on the preferences of the user. This page can be used as a general guideline for acquiring the ideal flavor. • Hardwoods such has hickory, pecan, apple, cherry or mesquite typically burn slower and produce more smoke over longer periods of time. - Page 20 SUGGESTED SMOKING AND MEAT TEMPERATURES Safe Minimum Food Suggested Smoking Suggested Smoking Safe Minimum Food Temperatures Temperatures Temperatures Temperatures Game Meat, Poultry, Fish Beef, veal and lamb Chops, steaks and roasts (pieces and whole cuts) (deer, elk, moose, caribou/reindeer, antelope and pronghorn) Medium-rare 225°...
-
Page 21: Care And Maintenance
CARE AND MAINTENANCE AFTER USE SAFETY AND MAINTENANCE WARNING • Use caution when lifting and moving the smoker to avoid strain injuries. Two people are recommended to lift or move the smoker. • DO NOT store the smoker near gasoline or other combustible liquids or where combustible vapors may be present. -
Page 22: Troubleshooting
TROUBLESHOOTING If you have any questions regarding the product, please call customer service at 1-877-447-4768, 8:30 a.m. – 4:30 p.m., CST, Monday – Friday. PROBLEM POSSIBLE CAUSE CORRECTIVE ACTION • Turn on the smoker. No heat • Smoker is turned off. •... - Page 23 TROUBLESHOOTING PROBLEM POSSIBLE CAUSE CORRECTIVE ACTION Flare-ups. • Trim the appropriate amount of fat • Meat contains excessive amounts of fat. before cooking. • Cooking temperature is • Lower the temperature as needed. too high. • Clean the smoker, according to •...
-
Page 24: Replacement Parts List
REPLACEMENT PARTS LIST For replacement parts, call our customer service department at 1-877-447-4768, 8:30 a.m. - 4:30 p.m. CST, Monday - Friday or e-mail us at customerservice@ghpgroupinc.com. PART DESCRIPTION PART # PART DESCRIPTION PART # Water Bowl 70 - 01 - 367 Smoker Cabinet Assembly 70 - 01 - 364... -
Page 25: Warranty
This warranty gives you specific legal rights, and you may have other rights that vary from state to state. GHP Group Inc. 6440 W. Howard Street Niles, Il, USA 60714-3302 Item name: Vertical Electric Digital Smoker Model #: DGU732BDE / DGU732BDE-D Rated Power: 1000W/Hr... - Page 26 Fumoir Numérique Électrique Vertical MODÈLE #DGU732BDE / DGU732BDE-D UL 1026 - sixième édition, 2012 Appareils ménagers pour cuisson et appareils de service alimentaire CSA C22.2 No. 64-10 (Réaffirmé 2014) Appareils ménagers pour cuisson et appareils à cuisson liquide POUR USAGE EXTÉRIEUR SEULEMENT...
- Page 27 ® DYNA-GLO FUMOIR NUMÉRIQUE ÉLECTRIQUE VERTICAL ARRÊT! NUL BESOIN DE REVENIR AU MAGASIN Questions sur l’assemblage? Besoin d’information sur des pièces? Le produit est couvert par la garantie des fabricants? Composez le numéro sans frais : 1 877 447-4768 du lundi au vendredi de 8 h 30 h à 16 h 30, HNC Conservez ce Manuel du propriétaire et votre preuve d’achat en cas de besoin...
-
Page 28: Consignes De Sécurité
TABLE DES MATIÈRES Consignes de sécurité ........................28 Contenu de l’emballage .........................33 Quincaillerie incluse ........................34 Préparation avant l’assemblage.....................34 Instructions pour l’assemblage ....................35 Mode d’emploi ..........................38 Conseils sur le tabagisme ......................44 Entretien ............................46 Dépannage ..........................47 Liste des pièces de rechange .......................49 Garantie ............................51 Assembleur / installateur: Ce manuel d'instructions contient des informations importantes nécessaires à... - Page 29 CONSIGNES DE SÉCURITÉ PRÉCAUTIONS IMPORTANTES LIRE TOUTES LES INSTRUCTIONS AVANT D’UTILISER CE FUMOIR NE PAS utiliser ce produit pour autre chose que sa raison principale. Il n’est PAS destiné à • l’usage commercial. Il n’est PAS destiné à être installé ou utiliser sur ou dans un véhicule récréatif ou/et bateau.
- Page 30 CONSIGNES DE SÉCURITÉ • Une supervision assidue est requise lorsque l’appareil est utilisé près ou par des enfants. • Débrancher de la prise lorsque l’appareil n’est pas utilisé ou avant de nettoyer. Attendre que l’appareil soit complétement refroidi avant de remettre ou détacher des pièces. •...
- Page 31 CONSIGNES DE SÉCURITÉ Circuit Interrupteur de terre • Depuis 1971, le code èlectrique national (CÈN) requiert des circuits interrupteurs de terre sur tout circuit extèrieur. • Si votre rèsidence a ètè batie avant 1971, vèrifiè avec un èlectricien qualifiè afin de dèterminer si un circuit interrupteur de terre existe.
- Page 32 CONSIGNES DE SÉCURITÉ AVERTISSEMENT Afin d’éviter des blessures graves: • Lors de la cuisson, le fumoir doit être sur une surface égale et stable, ininflammable dans un endroit loin de matériaux combustibles, incluant de l’herbe sèche ou longue. • L’usage d’alcool, médicaments prescrits ou sans ordonnance peuvent altérer les décisions de l’utilisateur lors de l’assemblage et lors de l’opération de cet appareil.
-
Page 33: Contenu De L'emballage
CONTENU DE L’EMBALLAGE PIECE DESCRIPTION Assemblage du cabinet du fumoir Poignée de derrière Assemblage de la porte Poignée de porte Poignée d’accès pour éclisses de bois Grilles de cuisson Bol d’eau Boîte pour éclisses de bois Support pour la boîte d’éclisses Plateau à... -
Page 34: Quincaillerie Incluse
QUINCAILLERIE INCLUSE (PRÉ ASSEMBLÉ) M4 x 35 mm M5 x 12 mm Qte. 4 Qte. 3 4 M4 x 35 mm 1 M5 x 12 mm visse visses (BB) sont (AA) est préas- préassemblées semblée dans la dans la poignée poignée de porte de de porte (D). -
Page 35: Instructions Pour L'assemblage
INSTRUCTIONS POUR L’ASSEMBLAGE Retirer les 4 visses M4 x 35 mm pré-assemblés (BB) de la poignée (D) et attacher la poignée de porte (D) sur l’assemblage de la porte (C) tel que démontré. Serrer les vises. Quincaillerie utilisée M4 x 35 mm Retirer 1 visse préassemblée M5 x 12 mm (AA) de la poignée de la porte d’accès aux éclisses (E). - Page 36 INSTRUCTIONS POUR L’ASSEMBLAGE Retirer les 2 visses préassemblées M5 x 12 mm (AA) de l’assemblage du cabinet du fumoir (A). Insérer les 2 visses dans la poignée de derrière (B), et enfiler dans les trous de l’assemblage du cabinet du fumoir (A). Serrer les visses. Quincaillerie utilisée M5 x 12 mm Placer le plateau de graisse (J) sur le bas de...
- Page 37 INSTRUCTIONS POUR L’ASSEMBLAGE Placer la boîte d’éclisses de bois (H) sur le support à cet effet (I). Insérer le support (l) à l’intérieur de l’assemblage du cabinet du fumoir (A). Note: La boîte d’éclisses doit être sur le côté droit du cabinet du fumoir (A), directement sous l’entrée pour les éclisses, tel qu’indiqué.
-
Page 38: Mode D'emploi
MODE D’EMPLOI LIRE TOUTES LES INSTRUCTIONS AVANT D’UTILISER CE FUMOIR POUR LA PREMIÈRE FOIS Avant la première utilisation: Enlever tout emballage, étiquettes, satrapes de plastiques et étiquettes de vente si présent. Ne pas utiliser des outils pointus ou coupants. Laver les grilles de cuisson avec de l’eau savonnée et chaude, rincer et laisser sécher complètement avant de les remettre dans le fumoir. - Page 39 MODE D’EMPLOI Lignes directrices de sécurité • Se référer à la section ‘’Dépannage’’ aux pages 47 et 48, pour des problèmes d’opération. • NE PAS ouvrir la porte du fumoir lorsqu’il est en opération, sauf si nécessaire. Ouvrir la porte causera un échappement de chaleur et une prolongation de cuisson.
- Page 40 MODE D’EMPLOI Utilisation du thermomètre de viande: Le thermomètre mesure la température interne de la viande et indique quand la nourriture a rejoint la température idéale pour la consommation sécuritaire. Se référer au tableau à la page 45 pour les bonnes températures de nourriture. Pour un bon placement, enlever la sonde de son étui et pousser le bout du thermomètre vers la partie centrale la plus épaisse de la viande.
- Page 41 MODE D’EMPLOI Cuire avec le Fumoir: Utiliser le Bouton de température ( ) Portée de temps : 00:00 – 24:00 hs. Brancher le fumoir et presser le Bouton d’allumage ( ) une fois (un ‘beep’ devrait sonner). Presser le Bouton de temps (horloge) ( ) pour voir "00:00". Le côté heure clignotera. Presser les boutons "UP"...
- Page 42 MODE D’EMPLOI Voir la page 45 pour des suggestions pour enfumer et les températures de viande. NOTE: Si l’appareil est laissé sous tension ou sans attention pour 19 heures, l’appareil se fermera automatiquement Le panneau de contrôle pourrait fluctuer entre 10 – 15° F (5-8° C) lorsque l’appareil cycle afin de maintenir la bonne température de cuisson.
- Page 43 • Ne pas utiliser des produits pour fours abrasifs, laine d'acier ou brosses de métal pour nettoyer les grilles de porcelaine ou le corps du fumoir. Ceci endommagera le fini. • Remplacer les piéces défectueuses seulement avec des pieces certifiées Dyna-Glo, Ne pas tenter de réparer les parties endommagees.
-
Page 44: Conseils Sur Le Tabagisme
Accoupler les copeaux de bois avec la sorte de nourriture spécifique dépendant à la préférence de l'utilisateur.Cette page peux être utilliser comme guide pour des idées à fin de saveur • Le bois dur comme le bois du noyer, pacanier, pommier, cerisier, mesquite brûlent généralement plus lentement et produisent plus de fumée sur une longue période de temps. - Page 45 TEMPERATURES DE FUMAGE PROPOSÉES Températures fumeurs Températures de fumer acurate sont essentiels pour la nourriture en toute sécurité cuisson lorsque les sondes de viande ne sont pas disponible. Veuillez comprendre que l'utilisation de la jauge de tem- pérature installé en usine est acceptable outil pour la nourriture de fumer, mais ce n'est pas toujours le moyen idéal de mesurer le tabagisme le plus précis température, car les températures internes de fumeurs peuvent varier entre la cuisine haut et en bas grilles.
-
Page 46: Entretien
ENTRETIEN SÉCURITÉ ET ENTRETIEN APRÈS UTILISATION AVERTISSEMENT • Soyez prudent lorsque vous soulevez ou déplacez le fumoir, et ce, afin d’éviter des blessures. Il faut que deux personnes soulèvent ou déplacent le fumoir. • IL NE FAUT PAS placer l’appareil près d’essence ou d’autres liquides combustibles. Ou dans un endroit où... -
Page 47: Dépannage
DÉPANNAGE Si vous avez des questions concernant le produit, s'il vous plaît appelez le service à la clientèle au 1-877- 447-4768, Huit heures 30-16h30, HNC, du lundi - vendredi. PROBLÈME CAUSE POSSIBLE ACTION CORRECTIVE • Allumer le fumoir Aucune chaleur •... - Page 48 DÉPANNAGE PROBLÈME CAUSE POSSIBLE ACTION CORRECTIVE Trop peu ou • Pas assez d’éclisses de bois • Vérifier le niveau des éclisses de bois. Le aucune fumée vient • Les pastilles ou éclisses sont boîtier devrait être plein au moins au 3/4. du fumoir.
-
Page 49: Liste Des Pièces De Rechange
LISTE DES PIÈCES DE RECHANGE Pour les pièces détachées, appelez notre service à la clientèle au 1-877-447-4768, 8 heures 30-16h30, HNC, du lundi - vendredi. RÉF DESCRIPTION NO DE PIÈCE RÉF DESCRIPTION NO DE PIÈCE Boîtier pour éclisses Assemblage du cabinet du fumoir 70 - 01 - 364 de bois... - Page 50 LISTE DES PIÈCES DE RECHANGE 70-10-559 Imprime in China...
-
Page 51: Garantie
Il est possible que vous disposiez également d’autres droits, qui varient d’un État ou d’une province à l’autre. GHP Group, Inc. 6440 W. Howard Street Niles, IL, États-Unis 60714-3302 Nom de l’article : Fumoir Numérique Électrique Vertical Modèle : DGU732BDE/DGU732BDE-D Capacité nominale: 1000W/Hr... - Page 52 Ahumador Electrico Digital Vertical MODELO #DGU732BDE / DGU732BDE-D UL 1026 - sexta edicion, 2012 Electrodomésticos de Unidad Familiar y Aparatos de Servir Comida CSA C22.2 No. 64-10 (reafirmado 2014) Cocina de Unidad familiar y Aparatos de Calentador Líquidos PARA USO EXTERNO UNI-...
- Page 53 ® DYNA-GLO AHUMADOR ELECTRICO DIGITAL VERTICAL ¡PARE! NO TIENE QUE REGRESAR A LA TIENDA ¿Tiene preguntas respecto al ensamblaje? ¿Necesita información sobre las piezas? ¿Se encuentra el producto bajo garantía del fabricante? Llame gratis al: 1-877-447-4768 8:30 a.m. – 4:30 pm Hora del Centro, de lunes a viernes...
-
Page 54: Informacion De Seguridad
INDICE Informacion de seguridad ......................54 Contenido del paquete ........................59 Aditamentos .............................60 Preparación Antes del Ensamblado ....................60 Instrucciones de ensamblaje .......................61 Instrucciones de funcionamiento ....................64 Consejos para fumar ........................70 Cuidado y mantenimiento ......................72 Solución de problemas .........................73 Lista de piezas de repuesto ......................75 Garantla ............................77 Ensamblador / instalador: Este manual de instrucciones contiene información importante necesaria para el correcto montaje y el uso seguro de este aparato. - Page 55 INFORMACION DE SEGURIDAD PRECAUCIONES IMPORTANTES LEA TODAS LAS INSTRUCCIONES, ANTES DE UTILIZAR ESTE AHUMADOR • NO utilice este producto para algo que no sea su proposito. NO es para uso comercial. NO está destinado a ser instalado o utilizado en o sobre un vehículo y / o barco recreativo. •...
- Page 56 INFORMACION DE SEGURIDAD • Para protegerse contra descargas eléctricas, no sumerja el cable, los enchufes, o conjunto de control del termostato en agua u otro líquido. • Se requiere supervisión cuando cualquier aparato es utilizado por o cerca de niños. •...
- Page 57 INFORMACION DE SEGURIDAD Interruptor de falla a tierra • Desde 1971 el codigo electrico nacional (NEC) exige dispositivos de GFCI entodos los circuitos al aire libre. • Si su vivienda fue construida antes de 1971, consulte con un electricist acalificado det determinar si existe.
- Page 58 INFORMACION DE SEGURIDAD ADVERTENCIA Para evitar lesiones graves: • Durante la coccion, el ahumador debe estar sobre una superficie nivelada, estable y incombustible en un area libre de material combustible, incluyendo hierba larga o seco. • El uso de alcohol, prescripción o medicamentos de venta libre pueden afectar la capaci dad del usuario para armar correctamente y operar con seguridad este aparato.
-
Page 59: Contenido Del Paquete
CONTENIDO DEL PAQUETE PIEZA DESCRIPCION CANT. Conjunto del Gabinete del Ahumador Manilla Trasera Conjunto de Puerta Manilla de la Puerta Manilla de la puerta de acceso de astillas de madera Parillas de coccion Tazon de Agua Deposito de astillas de madera Soporte de deposito de las astillas de madera Recipiente de Grasa... -
Page 60: Aditamentos
ADITAMENTOS (PRE-ENSAMBLADOS) M5 x 12 mm M4 x 35 mm Tornillo Tornillo Cant. 3 Cant. 4 1 M5 x 12 mm 4 M4 x 35 mm tornillo (AA) es pre- tornillo (BB) son ensamblado en la pre-ensamblado manilla de puerta en el manilla de la de astilla de madera puerta (D). -
Page 61: Instrucciones De Ensamblaje
INSTRUCCIONES DE ENSAMBLAJE Retire los 4 tornillos M4 x 35 mm pre-ensamblados (BB) de la manilla de la puerta (D) y una el manilla de la puerta (D) en el conjunto de la puerta (C) mostrado. Apriete los tornillos. Aditamentos utilizados M4 x 35 mm Tornillo Quite 1 tornillo M5 x 12 mm pre-ensamblado (AA) - Page 62 INSTRUCCIONES DE ENSAMBLAJE Quite los 2 tornillos pre-ensamblados M5 x 12 mm (AA) del conjunto del gabinete del ahumador (A). Inserte los 2 tornillos en la manilla trasera (B) y en los agujeros de rosca en el conjunto del gabinete del ahumador (A). Apriete los tornillos. Aditamentos utilizados M5 x 12 mm Tornillo...
- Page 63 INSTRUCCIONES DE ENSAMBLAJE Coloque el depósito de astillas de madera (H) en el soporte de depósito de astillas de madera (I). Inserte el soporte de depósito de astillas de madera (I) en el interior del conjunto de gabinete del ahumador (A). Nota: El depósito de astillas de madera debe estar en el lado derecho del gabinete del ahumador (A), directa- mente debajo del cargador de astillas de madera, como...
-
Page 64: Instrucciones De Funcionamiento
• No utilice limpiadores de horno abrasivos, lana de acero o cepillos metálicos para limpiar las parrillas de porcelana o del ahumador. Ellos dañarian el acabado. • Reemplazar parte(s) dañada unicamente con Dyna-Glo repuestos certificado. No intente reparar las partes dañadas. - Page 65 INSTRUCCIONES DE FUNCIONAMIENTO Guia de Seguridad • Consulte la "Sección Solución de problemas", en las páginas 73 y 74, por problemas operativos. • NO abra la puerta del ahumador durante el funcionamiento, a menos que sea necesario. Al abrir la puerta permitirá...
- Page 66 INSTRUCCIONES DE FUNCIONAMIENTO Utilizando el termometro de carne: El termometro de carne mide la temperatura interna de la carne y es útil para indicar cuando la comida ha llegado a la temperatura recomendada para el consumo seguro. Consulte la tabla en la página 71 para temperaturas de los alimentos adecuados.
- Page 67 INSTRUCCIONES DE FUNCIONAMIENTO Cocinando con el ahumador: Usando el Boton de Tiempo ( ) Pantalla: 00:00 – 24:00 hours. Conecte el ahumdaor y pulse el botón de Encendido ( ) una vez (un pitido debe ocurrir). Pulse el botón Tiempo ( ) para mostrar "00:00". El lado hora parpadeará dentro y fuera. Pulse el botón "UP"...
- Page 68 INSTRUCCIONES DE FUNCIONAMIENTO después de que el botón de la sonda de la carne ( ) se libera . Consulte la página 71 para temperaturas fumadores y carne sugeridas. NOTA: Si el aparato está encendido y deja desatendido durante 19 horas, el aparato se apagará automáticamente.La lectura de la temperatura del panel de control puede fluctuar más o menos (5.8 °...
- Page 69 • No utilice limpiadores de horno abrasivos, lana de acero o cepillos metalicos para limpiar las parrillas de porcelana o del ahumador. Ellos dañarian el acabado. • Reemplazar parte(s) dañada unicamente con Dyna-Glo repuestos certificado. No intente reparar las partes dañadas.
-
Page 70: Consejos Para Fumar
CONSEJOS SOBRE AHUMADO Vinculación de astillas de madera con un tipo específico de comida dependerá de las preferencias del usuario. Esta página puede ser utilizada como una guía general para adquirir el sabor ideal. • Las maderas duras tales como el nogal, pacana, manzana, cereza o mezquite suelen quemarse más lento y producen más humo durante períodos más largos de tiempo. - Page 71 FUMAR Y TEMPERATURAS DE CARNE SUGERENCIAS TEMPERATURAS DE AHUMADO SUGERIDAS Temperaturas fumar ACURATE son críticos para cocinar los alimentos de manera segura cuando las sondas de carne no son disponible. Por favor, comprenda que el uso del medidor de temperatura instalado en fábrica es una aceptable herramienta para ahumar alimentos, pero no siempre es el medio ideal para medir el fumar más precisa la temperatura porque la temperatura interna fumador puede variar entre la cocina superior e inferior rejas.
-
Page 72: Cuidado Y Mantenimiento
CUIDADO Y MANTENIMIENTO DESPUÉS DEL USO DE CUIDADO Y MANTENIMIENTO ADVERTENCIA • Tenga cuidado al levantar o mover el ahumador para evitar lesiones por esfuerzo. Se recomiendan dos personas para levantar o mover el ahumador. • NO almacene cerca del fumador gasolina u otros líquidos inflamables o combustibles, donde los vapores puedan estar presentes. -
Page 73: Solución De Problemas
SOLUCIÓN DE PROBLEMAS Si usted tiene alguna pregunta sobre el producto, por favor llame a servicio al cliente al 1-877-447-4768, 08:30 am - 16:30 CST, Lunes - Viernes. PROBLEMA CAUSA POSIBLE ACCIÓN CORRECTIVA • Encienda el ahumador Ahumador sin • Ahumador esta apagado •... - Page 74 SOLUCIÓN DE PROBLEMAS PROBLEMA CAUSA POSIBLE ACCIÓN CORRECTIVA Brotes • Recorte la cantidad adecuada de grasa • La carne contiene canti- dades excesivas de grasa antes de cocinar • La temperatura de coccion • Baje la temperatura según sea necesario es demasiado alta •...
-
Page 75: Lista De Piezas De Repuesto
LISTA DE PIEZAS DE REPUESTO Para obtener piezas de repuesto, llame a nuestro Departamento de Servicio al Cliente al 1-877-447-4768, de 8:30 am - 4:30 pm, hora central, de lunes - viernes. REF. DESCRIPCIÓN PIEZA # REF. DESCRIPCIÓN PIEZA # Tazon de agua 70 - 01 - 367 Conjunto del gabinete... - Page 76 LISTA DE PIEZAS DE REPUESTO 70-10-559 Impreso en China...
-
Page 77: Garantla
Esta garantía le otorga derechos legales específicos, pero podría tener también otros derechos legales que varían según el estado. GHP Group Inc. 6440 W. Howard Street Niles, IL, USA 60714-3302 Nombre del artículo: Ahumador Electrico Digital Vertical Modelo #: DGU732BDE/DGU732BDE-D Potencia nominal: 1000W/hr...