
Related Manuals for Acoustic Research ARIR201


Summary of Contents for Acoustic Research ARIR201
- Page 1 ARIR201 It is important to read this user manual prior to using your new product for the first time.
-
Page 2: Important Safety Instructions
Important safety instructions IMPORTANT SAFETY INSTRUCTIONS PLEASE READ AND SAVE FOR FUTURE REFERENCE Some of the following information may not apply to your particular product; however, as with any electronic product, precautions should be observed during handling and use. • Read these instructions. -
Page 3: Plugging In For Power
Plugging in for power AC OUTLET POWER SUPPLY: 100 - 240 V ~ 50/60 Hz Important battery precautions • Any battery may present a risk of fire, explosion, or chemical burn if abused. Do not try to charge a battery that is not intended to be recharged, do not incinerate, and do not puncture. -
Page 4: Fcc Information
FCC Information FCC information Note: This equipment has been tested and found to comply with the limits for a Class B digital device, pursuant to Part 15 of FCC Rules. These limits are designed to provide reasonable protection against harmful interference in a residential installation. -
Page 5: Table Of Contents
Contents Important safety instructions IMPORTANT SAFETY INSTRUCTIONS ... 1 Plugging in for power ... 2 Important battery precautions ... 2 Ecology ... 2 Headset safety ... 2 FCC Information ... 3 Contents ... 4 End user license agreement ... 5 Before you begin Unpack the unit ... -
Page 6: End User License Agreement
Program's proprietary notices. (b) You may transfer the Program and license to another party only as a part of the Acoustic Research® brand Internet Radio Device (the “Device”), and only if the other party agrees to accept the terms and conditions of this EULA. If you transfer... - Page 7 PROFITS, BUSINESS INTERRUPTION, CORRUPTION OF FILES, LOSS OF BUSINESS INFORMATION, OR ANY OTHER PECUNIARY LOSS) REGARDLESS OF CAUSE OR FORM OF ACTION, INCLUDING CONTRACT, TORT, OR NEGLIGENCE, ARISING OUT OF YOUR USE OF OR INABILITY TO USE THE PROGRAM, EVEN IF AUDIOVOX HAS BEEN ADVISED OF THE POSSIBILITY OF SUCH DAMAGES.
-
Page 8: Before You Begin
Before you begin Dear Acoustic Research customer, Thank you for purchasing the AR Wi-Fi Infinite Radio. This product will let you listen to Slacker™ Radio (where available), Pandora Radio, Internet Radio, MP3tunes, AM/FM tuner, weather forecast and music recorded in the internal memory or a USB device. -
Page 9: Setup Your Ar Infinite Radio Accounts
2. Setup your AR Infinite Radio accounts To simplify setup on the radio please complete these steps: A. Find the Setup Information Card that contains your radio’s MAC address number (MAC: 00-21-2A- XX-XX-XX) and activation PIN # (PIN: XXXX). (This number is also found in the Device Info screen under the Settings menu in your radio.) B. -
Page 10: Optional: For Use With A "Wired" Connection
4. Optional: For use with a "Wired" connection Use the supplied Ethernet cable if you do not have a wireless (Wi-Fi) access point. L A N Broadband modem or Ethernet router/hub/switch 5. Plug in and turn on the radio Only use the power adapter which is included with your product. Electrical outlet Exit the DEMO mode after turning on... -
Page 11: Set Up The Radio
6. Set up the radio Refer to Using the menus on page 14-15 for more information on making choices and inputting information in menus. A. NOTE: When you turn on the radio for the first time, it will be in "DEMO" mode. To exit this mode, press and release preset 1, then SLEEP/SNOOZE, then preset 6 on top of the radio. - Page 12 • At the Network Setup screen, press to select Wireless and then press SELECT. The Network Setup screen then shows with three setup options. Press an option and then press SELECT. • Detect Networks: to automatically scan for available networks and display a list of networks to choose from.
-
Page 13: Check Ip Address
H. If Enter SSID is selected, the Network Setup screen will be displayed. Enter your SSID. • If your network is secured (indicated by ), you will be asked to enter your network's security type and password. The radio should then connect to the Internet. -
Page 14: General Controls
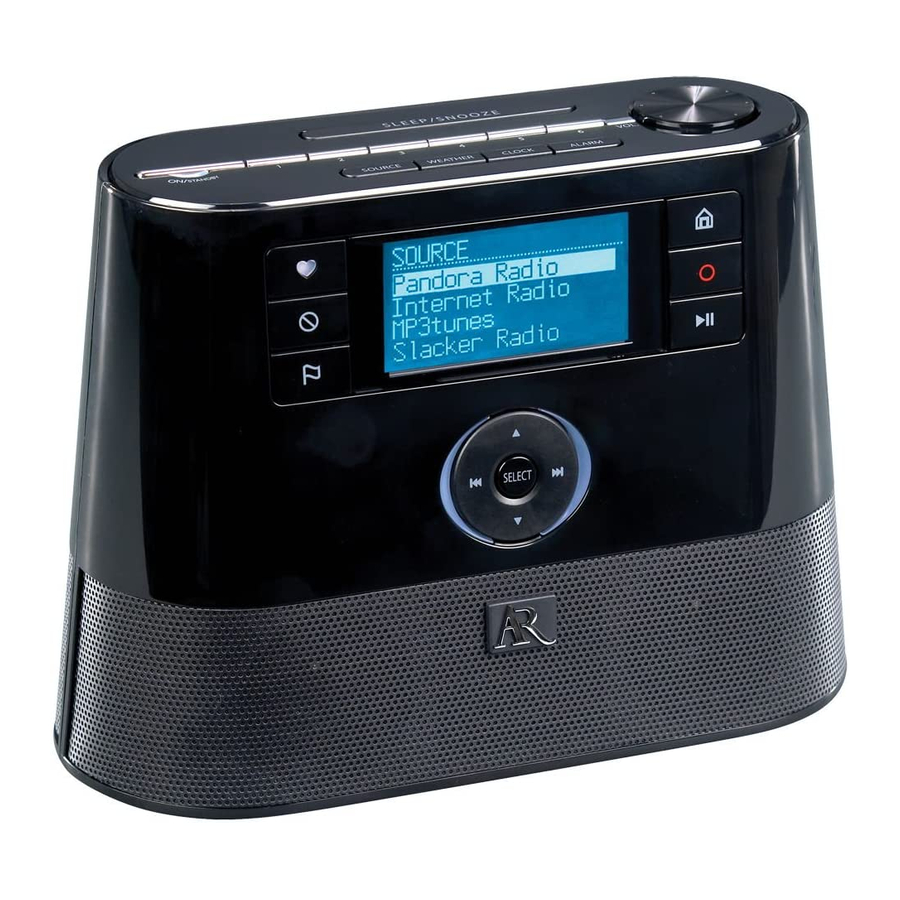
General controls Front and top Station presets On/standby Audio source Weather Heart Menu up Previous/scan back/reverse/ menu back Menu down Rear LAN port Headphone/ audio line-out RealAudio is a trademark or a registered trademark of RealNetworks, Inc. WEATHER DC IN You can connect USB devices to the USB port: The radio can play open MP3, WMA and RealAudio audio files stored on the connected... -
Page 15: Turning On Or Off
Turning on or off Press ON/STANDBY to turn the radio on or off (standby mode). Volume control Rotate the VOL. knob to adjust the volume. Source selection Press SOURCE repeatedly to select among the following audio content sources. The selected source will be activated after 1.5 seconds. - Page 16 To input characters: • Some menus require character input (e.g. password, ZIP code). • When inputting characters, press enter the alpha-numeric characters listed at the bottom of the screen. Press SELECT to confirm selections. • Press to choose among uppercase, lowercase, numeric, special characters or commands.
-
Page 17: Accessing The Digital Clock
Clock and alarm Accessing the digital clock The Wi-Fi Internet Radio also includes a digital clock which will be automatically updated when connected to the Internet. Wi-Fi connection strength Current temperature Alarm clock status • Press CLOCK to show the clock without interrupting audio playback. -
Page 18: Sleep Mode
8. Press to highlight one of the sources of wake sound: Beep/ • Beep/Buzzer • AM Preset • FM Preset • Slacker Preset • Slacker Library (premium account required) • Pandora Preset • Internet Preset Read relevant sections (e.g. Internet Radio) in this user manual to understand how to preset stations. -
Page 19: Slacker Radio
Slacker Radio Slacker Radio is a premium, streaming content provider partner which offers "personalization" through the use of selectable "Heart" and "Ban" buttons. It also uses artist recommendation and related artists to further assist discovery of music and enjoyment of stations. You can listen to Slacker Radio with an anonymous account for a limited time only with some limited functionality. -
Page 20: Tag Options
To store the current station as a preset: 1. Select a station. 2. Press and hold 1, 2, 3, 4, 5 or 6 on top of the radio until a beep sound is heard to store the current station to that preset button. •... -
Page 21: Pandora Radio
Pandora Radio Pandora Radio is a premium, streaming content provider partner which offers “personalization” through the use of selectable “Thumbs Up” and “Thumbs Down” buttons. It also uses artist recommendation and related artists to further assist discovery of music and enjoyment of stations. -
Page 22: Tag Options
• To edit a preset station, repeat the steps above to overwrite the previously stored station. • You can assign a preset station as the wake sound of the alarm, refer to page 17 for more information. To thumbs up a song: Press while listening. -
Page 23: Internet Radio
Internet Radio With Internet radio, you can listen to music, news, sports, weather or talk radio in other countries or from your home town. It offers the most music selections from around the world and most stations are free. Accessing Internet Radio •... -
Page 24: Recording Internet Radio
To assign the current station as the wake sound of the alarm clock: 1. Press . 2. Press to highlight Send to Alarm and then press SELECT. Recording Internet Radio Notice! Use of the recording feature is for personal use only. (Files cannot be transferred or moved from the internal memory.) During recording, key functionality will be limited. -
Page 25: Mp3Tunes
MP3tunes MP3tunes is a Music Service Provider (MSP) and the home of MP3tunes Locker, a secure, online music space to allow unlimited listening. MP3tunes users can upload their own music collections to the MP3tunes Locker and listen through this radio when the computer is turned off. -
Page 26: Fm/Am Tuner
FM/AM Tuner FM/AM antenna • For FM reception, uncoil the FM antenna at the back of the radio, ensuring it is fully extended (you may even want to tape it to the wall behind the radio if possible. The higher the better.) •... -
Page 27: Recordings
Recordings The radio's internal memory stores up to 10 hours of recordings from Internet Radio and FM/ AM Tuner. Accessing Recordings • Press SOURCE repeatedly to select Recordings. • Press to highlight Recordings in the Source menu and then press SELECT. Listening to recordings 1. -
Page 28: Usb Input
USB Input The radio can play back music files (mp3, wma and RealAudio (RA8 and G2) formats) stored on an external USB device connected to it. The USB connection port is located at the back of the radio. Accessing USB Input mode •... -
Page 29: Weather
Weather Weather broadcast Your radio includes a complimentary 4 year weather, on-demand subscription from WeatherBug® A digital weather broadcast is available including: • Text-to-speech reading of weather forecast for the ZIP code (US), Postal code (Canada) or City (Mexico) associated with the radio •... -
Page 30: Emergency Broadcast System Alert
For Canada: For Mexico: To return to the previous audio source or playback screen: Press WEATHER a third time. Emergency Broadcast System alert When an Emergency Broadcast System alert is received, the radio will: • pause current audio playback, • display the emergency warning text on the display, •... -
Page 31: Settings
Settings Changing radio's settings To change the radio settings: 1. Press to display the Source menu. 2. Press to highlight Settings and then press SELECT. 3. Press to highlight a setting and press SELECT to enter the sub-menu. • Repeat this step to browse for more settings and sub-menus. -
Page 32: More Information
More information Troubleshooting tips The radio cannot be turned on. • Plug the AC power adapter securely into the radio and a wall outlet. • Check the power outlet by plugging in another device. • Press and hold ON/STANDBY for 10 seconds to reboot the unit. -
Page 33: Copyright Warning
Infinite Radio. Product registration Go to www.acoustic-research.com for online registration. Technical specification Product: Wi-Fi Internet Radio Brand: Acoustic Research Model: ARIR201 Electrical Consumption: 10 W Electrical power source External AC adapter for radio Output: 5.0V DC 2.0A Input: 100-240V ~ 50/60Hz 0.7A... -
Page 34: Specifications
Specifications Hardware • Dimensions: 212 mm H, 94 mm W, 154 mm D • Unit Weight: 790 g (27.9oz) (without batteries) • Standards: IEEE 802.11g and 802.11b • Channels: 11 Wi-Fi Channels (US, Canada) • Ethernet Port : 10/100 RJ-45 compatible •... -
Page 35: Warranty Information
Warranty information 12 Month Limited Warranty Applies to AR Internet Radios AUDIOVOX ACCESSORIES CORP. (the Company) warrants to the original retail purchaser of this product that should this product or any part thereof, under normal use and conditions, be proven defective in material or workmanship within 12 months from the date of original purchase, such defect(s) will be repaired or replaced with reconditioned product (at the... - Page 36 • Properly pack your unit. Include any remotes, memory cards, cables, etc. which were originally provided with the product. However DO NOT return any removable batteries, even if batteries were included with the original purchase. We recommend using the original carton and packing materials. Ship to Audiovox Electronics Corp.
- Page 37 Illustrations contained within this publication are for representation only and subject to change. The descriptions and characteristics given in this document are given as a general indication and not as a guarantee. In order to provide the highest quality product possible, we reserve the right to make any improvement or modification without prior notice.