Advertisement
Quick Links
4-688-041-12(1)
Underwater Housing
Caisson de plongée
Operating Instructions / Mode d'emploi /
Manual de instrucciones / Bedienungsanleitung
©2016 Sony Corporation
Printed in China
MPK-URX100A
1
5
6
DSC-RX100
a
DSC-RX100M2
DSC-RX100M3/M4/M5
a
a
b
a
b
DSC-RX100
DSC-RX100M2/M3/M4/M5
b
3
DSC-RX100M3/M4/M5
DSC-RX100/M2
DSC-RX100/M2
c
DSC-RX100M3/M4/M5
1
For Customers in Europe
Notice for the customers in the countries applying EU
Directives
Manufacturer: Sony Corporation, 1-7-1 Konan Minato-ku Tokyo, 108-0075 Japan
For EU product compliance: Sony Belgium, bijkantoor van Sony Europe Limited,
Da Vincilaan 7-D1, 1935 Zaventem, Belgium
Main Feature
This Underwater Housing (here in after referred to as "this unit") is designed for the
following camera models:
DSC-RX100, DSC-RX100M2, DSC-RX100M3, DSC-RX100M4, DSC-RX100M5
Water pressure resistance: Up to depths of 40 m (132 feet) underwater
Precautions
• When using this unit while diving, be sure to pay attention to the surrounding
situation. Lack of attention may cause an accident while diving.
• In case a water leakage is occurred, be sure to pay attention to the surrounding
situation and surface following the safety rules for diving.
• Do not subject the front glass to strong shock, as it may crack.
• Protect the Underwater Housing against strong physical impacts.
A strong physical impact may cause the camera finder to pop up, resulting in the
blank monitor. ()
• Do not throw this unit into the water.
• Avoid using this unit under the following situations:
– in a very hot or humid place.
– in water hotter than 40 °C (104 °F).
– at temperatures lower than 0 °C (32 °F).
In these situations, moisture condensation or water leakage may occur and
damage the camera.
• Do not leave this unit under direct sunlight in a very hot and humid place for a
long period of time. If you cannot avoid leaving this unit under direct sunlight, be
sure to cover this unit with a towel or other protection.
2
• When the camera overheats, it may automatically turn off or recording may
malfunction. To use the camera again, leave it in the cool place for a while to cool
down.
• Use the supplied spacer to keep this unit open if you take it onboard a plane. If it
is shut tight, changes in cabin pressure may make it difficult to open.
• It is recommended that you use Sony lenses/accessories designed to suit the
characteristics of this camera.
Using the products of other manufacturers may cause the camera not to operate
to its capability, or result in accidents and malfunctions of the camera.
If sun oil is on this unit, be sure to wash it off thoroughly using lukewarm water.
If this unit is left with sun oil on its body, the surface of this unit may become
discolored or damaged (such as cracks on the surface).
Water leakage
Installing the camera in this unit
If water happens to leak in, stop exposing this unit to water immediately.
• If the camera gets wet, take it to the nearest Sony dealer immediately. Repair
• Install the camera in this unit in a location with low humidity, such as a dry
costs must be borne by the customer.
indoor location. Opening or closing this unit in a hot and humid location may
• In the unlikely event that a malfunction of this unit causes damage due to water
cause fogging inside this unit.
leakage, Sony does not guarantee against damages to the equipment contained
• This unit is supplied with two (2) types of lens ring adaptors. Use the lens ring
in it (camera, battery pack, etc.) and the recorded contents, nor expenses entailed
adaptor that fits your camera. Using the wrong lens ring adaptor may damage
in the photography.
the camera or allow water to leak into this unit.
• Refer to the operating instructions supplied with your camera as well.
Supplied items ()
Preparing the camera ()
Underwater Housing (1)
1 Remove the strap from the camera.
Rear attachment A (for DSC-RX100) (1)
2 Insert the battery pack and memory card.
Rear attachment B (for DSC-RX100M2/M3/M4/M5) (1)
Be sure to use a fully charged battery pack.
Lens ring adaptor A (for DSC-RX100/M2, gray) (1)
Make sure that the memory card has enough space to record images.
3 Attach the lens ring adaptor that fits your camera.
Lens ring adaptor B (for DSC-RX100M3/M4/M5, black) (1)
DSC-RX100/RX100M2: Lens ring adaptor A (for DSC-RX100/M2, gray)
Front attachment (1) (attached to this unit )
Other models: Lens ring adaptor B (for DSC-RX100M3/M4/M5, black)
Diffuser (1) (with the Leash Cord attached)
4 Press the ON/OFF (power) button to turn on the camera.
External flash adaptor (1) (with the Leash Cord attached)
5 Select the shooting mode.
Hand strap (1) (-a)
6 Use MENU to set [AF Illuminator] to [Off].
Front Lens Cap (1)
The AF Illuminator cannot be used with this unit.
7 Check the lens and LCD screen for any dirt.
Set of printed documentation
Silicone grease (1)
8 Let the flash pop up.
Depending on the Flash Mode, the camera flash always lights.
9 Press the ON/OFF (power) button to turn off the camera.
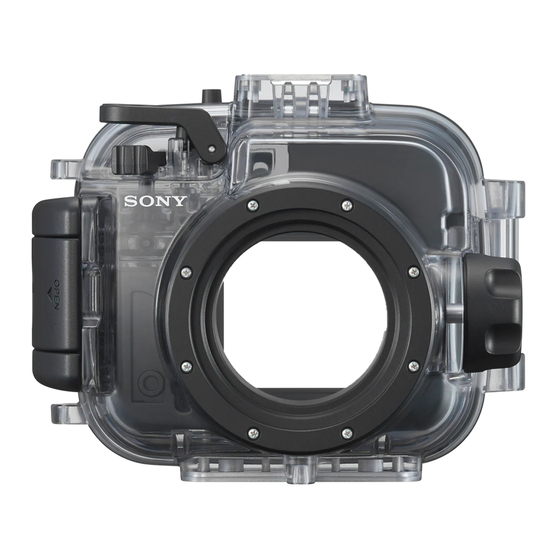
Identifying the Parts ()
While the camera is turned on, installing the camera in this unit may damage
the camera lens.
Shutter lever
Installing the camera in this unit ()
Zoom lever
Front glass
When either of the following attachment grips (not supplied) is attached to your
Front casing
camera, remove the front attachment from this unit before installation. (-b)
• AG-R1
Lens ring rotation dial
• AG-R2
Tripod receptacle
Accessory shoe
1 Install the camera in this unit.
ON/OFF (power) button
2 Close the rear casing and secure the buckle.
Rear casing
Note
While closing the rear casing, keep anything, such as the hand strap, the leash
Mode dial
cord, or a strand of hair, out of the way. If either of them is slightly nipped
Buckle
between the front and rear casings of this unit, water may leak into this unit.
Buckle lock latch lever
3 Operate the buttons and dials on this unit several times to make
Hook for hand strap
sure that the camera inside functions properly.
Operation buttons
Attaching the diffuser or the external flash adaptor ()
MOVIE (movie) button
Mode dial coupling rubber
You cannot attach the diffuser and the external flash adaptor concurrently.
O-ring
Drip-proof packing
• Attaching the diffuser (-a)
Spacer (Be sure to remove the spacer when using this unit.
Attach the spacer for storage.)
• Attaching the external flash adaptor (-b)
Filter thread
• Removing the diffuser or the external flash adaptor (-c)
About the filter thread
O-ring and Drip-proof packing ()
• The filter thread allows an accessory with the diameter of 67 mm to be attached.
O-ring maintenance is very important. Failure to do O-ring maintenance
• Depending on the accessory, images may appear partially dark or distorted when
according to the instructions may lead to water leaks and cause this unit to
captured with the accessory attached to this unit.
sink.
• Some lenses, such as a conversion lens and a macro lens, are not available for use
with DSC-RX100 and DSC-RX100M2.
O-ring
This unit uses an O-ring to maintain its water resistance.
Using this unit
Fitting the O-ring
Avoid dusty or sandy locations for fitting the O-ring.
Before shooting with the camera in this unit underwater, first take them to a
1 Remove the O-ring attached to this unit. ()
depth of about 1 m (3.3 feet) and make sure that the camera operates properly
To remove the O-ring, press it lightly and slide it in the direction of the arrow as
and no water leaks into this unit, then commence your dive.
illustrated. This makes the O-ring slack enough for easy removal.
For details on the camera functions, refer to the operating instructions supplied
Be careful not to scratch the O-ring with your fingernail.
with the camera.
2 Inspect the O-ring.
• Carefully check that there is
no dirt, sand, hair, dust, salt,
Recording ()
threads, etc. on the O-ring. If you
1 Press the ON/OFF (power) button () to turn on the power.
find any, be sure to wipe off with
a soft cloth.
2 Press the shutter lever () to record images.
Dirt
Sand
Hair
• Use the zoom lever () for zooming in/out.
• Lightly run your fingertip around the O-ring to check for any invisible dirt.
• Use the lens ring rotation dial () for zooming in/out or adjusting the focus.
• Be careful not to leave any cloth fibers on the O-ring after wiping it.
• Check the O-ring for cracks,
Using/Setting the functions
skewing, distortion, fine splitting,
You cannot operate the control wheel of the camera when using this unit, but you
scratches, embedded sand, etc.
can change the settings with the camera menu.
Replace the O-ring if you find
any of these.
Depending on the camera, some functions are not available with this unit.
Cracks
Distortion
Scratches
3 Inspect the O-ring groove on the rear casing.
Carefully remove any grains of sand or hardened salt stuck in the groove.
Selecting the mode
4 Inspect the O-ring contact surface on the front casing in the
Select the shooting mode using the mode dial on this unit.
same way.
While recording movies, you cannot record audio correctly.
5 Apply the silicone grease supplied with the O-ring.
Notes on recording
• Use your fingertips to thinly and evenly coat the entire surface of the O-ring
• If you do not record any images for a certain time, the camera turns off
with a small drop of silicone grease, as illustrated.
automatically to prevent the battery pack from running out. To use the camera
• Make sure there is always a thin coating of silicone grease on the surface of
again, turn on the power again.
the O-ring. Silicone grease protects the O-ring and prevents wear.
• When using the camera flash inside this unit, the effective flash range is reduced
and images tend to be darker overall, so the shooting distance may be greatly
Silicone grease
reduced in some shooting conditions (pitch dark, etc.). In such conditions, it is
Only use the supplied silicone grease. Other kinds of grease will damage the
recommended that you use an external underwater light as well as the flash.
O-ring and cause water leaks.
• If you use the flash underwater, the flash light may be reflected by particles in the
When you are finished with applying silicone grease, wash your hands with
water and appear in the image as circles of light.
• Reflected glare may occur depending on the shooting condition. If this happens,
soap and water.
change the condition.
First-aid measures
Eye contact Rinse immediately with plenty of water. Get medical attention
• Colors of underwater photos change depending on depth, weather and water
condition.
immediately.
Please adjust White Balance setting accordingly.
Skin contact Wash skin with soap and water. Get medical attention if irritation
develops and persists.
Playing back
Ingestion Rinse mouth. Get medical attention immediately.
You can use the operation buttons on this unit to view the saved images and
6 Fit the O-ring () into the groove of this unit.
movies on the LCD screen on your camera. While the camera is inside this unit,
Fit the O-ring evenly into the groove paying attention to the following points:
however, you do not hear the movie audio.
– Check for dirt on the O-ring.
– Check that the O-ring is not twisted or protruding.
Removing the camera
– Do not pull hard on the O-ring.
Final check
Before opening this unit, rinse it with tap water or fresh water and then wipe
the water off with a soft cloth. When opening it, be careful not to let any water
Check the O-ring again for any dirt, scratches or twisting, etc.
from your body, hair or wetsuit cuffs drip onto the camera.
A loose or sandwiched O-ring, or sand or dirt on the O-ring may cause leaks
1 Press the ON/OFF (power) button to turn off the camera.
underwater.
Be sure to check the O-ring before use.
While the camera is turned on, removing the camera from this unit may damage
the camera lens.
2 Open this unit.
How to check for water leaks
3 Remove the camera from this unit.
Before installing the camera, close this unit and immerse it in water to make sure
When the camera has been used for a long time, the camera heats up. Keep the
no water leaks in.
camera in this unit for a while to let it cool down before removing the camera
Drip-proof packing (-a)
from this unit.
Be careful not to drop the camera when removing it.
Do not remove the drip-proof packing () or apply silicone grease to it.
Troubleshooting
Before sending this unit for repair, check the following to see if it helps you solve
If the packing is slack or is nipped between the casings, water may leak into this
your issue.
unit.
If it does not help, contact Sony Customer Information Services Center.
If the drip-proof packing comes off, refit the packing carefully while keeping it
untwisted.
There are drops of water inside this unit.
• There are scratches or cracks on the O-ring.
O-ring and drip-proof packing serviceable life
Replace the O-ring with a new one.
The serviceable life of the O-ring varies depending on the frequency in use of this
• The O-ring is not set correctly.
unit and the storage conditions. Generally, it is about one year.
Check the method of O-ring attachment.
Replace the drip-proof packing with a new one if you find scratches or cracks on it.
The recording function does not work.
After replacing, check that no water leaks in.
• The camera heats up.
Leave the camera in the cool place for a while to cool down.
Maintenance
• The wrong attachment is attached.
Attach the correct attachment for your camera correctly.
• After using this unit in or by the sea, keep this unit fastened by the buckle and
The mode is not switched.
wash them altogether thoroughly in fresh water to remove salt and sand, then
wipe them with a soft dry cloth. It is recommended that you keep this unit
• There is dirt or dust on the attachment.
Remove any dirt or dust from the attachment with a dampened cloth.
fastened by the buckle and immersed in fresh water for about 30 minutes. If this
unit is left with salt on it, metal portions may be damaged or rusted, resulting in
The operation buttons on this unit seem heavy to press,
water leaks.
• Wipe the interior of this unit with a soft dry cloth. Do not wash the interior with
slightly stuck, or slow to pop back.
water.
• Every button contains an O-ring inside.
When you start using this unit after a long interval, the O-ring may cause such
Be sure to perform the above maintenance each time you use this unit. Do not use
inconvenience, which does not indicate a malfunction.
any type of solvent such as alcohol, benzine or paint thinner for cleaning, as this
might damage the surface finish of this unit.
Design and specifications are subject to change without notice.
When storing this unit
• Attach the spacer supplied with this unit to prevent wear of the O-ring. ()
• Prevent dust from collecting on the O-ring.
POUR LES CLIENTS RÉSIDANT EN
• Lightly coat the O-ring with silicone grease and insert it into the seating groove,
then store this unit in a cool, well-ventilated location. Do not fasten the buckle.
EUROPE
• Avoid storing this unit in a cold, very hot or humid place, or together with
naphthalene or camphor, as these conditions might damage this unit.
Avis aux consommateurs des pays appliquant les Directives
Preparation
UE
Fabricant : Sony Corporation, 1-7-1 Konan Minato-ku Tokyo, 108-0075 Japon
Pour toute question relative à la conformité des produits dans l'UE : Sony Belgium,
Attaching the rear attachment to this unit (-a, b)
bijkantoor van Sony Europe Limited, Da Vincilaan 7-D1, 1935 Zaventem, Belgique
• This unit is supplied with two (2) types of rear attachments. Use the rear
Caractéristiques principales
attachment that fits your camera. Using the wrong attachment may damage
the camera or allow water to leak into this unit.
Ce caisson de plongée (appelé ci-dessous « ce caisson ») est destiné aux modèles
• Do not apply excessive pressure while attaching the rear attachment.
d'appareil photo suivants :
• Keep the shape of the removed attachments intact when storing.
DSC-RX100, DSC-RX100M2, DSC-RX100M3, DSC-RX100M4, DSC-RX100M5
Résistance à la pression de l'eau : jusqu'à 40 m de profondeur
Preparing the O-ring and drip-proof packing
1 Remove the O-ring attached to this unit.
Précautions
2 Coat the O-ring with silicone grease.
• Si vous utilisez ce caisson pendant la plongée, faites attention à votre
3 Attach the O-ring to this unit.
environnement. Un manque d'attention peut causer un accident pendant la
4 Check the drip-proof packing for any sand or dirt.
plongée.
• Si de l'eau devait s'infiltrer dans ce caisson, faites attention à votre environnement
et remontez à la surface en observant les règles de sécurité propres à la plongée.
• Ne soumettez pas la vitre avant à des chocs trop forts, car elle pourrait se briser.
• Protégez le Caisson de plongée contre des chocs physiques violents.
Un choc physique violent risque de faire sortir le viseur de l'appareil photo,
désactivant l'écran. ()
• Ne jetez pas ce caisson dans l'eau.
• N'utilisez pas ce caisson dans les situations suivantes :
– à un endroit très chaud ou humide ;
– dans une eau dont la température est supérieure à 40 °C ;
– à une température inférieure à 0 °C.
Dans de telles situations, l'appareil photo risque de s'endommag er par la
condensation d'humidit é ou les infiltrations d'eau.
• Ne laissez pas ce caisson en plein soleil à un endroit très chaud et humide
pendant longtemps. Si ce caisson doit rester en plein soleil, veillez à le recouvrir
d'une serviette ou d'un tissu quelconque.
• Lorsque l'appareil photo est trop chaud, il peut s'éteindre automatiquement ou
l'enregistrement risque de ne pas s'effectuer normalement. Laissez l'appareil
photo un moment à un endroit frais avant de le réutiliser.
• Utilisez l'entretoise fournie avec ce caisson si vous l'emmenez à bord d'un avion.
S'il est trop fermé, les variations de pression de la cabine risquent de rendre
difficile son ouverture.
• Nous vous recommandons d'utiliser des objectifs/accessoires Sony conçus pour
répondre aux caractéristiques de cet appareil photo.
L'utilisation des produits d'autres fabricants peut empêcher l'appareil photo de
fonctionner au maximum de ses capacités, voire provoquer des accidents ou
dysfonctionnements.
Si de l'huile solaire devait tomber sur ce caisson, prenez soin de l'enlever avec
de l'eau tiède. Si vous laissez ce caisson avec des taches d'huile au soleil, sa
surface risque de se décolorer ou de s'endommager (elle peut se craqueler).
Infiltration d'eau
Si de l'eau devait s'infiltrer dans ce caisson, retirez-le immédiatement de l'eau.
• Si l'appareil photo devait être mouillé, portez-le immédiatement au revendeur
Sony le plus proche. Les frais de réparation seront à la charge du client.
• Si une défectuosit é du caisson devait provoquer des dégâts dus à une infiltration
d'eau, Sony ne garantira pas les dégâts causés à l'appareil qu'il contient (appareil
photo, batterie, etc.), le contenu de la prise de vue ou les frais liés à la prise de
vue.
Nomenclature ()
Caisson de plongée (1)
Fixation arrière A (DSC-RX100) (1)
Fixation arrière B (DSC-RX100M2/M3/M4/M5) (1)
Adaptateur de bague d'objectif A (DSC-RX100/M2, gris) (1)
Adaptateur de bague d'objectif B (DSC-RX100M3/M4/M5, noir)
(1)
Fixation avant (1) (fixée à ce caisson )
Diffuseur (1) (avec le cordon fixé)
Adaptateur de flash externe (1) (avec le cordon fixé)
Dragonne (1) (-a)
Capuchon d'objectif avant (1)
Jeu de documents imprimés
Graisse de silicone (1)
Identification des pièces ()
Manette du déclencheur
Levier de zoom
Vitre avant
Boîtier avant
Sélecteur de rotation de la bague d'objectif
Filetage pour pied photo
Sabot
Touche ON/OFF (Alimentation)
Boîtier arrière
Sélecteur de mode
Boucle
Levier de blocage de la boucle
Crochet pour la dragonne
Touches d'exploitation
Touche MOVIE (film)
Caoutchouc de couplage du mode de sélection
Joint torique
Garniture pare-gouttes
Entretoise (assurez-vous de retirer l'entretoise avant d'utiliser ce
caisson. Remettez l'entretoise lors du rangement.)
Filetage de filtre
Joint torique et garniture pare-gouttes
()
L'entretien du joint torique est très important. De l'eau risque de s'infiltrer dans ce
caisson et de le faire couler si vous ne nettoyez pas correctement le joint torique.
Joint torique
L'étanchéit é de ce caisson est assurée par un joint torique.
Mise en place du joint torique
Évitez de mettre le joint torique en place à un endroit poussiéreux ou sablonneux.
1 Retirez le joint torique de ce caisson. ()
Pour retirer le joint torique, appuyez légèrement dessus et faites-le glisser dans
le sens de la flèche, comme illustré. Le joint devient assez souple pour faciliter
son retrait. Veillez à ne pas abîmer le joint torique avec vos ongles.
2 Inspectez le joint torique.
• Vérifiez avec soin la présence de
saletés, grains de sable, cheveux,
poussière, sel, fils, etc. sur le joint
torique. Si c'est le cas, essuyez le
joint avec un chiffon doux.
Saleté
Sable
Cheveux
• Passez légèrement votre doigt sur le joint torique pour repérer les saletés
invisibles.
• Veillez à ne pas laisser de fibres de tissu sur le joint torique après l'avoir
nettoyé.
• Assurez-vous que le joint torique
ne présente aucune craquelure,
déformation, irrégularit é,
coupure, éraflure, incrustation de
sable, etc. Remplacez-le s'il en
Craquelures
Déformation
Éraflures
présente.
3 Inspectez la rainure du joint torique du boîtier arrière.
Retirez avec soin les grains de sable ou de sel s'incrustant parfois dans la
rainure.
4 Inspectez également la surface du joint torique en contact avec
la partie avant.
5 Appliquez de la graisse de silicone fournie sur le joint torique.
• Du bout du doigt, étalez une petite goutte de graisse de silicone en fine
couche et régulière sur toute la surface du joint torique, comme illustré.
• Assurez-vous qu'une fine couche de graisse de silicone recouvre toujours la
surface du joint. La graisse de silicone protège le joint torique et l'empêche de
s'user.
Graisse de silicone
Utilisez seulement la graisse de silicone fournie. Tout autre type de graisse
endommagera le joint torique et causera des infiltrations d'eau.
Une fois que vous avez fini d'appliquer la graisse de silicone, lavez-vous les
mains avec de l'eau et du savon.
Premiers soins
Contact avec les yeux Rincez immédiatement vos yeux sous l'eau courante.
Consultez un médecin si une irritation se développe ou persiste.
Contact avec la peau Lavez la peau avec de l'eau et du savon. Consultez un
médecin si une irritation se développe ou persiste.
Ingestion Rincez votre bouche. Consultez immédiatement un médecin.
6 Insérez le joint torique () dans la rainure de ce caisson.
Insérez le joint torique uniformément dans la rainure en prêtant attention aux
points suivants :
– assurez-vous qu'il n'y a pas de salet é sur le joint torique ;
– assurez-vous que le joint torique n'est pas tordu ou ne ressort pas ;
– ne tirez pas fort sur le joint torique.
Vérification finale
Vérifiez une nouvelle fois s'il n'y a pas de saleté, rayures ou torsion, etc.
Une infiltration d'eau dans ce caisson peut être due à un joint torique détendu
ou aplati, ou bien à la présence de grains de sable ou de poussière.
Veillez à bien vérifier le joint torique avant d'utiliser ce caisson.
Vérification de l'étanchéité
Avant d'installer l'appareil photo, fermez ce caisson et plongez-le dans l'eau pour
vous assurer que de l'eau ne s'infiltre pas à l'intérieur.
Garniture pare-gouttes (-a)
N'enlevez pas et n'appliquez pas de graisse de silicone sur la garniture pare-
gouttes ().
ISi la garniture est lâche ou coincée entre les boîtiers, de l'eau risque de s'infiltrer
dans ce caisson.
Si la garniture pare-gouttes se détache, remettez-la en place avec précaution sans
la défaire.
Durée de vie du joint torique et de la garniture pare-
gouttes
La durée de vie du joint torique varie selon la fréquence d'utilisation et les
conditions de rangement de ce caisson. Le joint torique dure environ un an.
Remplacez la garniture pare-gouttes par une neuve si elle est rayée ou craquelée.
Une fois le remplacement effectu é, assurez-vous que le caisson est étanche.
Entretien
• Après avoir utilisé le caisson à proximité ou dans de l'eau de mer, laissez-le fixé à
la boucle et lavez-les bien dans de l'eau fraîche pour retirer le sable et le sel, puis
essuyez-les avec un chiffon doux et sec. Il est conseillé de laisser ce caisson fixé à
la boucle et de l'immerger dans de l'eau fraîche pendant 30 minutes environ. Si le
caisson n'est pas bien nettoyé, le sel restant peut attaquer les parties métalliques
et causer de la corrosion, et par la suite une infiltration d'eau.
• Essuyez l'intérieur de ce caisson avec un chiffon doux et sec. Ne lavez pas
l'intérieur à l'eau.
Effectuez toutes les opérations mentionnées ci-dessus chaque fois que vous
utilisez ce caisson. N'utilisez pas de solvant, comme de l'alcool, de la benzine ou
du diluant pour le nettoyage, car ces substances peuvent attaquer la finition de ce
caisson.
(Suite à la page arrière)
Advertisement

Related Manuals for Sony MPK-URX100A


Summary of Contents for Sony MPK-URX100A
- Page 1 – dans une eau dont la température est supérieure à 40 °C ; • If the camera gets wet, take it to the nearest Sony dealer immediately. Repair • Install the camera in this unit in a location with low humidity, such as a dry –...
- Page 2 Bitte passen Sie den Weißabgleich entsprechend an. daños debido a la infiltración de agua, Sony no se responsabilizará de los daños correctement. Hersteller: Sony Corporation, 1-7-1 Konan Minato-ku Tokio, 108-0075 Japan ocasionados en el equipo que contenga (cámara, batería, etc.) o en el contenido Falls die Abdichtung locker ist oder zwischen den Gehäuseteilen eingeklemmt...