Table of Contents
Advertisement
Quick Links
TOWER CAM PG2
PowerG, Outdoor Mirror PIR Motion Detector with Anti-
masking and Built-In Camera
1. INTRODUCTION
The TOWER CAM PG2 is a 2-way, wireless outdoor digital mirror PIR detector
with built-in camera. Activated upon PIR detection or upon demand, the
TOWER CAM PG2 sends clear images to the Monitoring Station for alarm
image verification.
The PIR motion detector's features are as follows:
Operates with PowerMaster control panels (version 18 and higher)
l
Patented 8 independent quad PIR detectors (Octa-QUAD™) operating in
l
true Quad configuration (patented) with true motion recognition (TMR)
processing for each of the 8 PIR detectors.
Advanced Obsidian Black Mirror
l
Optimum performance even in poor weather conditions such as snow, rain,
l
dust, wind and direct sunlight
Tamper protection prevents opening and removal from wall
l
PowerG two-way Frequency Hopping Spread Spectrum
l
technology
- provides robustness and reliability
Built-in link quality indicators enable installer to check signal quality without
l
physically approaching the control panel.
Robust housing with recessed window.
l
Smart anti masking distinguishes between masking spray and rain.
l
Alarm LED is visible in sunlight.
l
Automatic termination of walk-test after 15 minutes.
l
Microprocessor-controlled temperature compensation.
l
Immunity to pets weighing up to 18 Kg (40lb) – see Table 1
l
Built-in swivel bracket
l
The camera's features are as follows:
Up to 10 cameras can be enrolled
l
Images multiplexed from all enrolled cameras
l
Color and black & white images
l
Auto-setup
l
Camera tuning by simple walk-test
l
Day and night CMOS camera, with near IR illumination. This allows taking
l
pictures in full darkness without letting the intruder know.
Instant capture: guarantees capture of fast moving intruder.
l
Optional AC power
l
An event records 2 images per second. 10-15 images total
l
Notes:
1. For UL/ULC installation, the camera feature is not to be enabled in UL
listed product.
2. Pet immunity is not evaluated by UL/ULC.
2. INSTALLATION
2.1. Installation
A. Bracket installation (see
Figure
to the surveyed ground surface.
B. Adjust the detector's horizontal and vertical angles (see
depending on the mounting height and coverage distance that you require. See Figure 3 A and Table 1 for details. The information refers to a
relatively flat surveyed area. Verify the correct installation by using the walk test method.
C. Fasten the detector to the bracket (see Figure 2 step 4).
Table 1 - Vertical Adjustment Reference
Mounting Height
Coverage Distance
2m / 6.7ft
3.0m / 10 ft
-
2.5m / 8 ft
1
2.0m / 7 ft
1
1.5m / 5 ft
2
D-304493 TOWER CAM PG2 Installation Instructions
TM
optics (patent pending).
FHSS-TDMA
2). Fix the bracket firmly on a stable wall or pillar. The orientation of the fixed bracket must be as parallel as possible
Figure
4m / 13ft
6m / 20ft
8m / 26ft
1
2
2
1
2
3
2
3
4
3
4
5
Installation Instructions
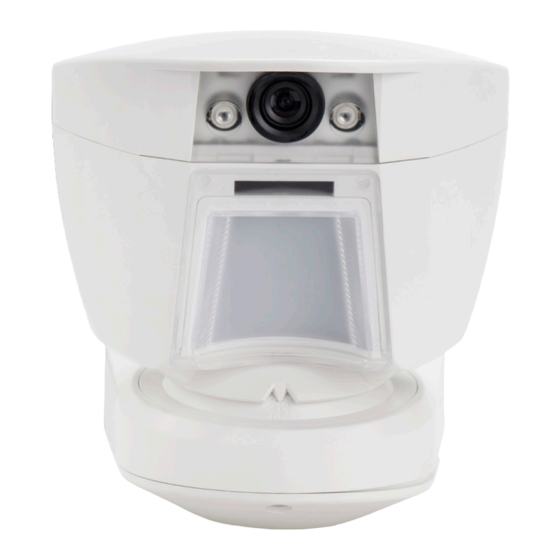
A. IR LEDs
D. External power LED
3), according to the surveyed ground surface. Set the vertical angle position
10m / 33 ft
12m / 39 ft
3
3
4
4
5
5
5
-
B. Indication LED
E. Alarm LED
Figure 1. External View
C. Camera
1
Advertisement
Table of Contents

Related Manuals for Visonic TOWER CAM PG2


Summary of Contents for Visonic TOWER CAM PG2
- Page 1 Built-In Camera 1. INTRODUCTION The TOWER CAM PG2 is a 2-way, wireless outdoor digital mirror PIR detector with built-in camera. Activated upon PIR detection or upon demand, the TOWER CAM PG2 sends clear images to the Monitoring Station for alarm image verification.
- Page 2 Note: The 2 screw holes enable adjustment of the bracket on the wall, if needed, following the walk test. Figure 2 - Installation HORIZONTAL ADJUSTMENT (-45° to +45°) VERTICAL ADJUSTMENT (0° to -10° in 2.5° clicks / steps) D-304493 TOWER CAM PG2 Installation Instructions...
-
Page 3: Battery Insertion
It is recommended to perform the first batteries insertion on a flat surface (see Figure 4). After battery insertion, the LED will flash for 60 seconds and then the detector will enter a 15 minutes' local diagnostic mode. D-304493 TOWER CAM PG2 Installation Instructions... -
Page 4: Steps 7 And 8 Are Optional For External 7.5 Vdc Power Connection
Replace battery with CR17450 Lithium batteries manufactured by EVE only. Dispose of used battery promptly. Keep away from children. Do not disassemble and do not dispose of in fire. Note: Tamper protection is mandatory for UL burglary installations. Figure 4 – Battery Insertion D-304493 TOWER CAM PG2 Installation Instructions... -
Page 5: Configuring The Detector Parameters
[2] PARTITIONS will appear only if PARTITIONING was previously enabled in a panel that supports the Partitioning feature (for further details, see "Partitioning" in the PowerMaster Installer Guide). 2.4. Configuring the Detector Parameters Enter the DEVICE SETTINGS menu and follow the configuration instructions for the TOWER CAM PG2 PIR detector as described below. Option Configuration Instructions ALARM LED Define whether or not to activate the alarm LED indication. - Page 6 AM detection – diagnostic mode Yellow indication LED blinks slowly (0.2 sec. ON, 30 sec. OFF) AM detection – Normal mode A. Alarm LED B. Indication LED C. Enroll button D. Tamper switch Figure 5. TOWER CAM PG2 D-304493 TOWER CAM PG2 Installation Instructions...
-
Page 7: Compliance With Standards
Europe (CE): EN 300220, EN 301489, EN 60950, EN 50130-4, EN 50130-5, EN 50131-2-2, EN 50131-6, EN 50131-1 Grade 2 Class IV The TOWER CAM PG2 is compatible with the RTTE requirements - Directive 1999/5/EC of the European Parliament and of the Council of 9 March 1999 and EN50131-1 Grade 2 Class IV. -
Page 8: Warranty
IN JU R Y AN D/ OR D A MA GE TO PR OPER T Y OR OT HER L OSS W HET HER D IR EC T, I ND I REC T, INCIDENT AL, CONSEQUENTIAL OR OTH ERWISE, B ASED ON A CLAIM THAT TH E PRODUC T FAILED TO FUNCTION. EMAIL: info@visonic.com INTERNET: www.visonic.com © VISONIC LTD. 2016 TOWER CAM PG2 D-304493 (Rev. 5 04/16) D-304493 TOWER CAM PG2 Installation Instructions...