
Related Manuals for Lenovo IdeaCentre 310S-08IGM


Summary of Contents for Lenovo IdeaCentre 310S-08IGM
-
Page 1: User Guide
310S Series User Guide Machine Type (MT): 90G9 [ideacentre 310S-08ASR/Energy Star] 90HX [ideacentre 310S-08IGM/Energy Star]... -
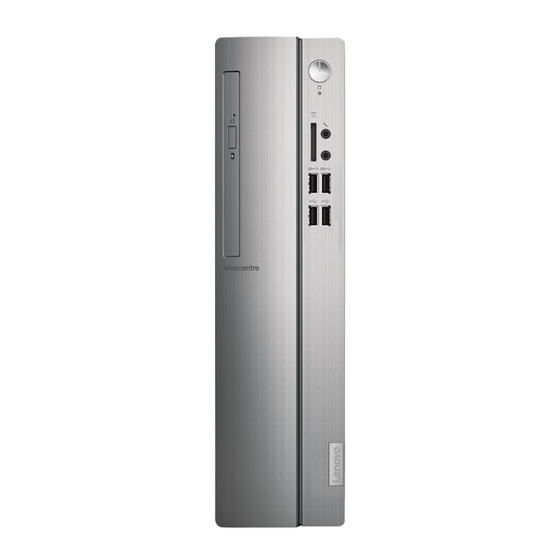
Page 2: Front View Of The Computer
Front view of the computer Optical drive eject button Headphone connector (selected models only) Memory card reader (selected Optical drive (selected models models only) only) USB 3.0 connectors (2) Power button USB 2.0 connectors (2) Hard disk drive indicator Microphone connector ATTENTION: Be sure not to block any air vents on the computer. -
Page 3: Rear View Of The Computer
Rear view of the computer 310S-08ASR 310S-08IGM Audio connectors Ethernet connector HDMI-out connector Power connector VGA-out connector Expansion card slots (such as graphic card) USB 2.0 connectors (2) NOTE: If your model has two VGA monitor connectors, be sure to use the connector on the graphics adapter. - Page 4 Installing the computer bracket NOTE: The computer bracket shown in the illustrations below is only for demonstration and need to be purchased separately.
-
Page 5: Safety Information For Replacing Crus
If you no longer have this copy of the Safety, Warranty, Environment, Recycling Information Guide and Important Product Information Guide, you can obtain one online from the website at http://www.lenovo.com/UserManuals. Pre-disassembly instructions Before proceeding with the disassembly procedure, make sure that you do the following: 1. - Page 6 Removing the computer cover Removing the front bezel...
- Page 7 Replacing a hard disk drive Replacing the optical drive...
- Page 8 Replacing a PCI express adapter Replacing a memory module...