Table of Contents
Advertisement
Advertisement
Table of Contents

Related Manuals for Samsung HT-Q80 HT-TQ85


Summary of Contents for Samsung HT-Q80 HT-TQ85
- Page 1 Home Theater System with 5 Disc DVD Changer and HDMI HT-Q80 SAMSUNG ELECTRONICS AMERICA, INC. HT-TQ85 SERVICE DIVISION 400 Valley Road, Suite 201 Mount Arlington, NJ 07856 1-800-SAMSUNG (1-800-726-7864) www.samsung.com Instruction Manual AH68-01834A COMPACT DIGITAL AUDIO...
-
Page 2: Safety Warnings
Safety Warnings Note to CATV system installer : CLASS 1 LASER PRODUCT This reminder is provided to call the CATV system KLASSE 1 LASER PRODUKT installer’s attention to Section 820~40 of the NEC LUOKAN 1 LASER LAITE which provides guidelines for proper grounding and, KLASS 1 LASER APPARAT in particular, specifies that the cable ground shall be PRODUCTO LASER CLASE 1... -
Page 3: Safety Instructions
Safety Instructions READ INSTRUCTIONS CLEANING All the safety and operating instructions should be Unplug this video product from the wall outlet read before the appliance is operated. before cleaning. Do not use liquid cleaners or aerosol cleaners. Use a damp cloth for cleaning. RETAIN INSTRUCTIONS The safety and operating instructions should be LIGHTNING... -
Page 4: Table Of Contents
To compensate for this, you can adjust the audio delay time to sync up with the video. Optional XM radio Samsung ’s XM Ready Home Theater Systems give you the opportunity to enjoy America ’s leading satellite radio service in CD-quality sound. -
Page 5: Notes On Discs
Notes on Discs DVD (Digital Versatile Disc) offers fantastic audio and video, thanks to Dolby Digital sur- round sound and MPEG-2 video compression technology. Now you can enjoy these realistic V I D E O effects in the home, as if you were in a movie theater or concert hall. DVD players and the discs are coded by region. -
Page 6: Description
Description —Front Panel— Tuning Up & Skip ( Tuning Down & Skip ( Disc Tray Function button Remote Control Sensor Standby indicator Power ( ) button GROUP indicator CHAPTER indicator TRACK indicator DOLBY DIGITAL indicator PROGRAM indicator LINEAR PCM indicator REPEAT indicator indicator TITLE... -
Page 7: Remote Control
Description —Remote Control— TV button DVD Receiver button POWER button Number(0~9) buttons REMAIN button STEP button SEARCH buttons VOLUME button MENU button INFO button PL II EFFECT button PL II MODE button FM/XM MEMORY button ZOOM button SLEEP button SLOW, MO/ST button DIMMER button Insert Remote Batteries DVD button... -
Page 8: Connecting The Speakers
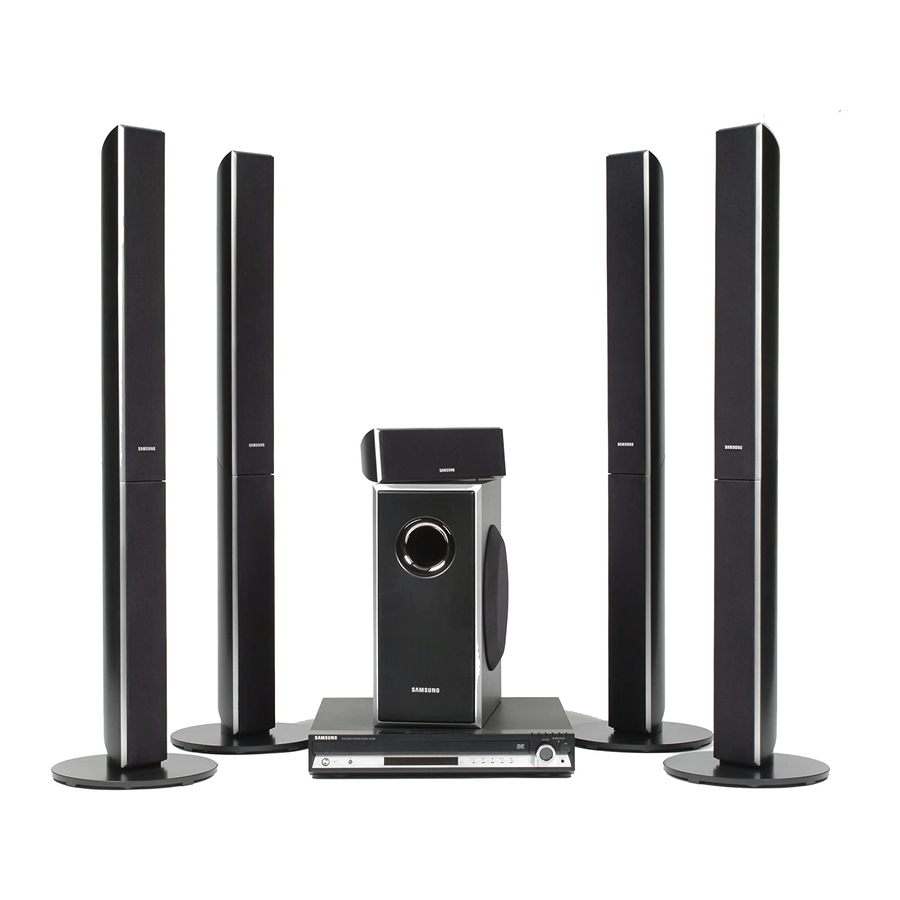
Connecting the Speakers Before moving or installing the product, be sure to turn off the power and disconnect the power cord. HT-Q80 Rear Speaker (R) Center Speaker Front Speaker (R) Subwoofer Position of the Home Theater Selecting the Listening Position •... -
Page 9: Connecting The Optional Wireless Receiving Amplifier
Connecting the optional Wireless Receiving Amplifier To connect the rear speakers wirelessly, you have to additionally purchase the wireless receiving module and TX card from your Samsung retailer. HT-Q80 WIRELESS RECEIVER MODULE Rear Speaker (L) Rear Speaker (R) HT-TQ85 Rear Speaker (L) -
Page 10: Connecting The Video Out To Tv
Connecting the optional Wireless Receiving Amplifier Resetting Wireless Communication Reset the system if a communication failure occurs, or if the Link indicator (blue LED) on the wireless receiver does not light up and the "REAR CHK" message blinks on the main unit's display. Reset the system while the main unit and the wireless receiver module (SWA-3000) are in Power Standby mode. -
Page 11: Connecting The Hdmi In/Out
Connecting the HDMI IN/OUT HDMI (High-Definition Multimedia Interface) is a next generation TV-type digital interface specification that enables transmitting digital video and audio over a single cable. In addition, it enables you to enjoy multi-channel digital audio. Connect the HDMI IN Port of this unit and the HDMI OUT Port of a set-top box or the DVD player. -
Page 12: Connecting External Components
HDMI Function Resolution Selection • This function allows the user to select screen resolution for HDMI output. In Stop mode, press and hold the SD/HD (Standard Definition/High Definition)button on the remote control. • Resolutions available for the HDMI output are 480P, 720P and 1080i. •... -
Page 13: Connecting The Fm Antenna
Connecting the FM Antenna FM Antenna (supplied) Connect the FM antenna supplied to the FM 75Ω COAXIAL terminal. Slowly move the antenna wire around until you find a location where reception is good, then fas- ten it to a wall or other rigid surface. Cooling Fan The cooling fan supplies cool air to the unit to prevent overheating. -
Page 14: Before Using Your Home Theater
Your Home Theater is capable of playing DVD, CD, MP3/WMA and JPEG discs.Depending on the disc you are using, these instructions may vary slightly. Read the instructions carefully before using. To Operate your Samsung TV and the Home Theater with the HT-Q80/HT-TQ85's Remote Control Plug the main unit's... -
Page 15: Disc Playback
Disc Playback Press OPEN/CLOSE button to open the disc tray. Load a disc. • Place a disc gently into the tray with the disc’s label facing up. Press DISC SKIP button. • Rotate the carousel tray so you can load the third, fourth, and fifth discs. -
Page 16: Mp3/Wma-Cd Playback
MP3/WMA-CD Playback Data CDs (CD-ROM, CD-R, CD-RW) encoded in MP3/WMA format can be played. Press the OPEN/CLOSE button to open the disc tray, and then load the MP3/WMA disc. • The MP3/WMA menu screen will appear and playback will start. •... -
Page 17: Jpeg File Playback
JPEG File Playback Images captured with a digital camera or camcorder, or JPEG files on a PC can be stored on a CD and then played back with this Home Theater. Slide Mode Place the JPEG disc on the disc tray. Press the OPEN/CLOSE button. -
Page 18: Divx Playback
DivX Playback The functions on this page apply to DIVX disc playback. Skip Forward/Back During playback, press the button. • Goes to the next file whenever you press button, if there are over 2 files in the disk. • Goes to the previous file whenever you press button, if there are over 2 files in the disk. -
Page 19: Checking The Remaining Time
Checking the Remaining Time Press the REMAIN button. • For checking the total and remaining time of a title or chapter being played. Each time the REMAIN button is pressed DVD- DVD- VIDEO AUDIO TITLE ELAPSED GROUP ELAPSED TITLE REMAIN GROUP REMAIN CHAPTER ELAPSED TRACK ELAPSED... -
Page 20: Repeat Playback
Repeat Playback Repeat playback allows you to repeatedly play a chapter, title, track (song), or directory (MP3 file). JPEG Press REPEAT button. • Each time the button is pressed during playback, the repeat playback mode changes as follows: DVD- DVD- VIDEO AUDIO CHAPTER... -
Page 21: Step Function
Step Function Press STEP button. • The picture moves forward one frame each time the button is pressed during playback. Angle Function This function allows you to view the same scene in different angles. Press Cursor but- Press INFO button. ton to move to ANGLE ( ) display. -
Page 22: Bonus Group / Navigating Pages
Bonus Group / Navigating Pages Bonus Group DVD- AUDIO Some DVD-Audio discs have an extra ‘bonus’ group that requires a 4-digit key number to access. See the disc packaging for details and the-key number. When you play a DVD-Audio disc that has a bonus group, the key number input screen appears automatically. -
Page 23: Playing Media Files Using The Usb Host Feature
Playing Media Files using the USB HOST feature You can enjoy media files such as pictures, movies and music saved in an MP3 player, USB memory or digital camera in high quality video with 5.1 channel home theater sound by connecting the storage device to the USB port of the home theater. Press the FUNCTION Connect the USB button on the main unit... -
Page 24: Moving Directly To A Scene/Song
Moving Directly to a Scene/Song Moving to a Title/Track Press Cursor , buttons or numeric buttons to select Press INFO button. the desired title/track and then press ENTER button. 001/040 0:00:37 01/05 03/05 001/002 0:00:01 Moving to a Chapter Moving to a Specific Time Press Cursor but- Press Cursor ,... -
Page 25: Setting The Language
Setting the Language OSD (On-Screen Display) language is set to English by default. In Stop mode, press MENU button. MOVE ENTER EXIT Note • To select another language, select OTHER and enter the language code of your country. (See page 82 for language codes) AUDIO, SUB TITLE and DISC MENU language can be selected. -
Page 26: Setting Tv Screen Type
Setting TV Screen type Depending on your TV type (Wide Screen or conventional 4:3), you can select the TV's aspect ratio. In Stop mode, press MENU button. MOVE ENTER EXIT Press Cursor button to move to ‘TV DISPLAY’ and then press ENTER button. -
Page 27: Setting Parental Controls (Rating Level)
Setting Parental Controls (Rating Level) Use this to restrict playback of adult or violent DVDs you do not want children to view. In Stop mode, press MENU button. MOVE ENTER EXIT Press Cursor Press Cursor , button button to move to to select the desired rating ‘PARENTAL’... -
Page 28: Setting The Wallpaper
MOVE SELECT RETURN EXIT Select this to set the Select this to set the desired Samsung Logo image as image as your wallpaper. your wallpaper. JPEG To select one of the 3 wallpaper settings you've made In Stop mode, press MENU button. -
Page 29: Dvd Playback Mode
DVD Playback Mode Some DVD-Audio discs contain DVD-Video as well as DVD-Audio. To play back the DVD-Video portion of the DVD-Audio disc, set the unit to DVD-Video mode. Press the MENU button while the disc tray is open. MOVE ENTER EXIT Press Cursor button... -
Page 30: Setting The Delay Time
Setting the Delay Time If the speakers cannot be placed at equal distances from the listening position, you can adjust the delay time of the audio signals from the center and rear speakers. In Stop mode, press MENU button. MOVE ENTER EXIT Setting up the Speaker Delay Time... -
Page 31: Setting The Test Tone
Setting the Test Tone Use the Test Tone feature to check the speaker connections. In Stop or no Press Cursor button to move to disc mode, ‘Audio’ and then press MENU press ENTER button. button. MOVE ENTER MOVE ENTER EXIT EXIT Press RETURN button to return to the previous level. -
Page 32: Setting The Audio
Setting the Audio You can adjust the balance and level for each speaker. When adjusting the audio quality using the setup screen Method 1 In Stop mode, press MENU button. MOVE ENTER EXIT Press Cursor button to move to ‘SOUND EDIT’... -
Page 33: Av Sync Setup
AV SYNC Setup Video may look slower than the audio if it is connected to a digital TV. If this occurs, adjust the audio delay time to to match the video. Press Cursor Press the MENU button. to move to ‘Audio’ and then press ENTER button. -
Page 34: Dolby Pro Logic Ii Mode
Dolby Pro Logic II Mode You can select the desired Dolby Pro Logic II audio mode. Press PL II MODE button. • Each time the button is pressed, the mode changes as follows. Note • When selecting Pro Logic II mode, connect your external device to the AUDIO INPUT jacks (L and R) on the player. -
Page 35: Listening To Radio
Listening to Radio Remote Control Unit Press the FM/XM Tune in to the button and select desired station. the FM band. Automatic Tuning 1 When is pressed, a preset broadcast station is selected. Press and hold TUNING/CH to Automatic Tuning 2 automatically search for active broadcasting stations. -
Page 36: Before Using Xm Satellite Radio
Before Using XM Satellite Radio What is XM satellite Radio? XM Satellite Radio is the satellite radio service with millions of listeners across the U.S., broadcasting live daily. XM’s channel lineup includes more than 160 digital channels of choice from coast to coast: 68 commercial-free music channels, featuring hip hop to opera, classical to country, bluegrass to blues;... -
Page 37: Xm Display Mode
XM Display Mode The XM features described here only operate when the optional XM antenna is connected to the main unit. Press the XM DISPLAY button. • Each time the XM DISPLAY button is pressed, the mode changes as follows: CHANNEL NAME/NUMBER CHANNEL CATEGORY ARTIST NAME/SONG TITLE... -
Page 38: Xm Search Mode
XM Search Mode Press the XM SEARCH button. • Each time the XM SEARCH button is pressed, the mode changes as follows: CHANNEL SEARCH CATEGORY SEARCH PRESET SEARCH • Channel Search Mode : Press TUNING/CH (or button on the main unit) to move to the desired channel. •... -
Page 39: Convenient Functions
Convenient Functions Sleep Timer Function You can set the time that the Home Theater will shut itself off. Press SLEEP button. • "SLEEP" will be displayed. Each time the button is pressed, the preset time changes as follows: 10 To confirm the sleep timer setting, press SLEEP button. •... -
Page 40: Operating A Tv With The Remote Control
TV. • If you do not set the remote control with the code for your brand of TV, the remote control will work on a Samsung TV by default. TV Brand Code List Brand... -
Page 41: Before Calling For Service
Refer to the chart below when this unit does not function properly. If the problem you are experiencing is not listed below or if the instruction below does not help, turn off the unit, disconnect the power cord, and contact the nearest authorized dealer or Samsung Electronics Service Center. Symptom Check/Remedy Disc tray does not open. -
Page 42: Cautions On Handling And Storing Discs
Cautions on Handling and Storing Discs Small scratches on the disc may reduce sound and picture quality or cause skipping. Be especially careful not to scratch discs when handling them. Handling discs Do not touch the playback side of the disc. Hold the disc by the edges so that fingerprints will not get on the surface. -
Page 43: Usb Host Feature Supported Products
Optio-S50 Pentax Digital Camera Optio 33LF Pentax Digital Camera YP-T5 VB Optio MX Pentax Digital Camera YP-53 Digimax-420 Samsung Digital Camera Digimax-400 Samsung Digital Camera Sora PDR-T30 Toshiba Digital Camera Multi Card Reader Coolpix 5900 Nikon Digital Camera Coolpix S1... -
Page 44: Speaker Installation
SAMSUNG will repair or replace this product, at our option and at no charge as stipulated herein, with new or reconditioned parts or products if found to be defective during the limited warranty period specified above. All replaced parts and products become the property of SAMSUNG and must be returned to SAMSUNG.