Table of Contents
Advertisement
Available languages
Available languages
מאושר
לטיסה
0044
DeVilbiss BLUE™ Positive Airway Pressure Device Instruction Guide
DV63 DeVilbiss
Standard Plus -סדרת ה
®
CPAP DV64 DeVilbiss AutoPlus
™DeVilbiss BLUE הוראות למכשיר לחץ אוויר חיובי
CE0044 הנם בתקןDV63E & DV64E מכשירים מסדרת
. אינם בתקן זהDV63A & DV64A מכשירים מסדרת
Assembled in the USA. Not manufactured with natural rubber latex
-ו
®
.מורכבים בארה"ב. מיוצר ללא גומי לייטקס טבעי
DV63E & DV64E series devices are CE0044
DV63A & DV64A series devices are not
HE
בלבדRX
EN
RX ONLY
Advertisement
Table of Contents

Related Manuals for DeVilbiss DV63 Standard Plus


Summary of Contents for DeVilbiss DV63 Standard Plus
- Page 1 .מורכבים בארה"ב. מיוצר ללא גומי לייטקס טבעי CE0044 הנם בתקןDV63E & DV64E מכשירים מסדרת . אינם בתקן זהDV63A & DV64A מכשירים מסדרת DeVilbiss BLUE™ Positive Airway Pressure Device Instruction Guide RX ONLY Assembled in the USA. Not manufactured with natural rubber latex DV63E &...
- Page 2 שלךCPAP-התחלה מהירה - הפעלת ה לחות דירוג לחץ טיפול )לחות (אופציונלי הפסקת הטיפול תחילת הטיפול בעת ההפעלה, תכונה זו מגבירה את המכשיר בהדרגה ללחץ יש לנקות, למלא ולהתקין את הרשום כדי לסייע לך להירדם בקלות רבה יותר. ניתן להגדיר :כיבוי...
- Page 3 HE - 2 ................... עברית EN - 32 ................ENGLISH תוכן העניינים 51 - HE ..............תפריטי הגדרות שעון 2 - HE ........... שלךCPAP-התחלה מהירה - הפעלת ה 15 - HE ..............שעון - זמן נוכחי 4 - HE ................הגדרות סמלים 15 - HE ..................פורמט...
- Page 4 מאווררות המומלצות על ידיCPAP יש להשתמש במכשיר רק עם מסכות - פסולת אלקטרונית וציוד אלקטרוניEU- של הEU/2012/19 , הרופא שלך או מטפל נשימתי. הדבר כולל מסכת אף, מסכת פניםDeVilbiss . אין להשתמשCPAP מלאה, כרית אף וצינורית אף המעוצבות לשימוש עם...
- Page 5 בלבד. יש להשתמש ביציאה רק עם אביזרים המאושרים לשימוש על ידי C˚42 ....... חיבור לאספקת חשמל חיצונית . אין לנסות לחבר מכשיר אחר ליציאה זו, היות והוא עשוי לפגועDeVilbiss הציוד אינו מתאים לשימוש בנוכחות תערובת הרדמה דליקה עם אוויר או עם...
- Page 6 מבוא מטרות שימוש . שלך מאריזתו וזהה את כל הפריטיםCPAP-ראשית כל, הוצא את ה OSA- מיועדת לשימוש בטיפול בDeVilbiss IntelliPAP2/DeVilbiss BLUE סדרת תוכן העניינים במטופלים הנושמים באופן ספונטני השוקלים 03 ק"ג (66 פאונד) ומעלה, באמצעות .יישום לחץ אוויר חיובי. המכשיר משמש בסביבות ביתיות וטיפוליות...
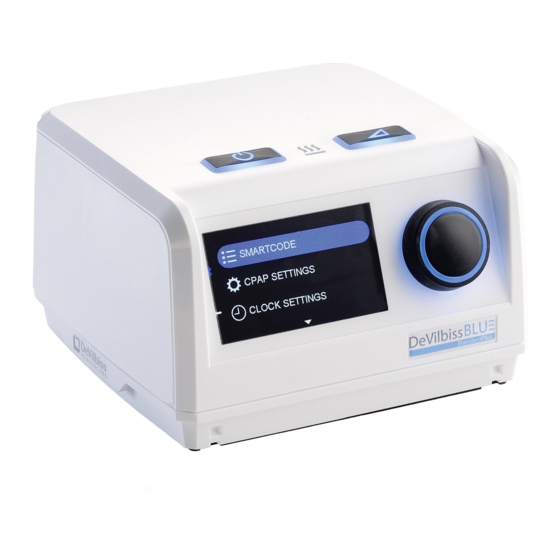
- Page 7 חלקים חשובים הבנת התצוגה שלך תפריט צד: סמלי מצב מסך הטיפול: מפוח פועל )שעון (אם פעיל מחוון פעולת המפוח )סמלי מצב (ראה תפריט צד מחוברUSB מחוון מחוון מצב לחץ נוכחי מסופק Bluetooth מחוון אות מחוון אוקסימטר מחובר פועלSmartFlex מחוון מחוון...
- Page 8 חלקים חשובים הבנת המכשיר שלך הבנת אפשרויות הבקרה שלך לחצן הפעלת/כיבוי מפוח לחצן אפשרות דירוג עבור מחמם פועל / משטח חםLED מחוות )(פעיל רק עם מכשיר האדים המחומם האופציונלי רמקולים צג לחצן הפעלת/כיבוי לחצן אפשרות דירוג ידית מסתובבת מפוח - מתחיל - מפעיל...
- Page 9 הרכבת המערכת .5. הכן את המסכה וחבר אותה לצינור .1. הנח את רכיבי המערכת על משטח יציב ,הערה - עבור דגמים עם אפשרות מכשיר אדים חמים .אנא עיין במדריך מכשיר האדים לצורך התקנת המכשיר 2. חבר את כבל החשמל שבחלקו האחורי של .המכשיר...
- Page 10 תכונות והגדרות למכשיר שלך יש תכונות והגדרות רבות להתאמה פריטי תפריט ראשי תפריטים לתצוגה מהירה אישית ושיפור חוויית הטיפול שלך. רבות מתכונות :ללא אפשרות מכשיר אדים אלו ניתנות להתאמה מלאה, ואחרות ניתנות ,התצוגה המהירה מציגה סקירה של הטיפול שלך .להתאמה...
- Page 11 תכונות והגדרות SmartCode תפריטי נתונים ® SmartCode Rx תפריט המשנה של . מציעות סקירה מפורטת של הטיפול דרך קוד מוצפןSmartcode ערכות נתוני הנתונים המפוענחים כוללים מידע הדרוש לחברות ביטוח רבות לצורך המשך הכיסוי תפריט משנה זה מאפשר לספק שלך להתאים את המינון שלך באמצעות הזנת www.
- Page 12 תכונות והגדרות CPAP תפריטי הגדרות RX לחץ SmartFlex™ Pressure Relief Comfort טכנולוגיית לשחרור הלחץ מנמיכה מעט את הלחץ במהלך הנשיפה ומקלהSmartFlex-כאשר אפשרות זו מופעלת, תכונת ה Rx בחר באפשרות לחץ עליך לנשוף בלחץ שנרשם לך. במקרה של אירוע נשימתי במהלך השימוש בתכונת שחרור הלחץ, מכשיר זה יכבה .את...
- Page 13 תכונות והגדרות CPAP תפריטי הגדרות הגדרות צנרת הגדרת לחות אפשרויות דירוג התכונה מאפשרת התאמה לטיפול מיטבי בהתבסס על בעת ההפעלה, תכונה זו מגבירה את המכשיר בהדרגה (ההגדרה זמינה רק אם יש .מידות הצינורות שלך .ללחץ הרשום כדי לסייע לך להירדם בקלות רבה יותר ברשותך...
- Page 14 תכונות והגדרות CPAP תפריטי הגדרות אפשר תפריט הגדרות בהירות הגדרות עוצמת קול ראשית .מאפשר התאמה של הצג ושולט בבהירות )= מאופשר (מופעל מאפשר התאמה של עוצמת קול .ההתראה להודעות למטופל 3. בחר פעילות או 1. בחר בהירות מאפשר הפעלה או כיבוי של תכונת ההפעלה/הפסקה המתנה...
- Page 15 תכונות והגדרות תפריט הגדרות שעון פורמט שעון - זמן נוכחי שעון מעורר 1. בחר זמן נוכחי 1. בחר פורמט שעון של . שלך להעיר אותך באמצעות התראהCPAP-שעון מעורר מאפשר ל 21 או 42 שעות 1. בחר שעון מעורר 4.
- Page 16 תכונות והגדרות תוספות תפריט זה מאפשר חיבור מכשירים מאושרים של אוקסימטר מודם אלחוטי , אוקסימטרDV6WM כמו מודם אלחוטיDeVilbiss Nonin WristOx2 מידע אודות האוקסימטר האלחוטי האופציונלי DV6WM-מידע אודות ה . ומכשירים אחריםNonin WristOx2 אלחוטי ® ® .האופציונלי לילי 1. בחר אוקסימטר...
- Page 17 תכונות והגדרות תוספות מידע .מאפשר לך לצפות בפרטים בסיסיים של המכשיר מכשיר אחר ,2. סובב את הידית כדי לעבור בין מסכי מדד הציות '1. בחר 'מידע .1. בחר במכשיר הרצוי .BIOS-המספר הסידורי, החומרה וה 2. מסך פרטי מכשיר .נוספים SE-DV64-HE 17 - HE...
- Page 18 הודעות למטופל 3. הודעות מכשירים נלווים הודעות אלו עשויות להיות מוצגות כאשר מכשירים נלווים נמצאים בשימוש. ניתן יתכן שהודעות שונות יוצגו במהלך הטיפול שלך; חלקן יכללו התראת שמע שעצמתה .להסירן מהצג באמצעות לחיצה על לחצן או הנעת החוגה .נקבעת בהתאם לעוצמת הקול הראשית הודעה...
- Page 19 DEVILBISS SMARTLINK מערכת ניהול טיפול מסוג ® . כלולה בכל מכשיר. בשילוב עם התוכנה הבלעדית שלנו, היא מסייעת לספק שלך לעקוב אחר יעילות הטיפול ותדירות השימוש שלך במכשירDeVilbiss SmartLink טכנולוגיית .SmartLink או להורידו ישירות למחשב עליו מותקנת תוכנתSD ניתן לאסוף מידע באמצעות כרטיס...
- Page 20 DC/פעולת סוללה :DC ישנן כמה אפשרויות למקור חשמל אינו זמין, בטיסות או בכל פעם שיש צורך בניידות. לקבלתAC ) לשימוש כמקור חשמל לגיבוי כאשר חשמלDV6EB( מציעה סוללה אופציונלית ומותאמת-אישיתDevilbiss .1 .פרטים אנא עיין במדריך המצורף לסוללה . האופציונליDC-, באמצעות כבל הV DC 12 2. באפשרותך להפעיל את המכשיר שלך בעזרת מקור חשמל...
- Page 21 תוספת חמצן אזהרה - שימוש בחמצן ,חמצן מעודד התלקחות. כדי להימנע מפציעה אפשרית, אין לעשן במהלך השימוש במכשיר זה עם תוספת חמצן. אין להשתמש במכשיר זה ליד חפצים חמים .חומרים דליקים או להבות חשופות תמיד יש להדליק את המכשיר לפני הדלקת מקור החמצן. כבה את מקור החמצן לפני כיבוי המכשיר.. אף פעם אל תאפשר למקור החמצן לפעול באופן רציף בעודו .מחובר...
- Page 22 מתאם מהדק לסוללת DC כפל חשמל (דורש כבל חשמלDC AC כבל חשמל כבל חשמל כבל חשמל AC כבל חשמל DV6 סוללת (מתאם לשקע DC DV6X-619( Devilbiss של )(אוסטרליה ) (בריטניהAC ) (אירופהAC )(ארה"ב אספקת חשמל )מצת #DV51D-696 DV6EB# DV51D-609#...
- Page 23 ניקוי אזהרה .על מנת להימנע מהתחשמלות, תמיד נתק את כבל החשמל ממקור החשמל בשקע לפני ניקוי זהירות - אף פעם אל תשטוף או תניח את המכשיר במים. אף פעם אל תאפשר לנוזלים להיכנס אל תוך אחד מהמתגים או היציאות אל מסנן האוויר, או מסביבם. הדבר יגרום לנזק .למוצר.
- Page 24 ניקוי צנרת מסננים מסנן חלקיקים זעירים אופציונלי .מסנן כניסת אוויר - בדוק בכל 01 ימים ונקה במידת הצורך .יש לנקות את הצינור בכל יום - בדוק בכל 01 ימים והחלף זהירות - תפקוד תקין של המסנן חשוב לתפעול המכשיר ומיועד .1.
- Page 25 השלכת המוצר תחזוקה האריזה החיצונית מיוצרת מחומרים ידידותיים לסביבה, שיכולים לשמש כחומרי גלם אזהרה משניים. אם אינך זקוק לאריזה זו עוד, קח אותה למתקן המקומי למחזור והשלכת סכנת התחשמלות – אין לנסות לפתוח או להסיר את המארז; הרכיבים הפנימיים .פסולת, בהתאם לתקנות הרלוונטיות במיקומך אינם...
- Page 26 פתרון בעיות אזהרה סכנת התחשמלות – אין לנסות לפתוח או להסיר את המארז; הרכיבים הפנימיים אינם מיועדים לטיפול המשתמש. אם יש צורך בטיפול, פנה לספק הציוד שלך לקבלת .הוראות או שירות. פתיחת המכשיר או ניסיון לטפל בו יבטלו את האחריות פתרון...
- Page 27 .1. עיין בהוראות ההרכבה כדי לוודא שכל המגעים מחוברים היטב 1. מחולל הזרימה אינו מחובר כיאות לבסיס העגינה של .מכשיר האדים מופיעה על הצג .DeVilbiss שלDV6 2. הוסף מכשיר אדים חמים מסדרת שלך אינו מצויד במכשיר האדיםCPAP-2. מכשיר ה .האופציונלי SE-DV64-HE...
- Page 28 מפרטים CPAP ' ס"מ) עx 5.9” )15 ' ס"מ) רx 6.1” )15.5 'גודל................................. 7.3” (4.9 ס"מ) ג בלבד; 57.1 ק"ג (8.3 פאונד) כולל מכשיר אדיםCPAP )משקל ..........................9.0 ק"ג (39.1 פאונד 100-240V~, 50/60 Hz ....................................AC דרישות חשמליות VDC, 5.2 Amps 11-17 ....................................DC דרישות חשמליות AC צריכת...
- Page 29 מפרטי מסנן מסנן רגיל ......................................חלקיקים בגודל > 0.3 מיקרון מסנן חלקיקים זעירים אופציונלי................................חלקיקים בגודל > 3.0 מיקרון )ISO 17510-1:2007- (בהתאם לDV6HH דיוק לחץ דינמי לטווח-קצר עם או ללא מכשיר האדים דיוק לחץ דיוק לחץ עם מכשיר אדיםCPAP ...
- Page 30 .מכשיר זה מיועד לשימוש בסביבה האלקטרומגנטית המפורטת להלן. על הלקוח או המשתמש במכשיר זה להבטיח שהוא ישמש בסביבה כזו אכיפה אלקטרומגנטית - הנחייה תאימות בדיקת פליטה חייב לפלוט אנרגיה אלקטרומגנטית כדי לבצע אתDeVilbiss שלDV64- וDV63 מסדרתCPAP-ה RF פליטות 2 קבוצה .הפונקציה עבורה הוא נועד. הוא עשוי להשפיע על ציוד חשמלי הנמצא בסביבתו...
- Page 31 סביבה אלקטרומגנטית - הנחייה רמת תאימות IEC 60601 רמת בדיקה של בדיקת חסינות השדות המגנטיים של תדר החשמל צריכים להיות טיפוסיים לסביבה 06/05 שדהHz תדר חשמל A/m 30 A/m 30 .מסחרית או סביבת בית חולים טיפוסית IEC 61000-4-8 מגנטי מטלטל ונייד. גודלRF יש לשמור מרחק בין מכשיר זה לציוד שידור המרחק...
- Page 32 QUICK START – OPERATING YOUR CPAP THERAPY PRESSURE RAMP HUMIDIFICATION )optional( Humidification When activated, this feature gradually ramps up the device to Starting Therapy Stopping Therapy Clean, fill and install humidifier To turn blower on: To turn blower off: prescription pressure to help you fall asleep easier. Ramp time chamber daily.
-
Page 33: Table Of Contents
TABLE OF CONTENTS Quick Start - Operating Your CPAP ..............EN - 32 Clock Settings Menus .................. EN - 15 Symbol Definitions .................... EN - 4 Clock - Current Time ................EN - 15 Format ..................... EN - 15 Important Safeguards ..................EN - 4 Wake-Up Alert .................. -
Page 34: Symbol Definitions
The device should be used only with vented CPAP masks recommended by recycled per EU Directive 2012/19/EU-Waste Electrical & Electronic Equipment DeVilbiss, your physician or respiratory therapist. These include nasal, full face, nasal pillow and nasal cannula masks designed for CPAP use. Do Not use a non-vented IMPORTANT SAFEGUARDS mask with this CPAP device. - Page 35 • Only use a DeVilbiss DC Power Cord and Battery Adapter Cable. Use of any other and discontinue use. Contact your home care provider. system may cause damage to the device.
-
Page 36: Introduction
Contents Intended Use The DeVilbiss IntelliPAP2/DeVilbiss BLUE Series is intended for use in treating OSA in spontaneously breathing patients 30 Kg (66 lbs) and above by means of application of positive air pressure. The Device is to be used in Home and Healthcare Environments. -
Page 37: Important Parts
IMPORTANT PARTS Understanding Your Display Therapy Screen: Blower On Inset: Status Icons Clock (if active) Blower On Indicator Status Icons (see inset) USB Connected Indicator Mode Indicator Current delivered Bluetooth Signal Indicator pressure Oximeter Connected Indicator SmartFlex On Indicator Wake-Up Alert Indicator Ramp On and Time Humidifier On and Setting Remaining Indicator... -
Page 38: Understanding Your Controls
IMPORTANT PARTS Understanding Your Controls Understanding Your Device Blower On/Off Button Ramp Button Heater On / Hot Surface LED Indicator (only active with optional heated humidification) Display Speaker Blower ON / OFF Ramp Button - starts Button - starts and and stops Ramp Rotary Knob stops Therapy... -
Page 39: System Assembly
SYSTEM ASSEMBLY 1. Place system components on a stable surface. 5. Prepare mask and connect to tubing. NOTE – For models with heated humidification option, please refer to humidifier guide for device set up. 2. Insert power cord into back of device and wall outlet. 6. -
Page 40: Features And Settings
FEATURES AND SETTINGS Your device has many features and settings to Main Menu Items Quick View Menus personalize and improve your therapy experience. Many Without humidifier option: Quick View shows an overview of your therapy, as well of these are fully adjustable, while others may have as more-detailed information for a preset number of limited or no adjustability. -
Page 41: Smartcode ® Data Menus
FEATURES AND SETTINGS SmartCode ® Data Menus SmartCode data sets offer a detailed look at your therapy through an encrypted code. SmartCode Rx Submenu The decrypted data includes info required by many insurers to continue coverage of your This submenu allows your provider to adjust your prescription through input of an equipment. -
Page 42: Cpap Settings Menus
FEATURES AND SETTINGS CPAP Settings Menus RX Pressure SmartFlex™ Pressure Relief Comfort Technology When activated, the SmartFlex pressure relief feature helps make it easier for you to exhale against your prescribed pressure by slightly Select Rx Pressure lowering the pressure during exhalation. If you experience a respiratory event when using the pressure relief function, the device will automatically deactivate this function until normal breathing resumes. -
Page 43: Ramp Options
FEATURES AND SETTINGS CPAP Settings Menus Humidity Settings Ramp Options Tubing Settings (Setting only applicable if you Allows adjustment for optimal therapy based on your When activated, this feature gradually ramps up have the optional heated tubing dimensions. the device to prescription pressure to help you fall humidifi cation.) asleep easier. -
Page 44: Master Volume Settings
FEATURES AND SETTINGS CPAP Settings Menus Brightness Settings Enable Menu Master Volume Settings Allows adjustment of display and controls brightness. Allows adjustment of alert volume for = Enabled (ACTIVATED) patient messages. 1. Select Brightness 3. Select Active or Allows Auto-Start/Stop feature and Notifi cations to be Standby activated or deactivated. -
Page 45: Clock Settings Menus
FEATURES AND SETTINGS Clock Settings Menu Clock - Current Time Format Wake-Up Alert 1. Select Current Time 1. Select 12 or 24 hour Wake up alert allows your CPAP to also function as an alarm clock. Clock Format 1. -
Page 46: Add-Ons
FEATURES AND SETTINGS Add-Ons This menu allows the connection of DeVilbiss approved Oximeter Wireless Modem devices such as DV6WM Wireless Modem, Nonin ® Information on optional Nonin WristOx2 wireless oximeter. Information on optional WristOx2 wireless oximeter, and other devices. ®... -
Page 47: Other Device
FEATURES AND SETTINGS Add-Ons Info Allows you to see basic device information. Other Device 1. Select Info. 2. Turn knob to scroll through Compliance Meter, 1. Select desired Device. Serial Number, Firmware, and BIOS screens. 2. Other Device information screen. -
Page 48: Patient Messages
PATIENT MESSAGES 3. Add-On Device Messages These messages may be displayed when Add-On items are in use, Dismiss from Display Various messages may be displayed during your therapy; some include an audible alert by Button Press or Knob Movement. that is controlled by Master Volume Setting. Displayed Message Condition for Occurrence ... -
Page 49: Patient Therapy Management System
® DeVilbiss SmartLink technology is included in every device. It is used by your provider in conjunction with our exclusive software to monitor the effectiveness of your therapy and how consistently you use the device. Information can be obtained through the use of an SD card or by direct download to a computer with SmartLink software installed. -
Page 50: Travel Information
Several DC power source options are available: DeVilbiss offers an optional, custom battery (DV6EB) for use as a backup power source when AC power is not available, when traveling by air, or any time portability is desired. Please refer to the guide included with your battery for details. -
Page 51: Supplemental Oxygen
SUPPLEMENTAL OXYGEN WARNING-OXYGEN USE • Oxygen supports combustion. To avoid possible physical injury, do not smoke while using this device with supplemental oxygen. Do not use this device near hot objects, volatile substances or sources of open flames. • Always turn on the device before turning on the oxygen source. Turn off the oxygen source before turning off the device. Never allow the oxygen source to run continuously while connected to the device if the device is not in use. -
Page 52: Replacement Items/Spare Parts
22 mm 15 mm Heated Humidifier with Standard Humidification - #DV6HH Heated Humidifier with PulseDose® Humidification upgrade - #DV6HHPD Power Items DeVilbiss DV6 AC power cord AC power cord (UK) AC power cord (EU) AC power cord DC power cord... -
Page 53: Cleaning
CLEANING WARNING To avoid electric shock, always unplug the power cord from the wall outlet power source before cleaning. CAUTION – Never rinse or place the device in water. Never allow liquids to get into or around any of the ports, switches or air filter; doing so will result in product damage. If this occurs, do not use the device. - Page 54 CLEANING Tubing Filters Air-Inlet Filter - Check every 10 days and clean as necessary. Optional Fine Particle Filter - Tubing should be cleaned daily. Check every 10 days and replace CAUTION – Proper filter function is important for the operation of the 1.
-
Page 55: Maintenance
MAINTENANCE PRODUCT DISPOSAL The outer packaging is made of environmentally friendly materials that can be used as WARNING secondary raw materials. If you no longer need this packaging, take it to your local Electric shock hazard - Do not attempt to open or remove the cabinet; there are recycling and waste disposal facility according to the applicable regulations for your no user-serviceable internal components. -
Page 56: Troubleshooting
TROUBLESHOOTING WARNING Electric Shock Hazard - Do not attempt to open or remove the cabinet; there are no user-serviceable internal components. If service is required, contact your equipment provider for instructions on obtaining service. Opening or attempting to service your device will void the warranty. Issue Possible Cause Remedy... - Page 57 1. The flow generator is not fully seated onto the humidifier 1. Refer to assembly instructions to ensure proper contact is made. visible on display cradle. 2. Your CPAP device is not equipped with the optional humidifier. 2. Add a DeVilbiss DV6 series heated humidifier SE-DV64-HE EN - 57...
-
Page 58: Specifications
SPECIFICATIONS CPAP Size ..........................................3.7” (9.4 cm) H x 6.1” (15.5 cm) W x 5.9” (15 cm) D Weight ....................................1.93 lbs (0.9 kg) CPAP only; 3.8 lbs. (1.75 kg) including humidifier Electrical Requirements AC ............................................100-240V~, 50/60 Hz Electrical Requirements DC ............................................11-17 VDC, 5.2 Amps Maximum Power Consumption (including humidifier) .................................65 watts max from AC power source Typical Power Consumption with Humidifier ............................................25 watts Typical Power Consumption without Humidifier ..........................................10 watts... - Page 59 Filter Specifications Standard Filter ................................................> 3.0 micron particles Optional Fine Particle Filter ............................................> 0.3 micron particles Dynamic Short-Term Pressure Accuracy with and without DV6HH Humidifier (Per ISO 17510-1:2007) Pressure Accuracy Pressure Accuracy Set Pressure CPAP only CPAP with Humidifier Waveform Volume [mL] Breath Rate [min-1]...
-
Page 60: Guidance And Manufacturer's Declaration
This device is intended for use in the electromagnetic environment specified below. The customer or user of this device should assure that it is used in such an environment. Emissions Test Compliance Electromagnetic Enforcement – Guidance RF Emissions The DeVilbiss DV63 and DV64 Series CPAP must emit electromagnetic energy in order to perform its intended function. Group 2 CISPR 11 Nearby electronic equipment may be affected. Class B... - Page 61 Immunity Test IEC 60601 Test Level Compliance Level Electromagnetic Environment - Guidance Power Frequency 50/60Hz Power frequency magnetic fields should be that of a typical location in a typical commercial 30 A/m 30 A/m Magnetic Field IEC 61000-4-8 or hospital environment. Portable and mobile RF communications equipment should be separated from the device V1 = 3 Vrms Conducted RF...
- Page 62 FRANCE +49 (0) 621-178-98-0 +33 (0) 2 47 42 99 42 DeVilbiss Healthcare LLC 100 DeVilbiss Drive Somerset, PA 15501 USA www.DeVilbissHealthcare.com 814-443-4881 800-338-1988 DeVilbiss Healthcare. DeVilbiss BLUE™, , הנם סימנים מסחריים רשומים של SmartCode-, ו...