Alcatel GO Flip User Manual
Sprint
Hide thumbs
Also See for GO Flip:
- User manual (60 pages) ,
- Manual (31 pages) ,
- Quick start manual (6 pages)

Related Manuals for Alcatel GO Flip


Summary of Contents for Alcatel GO Flip
- Page 1 User Guide [Gflip2_sprint_4044T_ug_en_20161122_d1]...
-
Page 2: Table Of Contents
Table of Contents Table of Contents ............................i Introduction..............................2 About the User Guide..........................2 Set Up Your Phone ............................3 Parts and Functions ..........................3 Battery Use ............................4 Insert the Battery ........................... 5 Remove the Battery ........................6 Charge the Battery ........................ - Page 3 Update Your Profile ........................21 Update Your PRL ........................22 Your Phone's Home Screen ........................23 Home Screen Basics........................... 23 Home Screen Layout ........................23 Status Bar ............................23 Customize the Home Screen ......................25 Change the Wallpaper ........................ 25 Phone Calls and Voicemail .........................
- Page 4 Send a Multimedia Message (MMS) ................... 47 Save and Resume a Draft Message ................... 48 New Messages Notification ......................48 Manage Message Conversations ....................48 Text and MMS Options ....................... 49 E-Mail ..............................49 Set Up an Email Account ......................50 Add another Email Account ......................
- Page 5 Send Pictures or Videos by Email, Messages or Bluetooth ............71 Camera Settings ..........................72 Switch between Camera and Video Mode .................. 72 Set Camera Functions ........................ 73 Productivity ..............................75 Calendar .............................. 75 Add an Event to the Calendar ..................... 75 View Calendar Events .........................
- Page 6 USB Storage Settings ......................... 99 Media Storage Settings ........................99 Application Storage Settings ......................100 Device Settings ............................101 Device Information Settings ......................101 Downloads Settings .......................... 102 Battery Settings ..........................103 Accessibility Settings......................... 103 System Updates Settings ........................104 Help Settings .............................
- Page 7 Getting Started The following set of topics will introduce you to your phone, help you get set up with service, provide an overview of the phone screen, and get you started with basic phone operations.
-
Page 8: Introduction
The following topics describe the basics of using this guide and your new phone. About the User Guide Thank you for purchasing your new Alcatel 4044T. The following topics explain how best to use this guide to get the most out of your phone. -
Page 9: Set Up Your Phone
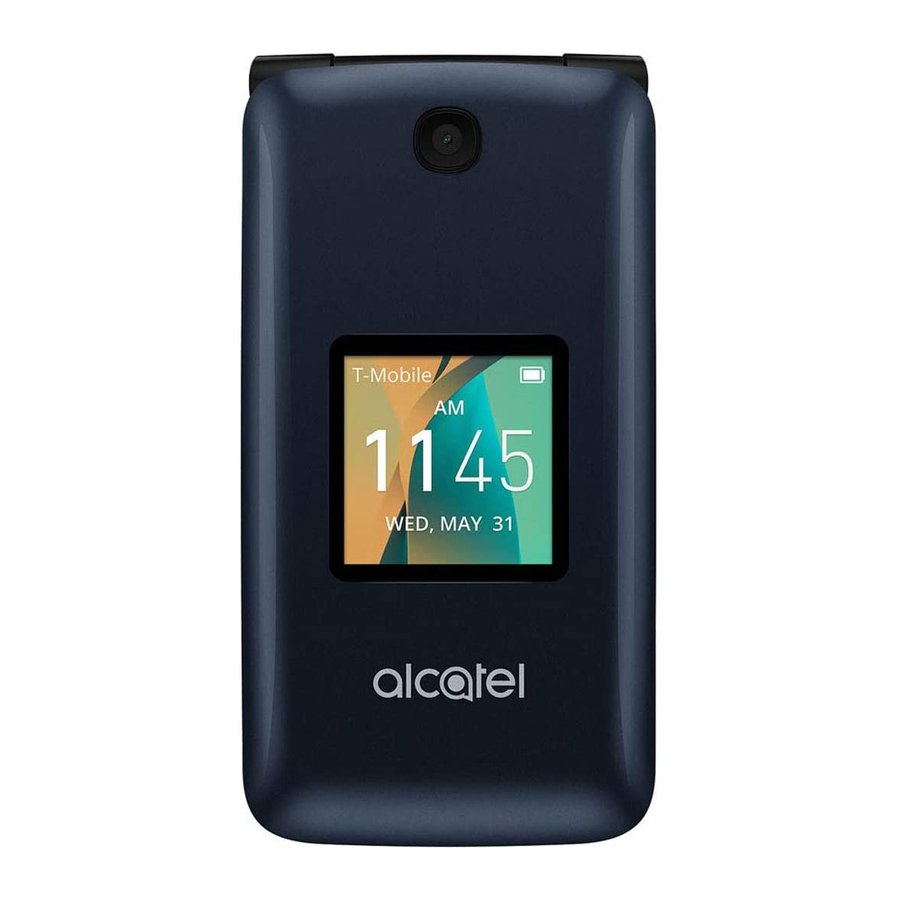
Set Up Your Phone The following topics give you all the information you need to set up your phone and wireless service the first time. Parts and Functions These topics illustrate your phone’s primary parts and key functions. Note: Your phone's screens and apps layouts are subject to change. This user guide uses sample images only. -
Page 10: Battery Use
Part Description Camera Takes pictures and records videos while facing the screen. Receiver Lets you hear the caller and automated prompts. Displays all the information needed to operate your phone, such as the Main screen call status, the Contacts list, and the date and time. Display the date, time and the notification of incoming calls or Sub screen messages. -
Page 11: Insert The Battery
Cleaning: Clean soiled terminals between battery and phone with a clean, dry cotton swab. Soiled terminals can result in a poor connection and prevent charging, etc. Insert the Battery Follow these instructions to insert your phone’s battery safely and properly. 1. -
Page 12: Remove The Battery
Remove the Battery Follow these instructions to remove your phone’s battery. Always power the phone off before removing the battery. 1. Remove the battery cover. Lift gently in the direction shown. 2. Remove the battery. Lift upward gently as shown. Charge the Battery Follow these instructions to charge your phone’s battery using either the included AC adapter or via a USB connection on your computer. - Page 13 Charge Using the AC Adapter 1. Plug the charger into the charging port of your phone. 2. Plug the AC adapter into an electrical outlet. The indicator light illuminates when charging starts. The light goes off when the battery is fully charged.
-
Page 14: Sim Card
2. Insert the large end of the USB cord into an external USB port on your computer. 3. After charging, remove the USB cable from both the phone and the computer. SIM Card The SIM card is an IC card containing phone number and other customer information. Your phone’s SIM card is preinstalled and should only be accessed if directed by a customer service representative. -
Page 15: Sd Card
Insert SIM Card Follow these instructions to insert a SIM card. Remember to power off your phone before inserting a SIM card. Note: Your phone’s SIM card is preinstalled. These instructions are for reference only. 1. Remove the battery cover and battery. (See Remove the Battery.) 2. -
Page 16: Insert An Sd Card
Insert an SD Card Follow these steps to insert an optional SD card (not included). Make sure to power your phone off before inserting or removing an SD card. 1. Remove the battery cover and battery. (See Remove the Battery.) 2. - Page 17 2. Remove the battery. 3. Push down the plastic spring and remove SD card. 4. Insert the battery. Align the contacts of the battery with the contacts in the phone. Set Up Your Phone...
-
Page 18: Turn Your Phone On And Off
5. Attach the battery cover. Make sure all the tabs are secure and there are no gaps around the cover. Turn Your Phone On and Off The instructions below explain how to turn your phone on and off. Turn Your Phone On ■... -
Page 19: Activation And Service
Activation and Service Before using your phone, you must set up your service with Virgin Mobile. You will need your phone’s serial numbers (MEID and ICC ID). These numbers can be found on the phone's packaging. For more information about your Virgin Mobile account, see Virgin Mobile Account Information and Help. -
Page 20: Complete The Setup Screens
Complete the Setup Screens The setup screens help you set up certain features and preferences on your phone. Once your phone has been turned on, you will see a Welcome message. You can then complete the setup process. Note: You may be able to complete the setup screens before your phone has been activated on your account. -
Page 21: Basic Operations
Basic Operations The following topics outline basic features and operations of your phone. Basics The following topics offer an overview of your phone’s basic operations. Home Screen and Applications (Apps) List Most of your phone’s operations originate from the home screen or the apps list. 1. -
Page 22: Capture Screenshots
For more information, see Basic Settings. Capture Screenshots You can use your phone’s End/power and home keys to capture screenshots. ■ Press and hold the Camera key and Volume down key at the same time to capture a screenshot of the current screen. ... - Page 23 Function/Service Perform basic mathematical calculations. Calculator Create and manage events, meetings, and appointments, organize your time Calendar and reminds you of important events. Place and receive calls, use voicemail, set up and manage contacts, and Phone more. Take and share pictures and videos. Camera/Video Set alarms, use a stopwatch, set a timer.
-
Page 24: Phone Number
Phone Number Follow the instructions below to display your phone’s wireless phone number. 1. From app list, press Settings > Device > Device Information. 2. Press Phone Number. You will see the number listed under Phone number. Airplane Mode Airplane mode turns off all functions that emit or receive signals, while leaving your phone on so you can use apps that don’t require a signal or data. -
Page 25: Enter Text
To turn off airplane mode: 1. From app list, press Settings > Network & Connectivity. 2. Tap Airplane mode. 3. Press Navigation key to select Off to disable airplane mode. Your phone’s wireless connection features are now restored. Enter Text You can type on your phone using keyboards. -
Page 26: Update Your Phone
3. You will be prompted to enter the passcode. See Screen Lock Update Your Phone From time to time, updates may become available for your phone. You can apply updates through the Settings > Device > System Updates menu. Software Update Cautions During update: The phone cannot be used until the software update is complete. -
Page 27: Update Your Profile
Confirm Your Current Phone Software 1. From app list, press Settings > Device > Device Information. 2. Locate the Software version read-only field. Update Your Profile This option allows you to automatically update your online user profile information. If you choose to change your user name and select a new one online, you must then update the user name on your phone. -
Page 28: Update Your Prl
Update Your PRL This option allows you to download and update the PRL (preferred roaming list) automatically. 1. From app list, press Settings > Device > System Updates > Update PRL. 2. Follow the onscreen instructions. The phone will download and install the PRL update and you will see a confirmation when complete. -
Page 29: Your Phone's Home Screen
Your Phone's Home Screen The following topics describe how to use your phone’s home screen and understand the status bar. Home Screen Basics The home screen is the starting point for your phone’s applications, functions, and menus. Home Screen Layout Your home screen extends beyond the initial screen. - Page 30 Status bar/Status area Main Status Icons Icon Status ® Bluetooth active ® Wi-Fi active Vibrate Network (full signal) Network (roaming) 4G LTE data service 3G data service Airplane mode Alarm set Battery (charging) Battery (full charge) Notification Icons Icon Notification General numerical notifications (missed call, new mail, new message,etc.
-
Page 31: Customize The Home Screen
Customize the Home Screen Learn how to set the wallpaper. Change the Wallpaper Select and assign your phone’s background wallpaper. 1. From app list, press Settings > Personalization > Display > Wallpaper. 2. Press Wallpaper and press Navigation key to select from Gallery, Wallpaper, or Camera. 3. - Page 32 Making Connections The following set of topics will cover your phone’s ability to help you make connections, from phone calls and maintaining contacts, to text messages, email, Internet, and international services.
-
Page 33: Phone Calls And Voicemail
Phone Calls and Voicemail The following topics outline the use of your device’s phone app to place and receive calls, use voicemail, and more. Place and Answer Calls The following topics describe how to directly dial calls, how to answer incoming calls, and how to use the in-call screen options. -
Page 34: Call Using The Phone Dialer
Call Using the Phone Dialer The most “traditional” way to place a call is by using the phone’s dialer screen. 1. From app list, press Phone to display the phone screen. The phone app opens. 2. Tap the number keys on the keypad to enter the phone number. ... -
Page 35: Call Emergency Numbers
Troubleshooting Question: Call does not connect. Answer 1: Was the number dialed using the area code? If not, try dialing using the full 10-digit number including the area code. Answer 2: Are you in an area with poor wireless coverage? Try calling again from another area. Call Emergency Numbers You can place calls to 9-1-1 even if the phone’s screen is locked or your account is restricted. - Page 36 Answer an Incoming Call 1. When a call arrives, press to answer it. The call begins. 2. To end the call, press The call ends. Mute the Ringing Sound To mute the ringer without rejecting the call, you can press the Volume key down. Reject an Incoming Call ■...
-
Page 37: In-Call Screen Layout And Operations
In-Call Screen Layout and Operations While you’re on a call, you will see a number of onscreen options. In-Call Screen Layout ● Speaker : Route the phone’s audio through the speaker (On) or through the earpiece (Off). to activate Speaker to route the phone’s audio through the speaker. (You can Press adjust the speaker volume using the Volume key.) again to deactivate Speaker to use the phone’s earpiece. -
Page 38: Call From Call Log
2. Tap Contacts to display the Contacts list. The contacts list appears. 3. Press Navigation key to select a contact. 4. Press to call the number. 5. To end the call, press The call ends. Call from Call Log The call log list lets you quickly place calls to recent incoming, outgoing, or missed numbers. -
Page 39: Voicemail
The call log list appears. 2. Select an entry and press to display the Options details. 3. Select an entry and press to place a call. The phone dials the number. The call begins when the other party answers. 4. -
Page 40: Optional Calling Services
Optional Calling Services The following topics outline additional voice-related services available with your phone, including call services and more. Call Waiting When you’re on a call, your phone’s screen informs you that another call is coming in and displays the caller’s phone number (if it is available). -
Page 41: Call Forwarding
using this feature, the normal airtime rates will be charged for each of the two calls. 1. On the Phone screen, enter a number and press (or place a call from Log or Contacts). 2. Once you have established the connection, dial the second number. ... -
Page 42: Call Settings
To activate Call Forwarding: 1. From app list, press Settings > Network & Connectivity > Call Settings > Call Forwarding. The call forwarding menu appears. 2. Configure your options. Your call settings options are set. Call Settings Your phone’s Call Settings menu lets you configure your voicemail options and a number of other settings for the phone application. - Page 43 Select a menu item to display its options. Select your options and follow the prompts to set them. Your call settings options are set. TTY Mode A TTY (teletypewriter, also known as a TDD or Text Telephone) is a telecommunications device that allows people who are deaf, hard of hearing, or who have speech or language disabilities, to communicate by telephone.
-
Page 44: Contacts
Contacts The Contacts application lets you store and manage contacts from a variety of sources, including contacts you enter and save directly in your phone. Contacts Cautions Information saved in Contacts may be lost or changed if the battery is removed for a long period or left uncharged. - Page 45 The New Contact screen appears. 3. Use the keyboard to enter as much information as you want. Name Last name Company Mobile Phone Personal Email [Ringtone]:Press to change or delete ringtone for particular contact. ...
-
Page 46: View Contacts
3. To add the number to an existing contact, choose Add to Existing Contact. To add a new contact, choose Create new contact. For an existing contact, choose the contact name and press to select a number type for the new number. -
Page 47: Contacts Screen Layout
Contacts Screen Layout The following illustration show’s your Contacts app layout and describes the various features. All contacts tab Special dial tab Search Contact image Contact Item Description All contacts tab Show all contacts. Speed Dial tab Show speed dial contacts. Select to show contact’s details. -
Page 48: Delete A Contact
2. Tap a contact to view its details. The contact’s detailed listing appears. 3. Press > Edit. 4. Tap any field you want to change or add. See Add a Contact. 5. Add or edit the information, and then press to save. -
Page 49: Share A Contact
4. Press Delete. The contact is deleted. Share a Contact You can quickly share contacts using Bluetooth, Gmail, or text messaging. 1. From app list, press Contacts You will see the Contacts list. 2. Press a contact to display it, and then press >... -
Page 50: Back Up Contacts
Import Contacts from an SD Card or USB Storage 1. From app list, press Contacts You will see the Contacts list. 2. Press > Settings > Import Contacts/Export Contacts. You will see the Import Contacts/Export Contacts menu. 3. Press Import Contacts or Export Contacts. 4. - Page 51 2. Press > Settings > Import Contacts/Export Contacts. You will see the Import Contacts/Export Contacts menu. 3. Press Export Contacts. 4. Choose Memory card to confirm the export. 5. Follow the onscreen instructions and select contacts to complete the export. ...
-
Page 52: Messaging
Messaging With wireless service and your phone’s messaging capabilities, you have the opportunity to share information through many different channels and accounts, including personal and corporate email, and text and multimedia messaging. Text and Multimedia Messaging With text messaging (SMS), you can send and receive instant text messages between your wireless phone and another messaging-ready phone. -
Page 53: Send A Multimedia Message (Mms)
Note: Once you go over the 160-character limit, a new message is created but automatically joined into one when received. 4. When done, press to send the text message. Send a Multimedia Message (MMS) When you need to add a little more to a text message, you can send a multimedia message (MMS) with text and pictures, music, audio or video files, contact cards. -
Page 54: Save And Resume A Draft Message
Contacts. Select a contact from your phone. Camera. Select Camera to take a photo or a video. 7. Press to to send the MMS message. Save and Resume a Draft Message While composing a text or multimedia message, press continuously and press to save your message as a draft. -
Page 55: Text And Mms Options
Note: If you are concerned about the size of your data downloads, check the multimedia message size before you download it. Reply to a Message 1. From app list, press Messages 2. On the Messages screen, choose a conversation to open it. 3. -
Page 56: Set Up An Email Account
Set Up an Email Account Your phone supports several types of email accounts and allows you to have multiple email accounts set up at one time. Before setting up an email account, make sure you have the username (user ID), password, server name, etc., so you can get set up successfully. -
Page 57: Create And Send Email
The email account is added and you will begin receiving email for the account. Create and Send Email Compose and send email using any account you have set up on your phone. Increase your productivity by attaching files such as pictures, videos, or documents to your email messages. 1. -
Page 58: Open Email Messages
● Save to Local Draft (Send Later): While composing your message, press and a pop-up window will display whether to save as a draft. Note: To view your draft email messages, in the inbox, press > View Folders > Local Drafts. Note: To view your sent messages, in the inbox, press >... -
Page 59: Delete An Email Account
Delete an Email Account You can delete an email account from your phone if you no longer wish to receive messages for the account on your phone. 1. From app list, press E-Mail The email inbox opens. 2. Press >... - Page 60 The email inbox opens. 2. Press > View Folders > Inbox to see all your email inboxes at once. Refresh an Email Account Whatever your automatic synchronization settings are, you can also synchronize your sent and received email messages manually at any time. ...
-
Page 61: Internet And Social Networking
Internet and Social Networking The following topics describe how to connect to and use the Internet on your phone, and how to access popular social networking sites such as Facebook, Twitter, Hangouts, and more. Browser Your phone’s Web browser gives you full access to both mobile and traditional websites on the go, using 2G, 3G, 4G, or Wi-Fi data connections. - Page 62 The search results appear or a Web page opens. 3. Press Navigation key to locate the place you want to visit, and then press to confirm. Internet and Social Networking...
-
Page 63: Connectivity
Connectivity The following topics address your phone’s connectivity options, including Wi-Fi and Bluetooth. Wi-Fi Wi-Fi provides wireless Internet access over distances of up to 300 feet. To use your phone’s Wi-Fi, you need access to a wireless access point or “hotspot.” The availability and range of the Wi-Fi signal depends on a number of factors, including infrastructure and other objects through which the signal passes. -
Page 64: Wi-Fi Settings
Note: The next time your phone connects to a previously accessed secured wireless network, you will not be prompted to enter the password again, unless you reset your phone to its factory default settings or you instruct the phone to forget the network. Note: Wi-Fi networks are self-discoverable, which means no additional steps are required for your phone to connect to a Wi-Fi network. -
Page 65: Disconnect Wi-Fi
4. Configure your Wi-Fi settings. Disconnect Wi-Fi You may wish to disconnect from a connected Wi-Fi network without turning Wi-Fi off. 1. From app list, press Settings > Network & Connectivity > Wi-Fi. The Wi-Fi settings menu appears. 2. Select Available Networks and choose the name of the connected access point and then press to forget. -
Page 66: Bluetooth Information
Bluetooth Information Bluetooth is a technology that enables wireless connection with PCs, Bluetooth devices with hands-free features, etc. Function Description Audio output Listen to music, etc., wirelessly. Hands-free calls Call hands-free, using Bluetooth-capable hands-free devices and headsets. Data exchange Exchange data with Bluetooth devices. Enable the Bluetooth Feature Use the settings menu to enable or disable your phone’s Bluetooth capabilities. -
Page 67: Pair Bluetooth Devices
Pair Bluetooth Devices ® Search for and pair nearby Bluetooth devices. Registered Bluetooth devices can be connected simply. ■ Enable the Bluetooth function on the Bluetooth devices being paired beforehand. To pair Bluetooth devices: 1. From app list, press Settings >... -
Page 68: Connect To A Paired Bluetooth Device
The device is unpaired from your phone. To make another connection with the device, you will need to pair again. Connect to a Paired Bluetooth Device You can listen to music over a Bluetooth stereo headset, or have hands-free conversations using a compatible Bluetooth headset or car kit. -
Page 69: Receive Information Via Bluetooth
Sending Contacts Data via Bluetooth 1. From app list, press Contacts You will see the Contacts list. 2. Select a contact to send. 3. Press > Share > Bluetooth. 4. Tap a paired device to receive the data. The contact information is sent. ... - Page 70 The file is sent to your phone. When your phone receives a file, you will see a notification. To open the file immediately, pull down the status bar to display the notification panel, and then tap the notification. ...
- Page 71 Apps and Entertainment The following set of topics will explore the features that make your phone so much more than a phone, from the camera and productivity apps to music, entertainment, and more.
-
Page 72: Camera And Video
Camera and Video You can use the camera or video camera to take and share pictures and videos. Your phone comes with a 2 megapixel camera with an autofocus feature that lets you capture sharp pictures and videos. Camera Overview The camera's viewfinder screen lets you view your subject and access camera controls and options. -
Page 73: Take Pictures And Record Videos
The camera viewfinder appears. Take Pictures and Record Videos The following topics teach you how to take pictures and record videos with your phone’s camera. Capturing Pictures/Videos ● File Format for Pictures: File format for pictures is JPEG. ● File Format for Videos: File format for videos is MPEG4. -
Page 74: View Pictures And Videos Using Gallery
Note: If you have an SD card installed, pictures and videos are stored to the SD card. If no card is installed, pictures and videos are saved to your phone’s memory. 1. From app list, press Camera The camera viewfinder appears. 2. - Page 75 For pictures that are on your storage card or phone memory, you can do basic editing such as rotating and cropping. You can also easily assign a picture as your contact picture or wallpaper and share pictures with your friends. View Pictures and Videos You can access and view all your stored pictures and videos from your phone’s Gallery.
-
Page 76: Edit Pictures
Edit Pictures Whether you’re browsing pictures in filmstrip or grid view in the Gallery application, you can touch and hold on a picture to open a selection menu and choose to delete the picture, rotate or crop it, and more. Rotate a Picture 1. -
Page 77: Share Pictures And Videos
The list of pictures opens. 2. Select the picture you want to edit. 3. Press and then select Edit. An edit screen appears on the picture. 4. Press to save the changes to the picture. The modified picture is saved in the album as a copy. The original picture remains unedited. Share Pictures and Videos The Gallery application lets you send pictures and videos using email, Bluetooth or multimedia messages. -
Page 78: Camera Settings
The list of pictures opens. 2. Select the pictures you want to share. To select multiple items, press > Select Multiple to turn on multiple select. Select all the items you want to include. 3. Press > Share and then on the Share via menu, select E-mail, Messages or Bluetooth. ... -
Page 79: Set Camera Functions
1. From app list, press Camera The camera viewfinder appears. 2. Press Navigation Right key to switch to Video. The video screen opens. Set Camera Functions You can configure your camera’s settings to fit any situation and event. 1. - Page 80 The camera viewfinder appears. 2. Press to open options menu. The camera settings menu opens. 3. Select your desired settings. The settings are applied. Settable items differ depending on the camera type in use. Camera and Video...
-
Page 81: Productivity
Productivity Use your phone to stay ahead of the game with calendar, alarm, calculator and more productivity apps. Calendar Use Calendar to create and manage events, meetings, and appointments. Your Calendar helps organize your time and reminds you of important events. Depending on your synchronization settings, your phone’s Calendar stays in sync with your Calendar on the Web, Exchange ActiveSync calendar, and Outlook calendar. -
Page 82: View Calendar Events
The add event window opens. Enter an event title, start date/time, end date/time, etc., and then press to save. The event is added to your calendar. View Calendar Events You can display the Calendar in daily, weekly or monthly view. 1. -
Page 83: Sync Calendars
2. Select a date and then press to display events. The event details appear. In event details, press to edit the event. In event details, press to delete the event. Sync Calendars You can select which calendars you’d like to sync on your phone, along with what types of information you want to sync. -
Page 84: Calculator
2. Press > Sync calendar. The sync settings have been updated. Calculator Your phone’s convenient built-in calculator lets you perform basic mathematical equations. 1. From app list, press Calculator The calculator app launches. 2. Press keys for calculations. ... -
Page 85: Set Alarms
Set Alarms Set multiple alarms using your phone’s Clock app. 1. From app list, press Clock The Clock appears. 2. Press to create new alarm. The alarm adding screen appears. 3. Set the alarm options, including time, repeat pattern, alarm tone, and volume, and then press to confirm. -
Page 86: Additional Clock Features
Additional Clock Features Your phone’s clock app provides additional useful features including stopwatch and timer functions. These features are available from the clock app display. ■ From app list, press Clock The Clock appears. Timer The stopwatch lets you time events down to the hundredth of a second. 1. -
Page 87: Entertainment And Activities
Entertainment and Activities The following topics provide an overview of your phone’s music. Play Music Use the Music app to listen to all your music on your phone. Compatible music file formats include: mp3, wma, wav, mod, etc. 1. From app list, press Music ... -
Page 88: Music Screen Layout
Music Screen Layout The following picture outlines the main features of the Music app player screen. Library menu Options menu Play/pause Options Menu: Feature Description Shuffle All Press to shuffle all songs. Repeat All Press to repeat all songs Share Press to share a song via E-Mail, Messages or Bluetooth. - Page 89 Settings The following set of topics will cover your phone’s settings menus and options. For an overview of the settings menu, see Basic Settings.
-
Page 90: Connections Settings
Connections Settings The following topics introduce your phone’s basic settings menus and cover your phone’s Connections settings options. Basic Settings From the app screen, press Settings to access your phone’s settings menu. The table below outlines the top-level settings categories. Category Description Network &... - Page 91 Privacy & Security Set your phone’s lock screen options. Screen Lock SIM Security Set your SIM Card security. App Permissions Check and manage the apps in your phone. Do Not Track Set Do Not Track mode options. Browsing Privacy Set browsing privacy options. Storage USB Storage Enable USB storage.
-
Page 92: Wi-Fi Settings Menu
Access Settings 1. From app list, press Settings The settings menu opens. 2. Select categories and then select your settings options. Settings are made and applied. Wi-Fi Settings Menu The Wi-Fi settings menu lets you turn Wi-Fi on or off, set up and connect to available Wi-Fi networks, and configure advanced Wi-Fi options. -
Page 93: Bluetooth Settings
To disable Wi-Fi, select the Off icon 3. Select a Wi-Fi network, enter the password, and press to connect. Your phone is connected to the selected Wi-Fi network. 4. Configure your Wi-Fi settings. Your Wi-Fi settings changes are saved. ... - Page 94 The Bluetooth settings open. Bluetooth Settings Operations ● Enable Bluetooth: Select the On icon to turn Bluetooth on. When enabled, confirmation appears for your phone to be discoverable by other devices. Follow the onscreen instructions. To disable Bluetooth, select the Off icon ●...
-
Page 95: Mobile Network & Data
Mobile Network & Data The mobile network & date menu lets you view your SIM card’s carrier, enable data connection, enable VoLTE, and more. 1. From app list, press Settings > Network & Connectivity > Mobile Network & Data. The mobile network & data window opens. Mobile Network &... -
Page 96: Personalization Settings
Personalization Settings The following topics outline the device settings options available on your phone, including sounds, display, Notices, and more. Sound Settings The sound settings menu lets you control your phone’s audio, from ringtones and alerts to tap tones and notifications. -
Page 97: Display Settings
Display Settings Use the phone's display settings menu to adjust items such as wallpaper, brightness, and screen timeout. Display Settings Overview The display settings menu allows you to configure the following options: Display Setting Description Wallpaper Set a wallpaper. Brightness Set the display brightness. -
Page 98: Search Settings
Search Settings The search settings menu lets you manage search engine and enable search suggestions. Search Settings Overview The search settings menu allows you to configure the following options: Search Setting Description Set your phone’s search engine. Search Engine Search Suggestions Set to enable search suggestions. -
Page 99: Date & Time Settings
Access Notices Settings 1. From app list, press Settings > Personalization > Notices. The notices window opens. 2. Set your notices options. Your notices settings are saved and applied. Date & Time Settings Use the date and time settings menu to set date and time manually, as well as select time format options. Date &... -
Page 100: Language Settings
The date & time window opens. 2. Set available date and time options. Your date and time settings are applied and saved. Language Settings Your phone’s language settings let you select a language for the phone’s menus and keyboards. Language Settings Overview You can set the following options in the Language settings menu: Language Setting... -
Page 101: Input Methods Settings
The Language settings menu opens. 2. Set options. The language settings are applied and saved. Input Methods Settings Your phone’s input settings let you select and configure keyboard settings, and set your phone’s input languages. Input Methods Settings Overview You can set the following options in input methods settings menu: Input Methods Setting Description... -
Page 102: Privacy & Security Settings
Privacy & Security Settings The following topics cover your phone’s privacy & security settings, including screen lock settings, app permissions, Do Not Track, and browsing privacy. Screen Lock Settings You can increase the security of your phone by creating a screen lock. When enabled, you have to enter the correct password to unlock the phone’s control buttons and screen. -
Page 103: Do Not Track Settings
App Permissions Setting Description Set camera’s geolocation permission. Camera Set MMI test’s geolocation permission. MMI Test Set system’s geolocation permission. System Set Testbox’s geolocation permission. TestBox Set omamock’s geolocation permission. omamock Access App Permissions Settings 1. From app list, press Settings >... -
Page 104: Browsing Privacy Settings
2. Select options. The do not track settings are applied and saved. Browsing Privacy Settings Set your browsing privacy settings. Access Browsing Privacy Settings 1. From app list, press Settings > Privacy & Security > Browsing Privacy. 2. Select options. ... -
Page 105: Storage Settings
Storage Settings The storage settings menu lets you manage internal storage on your phone and provides menu choices for an optional SD card (not included). USB Storage Settings 1. From app list, press Settings > Storage > USB Storage. The USB storage settings menu opens. 2. -
Page 106: Application Storage Settings
2. Select options. The media storage settings are applied and saved. Application Storage Settings View the total/used/free space of application in your phone memory. ■ From app list, press Settings > Storage > Application Storage. The application storage window opens. Storage Settings... -
Page 107: Device Settings
Device Settings The following topics including device information, downloads, battery, accessibility, etc. Device Information Settings The device information menu lets you access important phone information, and view legal and safety information. Device Information Overview The following device information items may be reviewed or set: Device Information Item Description Check the phone’s model. -
Page 108: Downloads Settings
Access Device Information Options 1. From app list, press Settings > Device > Device Information. The device information window opens. 2. Select or view available options. Your phone information is displayed. Downloads Settings You can check your downloaded file in Downloads. Access Device Information Options 1. -
Page 109: Battery Settings
Battery Settings Monitor your phone’s battery usage through this settings menu. Check the battery consumption and percentage. 1. From app list, press Settings > Device > Battery. The Battery window opens. 2. Press items to view details. Check your battery condition and access additional options. Accessibility Settings The accessibility menu lets you enable and manage accessibility-related applications. -
Page 110: System Updates Settings
Select to enable TTY mode. Hearing Aid Compatibility Set to enable hearing aid compatibility. (HAC) Access Accessibility Options 1. From app list, press Settings > Device > Accessibility. The accessibility settings menu opens. 2. Set available accessibility options. Your accessibility settings are applied and saved. System Updates Settings From time to time, updates may become available for your phone. -
Page 111: Help Settings
The system updates window opens. 2. Select the item you want to update. Your phone will update automatically. Help Settings This menu lets you find help or guide for operation the phone. 1. From app list, press Settings >... - Page 112 Getting Help The following set of topics will cover troubleshooting tips, phone specifications, and how to contact Virgin Mobile and manage your wireless service.
-
Page 113: For Assistance
For Assistance The following topics address areas of support for your phone, including troubleshooting, specifications, account information, warranty information, and customer service contact information. Troubleshooting Check the questions and answers below for troubleshooting solutions for common phone issues. Check Here First Question: Phone freezes/operation is unstable. -
Page 114: Virgin Mobile Account Information And Help
Phone Specifications Item Description Weight Battery installed: Approx. 118 g GSM: Approx. 6 hours Continuous Talk Time 3G: Approx. 8 hours Continuous Standby Time Approx. 280 hours Charging Time Approx. 3 hours Dimensions Approx. 105x 52.8 x18.7 mm Battery Specifications Item Description Type... -
Page 115: Virgin Mobile Account Information And Help
Auto Pay Auto Pay is the easiest way to keep your service working. Once you register your credit card, debit card or PayPal account, you can set it to automatically pay your monthly plan. Then you can keep emailing, IMing, Tweeting with Twitter, surfing, and talking with no interruptions. - Page 116 Ratings have been developed for mobile phones to assist hearing device users find phones that may be compatible with their hearing device. Not all phones have been rated for compatibility with hearing devices. Phones that have been rated have a label located on the box. Your ALCATEL 4044T has an M4/T4 rating.
- Page 117 These ratings are not guarantees. Results will vary depending on the user’s hearing device and individual type and degree of hearing loss. If a hearing device is particularly vulnerable to interference noise; even a phone with a higher rating may still cause unacceptable noise levels in the hearing device. Trying out the phone with your hearing device is the best way to evaluate it for your personal needs.
-
Page 118: Index
Note: This equipment has been tested and found to comply with the limits for a Class B digital device, pursuant to part 15 of the FCC Rules. These limits are designed to provide reasonable protection against harmful interference in a residential installatio. This equipment generates, uses and can radiate radio frequency energy and, if not installed and used in accordance with the instructions, may cause harmful interference to radio communications. - Page 119 3-way Calling, 34 Date and Time, 93 Accessibility, 103, 104 Email Accessory Jack, 4 Delete account, 53 Activation, 13, 105 Manage inbox, 53 Airplane Mode, 18 Send Gmail, 51 Alarm, 79 Share pictures, 71 Answer a Call, 30 View and reply, 52 Apps Settings, 96, 97, 98 Emergency Numbers, 29 Back Key, 4...
- Page 120 Phone Status, 101 Conversations, 48 Phone Update Draft messages, 48 PRL, 22 Notifications, 48 Profile, 21 Options, 49 Software, 20 Send messages, 46 Pictures Timer, 80 Crop, 70 Touchscreen Rotate, 70 Keyboard, 19 Share via email, 71 Turn off, 19 Take with camera, 67 Turn on, 19 View, 69...