Samsung SMART DEVICE SGH-I617 User Manual
Smart device
Hide thumbs
Also See for SMART DEVICE SGH-I617:
- User manual (225 pages) ,
- Manual del usuario (162 pages) ,
- Service manual (134 pages)

Related Manuals for Samsung SMART DEVICE SGH-I617


Summary of Contents for Samsung SMART DEVICE SGH-I617
- Page 1 SGH-i617 S M A R T D E V I C E User Manual Please read this manual before operating your phone, and keep it for future reference.
-
Page 2: Intellectual Property
Intellectual Property All Intellectual Property, as defined below, owned by or which is otherwise the property of Samsung or its respective suppliers relating to the SAMSUNG Phone, including but not limited to, accessories, parts, or software relating there to (the “Phone System”), is proprietary to Samsung and protected under federal laws, state... - Page 3 EXCEPT AS SET FORTH IN THE EXPRESS WARRANTY CONTAINED ON THE WARRANTY PAGE ENCLOSED WITH THE PRODUCT, THE PURCHASER TAKES THE PRODUCT "AS IS", AND SAMSUNG MAKES NO EXPRESS OR IMPLIED WARRANTY OF ANY KIND WHATSOEVER WITH RESPECT TO THE PRODUCT, INCLUDING BUT NOT LIMITED TO THE MERCHANTABILITY OF THE PRODUCT OR ITS FITNESS FOR ANY PARTICULAR PURPOSE OR USE;...
-
Page 4: Table Of Contents
Section 1: Getting Started ...5 Activating Your Phone ...5 Powering On or Off the Phone ...9 The Home Screen ...9 Section 2: Understanding Your Phone ...11 Basics ...11 Front View of Your Phone ...12 Rear View of Your Phone ...14 Display Layout ...16 Customizing the Home Screen ...18 Setting the Home Screen Properties ... - Page 5 Section 5: Menu Navigation ... 49 Menu Navigation ...49 Menu Outline ...49 Section 6: Contacts & Calendar ... 54 Contacts ...54 Calendar ...57 Agenda View ...58 Section 7: Organizer ... 60 Alarms ...60 Calculator ...61 D-Day ...61 Notepad ...62 Smart Converter ...63 Stopwatch ...63 Tasks ...64 Voice Notes ...64...
- Page 6 Power and Charging Problems ...126 Program Problems ...128 Section 15: Health and Safety Information ...132 Health and Safety Information ...132 Samsung Mobile Products and Recycling ...134 UL Certified Travel Adapter ...134 Consumer Information on Wireless Phones ...135 Road Safety ...141 Responsible Listening ...143...
- Page 7 Product Performance ...148 Availability of Various Features/Ring Tones ...149 Battery Standby and Talk Time ...150 Battery Precautions ...150 Care and Maintenance ...151 Section 16: Warranty Information ... 153 Standard Limited Warranty ...153 Index ... 158 Table of Contents...
-
Page 8: Section 1: Getting Started
Section 1: Getting Started Topics Covered • Activating Your Phone • Powering On or Off the Phone • The Home Screen This section describes how to start using your phone by activating your phone, inserting your SIM card and battery, and navigating from the Home screen. Activating Your Phone When you subscribe to a cellular network, a plug-in Subscriber Identity Module (SIM) card is provided loaded with your subscription details, such as your PIN and other... -
Page 9: Installing The Sim Card
Lift the battery from the 1) bottom up and 2) out of the phone. Installing the SIM Card Important!: The plug-in SIM card and its contacts can be easily damaged by scratches or bending. Use caution when inserting or removing the card and keep all SIM cards out of reach of children. Make sure the gold contacts of the card face into the phone, then slide the SIM card into the socket. -
Page 10: Installing The Battery
Your phone is powered by a rechargeable Li-ion battery. Use the travel adapter to charge the battery, and use only Samsung approved batteries and chargers. Note: You must fully charge the battery before using your phone for the first time. A discharged battery recharges fully in approximately 4 hours. -
Page 11: Low Battery Indicator
Plug the connector of the travel adapter into the jack on the left side of the phone. Note: The following illustration shows the correct and incorrect method for connecting the charger. Verify the arrow on the adapter is showing and pointing to the handset for a correct connection. If it is not, damage to the accessory port occurs therefore voiding the phones warranty. -
Page 12: Powering On Or Off The Phone
Powering On or Off the Phone Press and hold the The phone is logged into your home network and receives the signal from the network. You can now make or answer a call and use programs on the phone. To turn off the phone, press and hold Quick List. - Page 13 The Home Screen Use the Left and Right Navigation keys to choose from the Grid or List display options. Getting Started...
-
Page 14: Section 2: Understanding Your Phone
Section 2: Understanding Your Phone Topics Covered • Basics • Front View of Your Phone • Rear View of Your Phone • Display Layout • Customizing the Home Screen • Setting the Home Screen Properties • Start menu screen • Entering text •... -
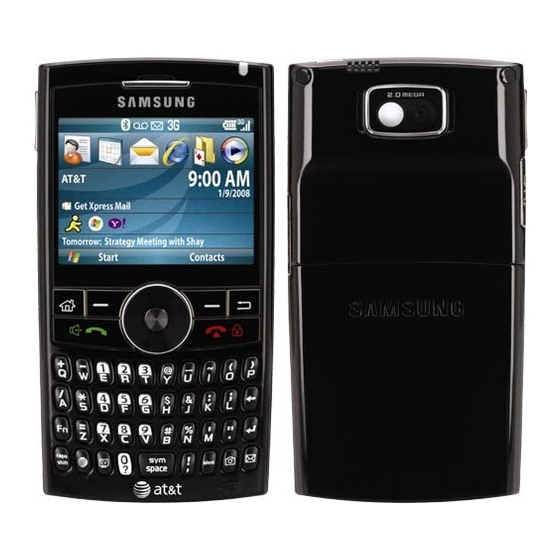
Page 15: Front View Of Your Phone
Front View of Your Phone The following illustrations show the main elements of your phone: Keys The following list correlates to the front view illustration. Power ON/OFF Button/Quick List key: Press and hold to turn the device on or off. When the device is on, a short press displays the Quick List screen. - Page 16 Left Soft key (LSK): Allows you to select softkey actions or menu items corresponding to the bottom left line on the display screen. Home key: Short press to return to the Home Screen from any menu, submenu, or application. A long press will launch the Task Manager screen.
-
Page 17: Rear View Of Your Phone
Navigation Wheel: This key allows you to rotate through phone menu options and provides a shortcut to phone functions from standby mode. In the music player, you can rotate left or right to scroll through songs. Display: This screen displays all the information needed to operate your phone. -
Page 18: To Lock The Keypad
Backlight A backlight illuminates the display and the keypad when you press any key. It turns off when no keys are pressed within a given period of time, and/or dims the light, depending on the settings in the Start > Settings > More > Power Management >... -
Page 19: Display Layout
Display Layout Status Bar The display has 3 areas. On the top line of the screen, the status bar displays icons to show your phone’s current status. Just below the display area, the Quick Launcher is displayed. And third is the Soft key command line. The following icons display: Shows the strength of the signal. - Page 20 Displays when the Vibrate profile is activated. Displays when Bluetooth is activated. For more information, refer to “Bluetooth mode” on page 93. Displays when a text (SMS) message, or multimedia (MMS) message was received. Displays when an E-mail was received. Displays when a new voicemail was received.
-
Page 21: Customizing The Home Screen
left or right, and press change the profile setting. For more information on changing these items, see the appropriate instructions for each task in this guide. Press on each item. Note: To ensure that operations, such as moving or saving files, proceed to completion, wait at least 50 seconds before removing the battery. -
Page 22: Entering Text
Switching between programs Your phone is a multi-tasking device. You can run multiple programs at the same time and switch from one program to another. From any program, press to switch to the Home screen. Then access another program from the Quick Launcher or Start menu. -
Page 23: Customizing Your Phone
Press twice to select CAP LOCK (press once more to return to remove CAP LOCK). Press twice to select Function lock (press once more to remove Function lock). Short press inserts a space. Press and hold to display the symbols grid. Customizing Your Phone You can customize the phone settings to suit the way you work. -
Page 24: Power Settings
Power Settings You can conserve battery power by adjusting the time-out settings for the display and the backlight of the keypad and display or adjusting the display brightness. On the Home screen, press the Start > Settings > More... > Power Management. -
Page 25: Owner Information
Select the Accessibility settings. • System font size: choose the font size (Normal or Large) displayed. • Confirmation time out: allows you to set the time out period, choose from None, 5 seconds, 10 seconds, or 20 seconds. Changing the Sound Profile Using Profiles, you can adjust and customize the phone tones for different events or environments and then apply the settings as a group. -
Page 26: Security Settings
Error Reporting Setting Your phone has the Error Reporting function which informs you of errors in a program that can give a crash to the phone system. You can enable or disable this function. On the Home screen, press the Start soft key. Select Settings >... -
Page 27: Locking The Sim Card
Locking the SIM Card When SIM Lock is enabled, your phone works only with the current SIM card. To use another SIM card, you must enter the SIM lock password. On the Home screen, press the Start > Settings > More... > Security > Enable SIM Lock. -
Page 28: Searching For Items
Menu Shortcut Settings If you set your Start menu style settings to List, (For more information, refer to “Display Layout” on page 16.) then you can use alphabet keys as shortcut keys to directly access specific programs that exist in the Start menu. Note: You can also assign phone numbers, e-mail addresses, or web pages in Contacts to the number keys as speed dial entries. -
Page 29: Video Share Settings
Press the Go soft key. The phone searches its file directory or programs and lists all matching items. Scroll to the one you want and press the Open soft key. Setting Up The Search Options You can change the search options for each item type to provide the phone with more specific information to narrow the search items. -
Page 30: Using An Optional Microsd Memory Card
Using an Optional microSD Memory Card Your phone has an expansion slot compatible with microSD memory cards, which are primarily used to back up or transfer files and data. Warning!: Use only compatible memory cards with your phone. Using incompatible memory cards, such as Secure Digital (SD) cards, may damage the card, as well as the phone, and data stored on the card. -
Page 31: Removing The Microsd Memory Card
Adding Programs Using Microsoft You can install programs downloaded from the Internet or included on the Getting Started CD included with your Samsung BlackJack II synchronization between your phone and your computer. First you need to determine what your phone and processor type is so that you know which version of the software to install. -
Page 32: Removing Programs
Download a program to your computer from the Internet or insert the Getting Started CD that contains the program into your computer. Be sure to select the program designed for your phone and the phone’s processor type. Read any installation instructions, Read Me files, or documentation that comes with the program. -
Page 33: Resetting Your Phone
Scroll to the program you want to delete. Press the Menu soft key and select Remove. Press the Yes soft key to confirm the deletion. Press the Ok soft key when you are finished Managing Certificates On your phone you can add and delete public key certificates. You can store the following two types of certificates on your phone. -
Page 34: Using Online Help
Using Online Help Your phone is supported by additional information available online, or on the Getting Started CD that came with your phone. For information on: additional programs that can be installed on your phone connecting to and synchronizing with a PC up-to-date information on your phone the supplied Getting Started CD. -
Page 35: Section 3: Synchronization
Section 3: Synchronization Topics Covered • Installing Microsoft® ActiveSync® • Customizing Connection Settings • Connecting Your Phone to a Computer • Connecting with a PC data cable • Synchronizing Information • Customizing Synchronization Settings • Windows Mobile Device Center 6 for Windows Vista This section describes Using Microsoft your desktop computer with the data on your phone. -
Page 36: Customizing Connection Settings
Insert the Getting Started CD into the CD-ROM drive of your desktop computer. Alternatively, double-click the downloaded Microsoft ® ActiveSync Follow the instructions on the screen for installing Microsoft When installation completes, the Synchronization Setup Wizard helps you to connect your phone to your desktop computer, to set up a partnership. Follow the instructions on the screen. -
Page 37: Connecting Your Phone To A Computer
Connecting Your Phone to a Computer To connect the phone to your computer, you can choose one of the following ways: Using a PC data cable • Using a Bluetooth connection • Connecting with a PC data cable Connect one end of the PC data cable (included with the i617 handset) to the jack on the left side of the phone and the other end to the USB port on your computer. -
Page 38: Synchronizing Information
® Important!: ActiveSync must be checked on the service list. If Serial Port is available, select it and make sure that a correct Bluetooth COM port is selected from the Connection Settings on the PC ® ActiveSync Press the Done soft key. Synchronizing Information To begin synchronization, connect your phone to your computer. -
Page 39: Customizing Synchronization Settings
Customizing Synchronization Settings You can customize various setting options for synchronization with a computer and a server, and set the synchronization schedule. First, you must terminate the connection between your phone and computer. Disconnect the PC data cable or remove the phone from the Bluetooth range. Changing PC Settings In ActiveSync Highlight Windows PC. -
Page 40: Windows Mobile Device Center 6 For Windows Vista
Press the Finish soft key when you are finished. Changing the Synchronization Schedule You can schedule synchronization with the Microsoft® Exchange Server on two separate times. Use the peak time schedule to synchronize during working hours or other times when you experience higher mail volumes. Use the off-peak time schedule to synchronize during times when you experience lower mail volumes. -
Page 41: System Requirements
System Requirements Windows Mobile Device Center is currently only available for the following versions of Microsoft Windows Vista™. - Windows Vista™ Ultimate - Windows Vista™ Enterprise - Windows Vista™ Business - Windows Vista™ Home Premium - Windows Vista™ Home Basic ®... -
Page 42: Section 4: Call Functions
Section 4: Call Functions Topics Covered • Turning the Phone Functions On and Off • Using the Dialing Screen • Making a call • Advanced Calling Features • Customizing Your Phone Functions • Video Share This section explains all of the call functions provided by your phone. Turning the Phone Functions On and Off You can choose to turn off the phone functions and just use the PDA functions at any time and then turn it back on when you want. -
Page 43: Making A Call
When you press calls you dialed, received, and missed on the screen. When you enter a digit, the Dialing screen lists all of the numbers containing the entered digit in Contacts and Call History, as well as the phone number assigned to the corresponding speed dial key. -
Page 44: Making A Call From Speed Dial
Making a call from Speed Dial Speed Dial is a list you can create of often-dialed numbers. By memorizing the position on the Speed Dial list, you can dial the number simply by entering that number of the Speed Dial key. The phone number assigned to the key displays on the Dialing screen. -
Page 45: Answering Or Ignoring A Call
Note: Some service providers may require a SIM card to be inserted, and in some cases the PIN to be entered as well. In some cases, other emergency numbers may also be accessed. Your service provider may save additional local emergency numbers on the SIM card. Answering or Ignoring a Call When a call comes in and the phone rings or vibrates, depending on the ringer setting:... -
Page 46: Call-Related Features
- Turn Hands-free On/Off: switches the current call to the connected hands-free car kit or headset, or switches it back to the phone. - Conference: joins the two or multiparty call into a conference call. - Contacts: opens the contact list. - Save to Contacts: saves the phone number of the person with whom you are speaking. -
Page 47: Viewing Details Of Calls
Managing your Call History Call History details all incoming, outgoing, and missed calls, and also provides a summary of total calls. It can also tell you when a call was initiated and how long it lasted. To open Call History On the Home screen, press the Start soft key and select Call History. -
Page 48: Customizing Your Phone Functions
Customizing Your Phone Functions You can personalize the settings of the phone functions, the services you have, and the network to which you are connected. Accessing the Phone setting options On the Home screen, press the Start soft key. Select Settings > Phone. Select a setting menu, and then set each option. -
Page 49: Voice Calls
- Receive channel list: Select to receive a list of all available broadcast channels from the network. - Language: Select your preferred languages to display CB messages. To edit the channel list, press the Menu soft key and select Edit Channels. Then press the Menu soft key and select the options for adding, deleting or editing channels. -
Page 50: Video Share
Own Numbers You can store your phone numbers with descriptive names. Changes made with this options does not affect the actual subscriber number of your SIM card. Service Dialing Numbers You can view the list of Service Dialing Numbers (SDN) assigned by your service provider. -
Page 51: Share A Recorded Video
When the recipient accepts the video share, “Establishing a Video Connection" displays to both the sender and the recipient. A Recording Started pop-up displays showing the memory available for the video. During a Video Share session, the following display above the soft key options: Tip: Press the key to stop the Video Share. -
Page 52: Section 5: Menu Navigation
Section 5: Menu Navigation Topics Covered • Menu Navigation • Menu Outline This section explains the menu navigation for your phone. It also includes an outline of all the available menus associated with your phone. Menu Navigation Menus and sub-menus can be accessed by scrolling through them using the Navigation keys or by using the shortcut keys. - Page 53 4: ActiveSync 5: AT&T Music 1: Windows Media 2: Shop Music 3: MusicID 4: XM Radio 5: Music Videos 6: The Buzz 7: Community 8: Music Apps 6: Cellular Video 7: MEdia Net 8: AT&T Mall 1: Shop Tones 2: Shop Games 3: Shop Graphics 4: Shop Multimedia 5: Shop Application...
- Page 54 5: My Documents 6: My Device 7: Storage Card 13: Games 1: Bubble Breaker 2: Solitaire 14: Internet Explorer 15: Applications 1: Camera 2: Download Agent 3: File Explorer 4: Get TeleNav 5: Java 6: MobiTV 7: PDF Viewer 8: RSS Reader 9: Smart Search 10: Speed Dial 11: Task Manager...
- Page 55 5: (E) Automatic 6: (F)Date and Time 7: (G) More... 8: (A) Connections 1: (A) Wireless Manager 2: (B) Beam 3: (C) Bluetooth 4: (D) USB 5: (E) GPRS 6: (F) Proxy 7: (G) More... 1: (A) VPN. 9: Security 1: (A) Device Lock 2: (B) Enable SIM Lock 3: (C) Enable SIM PIN...
- Page 56 6: (F) Version 7: (G) More.. 1: (A) Error Reporting 2: (B) Customer Feedback 3: (C) Windows Update...
-
Page 57: Section 6: Contacts & Calendar
Section 6: Contacts & Calendar Topics Covered • Contacts • Calendar • Agenda View Contacts maintains a list of your friends and colleagues so that you can easily find the information you are looking for, whether you are at home or on the road. The calendar feature allows you to view the Month, Week, and Day layout views. - Page 58 Mobile phone • Home phone • Custom ring tone (use the • Left or Right navigation key to make a selection) Picture (use the Right • navigation key to make a selection) E-mail • • Work2 phone • Home2 phone •...
- Page 59 Home phone • Custom ring tone (use the • Left or Right navigation key to make a selection) Picture (use the Right • navigation key to make a selection) E-mail • • Work2 phone • Home2 phone • Company phone •...
-
Page 60: Calendar
SIM Contact information includes the Name and Number for the contact. After completing the information, press Done to save the information. Menu options Press the Right soft key Menu to display the following options: - Edit: allows you to edit the contact information. - Send Contact: •... -
Page 61: Agenda View
New Appointment This menu allows you to enter a new appointment on your calendar. Use the following steps to enter a new appointment. From the Home screen, press Start > Calendar and press the Press the Menu soft key and select New Appointment. The following fields display: •... - Page 62 Options The following options are available for the calendar: From the Home screen, press Start > Calendar and press the Press the Menu soft key and select Tools > Options. The following options display: • Start In: allows you to set which view mode displays when you acces the calendar.
-
Page 63: Section 7: Organizer
Section 7: Organizer Topics Covered • Alarms • Calculator • D-Day • Notepad • Smart Converter • Stopwatch • Tasks • Voice Notes • World Clock The Organizer has many tools to assist you in daily activities. Alarms You can use the alarm clock to set a wake-up alarm or set an alarm to remind you of an appointment. -
Page 64: Calculator
Setting an alarm On the Alarm screen, select an alarm (Alarm 1 to Alarm 9). Set each alarm option. Press the Done soft key. Stopping an alarm Dismiss soft key to stop the alarm from ringing, or press the Snooze soft - Press the key to set the alarm to ring again after the specified snooze interval. -
Page 65: Notepad
Creating a D-Day counter Press the New soft key. Set options in each field. • Date: Enter the date of the day you want to count to or from. • Title: Enter the counter title. • Category: Select one of the preset categories. You can filter counters by category from the counter list. -
Page 66: Smart Converter
Sending a memo You can send your notes as part of a SMS or e-mail or message. Scroll to the memo you want. Press the Menu soft key and select Send via Email/Message. Compose and send a message. Deleting a memo Scroll to the memo you want. -
Page 67: Tasks
Tasks Tasks is a convenient place to create task reminders. You can mark a task as completed or delete a task. To open Tasks: On the Home screen, press Start > Organizer > Tasks. Creating a task note Enter your task information in the Enter new task here field. Press the When you are finished press the Completing a task... -
Page 68: World Clock
Press the Stop soft key to stop recording. Your phone automatically saves the voice note and lists it on the voice note list. Reviewing a voice note On the voice note list, select the note you want to review. Recording plays. During playback, you can adjust the sound volume by pressing Setting a voice note as the ringtone On the voice note list, scroll to a voice note. -
Page 69: Section 8: Messaging, Internet, And Messenger
Section 8: Messaging, Internet, and Messenger Topics Covered • Messaging • Working with SMS or MMS Messages • Creating an E-mail Account • Creating and sending an e-mail message • Viewing E-mail Messages • Internet Explorer • Connecting to a Website •... -
Page 70: Creating And Sending An Mms Message
Note: Message, Pictures, Sounds, and Video can be moved to the Storage Card to eliminate device overload. Creating and Sending an SMS Message On the Home screen, press the Start > Messaging > Messages. Press the Menu soft key and select New. Select Text Message press In the To: field, enter the recipients’... - Page 71 • Edit Page: allows you to add or delete pages, change the text style, change the Background Color, or set the page duration. • Save to: allows you to save the message as a Drafts or Template. • Cancel Message: cancels sending the message. •...
-
Page 72: Configuring Mms Settings
To access message options From any message folder, you can access the following options by pressing the Menu soft key; depending on the selected folder, available options may vary: New : allows you to create a new message. - Reply: sends a reply to the sender and/or all other recipients, or forwards the message to other people. -
Page 73: Working With E-Mail Messages
• Report Allowed : Send a delivery report from the network to the sender. • Advertisement Allowed : Accept advertisements. • Information Allowed : Accept information messages. • Send Read Report: Sends a report when message is read by the recipient. Multimedia Msg. -
Page 74: Creating An E-Mail Account
Connecting Directly to an E-mail Server You can send and receive e-mail messages by connecting to an e-mail server. You’ll need to set up a remote connection to a network or an ISP, and a connection to your e-mail server. When you connect to the e-mail server, new messages are downloaded to the phone’s Inbox folder. -
Page 75: Creating And Sending An E-Mail Message
Enter your Incoming mail server; select the account type (POP3 or IMAP4), and press the Next soft key. Enter your user name and password, and press the Next soft key. Enter your outgoing (SMTP) mail server and press the Next soft key. To configure advanced settings, such as SSL or Internet connection settings, select Advanced Server Settings. -
Page 76: Viewing E-Mail Messages
Viewing E-mail Messages You can also view messages you received, sent, composed but not sent by accessing the message folders. To open the message folders: On the Messaging main screen, access the e-mail account you want, press the Menu soft key, and select Folders. The following default folders display: •... -
Page 77: Inserting Signatures Into Messages
: allows you to access the following options: • Tools - Switch Accounts: allows you to switch to another message account. - Empty Deleted Items: removes all deleted messages permanently from the phone. - Options: allows you to change the options for the Messaging. Send/Receive: sends or receives the e-mail messages. -
Page 78: Internet Explorer
Internet Explorer Use Microsoft Pocket Internet Explorer to view Web HTML, cHTML, and WAP pages. You can browse by connecting to an Internet Service Provider (ISP) or network and browse the Web. When connected to an ISP or network, you can also download files and programs from the Internet. -
Page 79: Using The Favorites List
Using the Favorites list You can store your favorite links while using the Internet Browser and then access them easily at a later time. Categorizing them enables you to find them more quickly. Adding a web page to the Favorites list Go to the page you want to add, press the Menu soft key, and select Add to Favorites. -
Page 80: Instant Messaging
Changing Explorer options You can customize web browsing options, change the connection settings, and clear memory. On the Internet Explorer screen, press the Menu > Tools > Options. The following options are available: - General: You can select whether or not to play sounds on web pages, view the warnings when you move from a secure web page to a non-secure one, or enable or disable the receiving and sending of cookies. -
Page 81: Section 9: Applications
Section 9: Applications Topics Covered • Camera • Download Agent • File Explorer • Get TeleNav • Java • MobiTV • PDF Viewer • RSS Reader • Smart Search • Speed Dial • Task Manager • Office Mobile This section lists and describes the programs delivered on your device. Camera With the built-in camera of your phone, you can take photos or record videos of people or events while on the move. -
Page 82: Setting Camera Options
• Press the Left or Right Navigation key to adjust the brightness of the image. • Press the Menu soft key to access the camera options. • Use the number keypad to adjust the image quickly. Press to take a photo. Press the Save soft key to save the photo. -
Page 83: Viewing Photos
changes the image size. changes the white balance. select the length of time delay before taking a photo. changes the color tone or applies a special effect. allows you to add a decorative frame to the photo. allows you to launch Video Share. accesses camera setting options. -
Page 84: Setting Camcorder Options
Setting camcorder options You can customize the camcorder settings. Once you change the video settings, the corresponding icons display at the top of the video preview screen. On the video preview screen, press the Menu soft key. Camera: switches to Camera mode. •... -
Page 85: Download Agent
accesses camera setting options. Playing video clips To view the recorded video clips, press the My Video soft key in Camcorder mode. The list of the video clips in the currently selected memory displays. Changing the default camera settings To customize the default camera settings, press the Menu soft key and select Options. -
Page 86: File Explorer
File Explorer The File Explorer program allows you to open an explorer window similar to a ® desktop Windows based system. The explorer window allows you to navigate through your phone to locate the desired folders and files. You can also quickly manage, delete, copy, or edit any files and folders on your phone. -
Page 87: Java
Important!: You must have a data plan and a Bluetooth GPS Receiver to use this feature. On the Home screen, press Start > Applications > Get TeleNav. Press The TeleNav website displays, with the download option. Select the Download Now option, and press the You are asked to confirm the download of the program. - Page 88 Press The MobiTV initialization screen displays, showing the progress of the application. Once the initialization is complete, the first station in the default list displays. Press the Guide key to access the on-screen TV guide for the channels available. Select the channel you would like to watch. To exit MobiTV, press the Menu soft key, and select the Exit option.
-
Page 89: Pdf Viewer
PDF Viewer PDF Viewer allows you to view documents on your phone without any file-conversion or loss of content. To view a document, you must transfer documents from a PC. If you installed the memory card, you can view the files stored in it. Note: Some document formats, such as.sly and.put, are not transformed into their corresponding file types when you copy them to your phone by using ActiveSync the directory. -
Page 90: Rss Reader
Using options in a document view From a document view, you can use the number keypad to quickly perform an option. These are the keys you can use and options assigned to each key. Note: This feature is used primarily for unreconigzed document types or multipage graphics such as: multi-page pdf or multi-page JPEG image. -
Page 91: Smart Search
To export a channel: Scroll to a channel from the list. Press the Menu soft key and select OPML > Export. Enter a file name and press the OK soft key. The file is saved in the selected folder. To import a channel: Scroll to the folder to which you want to import a channel. -
Page 92: Speed Dial
Setting Up The Search Options You can change the search options for each item type to provide the phone with more specific information to narrow the search items. From the SmartSearch screen, press the Menu soft key and select Options. Select the item type you want and set each option. -
Page 93: Office Mobile
Managing running programs To activate a program, press the Menu soft key and select Activate. • To close a program, press the Stop soft key. To close all programs, press the Menu • soft key and select Stop all. To refresh the program list, press the Menu soft key and select Refresh. •... - Page 94 When you downloaded your files, you selected where they were stored. Select the folder and press the Open soft key. A list of the files available displays. Select the file you wish to open and press the Select soft key. The file will open.
- Page 95 Office Mobile Once you complete your editing, there are several options for what you can do with the edited file, including the ones displayed below. Use the Close File option to exit the file. Applications...
-
Page 96: Section 10: Getting Connected
Section 10: Getting Connected Topics Covered • Beaming with Bluetooth • Connecting to the Internet or your network • Creating a VPN connection You can use your phone to exchange information with other mobile devices as well as your desktop computer, a network, or the Internet.The following connection options are available: Exchange information between devices with Bluetooth capabilities without a •... - Page 97 Setting Bluetooth profiles You can change the settings for each Bluetooth profile available on your phone. On the Home screen, press the Start soft key, and select Settings > Connections > Bluetooth. The following options are available: Bluetooth: enables Bluetooth on the device. •...
-
Page 98: Receiving Data With Bluetooth
Receiving data with Bluetooth When a notification that a remote device is trying to connect with the device, enter the Bluetooth password entered from the remote device and press the Done soft key. When prompted to save incoming data, press the Yes soft key. Sending data with Bluetooth Locate the item you want to send in a program, such as Calendar, Contacts, Tasks and My Stuff, or File Explorer. -
Page 99: Connecting To The Internet Or Your Network
Connecting to the Internet or your network You can use the Connections settings to create dial-up, Virtual Private Network (VPN), GPRS, and proxy connections so that you can connect to the Internet or your corporate network. By using a data connection, you can browse the Internet, download e-mails, chat by using Windows Live Messenger, or synchronize remotely with an Exchange Server. -
Page 100: Creating A Vpn Connection
Creating a proxy connection You can use a proxy connection to gain access to the Internet over an existing connection to your corporate network. On the Home screen, press the Start > More > Settings > More > Connections > Proxy and press the Highlight New in the Proxy menu list. -
Page 101: Adding A Url Exception
• User name: Enter your user name for the VPN. • Password: Enter your password. • Domain: Enter the domain name, if required. • IPSec authentication: If you selected IPSec/L2TP for VPN type, select the type of authentication. • IPSec Pre-shared key: If you selected Pre-Shared Key for IPSec authentication, enter the shared key. - Page 102 Changing the data connection options On the Advanced screen, press the Menu soft key and select Options to access the following options: - Redial attempts: Select the redial attempt to connect the Internet or your network after an unsuccessful connection. - Idle disconnect after: Select the length of time your phone waits for connecting to the Internet or your network after the specified period, your phone will disconnect from the Internet or your network.
-
Page 103: Section 11: At&T Mall
Section 11: AT&T Mall Topics Covered • Shop Tones • Shop Games • Shop Graphics • Shop Multimedia • Shop Application • Shop Video • MEdia Net Home The AT&T Mall topics covered in this section are shopping for Tones, Games, Graphics, Multimedia, and Accessing the MEdia Home site. -
Page 104: Shop Games
Shop Games The Shop Games menu option allows you to shop for games using the built-in browser. You can download new games to your Java folder. To access this menu option, use the following steps: On the Home screen, press the Start > AT&T Mall > 2 Shop Games. Press Typically, a featured game(s) is presented along with the top sellers. -
Page 105: Shop Application
Shop Application The Shop Application menu option allows you to shop for application files using the built-in browser. You can download the new applications to your My Stuff folder. To access this menu option, use the following steps: On the Home screen, press the Start > AT&T Mall > 5 Shop Application. Press Follow the on-screen options. -
Page 106: Section 12: At&T Music
Section 12: AT&T Music™ Topics Covered • Accessing AT&T Music • Adding Music to your Handset • Using libraries • Using Windows Media Player • Setting up the Windows Media Player Sync Options • Synching Music via Windows Media Player •... -
Page 107: Shopping For Music
About DRM, licenses, and protected files Some digital media files, such as song downloaded from online stores, are encrypted to prevent the files from being unlawfully distributed or shared. Content providers use a technology called Windows Media Digital Rights Management (WMDRM), to encrypt the fields. -
Page 108: Transferring Music Using Windows Media Player
When the Home screen displays, press Start > Settings > Connections > USB and press the Use the Up or Down Navigation key to highlight Active Sync and press the Done soft key. Highlight the song you wish to download to the handset. Using your right mouse button, click on the highlighted song and select Transfer Track(s) to Portable Device from the drop-down menu. -
Page 109: Using Libraries
Note: It is now safe to unplug the USB connector from the handset. Copying media files using ActiveSync® Connect your phone to a computer and start synchronization. Open the file directory on the phone by clicking Explore from the ® Microsoft ActiveSync Drag the media files you want to copy and drop them into a folder. -
Page 110: Using Windows Media Player
Using Windows Media Player The built in Media Player is an application that can play music files. The music player supports files with extensions AAC, AAC+, eAAC+, MP3, WMA, 3GP, MPEG, MP4, and M4A. Launching the Media Player allows you to navigate within your Media Player folders and select playback material. -
Page 111: Using Playlists
Press the Up or Down navigation key to raise or lower the volume. Press the Using Playlists Playlists are used to assign songs to a list of preferred media which can then be grouped into a list for later playback. These Playlists can be created via either the handset’s Media Player options menu or from within a 3rd party music application (such as Windows Media Player) and then downloaded to the handset. -
Page 112: Setting Up The Windows Media Player Sync Options
Change the Order of Play or Remove songs from a Playlist When the Home screen displays, press the Start > AT&T Music > Windows Media and press the Press the Menu soft key, and select Library > My Playlists and press the key. -
Page 113: Synching Music Via Windows Media Player
Launch the Windows Media Player the left pane.) Click on the Sync tab to launch the partnership process. CJ_smith If the Device Setup screen (shown above) does not display, right-click on the phone icon (left pane) and select Setup Sync... Enter a new name for the phone (as it displays within the Windows Media Player’s left pane) and click Finish. -
Page 114: Using Musicid
Select a song and drag it to the Sync List section of the application (right pane). (The available memory indicator changes depending on the size of the selected song.) Once you select all the desired songs, click Start Sync to begin the upload process to the i617’s Music folder. -
Page 115: Using Id Song
Exit the application at any time, by pressing the Using ID song! When the Home screen displays, press Start > AT&T Music > MusicID and press the Highlight ID song! and press the Place the handset’s microphone up to the source of the song. The source of the song can be from radio, stereo, or headset. -
Page 116: Xm Radio
• IDing a Song: provides information about the analysis process. • Recommendations and More!: describes the process following the successful identification of a song. You can choose to purchase the song and wallpaper (if available) or send the musicID as a link to another phone number. •... -
Page 117: Music Videos
Streaming a Music Channel Press the OK soft key to accept the terms of the trial period. You have only a few days to use the service before the trial period expires. If at any time you wish to purchase a subscription to the XM Radio service, press the Buy soft key and follow the on-screen prompts. - Page 118 discographies, ringtones, concert dates, etc.), concert information, games, and setup options for your own personal billboard notifications. At the Home screen, press Start > AT&T Music > The Buzz and press the key. Press the Trial soft key to accept the terms of the trial period. You have only a few days to use the service before the trial period expires.
-
Page 119: Music Community
Music Community This Community is a place where you can find a listing of various fan sites that provide sound clips, wallpapers, bios, discographies, and other information about an artist. At the Home screen, press Start > AT&T Music > Community and press key. -
Page 120: Section 13: Cellular Video
Section 13: Cellular Video Topics Covered • Media Clip Options • Library • Using the Video Categories • Customizing Cellular Video • My Purchases • Parental Controls Your phone is equipped with a WAP (Wireless Application Protocol) browser which allows you to access Internet and then download media files directly to your phone. These media files are displayed using the built-in Media Player. -
Page 121: Full Screen
Stop Stops playing the selected Media Clip. Shuffle/Repeat This feature allows you to toggle between the shuffle or repeat options for the videos you played and saved to your device. Full Screen This feature changes the screen content to remove or include the information regarding the soft key menu options or to display the video only. -
Page 122: Using The Video Categories
About Displays information about the Windows Meida Player 10 Mobile such as Version and Build information. Using the Video Categories This grouping of media categories provides access to an additional listing of streaming media. Where the previous Favorites list of media stream can be user edited and updated, this list of categories is defined by AT&T’s homepage and can not be changed. -
Page 123: My Purchases
Adding a Video Alert When new media is available for download to your phone (such as breaking news), you can set your phone to notify you of the new available content. From the Home screen, press Start > Cellular Video and press the key. -
Page 124: Parental Controls
Parental Controls Your phone can be configured to block both purchased and streamed media content. Before filtering, you must first establish a pin/password and a contact e-mail address. Once this information is established, you can view the two available filter options: Content Filter and Purchase Blocker. - Page 125 Press the Yes soft key to accept the terms or the No soft key to reject them and cancel this process. When prompted, enter the PIN and e-mail address which was registered with MEdia Net in the previous section. Enter the PIN and highlight Go and press the Highlight Change Settings and press the Highlight the Contents Filter or Purchase Blocker option and press the key to mark the check-box.
-
Page 126: Section 14: Troubleshooting
Section 14: Troubleshooting Topics Covered • General Problems • Call Problems • Power and Charging Problems • Program Problems Review the following problems and descriptions to assist in troubleshooting your device. General Problems To perform a manual Hard Reset, power off the device. Important!: Caution, if you perform a manual Hard Reset, the storage and setting is also initialized. - Page 127 Problem The bars next to disappear The display is not clear White lines display on the screen This may happen if you turn on the phone after “PIN code” displays “PUK Required” displays Description Solution If you just turned on your phone, wait for •...
-
Page 128: Call Problems
Problem I forgot the password, PIN, reset password, or PUK codes Call Problems Problem I entered a number but it was not dialed My correspondent cannot reach me Description Solution If you forget, lose or change the lock code, contact your phone dealer. If you forget or lose a PIN or PUK code, or if you did not received such a code, contact your network provider. -
Page 129: Power And Charging Problems
Be careful not to touch the antenna area • while using the phone. Description Solution Remove the battery and then replace it. • Turn on the phone. If the problem persists, • contact a Samsung service representative. Troubleshooting 126... - Page 130 Problem The battery’s standby time is shorter than expected Is it OK if I leave the phone connected to the power outlet after it is fully charged The phone becomes hot The battery level seem sufficient, but the phone does not turn on The phone turns off when the adapter is connected Description Solution...
-
Page 131: Program Problems
Program Problems Problem Not enough memory to perform operation. Internet Explorer “Your Internet connection is not configured properly. Please verify your settings in Data Connections.” displays The phone is unable to connect to the Internet Description Solution Delete some data before performing this •... - Page 132 Problem Camera Images seem smudged Contacts No number is dialed when you recall a contact card Bluetooth I cannot end a Bluetooth connection If another device is connected to your device, I cannot find my friend’s Bluetooth enabled device I cannot discover the remote Bluetooth stereo headset Description Solution Check if the camera lens protection window is...
- Page 133 Problem I cannot connect to the remote Bluetooth stereo headset I cannot listen to music on the remote Bluetooth stereo headset There are breaks in the music being played on the remote Bluetooth stereo headset Call History The call history displays empty Description Solution Ensure that the correct passkey was entered on the phone during the connection with the...
- Page 134 - the model and serial numbers of your phone - your warranty details - a clear description of the problem Then contact your local dealer or Samsung after-sales service. Description Solution If the contact card does not have a phone number or e-mail address, you cannot select it.
-
Page 135: Section 15: Health And Safety Information
Section 15: Health and Safety Information Topics Covered • Health and Safety Information • Samsung Mobile Products and Recycling • UL Certified Travel Adapter • Consumer Information on Wireless Phones • Road Safety • Responsible Listening • Operating Environment • Using Your Phone Near Other Electronic Devices •... - Page 136 These FCC exposure limits are derived from the recommendations of two expert organizations, the National Counsel on Radiation Protection and Measurement (NCRP) and the Institute of Electrical and Electronics Engineers (IEEE). In both cases, the recommendations were developed by scientific and engineering experts drawn from industry, government, and academia after extensive reviews of the scientific literature related to the biological effects of RF energy.
-
Page 137: Samsung Mobile Products And Recycling
Additional product specific SAR information can also be obtained at www.fcc.gov/cgb/sar. Samsung Mobile Products and Recycling Samsung cares for the environment and encourages its customers to recycle Samsung mobile phones and genuine Samsung accessories. Go to: http://www.samsung.com/us/consumer/type/ type.do?group=mobilephones&type=mobilephones for more information. -
Page 138: Consumer Information On Wireless Phones
DANGER - TO REDUCE THE RISK OF FIRE OR ELECTRIC SHOCK, CAREFULLY FOLLOW THESE INSTRUCTIONS. FOR CONNECTION TO A SUPPLY NOT IN NORTH AMERICA, USE AN ATTACHMENT PLUG ADAPTOR OF THE PROPER CONFIGURATION FOR THE POWER OUTLET. THIS POWER UNIT IS INTENDED TO BE CORRECTLY ORIENTATED IN A VERTICAL OR HORIZONTAL OR FLOOR MOUNT POSITION. - Page 139 What is FDA's role concerning the safety of wireless phones? Under the law, FDA does not review the safety of radiation-emitting consumer products such as wireless phones before they can be sold, as it does with new drugs or medical devices. However, the agency has authority to take action if wireless phones are shown to emit radio frequency energy (RF) at a level that is hazardous to the user.
- Page 140 FCC also regulates the base stations that the wireless phone networks rely upon. While these base stations operate at higher power than do the wireless phones themselves, the RF exposures that people get from these base stations are typically thousands of times lower than those they can get from wireless phones. Base stations are thus not the primary subject of the safety questions discussed in this document.
- Page 141 interval between the time of exposure to a cancer-causing agent and the time tumors develop - if they do - may be many, many years. The interpretation of epidemiological studies is hampered by difficulties in measuring actual RF exposure during day-to-day use of wireless phones. Many factors affect this measurement, such as the angle at which the phone is held, or which model of phone is used.
- Page 142 If you must conduct extended conversations by wireless phone every day, you • could place more distance between your body and the source of the RF, since the exposure level drops off dramatically with distance. For example, you could use a headset and carry the wireless phone away from your body or use a wireless phone connected to a remote antenna.
-
Page 143: Medical Equipment
Do wireless phone accessories that claim to shield the head from RF radiation work? Since there are no known risks from exposure to RF emissions from wireless phones, there is no reason to believe that accessories that claim to shield the head from those emissions reduce risks. -
Page 144: Road Safety
Additional information on the safety of RF exposures from various sources can be obtained from the following organizations (Updated 12/1/2006): FCC RF Safety Program: • http://www.fcc.gov/oet/rfsafety/ Environmental Protection Agency (EPA): • http://www.epa.gov/radiation/ Occupational Safety and Health Administration's (OSHA): • http://www.osha.gov/SLTC/radiofrequencyradiation/index.html National Institute for Occupational Safety and Health (NIOSH): •... - Page 145 Let the person you are speaking with know you are driving; if necessary, suspend the call in heavy traffic or hazardous weather conditions. Rain, sleet, snow, ice and even heavy traffic can be hazardous. Do not take notes or look up phone numbers while driving. Jotting down a "to do"...
-
Page 146: Responsible Listening
Responsible Listening Caution!: Avoid potential hearing loss. Damage to hearing occurs when a person is exposed to loud sounds over time. The risk of hearing loss increases as sound is played louder and for longer durations. Prolonged exposure to loud sounds (including music) is the most common cause of preventable hearing loss. - Page 147 Do not listen at any volume that causes you discomfort. If you experience ringing in • your ears, hear muffled speech or experience any temporary hearing difficulty after listening to your portable audio device, discontinue use and consult your doctor. You can obtain additional information on this subject from the following sources: American Academy of Audiology 11730 Plaza American Drive, Suite 300...
-
Page 148: Operating Environment
Operating Environment Remember to follow any special regulations in force in any area and always switch your phone off whenever it is forbidden to use it, or when it may cause interference or danger. When connecting the phone or any accessory to another device, read its user's guide for detailed safety instructions. -
Page 149: Potentially Explosive Environments
Other Medical Devices If you use any other personal medical devices, consult the manufacturer of your device to determine if it is adequately shielded from external RF energy. Your physician may be able to assist you in obtaining this information. Switch your phone off in health care facilities when any regulations posted in these areas instruct you to do so. -
Page 150: Fcc Notice And Cautions
all wireless phone networks or when certain network services and/or phone features are in use. Check with local service providers. To make an emergency call: If the phone is not on, switch it on. Key in the emergency number for your present location (for example, 911 or other official emergency number). -
Page 151: Other Important Safety Information
Cautions Any changes or modifications to your phone not expressly approved in this document could void your warranty for this equipment, and void your authority to operate this equipment. Only use approved batteries, antennas and chargers. The use of any unauthorized accessories may be dangerous and void the phone warranty if said accessories cause damage or a defect to the phone. -
Page 152: Availability Of Various Features/Ring Tones
Understanding the Power Save Feature If your phone is unable to find a signal after searching, a Power Save feature is automatically activated. If your phone is active, it periodically rechecks service availability or you can check it yourself by pressing any key. Anytime the Power Save feature is activated, a message displays on the screen. -
Page 153: Battery Standby And Talk Time
Use only Samsung-approved batteries and recharge your battery only with • Samsung-approved chargers. When a charger is not in use, disconnect it from the power source. Do not leave the battery connected to a charger for more than a week, since overcharging may shorten its life. -
Page 154: Care And Maintenance
Dispose of used batteries in accordance with local regulations. In some areas, the • disposal of batteries in household or business trash may be prohibited. For safe disposal options for Li-Ion batteries, contact your nearest Samsung authorized service center. Always recycle. Do not dispose of batteries in a fire. Care and Maintenance Your phone is a product of superior design and craftsmanship and should be treated with care. - Page 155 Do not store the phone in cold areas. When the phone warms up to its normal • operating temperature, moisture can form inside the phone, which may damage the phone's electronic circuit boards. Do not drop, knock or shake the phone. Rough handling can break internal circuit •...
-
Page 156: Section 16: Warranty Information
(d) malfunctions resulting from the use of Product in conjunction with accessories, products, or ancillary/peripheral equipment not furnished or approved by SAMSUNG; (e) defects or damage from improper testing, operation, maintenance, installation, or adjustment; (f) installation, maintenance, and service of Product, or (g) Product used or purchased outside the United States or Canada. - Page 157 (i) the battery has been charged by a battery charger not specified or approved by SAMSUNG for charging the battery, (ii) any of the seals on the battery are broken or show evidence of tampering, or (iii) the battery has been used in equipment other than the SAMSUNG phone for which it is specified.
- Page 158 STATED HEREIN. SOME STATES/PROVINCES DO NOT ALLOW LIMITATIONS ON HOW LONG AN IMPLIED WARRANTY LASTS, SO THE ABOVE LIMITATION MAY NOT APPLY TO YOU. IN ADDITION, SAMSUNG SHALL NOT BE LIABLE FOR ANY DAMAGES OF ANY KIND RESULTING FROM THE PURCHASE, USE, OR MISUSE OF, OR INABILITY TO USE...
- Page 159 Limited Warranty, or make additional warranties binding on SAMSUNG. Accordingly, additional statements such as dealer advertising or presentation, whether oral or written, do not constitute warranties by SAMSUNG and should not be relied upon. Precautions for Transfer and Disposal...
- Page 160 Important!: If you are using a handset other than a standard numeric keypad, dial the numbers listed in brackets. Phone: 1-888-987-HELP (4357) ©2007 Samsung Telecommunications America. All rights reserved. No reproduction in whole or in part allowed without prior written approval. Specifications and availability subject to change without notice.
-
Page 161: Index
Index ActiveSync Windows Media Player AT&T Music Community Exit Help me out ID song! Manage ID’s Music Apps Music Video Shop Music The Buzz Back Light Battery installing low indicator removing Bluetooth Device Stereo Cellular Video Alerts Customizing Favorites My Purchases Parental Controls Change the order of songs in a Playlist Charging a Battery... - Page 162 Standard Limited Warranty Stereo Bluetooth Device Transferring Music From the Digital Music Stores Windows Media Player Travel adapter UL Certification Understanding Your Phone Front View of Your Phone Unlock the Keypad Video Categories Video Clip Viewing Video Share In-Call Share a Recorded Video Warranty Information Windows Media Player Sync List...