RocketFish RF-HD3035 User Manual
Usb 3.0 3.5" sata hard disk drive enclosure
Hide thumbs
Also See for RF-HD3035:
- Manual de l'utilisateur (20 pages) ,
- Guía del usuario (20 pages) ,
- Quick setup manual (2 pages)
Table of Contents
Advertisement
Advertisement
Table of Contents

Related Manuals for RocketFish RF-HD3035


Summary of Contents for RocketFish RF-HD3035
- Page 1 USB 3.0 3.5" SATA Hard Disk Drive Enclosure RF-HD3035 User Guide...
-
Page 2: Table Of Contents
USB 3.0 3.5" SATA Hard Disk Drive Enclosure Contents Introduction ...3 Safety information ...3 Important safety instructions ...3 Features...3 Package contents ...3 System requirements ...3 Setting up your hard drive enclosure ...4 Installing your hard drive in the enclosure ...4 Connecting the enclosure to your computer...5 Installing the software...8 Using your enclosure ...9... -
Page 3: Introduction
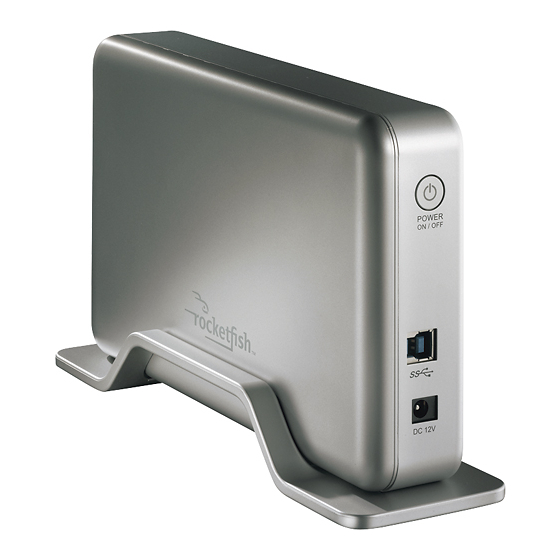
Congratulations on the purchase of your new Rocketfish RF-HD3035 external hard drive enclosure kit. The USB 3.0 Rocketfish 3.5" SATA hard drive enclosure lets you install a high-speed SATA hard drive and connect it to a computer via a USB 3.0 port. -
Page 4: Setting Up Your Hard Drive Enclosure
• Supports Microsoft Windows XP, Windows Vista, and Windows 7 operating systems. • Supports MAC OS X version 10.4 or higher operating system (USB 2.0 only). For highest performance and reliability, install the latest updates and service pack (SP). For Windows, go to the Start menu and select Windows Update. -
Page 5: Connecting The Enclosure To Your Computer
USB 3.0 capability, you can plug the USB 3.0 cable into any available USB 2.0 port. To connect the enclosure to your computer: Plug the power cord into the enclosure, then plug the AC power adapter into an AC power outlet. RF-HD3035... -
Page 6: Creating A New Partition
Plug the USB 3.0 B type connector into the USB port on the enclosure, then plug the USB 3.0 A type connector into an available USB 3.0 port on your computer. USB 3.0 A-type connector Press the Power button on the enclosure. The operating system automatically detects and sets up the new drive. - Page 7 Type a label name into the label field if you want to see the name of your memory card appear under its memory card icon. Click Start. The card is formatted. When the formatting is completed, click OK on the Format Complete window. Click Close to finish. RF-HD3035...
-
Page 8: Installing The Software
Installing the software The installation CD includes backup software to enable you to back up your files. Note: This Roxio Back On Track software runs only on Windows 7, Windows Vista, and Windows XP computers using USB. Important: Before installing the backup software, make sure that your Windows operating system has been updated to the latest service pack. -
Page 9: Using Your Enclosure
Using your enclosure Starting Roxio Back On Track To start Roxio Back On Track: Press the backup button (the button with the Rocketfish logo on it) on the front of the enclosure. -OR- Click Start, BackOnTrack (folder), then click BackOnTrack. -
Page 10: Selecting Files To Back Up
Selecting files to back up You can back up all of the files in a selected path or limit your project to certain file categories. The following categories can be selected from the project window: Email, Financial, Music, Photos, Productivity, and Video and Recorded TV. You can also create one custom category. -
Page 11: Creating A New Backup Files Project
OK. If you decided to run the project now, a progress screen will inform you when the project has been completed. Click Done to return to the project window. Note: Scheduled projects must be saved before they can be run. RF-HD3035... -
Page 12: Using The Backup Files Scheduler
To open and run a saved Backup Files project: Click File. If the project is listed on the File menu, select it. If the project is not listed, click Open and use the dialog box to navigate to the project file. By default, project files are saved in your Windows Vista and Windows 7 Documents folder or Windows XP My Documents folder. -
Page 13: Backup Files Options
Follow the on-screen instructions to set up a backup project. After a backup project is set up, push the One-Touch button to backup your data. To modify One-Touch backups in the future, follow the instructions for setting up backup projects. RF-HD3035... -
Page 14: Restoring Files
Restoring files The Restore Files project restores individual files and folders that you have protected using the Backup Files project. With Restore Files, you select a backup, search for the files or folder you would like to restore, and then click the action button. The files will be restored to the location you choose. -
Page 15: Troubleshooting
• Reorient or relocate the receiving antenna. RF-HD3035... - Page 16 • Increase the separation between the equipment and receiver. • Connect the equipment into an outlet on a circuit different from that to which the receiver is connected. • Consult the dealer or an experienced technician for help. FCC warning Changes or modifications not expressly approved by the party responsible for compliance with the FCC Rules could void the user’s authority to...
-
Page 17: One-Year Limited Warranty
Products and parts replaced under this warranty become the property of Rocketfish and are not returned to you. If service of Products and parts are required after the Warranty Period expires, you must pay all labor and parts charges. - Page 18 Distributed by Best Buy Purchasing, LLC 7601 Penn Avenue South, Richfield, MN 55423-3645 USA © 2010 BBY Solutions, Inc. All rights reserved. ROCKETFISH is a trademark of BBY Solutions, Inc. All other products and brand names are trademarks of their respective owners. 10-1087...