Yaesu FT1DR Quick Manual
C4fm fdma
Hide thumbs
Also See for FT1DR:
- Operating manual (156 pages) ,
- Instruction manual (68 pages) ,
- Technical supplement (62 pages)
Advertisement
Quick Links
Quick Manual
1
2
3
4
5
6
7
8
9
10
11
12
13
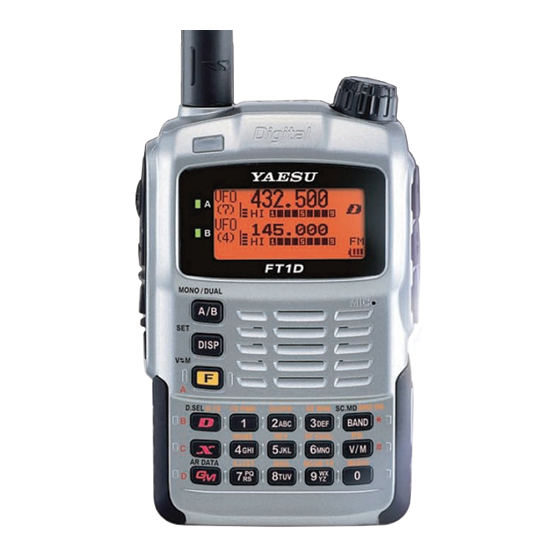
1 Antenna (SMA)
14 DIAL knob
2 Strobe
15 GPS antenna
3 A-band BUSY/TX lamp
16 Display
B-band BUSY/TX lamp
17 MIC/SP Jack
4 PTT switch
18 EXT DC IN Jack
5 MONI/SQL adjustment switch
19 DATA Connector
6 VOL switch
20 Microphone
7 Power switch
21 Speaker
8 A/B-band toggle key
22 Battery pack (back)
9 DISP toggle/SET mode key
23 Micro SD memory card slot
10 Function/MW key
24 BAND toggle/SCOPE key
11 Communication mode toggle/
25 VFO/memory mode toggle/DW key
WIRES-X key
26 Number keys (for setting
12 GM/SYNC key
frequency and selecting function)
13 ENT key
Entering/Changing Call Sign or Name
Enter a call sign or name when
The entered call sign or name
operating the transceiver for the
can be changed at any time.
first time or after a full reset.
Hold down d for one second
14
or longer.
Select "12 CALLSIGN" by
15
turning the D [DIAL] knob.
16
17
18
19
Turn the D [DIAL] knob
20
and press E, or use the
keyboard. F removes one
21
character at a time.
Change the call sign or name
22
by following the same steps as
the entry procedure.
23
24
Press the p [PTT] button, or
25
hold down E for one second,
to save the setting.
26
Press the p [PTT] button.
If a Problem or Confusion Occurs During Operation
Pressing the p [PTT] button, while configuring settings in SET
mode, usually returns to the main screen of the current operating
mode.
* Full reset: Hold down x, G and E and press P (Power). Press
F in response to the screen directions. (This also clears all content
registered in the memory.)
* Reset only the SET mode settings: Hold down x and t and press
P (Power). Press F in response to the screen directions.
EH044M551
Adjusting the Volume
Hold down V, while turning the D knob to adjust the volume.
Press the V button briefly to turn the mute function on or off.
Selecting the Operating Band and Changing
the Frequency
Toggle between operating bands by pressing A.
Press E.
The operating band frequency is displayed in large numbers.
Hold down A for one second or more to toggle between
mono band operation, in which only the operating band is
displayed, and the dual band operating display.
Presses B to switch between the operating receive
frequency bands displayed in the table below.
Press F and then B, to switch between the receive
bands in the opposite direction.
Transmission is possible in the 144 MHz and 430 MHz Amateur
bands.
Reception Frequency Bands
0.5MHz - 1.8MHz (AM radio band)
76 (88) MHz - 108MHz (FM radio band)
1.8MHz - 30MHz (short wave band)
30MHz - 76 (88) MHz (50MHz band)
108MHz - 137MHz (aviation radio band)
137MHz - 174MHz (144MHz band)
174MHz - 222MHz
222MHz - 420MHz (information radio band (1))
420MHz - 470MHz (430MHz band)
470MHz - 774 (800) MHz
*B-band is capable of up to 580MHz only
803 (800) MHz - 999MHz (information radio band (2))
In VFO mode, Change the frequency by turning the D [DIAL]
knob, or enter a frequency using the number keys.
(Press T to toggle between VFO and memory mode.)
Selecting a Communication Mode
Usually, select the auto communication mode. This automatically
changes the communication mode to that of the received signal.
A -
* Digital communication is only possible on A-band.
Band
Press X to toggle between communication modes.
"Analog (f)" → "Auto (_: Auto changing)" → "Digital
B -
(o)" → "Wide digital (W)"
Band
o: A simultaneous voice/data communication mode, in
which information (such as the call sign and position) is
communicated at the same time as the voice, in standard
C4FM modulation mode.
W: A full rate, high definition mode with emphasis on sound
quality for voice communication.
k: A high-speed data communication mode, to which the
radio automatically adjust when an image or GM operation
range signal is sent or received.
Changing Transmit Power Output
Press F, then 1, and then turn the D [DIAL] knob.
"HIGH" (5W) → "LOW1" (0.1W) → "LOW2" (1W) → "LOW3" (2.5W) →
A-Band B-Band
(when connected to the lithium ion battery pack or an external power
source.)
──
──
Press p [PTT] to return to the frequency display.
──
Locking the Keys and Switch
──
Press P (power switch) briefly to lock the Keys and Switches.
Unlock by pressing P (power switch) again.
──
( ): EXP/European Version
Tuning the Frequency
Advertisement

Related Manuals for Yaesu FT1DR


Summary of Contents for Yaesu FT1DR
- Page 1 Entering/Changing Call Sign or Name Adjusting the Volume Tuning the Frequency Quick Manual Enter a call sign or name when The entered call sign or name Hold down V, while turning the D knob to adjust the volume. In VFO mode, Change the frequency by turning the D [DIAL] operating the transceiver for the can be changed at any time.
- Page 2 16 groups (up to 24 members each) Press d to display the compass screen. other YAESU C4FM digital amateur transceivers; and also to range, and members out of range. The direction and distance of separate from “ALL” operation.