Table of Contents
Troubleshooting

Related Manuals for Generac Power Systems E

Summary of Contents for Generac Power Systems E
- Page 1 ® POWER SYSTEMS, INC. Operator’s Manual “E” Option Control Panels This manual contains standard drawings and schematics. For specific drawings, please refer to the Owner’s Manual of the unit. This manual should remain with the unit.
- Page 2 Important Safety Instructions E Option Control Panels SAVE THESE INSTRUCTIONS – The manufacturer suggests that these rules for safe operation be copied and posted in potential hazard areas. Safety should be stressed to all operators and potential operators of this equipment.
-
Page 3: Table Of Contents
Section 2 — Operation......14 Section 6 — Exploded Views and Parts Lists ......60 Output Function Table ..........14 E Panel Master Control Box Configuration Settings15 Section 7 — Notes ......76 E Panel Display Map ..........18 AUTHORIZED SERVICE DEALER LOCATION To locate the GENERAC AUTHORIZED SERVICE... -
Page 4: Section 1 — General Information
There is a keypad with six dropped. If the E panel detects that the line has been keys that are used for operating the display and select- dropped, it will disconnect the modem so that it is ing the various pages. - Page 5 The user will be able to scroll between the • Cooling down pages using the left and right arrow keys. Certain actions also cause the display to change pages, e.g., • Stopping when an alarm becomes active, the display automat- •...
-
Page 6: Alarms
Section 1 — General Information E Option Control Panels If an alarm becomes active, the display will switch to If an alarm condition occurs when the user is enter- this page and display the highest priority alarm mes- ing data, the data will be ignored, and the display will sage. -
Page 7: Alarm Processing
INPUT ALARM FUNCTIONS active regardless of the state of the generator. The E option panel will monitor the status of the ana- • Immediate: In this mode, the alarm is not active log and digital inputs, and generate alarm messages when the generator is stationary. -
Page 8: Programmable Parameters
PROGRAMMABLE PARAMETERS This type of alarm will act similarly to the non-latched The E option panel allows the user to configure vari- warning, except that the alarm does not clear when the ous options to control the generator starting and alarm condition clears. - Page 9 Note that if this function is controlled elsewhere more detail. (e.g., within a transfer switch), this time should be set to zero. The generator is ready to accept load when this timer expires. This parameter can be assigned to an output relay.
- Page 10 The set-points are user-definable, and the and the alarm type. A digital input to the E panel is alarms can be either non-latching, latching or shut- NOT a voltage sourced input, but a dry contact clo- down.
-
Page 11: E Panel Modem Setup Procedure
NOTE: NOTE: Use shielded cable, 100 feet maximum in length. Connect the shield drain wire to Pin 1 on the E Generac only supports the US Robotics 56k V90 panel end only. Sportster modem for connection of the “E” Panel to the phone line. -
Page 12: Additional Panel Components
RS485, to meet NFPA 110. Only one communica- In addition to the control module, the E option panel tion port is available for either a modem or remote contains the following components (see Figure 1.6): annunciator. -
Page 13: Checking/Replacing The E Panel Control Module Internal Fuse
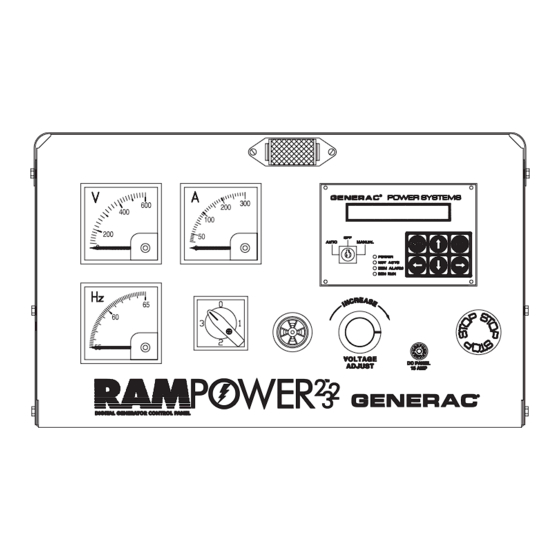
Section 1 — General Information E Option Control Panels VOLTAGE ADJUST POTENTIOMETER 4. Using a multimeter (e.g., Fluke 87) set to the diode range, measure between pins 1 (BAT+) and 2 (BAT- This potentiometer permits the operator to “fine ) of connector CON4 on the module. -
Page 14: Wiring Examples
Program set-up for the user programmable inputs is carried out in the Digital I/O Menu of the E module (please refer to the Display Map on pages 18-19). Each of the eight inputs has four parameters in which spe- cific options must be selected to make the annuncia- tion function properly. -
Page 15: Programming Examples
000000) and press ENTER. ber 5 (B/C Fail). With the relay de-energized, terminal From the ENGINE PARAMETER MENU, press the 5 will be grounded, signaling the E module to activate RIGHT arrow to get to the DIGITAL I/O MENU. on Programmable Input 1. -
Page 16: Section 2 — Operation
Section 2 — Operation E Option Control Panels OUTPUT FUNCTION TABLE Output Function Name Description Function ID Output Disabled Output not in use Common Alarm Active for all latched, non-latched and shutdown alarms Low Oil Pressure Warning Active after hold off time... - Page 17 Section 2 — Operation E Option Control Panels E PANEL MASTER CONTROL BOX CONFIGURATION SETTINGS ENGINE PARAMETER MENU Parameter Value Units Connection Mode (C1) RS232 Port Direct Connection Only or RS485 Port Master Password Restore All Values to Required (Factory Only)
- Page 18 Section 2 — Operation E Option Control Panels DIGITAL I/O MENU Channel Message Setting Alarm Enable Alarm Type Output 1 (F1) Output 2 (F1) Output 3 (F1) Preheat Output Function (F1) User Input 1 *1 Battery Charge Fail (S1) (A1)
- Page 19 Section 2 — Operation E Option Control Panels GenLink ® Communications Flowchart TABLE A Dip Switch Setting Down Down Down Down TABLE B “E” Panel Pin Modem Pin Generac ® Power Systems, Inc. 17...
- Page 20 Section 2 — Operation E Option Control Panels E PANEL DISPLAY MAP 18 Generac ® Power Systems, Inc.
- Page 21 Section 2 — Operation E Option Control Panels Generac ® Power Systems, Inc. 19...
-
Page 22: Diagnosis
E Option Control Panels OIL PRESSURE SENSING TESTING THE CONTROL PANEL (Refer to Figure 3.1) It is relatively easy to do a thorough test of the E OVERVIEW Panel's Oil Pressure input. An analog Oil Pressure Sender (OPS) is used for Place the Auto/Off/Manual switch to the Off position monitoring the engine oil pressure. - Page 23 2.2.2 If these tests pass at the back of the E 2. Check the 69 wire in the Deutsch connector (only Panel, but failed at the terminal strip, used on the "water tight connector"...
-
Page 24: Low Coolant Level
Panel to detect a Low Coolant Level condition. tions on the control panel terminal strip. Wire number 85 is used to connect the LCL to the E 4. Compare this measurement to the measurement Panel. The Ground for the LCL is made through the taken directly across the OPS. - Page 25 2.2.3 Once the hold off timer expires, the E TESTING THE CONTROL PANEL Panel will shut the engine down and It is relatively easy to do a thorough test of the E display a low coolant alarm. Panel's Low Coolant Level input.
- Page 26 The Low coolant level input is active low. This means 6.2 Check to see that both screws are tightened that a short to ground on the 85 line will cause the E securely. These screws should be tightened to Panel to shut down for Low coolant level.
-
Page 27: Coolant Temperature Sensing
This sender is con- Deutsch Connector terminal strip ("Sealed Connector" nected to the E Panel and allows the E Panel to mon- This Ground (0) Control Panels only) connection is itor and display the temperature of the Coolant sys-... - Page 28 2. Look for the following response from the E Panel. 2.2.2 If these test pass at the back of the E The E Panel should respond in either one of the Panel, but failed at the terminal strip,...
-
Page 29: Oil Temperature Sensing
(Refer to Figure 3.4) TESTING THE CONTROL PANEL OVERVIEW It is relatively easy to do a thorough test of the E Panel's Oil Temperature input. Oil Temperature sensing is an OPTION offered with the E Panel. When ordered, an analog Oil Place the Auto/Off/Manual switch to the Off position Temperature Sender (OTS) is mounted in the oil pan. - Page 30 1. Remove the 523 wire from the control panel ter- 2.2.2 If these tests pass at the back of the E minal strip. This simulates a sender open circuit Panel, but failed at the terminal strip, condition.
-
Page 31: Ac Voltage Display
5.2 Check to see if the wire is pinched anywhere along the run. A wire that is pinched between The scaling factor should be checked if the E Panel is the sheet metal can cause the 523 wire to not displaying the line to line voltage correctly. - Page 32 Figure 3.6 — Control Panel RPM Sensor conditions that will result in RPM sensor loss. Connections 1. No RPM signal at crank. The E Panel will monitor Control Panel RPM Sensor Connections the RPM sensor during the crank cycle. If no sig-...
-
Page 33: Engine Does Not Crank
Verify this number is not set to zero. 2. Start timer. This number (in seconds) defines the length of time the E Panel will keep the starter energized during a start attempt. Verify this num- Quick-Connect Terminals ber is not set to zero. - Page 34 5. Preheat timer. This number (in seconds) defines 4.2 "Attempting to start": The E Panel is activat- the length of time the E Panel will preheat prior to ing all the following outputs: cranking.
- Page 35 2. Check to see if the terminal nuts are tightened start." securely, but be careful not to over tighten them. 1.1 If it does not, then the E Panel has failed and 2.1 Coil terminals (10-32 studs and nuts). These needs to be replaced.
-
Page 36: Overcrank
Panel is displaying "attempting to start." OVERCRANK Wire number 14/219 is used to connect CON3-1 from the E Panel to the fuel solenoid. (Wire #14 used in a FAILED TO START 12 volt system, wire #219 used in a 24 volt system.) -
Page 37: Appendix — Phoenix And Deutsch Connectors
E Option Control Panels Figure 3.9 is a typical wiring schematic using a sec- Figure 3.9 — Typical Wiring Schematic Using a ondary relay for the E Panel fuel output. Refer to the Secondary Fuel Relay unit’s wiring schematics and diagrams to determine... - Page 38 Appendix — Phoenix and Deutsch Connectors E Option Control Panels HD30 Type Step 2: Wire Stripping Step 1: Contact Removal Solid Contacts Contact Part Wire Gauge Strip Length 1. With rear insert toward (inches) Range Number you, snap appropriate size...
- Page 39 Appendix — Phoenix and Deutsch Connectors E Option Control Panels DT Type Step 2: Wire Stripping Step 1: Contact Removal Solid Contacts Contact Part Wire Gauge Strip Length 1. Remove wedgelock using Range (inches) Number needlenose pliers or a hook shaped wire.
-
Page 40: Section 4 — Glossary
(by pressing the Enter key), the back light will stop flashing, and the alarm LED will be on • ANALOG INPUT: An analog input to the E control continuously. The message will be displayed on the panel is a voltage sourced input with a zero volt to 10-volt range. -
Page 41: Section 5 — Electrical Data
Section 5 — Electrical Data E Option Control Panels Generac ® Power Systems, Inc. 39... - Page 42 Section 5 — Electrical Data Wiring Diagram (For use with Marathon Alternator) – Drawing No. 0D4267A-A For units manufactured with a watertight connector. Standard diagram. Please refer to the Owner’s Manual of the unit for specific details. C2688 C3206 BATTERY SPEED PROBE BATTERY...
- Page 43 Section 5 — Electrical Data Wiring Diagram (For use with Marathon Alternator) – Drawing No. 0D4267C For units manufactured with a watertight connector. Standard diagram. Please refer to the Owner’s Manual of the unit for specific details. Generac ® Power Systems, Inc. 41...
- Page 44 Section 5 — Electrical Data Wiring Diagram (For Use With Marathon Alternator) – Drawing No. 0D4267-A For units manufactured with a watertight connector. Standard diagram. Please refer to the Owner’s Manual of the unit for specific details. LOCATED ON BOTTOM OF PANEL 485+ 485- C3207...
- Page 45 CON4 - PLUG 3.5 6 POS - EMERGENCY STOP SWITCH - 15 AMP FUSE - FREQUENCY METER - PANEL LAMP - E-PANEL CONTROLLER ASSEMBLY - VOLT/AMMETER SWITCH - TERMINAL BLOCK 2(12 POS) - TERMINAL BLOCK 4(9 POS) - VOLTMETER Generac ®...
- Page 46 Section 5 — Electrical Data Wiring Diagram (For Use With Generac Alternator) – Drawing No. 0D2378-C For units manufactured with a watertight connector. Standard diagram. Please refer to the Owner’s Manual of the unit for specific details. OPTIONAL BASETANK WIRE COLOR FUNCTION WIRE #'s LEGEND...
- Page 47 HZ = FREQUENCY METER BLUE SIGNAL/SENSING S15,S16,64,65 L1 = PANEL LAMP BLACK AC/MISC 68,69,85,502,509, MC1 = E-PANEL CONTROL ASSEMBLY YELLOW UNIT STATUS 515,523,567,575,589 PFG = PANEL FRONT GROUND STUD SW1 = VOLT/AMMETER SWITCH VM = VOLT METER VR1 = VOLTS TRIM POTENTIOMETER Generac ®...
- Page 48 FREQUENCY METER 50Hz AUTOMATIC 070042A FREQUENCY METER 60Hz 0C8481 PANEL LAMP 12V VOLTAGE 070202 PANEL LAMP 24V REGULATOR 0A4087 E-PANEL CONTROLLER ASSEMBLY (AVR) VARIOUS FIELD BOOST RESISTOR 044213 CHARGE ALT EXCITER RESISTOR 061945 VOLT/AMMETER SWITCH VOLTMETER 0-300V 070044 VOLTMETER 0-600V...
- Page 49 Schematic Diagram (For Use With Generac Alternator) – Drawing No. 0D2379 For units manufactured with a watertight connector. Standard diagram. Please refer to the Owner’s Manual of the unit for specific details. DSUB-1 CON4-6 DSUB-2 CON4-4 DSUB-3 'E' PANEL CON2-10 DSUB-4 CONTROL BOX DSUB-5 Generac ® Power Systems, Inc. 47...
- Page 50 Section 5 — Electrical Data Wiring Diagram (For Use With Generac Alternator) – Drawing No. 0C8319-E For units manufactured starting the 2nd quarter of 2000 thru 3rd quarter 2002. Standard diagram. Please refer to the Owner’s Manual of the unit for specific details.
- Page 51 Section 5 — Electrical Data Wiring Diagram (For Use With Generac Alternator) – Drawing No. 0C8319-E For units manufactured starting the 2nd quarter of 2000 thru 3rd quarter 2002. Standard diagram. Please refer to the Owner’s Manual of the unit for specific details.
- Page 52 Section 5 — Electrical Data Schematic Diagram (For Use With Generac Alternator) – Drawing No. 0C8318 For units manufactured starting the 2nd quarter of 2000 thru 3rd quarter 2002. Standard diagram. Please refer to the Owner’s Manual of the unit for specific details. 50 Generac ®...
- Page 53 Section 5 — Electrical Data Schematic Diagram (For Use With Generac Alternator) – Drawing No. 0A5501 For units manufactured prior to the 2nd quarter of 2000. Standard diagram. Please refer to the Owner’s Manual of the unit for specific details. Generac ®...
- Page 54 Section 5 — Electrical Data Wiring Diagram (For Use With Generac Alternator) – Drawing No. 0A5502-D For units manufactured prior to the 2nd quarter of 2000. Standard diagram. Please refer to the Owner’s Manual of the unit for specific details. 52 Generac ®...
- Page 55 Section 5 — Electrical Data Wiring Diagram (For Use With Generac Alternator) – Drawing No. 0A5502-D For units manufactured prior to the 2nd quarter of 2000. Standard diagram. Please refer to the Owner’s Manual of the unit for specific details. Generac ®...
- Page 56 Section 5 — Electrical Data Schematic Diagram (For Use With Marathon Alternator) – Drawing No. 0C1375-C For units manufactured prior to the 2nd quarter of 2000. Standard diagram. Please refer to the Owner’s Manual of the unit for specific details. 54 Generac ®...
- Page 57 Section 5 — Electrical Data Schematic Diagram (For Use With Marathon Alternator) – Drawing No. 0C8326-B For units manufactured starting the 2nd quarter of 2000. Standard diagram. Please refer to the Owner’s Manual of the unit for specific details. POSITIVE DC FROM BATTERY CON4-1 CON1-1 GROUND FROM ENGINE...
- Page 58 Section 5 — Electrical Data Wiring Diagram (For Use With Marathon Alternator) – Drawing No. 0C1376-D For units manufactured prior to the 2nd quarter of 2000. Standard diagram. Please refer to the Owner’s Manual of the unit for specific details. LOCATED ON BOTTOM OF PANEL NOTES: ALL WIRING 18 AWG UNLESS NOTED.
- Page 59 Section 5 — Electrical Data Wiring Diagram (For Use With Marathon Alternator) – Drawing No. 0C1376-D For units manufactured prior to the 2nd quarter of 2000. Standard diagram. Please refer to the Owner’s Manual of the unit for specific details. LOCATED ON FRONT OF PANEL ALARM HORN N/C 12 AWG...
- Page 60 Section 5 — Electrical Data Wiring Diagram (For Use With Marathon Alternator) – Drawing No. 0C8327-C For units manufactured starting the 2nd quarter of 2000. Standard diagram. Please refer to the Owner’s Manual of the unit for specific details. 58 Generac ®...
- Page 61 Section 5 — Electrical Data Wiring Diagram (For Use With Marathon Alternator) – Drawing No. 0C8327-C For units manufactured starting the 2nd quarter of 2000. Standard diagram. Please refer to the Owner’s Manual of the unit for specific details. Generac ®...
-
Page 62: Section 6 — Exploded Views And Parts Lists
Section 6 — Exploded Views and Parts Lists Control Panel (For Use With Generac Alternator) – Drawing No. 0D2383-J For units manufactured prior to the 3rd quarter 2002, with a watertight connector. Standard drawing. Please refer to the Owner’s Manual of the unit for specific details. VIEW A DETAIL 1 HINGE ASSEMBLY... - Page 63 022158 NUT HEX #10-32 STEEL 0C8229 DCL-E PNL TS#2 (W/FS) 022152 WASHER LOCK #10 0A6577 DECAL T STRIP 3 E PNL 023897 WASHER FLAT #10 ZINC 0D3153 DECAL T STRIP TB4 W/SEALED CON 024469 SCREW TAPTITE #10-32 X 3/8 BP...
- Page 64 Section 6 — Exploded Views and Parts Lists Control Panel (For Use With Marathon Alternator) – Drawing No. 0D4267B-H For units manufactured with a watertight connector. Standard drawing. Please refer to the Owner’s Manual of the unit for specific details. 52 53 54 43 44 44 45...
- Page 65 LUG DIS SN-PLG I-T 22-18 CU 0A6323 CHASSIS AVR & E-GOV 036261 RIVET POP .125 X ..275 AL 0D4267D HARNESS "E" CONTROL PNL WT CON 040479 MOUNT VIBR 1.0 X 1.0 X 1/4-20 0A4087 MSTR CTRL BOX E-PNL 0A2273 HINGE RAM PANEL...
- Page 66 Section 6 — Exploded Views and Parts Lists Control Panel (For Use With Generac Alternator) – Drawing No. 0D8764-H For units manufactured starting the 3rd quarter 2002, with a watertight connector. Standard drawing. Please refer to the Owner’s Manual of the unit for specific details. VIEW A DETAIL 1 HINGE ASSEMBLY...
- Page 67 WASHER FLAT #8 ZINC 0C8229 DCL-E PNL TS#2 (W/FS) 036918 SCREW PPHM #8-32 X 1/2 0A6577 DECAL T STRIP 3 E PNL 0A2284 SCREW SWAGE 8-32 X 1/2 Z/YC 0D3153 DECAL T STRIP TB4 W/SEALED CON 022158 NUT HEX #10-32 STEEL...
- Page 68 Section 6 — Exploded Views and Parts Lists Control Panel (For Use With Generac Alternator) – Drawing No. 0D8765-G For units manufactured starting the 3rd quarter of 2002. Standard drawing. Please refer to the Owner’s Manual of the unit for specific details. SEE VIEW "B"...
- Page 69 ITEM PART NO. QTY. DESCRIPTION 0D8759 PANEL BOTTOM/BACK (E-PANEL) 061945 SWITCH 6A AMP/V SELECTOR 0D8754 "E" PANEL FRONT W/SILK SCREEN 067680 ASSY VOLTAGE REGULATOR 60HZ 0A6322 CONTROL PANEL RIGHT SIDE 092952 ASSY VOLTAGE REGULATOR 50HZ 0A6321 CONTROL PANEL LEFT SIDE...
- Page 70 Section 6 — Exploded Views and Parts Lists Control Panel (For Use With Generac Alternator) – Drawing No. 0A6325-N For units manufactured prior to the 2nd quarter of 2000. Standard drawing. Please refer to the Owner’s Manual of the unit for specific details. 68 Generac ®...
- Page 71 0A6321 CONTROL PANEL LEFT SIDE 0A3393 DECAL, AVR COVER 0A6323 CHASSIS AVR/E GOV. 0A1441C COVER PLATE, E-GOV 0A6326 HARNESS E PNL. MAIN 0A3394 DECAL, E-GOV COVER SEE TABLE B CIRCUIT BREAKER 030809 GROMMET 1/8-11/16 044213 RESISTOR 10 OHM 12W 028739 TIE WRAP 4"...
- Page 72 Section 6 — Exploded Views and Parts Lists Control Panel (For Use With Marathon Alternator) – Drawing No. 0C3879-B For units manufactured prior to the 2nd quarter of 2000. Standard drawing. Please refer to the Owner’s Manual of the unit for specific details. 40 56 43 44 VIEW A...
- Page 73 036901 SCREW PPHM #6-32 X 3/8 034616 FITTING STRAIGHT 3/4 022155 WASHER LOCK #6 0C3207 DECAL T STRIP 1 E PNL 022985 WASHER FLAT #6 ZINC 0A6576 DECAL T STRIP 2 E PNL 0C2428 SCREW PHTT #6-32 X 1/2 ZYC...
- Page 74 Section 6 — Exploded Views and Parts Lists Control Panel (For Use With Generac Alternator) – Drawing No. 0C8459-J For units manufactured starting the 2nd quarter of 2000 thru 3rd quarter 2002. Standard drawing. Please refer to the Owner’s Manual of the unit for specific details. SEE VIEW "B"...
- Page 75 ASSY VOLTAGE REGULATOR 50HZ 0A6321 CONTROL PANEL LEFT SIDE 0A2275 DOOR-STOP RAM PANEL 0E3550 CHASSIS, UNIVERSAL 0A2400A TRUNKING 180MM 0C8320 HARNESS E PNL. WAUK (W/FS) 0A1441B COVER PLATE AVR SEE TABLE B CIRCUIT BREAKER 0C1127 DECAL AVR COVER 044213 RESIST MISC 10RX12W 0A1441C...
- Page 76 Section 6 — Exploded Views and Parts Lists Control Panel (For Use With Marathon Alternator) – Drawing No. 0C8460-G For units manufactured starting the 2nd quarter of 2000. Standard drawing. Please refer to the Owner’s Manual of the unit for specific details. 52 53 27 38 VIEW A...
- Page 77 CONTROL PANEL LEFT SIDE 074130 LUG DIS SN-PLG I-T 22-18 CU 0E3550 CHASSIS, UNIVERSAL 036261 RIVET POP .125 X .129-.133/#30 0C8328 HARNESS E PANEL MAIN 040479 MOUNT VIBR 1.00 X 1.00 X 1/4-20 0A4087 MASTER CONTROL BOX 0A2273 HINGE RAM PANEL SEE NOTE...
-
Page 78: Section 7 — Notes
Section 7 — Notes E Option Control Panels 76 Generac ® Power Systems, Inc. - Page 79 Section 7 — Notes E Option Control Panels Generac ® Power Systems, Inc. 77...
- Page 80 GENERAC ® POWER SYSTEMS, INC. P.O. BOX 8 WAUKESHA, WI 53187 Part No. 0A7605 Revision K (06/17/03) Printed in U.S.A.