Canon ME20F-SHN Setup Manual
Hide thumbs
Also See for ME20F-SHN:
- Button operation manual (44 pages) ,
- Network operation manual (185 pages)

Related Manuals for Canon ME20F-SHN


Summary of Contents for Canon ME20F-SHN
-
Page 1: Network Camera
Network Camera Setup Guide ENGLISH This User Manual should be read before using the network camera. -
Page 2: Network Connection
Highlights of the ME20F-SHN The Canon ME20F-SHN Network Camera boasts numerous features that allow it to excel in a variety of situations. The following highlights some of the ways that this camera can meet your needs. HD Video Network Connection... -
Page 3: Table Of Contents
Table of Contents 1. Introduction 4 3. External Connections 26 Types of User Manuals 4 Connecting to an External Recorder 26 Conventions Used in this Manual 4 Outputting a Recording Command to an External Recorder 26 Names of Parts 5 Operating Methods of the Camera 10 Connecting to RS-422/485 Terminals 28 Connecting to External Devices 29... -
Page 4: Introduction
"Shooting screen" refers to the screen in which the shooting image and onscreen displays appear. • Some screenshots have been altered to make them easier to read. • Illustrations in the manual show the camera with a Canon EF 70-200mm f/2.8L IS II USM lens or Canon CN7x17 KAS S/E1 lens attached. -
Page 5: Names Of Parts
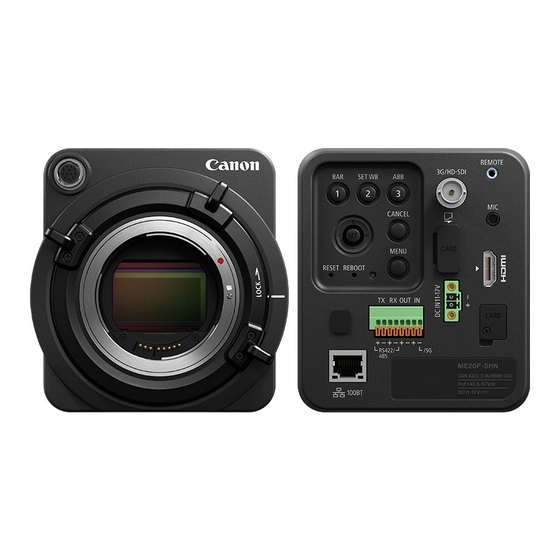
Names of Parts Names of Parts Back view BAR (color bars) button/Assignable button CANCEL button (A Button Operation 1 (A Button Operation Guide) Guide) SET WB (custom white balance) button/ 10 REMOTE (remote control) terminal Assignable button 2 (A Button Operation (A 31) Guide) For connecting to the optional RC-V100... - Page 6 Names of Parts Front view LENS terminal (A 19) EF-S lens mount index (A 18) Lens mount handle (A 18) EF lens contacts EF lens mount index (A 18) EF lens mount (A 18)
- Page 7 Names of Parts Top view Socket for 0.64 cm (1/4") screws (A 22) TB-1 Tripod Adapter Base for tripods with Socket for 0.95 cm (3/8") screws (A 22) 0.95 cm (3/8") screws (A 22)
- Page 8 Names of Parts Bottom view Socket for 0.64 cm (1/4") screws (A 22) TB-1 Tripod Adapter Base for tripods with Socket for 0.95 cm (3/8") screws (A 22) 0.95 cm (3/8") screws (A 22)
- Page 9 Names of Parts Right side view Left side view Air intake vent (A 22) Exhaust ventilation outlet (A 22) Focal plane mark...
-
Page 10: Operating Methods Of The Camera
Operating Methods of the Camera Operating Methods of the Camera There are two ways to operate the camera. You can operate it using the computer from a remote location via the network or directly operate it using the buttons on the back of the camera. Each method has different features as described below. -
Page 11: Setup
Setup Example Configuration The following example configuration illustrates how to connect the camera to external devices such as a monitor (A 16) or video recorder (A 26). RC-V100 Remote Controller (optional) External recorder RC-V100's REMOTE A terminal 3G/HD-SDI input Remote cable (supplied with the RC-V100) BNC cable (commercially... -
Page 12: Connecting The Power Supply
Connecting the Power Supply Connecting the Power Supply Power can be supplied to the camera in the two ways described below. Please be sure to read the user manual for the dedicated power supply before use. IMPORTANT • EF Cinema lenses are not available when using PoE+ power supply. Use an external power supply (DC power supply) for the camera with an EF Cinema lense attached. -
Page 13: External Power Supply (Dc In)
Connecting the Power Supply External Power Supply (DC IN) 11 V DC – 17 V DC input can be used. Connect the provided power connector as shown below. When connecting, fix it with screws while observing the limitation of tightening torque. Straight screw-in type 11 to 17 V DC Ground... - Page 14 Connecting the Power Supply IMPORTANT • You can power the camera using a commercially available external power supply connected to the DC IN 11-17 V terminal (via a commercially available power cable, using the supplied power connector). External power supply (commercially available) Power supply (output): 11 to 17 V DC Current (output): 3 A or higher Power cable (commercially available)
-
Page 15: Connecting To The Network
Connecting to the Network Connecting to the Network When connected to the network, the camera not only enables you to remotely operate it, but also allows you to record the video and perform monitoring with various intelligent functions. Also with PoE+ functions supported, the camera can be supplied with power via a LAN cable connected to a PoE+ HUB (A 12). -
Page 16: Connecting To An External Monitor
Connecting to an External Monitor Connecting to an External Monitor If you operate the camera using the buttons, you will need an external monitor connected to the camera. Connect the camera to an external monitor using the 3G/HD-SDI terminal or HDMI OUT terminal. Use the terminal on the camera that matches the one you wish to use on the monitor. -
Page 17: Adjusting The Black Balance
Adjusting the Black Balance Adjusting the Black Balance The first time you use the camera or if there is a noticeable change in the blacks of the video signal (such as when ambient temperature changes considerably), it is recommended to have the camera adjust the black balance. -
Page 18: Preparing The Lens
Preparing the Lens Preparing the Lens As much as possible, attach and remove the lens quickly and in a clean environment free of dust. Refer also to the instruction manual of the lens used. IMPORTANT • Avoid direct sunlight or strong light sources. Also, be careful not to drop the camera or lens. •... -
Page 19: Removing An Ef Lens
Preparing the Lens Only when using a compatible EF Cinema lens (A 33) 6 Connect the lens's 12-pin cable to the camera's LENS terminal. 7 Turn on the camera. 8 On the lens's MENU screen, select the signal path for data communication with the camera. -
Page 20: Using A Memory Card
Using a Memory Card Using a Memory Card Insert a memory card before installing the camera. NOTES • For recording onto a memory card, the following settings are required. System frequency: 59.94 Hz Frame rate: 29.97P Resolution: 1920 x 1080 Memory card slot Memory card cover Removing the Memory Card Cover... -
Page 21: Overview Of Connecting To External Devices
Overview of Connecting to External Devices Overview of Connecting to External Devices There are many ways in which you can configure the camera by connecting external devices. You can connect an external monitor, external recorder, optional RC-V100 Remote Controller, external microphone, pantilter, etc., as necessary. -
Page 22: Installing The Camera
Installing the Camera Installing the Camera Depending on where you install the camera, you may want to use a commercially available tripod, pantilter, housing unit or other accessory. The camera is shipped with two TB-1 Tripod Adapter Bases for tripods and accessories with 0.95 cm (3/8") screws. - Page 23 Installing the Camera • You can select the type of color bars using the [Camera Setup] > [Color Bars] > [Type] setting (A Button Operation Guide). • You can use the [Audio/Video Setup] > [1kHz Tone] setting to output a 1-kHz audio reference signal with the color bars (A Button Operation Guide).
-
Page 24: Rebooting/Resetting The Camera
Rebooting/Resetting the Camera Rebooting/Resetting the Camera This section describes how to operate the REBOOT switch and the RESET switch. To reboot/reset the camera by menu operation with the buttons* or via the network, refer to the respective operation guide. * Rebooting is not available by menu operation with the buttons. RESET switch REBOOT switch Rebooting... -
Page 25: Difference Of Reset Items Between Operating Methods
Rebooting/Resetting the Camera Difference of Reset Items between Operating Methods The items that can be reset differ depending on the operating method as described in the table below. Refer to Network Operation Guide or Button Operation Guide for more details. Items to be reset Operating methods/Setting items All settings... -
Page 26: External Connections
For details on compatible external recorders, consult the retail dealer from whom you purchased the camera or contact a Canon Service Center. For details on connecting the camera to an external monitor, refer to Connecting to an External Monitor (A 16). - Page 27 Connecting to an External Recorder • While a recording command is being output, the following settings are not available to be changed. - [Camera Setup] > [ABB] - [Audio/Video Setup] > [3G-SDI Mapping], [Rec Command] - [Other Functions] > [Reset], [Time Zone], [Set Clock] > [Date/Time], [Assignable Buttons], [System Frequency], [Frame Rate], [Resolution], [Camera Name]...
-
Page 28: Connecting To Rs-422/485 Terminals
Connecting to RS-422/485 Terminals Connecting to RS-422/485 Terminals Connect the camera to external devices such as a pantilter (commercially available) using the RS-422/485 terminals. 2-wire cable 4-wire cable Pantilter Pantilter IMPORTANT • Do not push the RS-422/485 terminal button with too much force. Doing so may cause the button to remain pushed-in. -
Page 29: Connecting To External Devices
Connecting to External Devices Connecting to External Devices External device I/O terminals consist of one input system and one output system. Viewer can be used via the network to check external device input status and control output to an external device (A Network Operation Guide). -
Page 30: Audio Input And Output
Audio Input and Output Audio Input and Output You can connect a commercially available microphone with a 3.5 mm stereo mini plug to the MIC terminal. The audio from the external microphone will be output from the 3G/HD-SDI terminal or HDMI OUT terminal, or via the network. -
Page 31: Using The Optional Rc-V100 Remote Controller
For details on how to connect and use the remote controller, refer to its instruction manual. Visit your local Canon website to download the latest version. -
Page 32: Additional Information
Additional Information Maintenance and Others Built-in Rechargeable Lithium Battery The camera has a built-in rechargeable lithium battery to keep the date/time and other settings. The built-in lithium battery is recharged while you use the camera; however, it will discharge completely if you do not use the camera for about 3 months. -
Page 33: Compatible Lenses And Functions
Depending on the lens’s purchase date, you may need to update the lens’s firmware to use these functions. For details, consult a Canon Service Center. Visit your local Canon website for the latest information about compatible lenses. IMPORTANT •... -
Page 34: List Of Setting Items For Each Operating Method
List of Setting Items for Each Operating Method List of Setting Items for Each Operating Method Available setting items are different depending on the operating method. The following table lists the setting items that can be configured using only one of the operating methods. Setting items that are not listed here can be configured in both operating methods. -
Page 35: Setting Items Available Only By Using The Buttons
List of Setting Items for Each Operating Method Setting item Menu item [Maintenance] > [Update Firmware] Update Firmware [Maintenance] > [Log] View Logs / Log Notifications Setting Items Available Only by Using the Buttons Setting item Menu item AE Response/Shockless WB/Zoom-Iris Correct./Focus Limit/ [Camera Setup] Focus Control/Auto Black Balance/Color Bars [Custom Picture] >... -
Page 36: Optional Accessories
TB-1 Tripod Adapter Base RC-V100 Remote Controller For our customers in the USA: Call or visit your local retailer/dealer for genuine Canon video accessories. You can also obtain genuine accessories for your Canon camera by calling: 1-800-828-4040, Canon U.S.A. Information Center. -
Page 37: Index
Index 100Base-TX LAN connector ..... . 15 3G/HD-SDI terminal ......16, 26 Reboot . -
Page 38: Trademark Acknowledgements
Trademark Acknowledgements • ( ) microSD, ( ) microSDHC and ( ) microSDXC Logos are trademarks of SD-3C, LLC. • HDMI, the HDMI logo and High-Definition Multimedia Interface are trademarks or registered trademarks of HDMI Licensing LLC in the United States and other countries. •... - Page 39 BIE-7222-000 © CANON INC. 2017...