Table of Contents
Advertisement
Quick Links
Advertisement
Table of Contents

Related Manuals for Global American 3304120


Summary of Contents for Global American 3304120
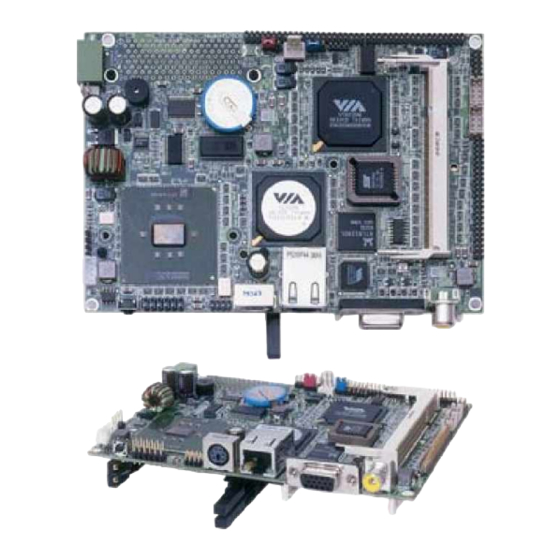
- Page 1 3304120 User’s Manual User’s Manual 3304120...
- Page 2 Copyright Disclaimers The accuracy of contents in this manual has passed thorough checking and review before publishing. Global American, Inc. is not liable for any infringements of patents or other manufacturer will not be responsible for any direct, rights resulting from its use. The indirect, special, incidental or consequential damages arising from the use of this product or documentation, even if advised of the possibility of such damage(s).
-
Page 3: Table Of Contents
3304120 User’s Manual Table of Contents Chapter 1 General Description ........1 1.1 Major Features ............... 2 1.2 Specifications ................ 3 1.3 Board Dimensions..............4 Chapter 2 Unpacking ..........5 2.1 Opening the Delivery Package..........5 2.2 Inspection................5 Chapter 3 Hardware Insatllation ...... - Page 4 3304120 User’s Manual Chapter 4 AMI BIOS Setup ........25 4.1 Starting Setup ..............25 4.2 Using Setup ................. 26 4.3 Main Menu ................27 4.4 Standard CMOS Setup............28 4.5 Advanced CMOS Setup ............29 4.6 Advanced Chipset Setup............ 30 4.7 Power Management Setup ..........
-
Page 5: Safety Instructions
Fasten the ALLIGATOR clip of the strap to the end of the shielded wire lead from a grounded object. Please wear and connect the strap before handle the 3304120 to ensure harmlessly discharge any static electricity through the strap. -
Page 6: Chapter 1 General Description
LAN, TV-Out, 4 COM, and USB2.0 interfaces. Its onboard ATA/33/66/100 to IDE drive interface architecture allows the 3304120 to support data transfers of 33, 66 or 100MB/sec. to one IDE drive connection. The VIA CLE266 integrated S3 3D supporting CRT/Panel displays up to 1600 x 1200 at 32-bit. -
Page 7: Major Features
Additional onboard connectors include four advanced USB2.0 port providing faster data transmission. And one external RJ-45 connector for 10/100 Based Ethernet use. Major Features The 3304120 comes with the following features: ¾ ULV Intel® Celer on® processor 400/650MHz ¾ One SO-DDR socket with a max. capacity of 1GB ¾... -
Page 8: Specifications
3304120 User’s Manual Specifications „ CPU: ULV Intel® Celeron® processor 400/650MHz „ Memory: One SO-DDR socket supporting up to 1GB „ Chipset: VIA CLE266/VT8235 „ I/O Chipset: W inbond W 83697UF „ CompactFlash: One, T ype II IDE interface adapter „... -
Page 9: Board Dimensions
3304120 User’s Manual Board Dimensions... -
Page 10: Chapter 2 Unpacking
Chapter 2 Unpacking Opening the Delivery Package The 3304120 is packed in an anti-static bag. The board has components that are easily damaged by static electricity. Do not remove the anti-static wrapping until proper precautions have been taken. Safety Instructions in front of this manual describe anti-static precautions and procedures. - Page 11 3304120 User’s Manual Cables Package Description 4-pin power cable x 1 MIC/Audio cable x 1 8-pin USB split type cable x 1 PS/2 KB/MS transfer cable x 1 RS-232 cable x 4 IDE flat cable x 1 It is recommended that you keep all the parts of the delivery package intact and store them in a safe/dry place for any unforeseen event requiring the return shipment of the product.
-
Page 12: Chapter 3 Hardware Insatllation
Chapter 3 Hardware Installation This chapter provides the information on how to install the hardware using the 3304120. This chapter also contains information related to jumper settings of switch, and the watchdog timer selection etc. Before Installation After confirming your package contents, you are now ready to install your hardware. -
Page 13: Board Layout
3304120 User’s Manual Board Layout... -
Page 14: Jumper List
MIC In/Audio Out Connector LCD1 44-pin Panel Connector PCMCIA Connector Mini PCI Connector Configuring the CPU The 3304120 v2.0 embedded with a ULV Intel® Celeron® processor 400/650MHz. User don’t need to adjust the frequently and check speed of Intel® processor. -
Page 15: System Memory
Before you turn on the power of your system, please set JBAT1 to Short 1-2 for normal operation. Power and Fan Connectors 3304120 provides one 4-pin power connectors at CN1. And one 2-pin ATX power in at CN3. +10~+30V wide range single DC power in can make 3304120 suitable for all kinds of environments even more. -
Page 16: System Front Panel Connectors
And 3304120 supports +5V Fan only. System Front Panel Connectors The 3304120 has one LED at location J2 that indicates the power-on status. This visual feature of the IDE LED may also be connected to a HDD LED, power button, reset switch, speaker and power LED via connector J2(1-3), J2(5-7), J2(9-11), J2(2-4-6-8), and J2(10-12). -
Page 17: Connector J2 Orientation
RST_SW 11 12 3.10 VGA Controller The 3304120 provides two connection methods of a VGA device. CN7 offers a single standard CRT connector while LCD1 is the 44-pin panel connector. VIA CLE266 VGA chipset shared main memory 8/16/32MB, and provides high quality DVD video playback. 3304120 also provides Hardware MPEG-2. - Page 18 Please set the proper voltage of your panel using JP3 before proceeding on installing it. The 3304120 has an onboard jumper that selects the working voltage of the flat panel connected to the system. Jumper JP2 offers two voltage settings for the user.
-
Page 19: Tv-Out Connector
3304120 User’s Manual 3.11 TV-Out Connector 3304120 can support TV-Out function which input could be up to 800 x 600 graphics resolutions. World Wide Video standards are supported including NTSC-M (North America, Taiwan), NTSC-J (Japan), PAL-B, D, G, H, I (Europe, Asia), PAL-M (Brazil), PAL-N (Uruguay, Paraguay) and PAL-NC (Argentina). -
Page 20: Audio Connectors
3304120 User’s Manual 3.13 Audio Connectors The 3304120 has an onboard AC97 3D audio interface. The following tables list the pin assignments of the MIC In/Audio Out and Line in connectors. JP1: MIC In/Audio Out Connector PIN Description PIN Description... -
Page 21: Pci E-Ide Drive Connector
3.14 PCI E-IDE Drive Connector CN13 is a standard 44-pin 2.0mm pitch connector daisy-chain driver connector serves the PCI E-IDE drive provisions onboard the 3304120. A maximum of two ATA/33/66/100 IDE drives can be connected to the 3304120 via CN13. -
Page 22: Serial Port Connectors
3304120 User’s Manual 3.15 Serial Port Connectors The 3304120 offers two W83697UF compatible UARTs with Read/Receive 16-byte FIFO serial ports and four internal 10-pin connectors. z CN8: COM1 Connector (5x2 Header) PIN Description PIN Description DCD1 DSR1 RXD1 RTX1 TXD1... -
Page 23: Usb Connector
3304120 User’s Manual 3.16 USB Connector The 3304120 provides two 8-pin connectors, at location J5 and J6, for four USB2.0 connections to the 3304120. z J5/J6: USB Connector Description Description +5VSUS +5VSUS BD2-/ BD1- BD3-/ BD0- BD2+/ BD1+ BD3+/ BD0+ 3.17 Keyboard/Mouse Connectors... -
Page 24: Watchdog Timer
3304120 User’s Manual 3.18 Watchdog Timer Once the Enable cycle is active, a Refresh cycle is requested before the time-out period. This restarts counting of the WDT period. When the time counting goes over the period preset of WDT, it will assume that the program operation is abnormal. -
Page 25: Gpio Connector
3304120 User’s Manual 3.19 GPIO Connector The 3304120 offers four general purpose I/O ports with the following capabilities: „ I2C/SMB Support „ Thermal Detect „ Notebook Lid Open/Close Detect „ Battery Low Detect z J3: General Purpose Input/Output Description GPIO8... - Page 26 3304120 User’s Manual Description Description C/BE[3]# AD[24] AD[23] IDSEL AD[21] AD[22] AD[19] AD[20] AD[17] AD[18] C/BE[2]# AD[16] IRDY# 3.3V FRAME# TRDY# SERR# STOP# 3.3V PERR# DEVSEL# C/BE[1]# AD[14] AD[15] AD[13] AD[12] AD[11] AD[10] AD[9] AD[8] C/BE[0]# AD[7] 3.3V 3.3V AD[6]...
-
Page 27: Compactflash™ Connector
3304120 User’s Manual 3.21 CompactFlash™ Connector The 3304120 also offers an optional CompactFlash™ connector which is IDE interface located at the solder side of the board (beneath the SO-DIMM connector). The designated CN14 connector, once soldered with an adapter, can hold CompactFlash™ cards of various sizes. -
Page 28: Pcmcia Connector
3304120 User’s Manual 3.22 PCMCIA Connector 3304120 built-in two CardBus/PCMCIA interface connectors. z U32: PCMCIA Connector Description Description CAD0 CAD1 CAD3 CAD5 CAD7 CCBE0 CAD9 CAD12 CAD12 CAD14 CCBE1 CPAR CPERR CGNT IRQ*INT VPP1 CCLK CIRDY CCBE2 CAD18 CAD20 CAD21... - Page 29 3304120 User’s Manual This page is intentionally left blank.
-
Page 30: Chapter 4 Ami Bios Setup
3304120 User’s Manual Chapter 4 AMI BIOS Setup The 3304120 uses AMI BIOS for the system configuration. The AMI BIOS setup program is designed to provide the maximum flexibility in configuring the system by offering various options that could be selected for end-user requirements. -
Page 31: Using Setup
3304120 User’s Manual Using Setup In general, you use the arrow keys to highlight items, press <Enter> to select, use the <PageUp> and <PageDown> keys to change entries, and press <Esc> to quit. The following table provides more detail about how to navigate in the Setup program using the keyboard. -
Page 32: Main Menu
3304120 User’s Manual Main Menu Once you enter the AMI BIOS CMOS Setup Utility, the Main Menu will appear on the screen. The Main Menu allows you to select from several setup functions and two exit choices. Use the arrow keys to select among the items and press <Enter>... -
Page 33: Standard Cmos Setup
3304120 User’s Manual Standard CMOS Setup The Standard Setup is used for the basic hardware system configuration. The main function is for Data/Time and Floppy/Hard Disk Drive settings. Please refer to the following screen for the setup. When the capacity of the IDE hard disk drive is larger than 528MB, you must set the HDD mode to LBA mode. -
Page 34: Advanced Cmos Setup
3304120 User’s Manual Advanced CMOS Setup This section allows you to configure your system for the basic operation. You have the opportunity to select the system’s default speed, boot-up sequence, keyboard operation, shadowing and security. AMIBIOS SETUP ADVANCED CMOS SETUP (C)2001 American Megatrends, Inc. -
Page 35: Advanced Chipset Setup
3304120 User’s Manual Advanced Chipset Setup This section allows you to configure the system based on the specific features of the installed chipset. This chipset manages bus speeds and the access to the system memory resources, such as DRAM and the external cache. -
Page 36: Power Management Setup
3304120 User’s Manual Power Management Setup The Power Management Setup allows user to configure the system for saving energy in a most effective way while operating in a manner consistent with his own style of computer use. AMIBIOS SETUP POWER MANAGEMENT SETUP (C)2001 American Megatrends, Inc. -
Page 37: Pci / Plug And Play Setup
3304120 User’s Manual PCI / Plug and Play Setup This section describes configuring the PCI bus system. PCI, or Personal Computer Interconnect, is a system that allows I/O devices to operate at speeds nearing the speed the CPU itself uses when communicating with its own special components. -
Page 38: Peripheral Setup
3304120 User’s Manual Peripheral Setup The IDE hard drive controllers can support up to two separate hard drives. These drives have a master/slave relationship that is determined by the cabling configuration used to attach them to the controller. Your system supports two IDE controllers--a primary and a secondary--so you can install up to four separate hard disks. -
Page 39: Auto-Detect Hard Disks
3304120 User’s Manual 4.10 Auto-Detect Hard Disks This option detects the parameters of an IDE hard disk drive, and automatically enters them into the Standard CMOS Setup screen. Up to four IDE drives can be detected, with parameters for each appearing in sequence inside a box. -
Page 40: Change Supervisor/User Password
3304120 User’s Manual 4.11 Change Supervisor/User Password AMIBIOS HIFLEX SETUP UTILITY VERSION x.xx (C)2001 American Megatrends, Inc. All Rights Reserved Standard CMOS Setup Advanced CMOS Setup Advanced Chipset Setup Power Management Setup Enter new supervisor password: _ Change Supervisor Password... -
Page 41: Auto Configuration With Optimal Settings
3304120 User’s Manual PASSWORD DISABLED. When a password has been enabled, you will be prompted to enter it every time you try to enter Setup. This prevents an unauthorized person from changing any part of your system configuration. Additionally, when a password is enabled, you can also require the BIOS to request a password every time your system is rebooted. -
Page 42: Auto Configuration With Fail Safe Settings
3304120 User’s Manual 4.13 Auto Configuration with Fail Safe Settings When you press <Enter> on this item you get a confirmation dialog box with a message similar to the figure below. This option allows you to load/restore the default values to your system configuration, optimizing and enabling all high performance features. -
Page 43: Save Settings And Exit
3304120 User’s Manual 4.14 Save Settings and Exit Pressing <Enter> on this item asks for confirmation: AMIBIOS HIFLEX SETUP UTILITY VERSION x.xx (C)2001 American Megatrends, Inc. All Rights Reserved Standard CMOS Setup Advanced CMOS Setup Advanced Chipset Setup Power Management Setup... -
Page 44: Exit Without Saving
3304120 User’s Manual 4.15 Exit Without Saving Pressing <Enter> on this item asks for confirmation: Quit without saving (Y/N)? Y This allows you to exit Setup without storing in CMOS any change. The previous selections remain in effect. This exits the Setup utility and restarts your computer. - Page 45 3304120 User’s Manual Any advice or comments about our products and service, or anything we can help you with please don’t hesitate to contact with us. We will do our best to support you for your products, projects and business.