Honeywell T6 Pro Z-Wave User Manual
Hide thumbs
Also See for T6 Pro Z-Wave:
- User manual (78 pages) ,
- Professional install manual (25 pages) ,
- Getting started (2 pages)
Table of Contents
Advertisement
T6 Pro Z-Wave
Programmable Thermostat
User Guide
*TH6320ZW2003 depicted. Other models may vary.
Actual size 4.09'' x 4.09'' x 1.06''
Welcome
This user guide is designed to help you get acquainted with your new T6 Pro Z-Wave
thermostat. Check out the table of contents on page 2 to browse by topic.
Need help? Get in touch.
Web: yourhome.honeywell.com/
Phone: 1-800-468-1502
Social: Twitter: @HoneywellHome, Facebook: Honeywell Home
Advertisement
Table of Contents

Related Manuals for Honeywell T6 Pro Z-Wave


Summary of Contents for Honeywell T6 Pro Z-Wave
- Page 1 Actual size 4.09'' x 4.09'' x 1.06'' Welcome This user guide is designed to help you get acquainted with your new T6 Pro Z-Wave thermostat. Check out the table of contents on page 2 to browse by topic. Need help? Get in touch.
-
Page 2: Table Of Contents
Table of contents Thermostat features ........................ 3 Thermostat overview ....................... 4 Basic thermostat operation Adjusting the temperature ........................4 Program schedule overrides .........................5 Adjusting the temperature in Auto mode ..................6 Selecting system mode ...........................7 Built-in compressor protection ......................8 Setting the fan .............................8 Main menu settings Z-Wave setup ..............................9 Z-Wave connection status ........................10... -
Page 3: Thermostat Features
You can display actual temperature or % relative humidity, or to see whether your cooling / heating system is running. Auto change from heat to cool: When Auto mode is selected, the T6 Pro Z-Wave thermostat can automatically determine whether your home needs heating or cooling to reach the desired temperature at the right time. -
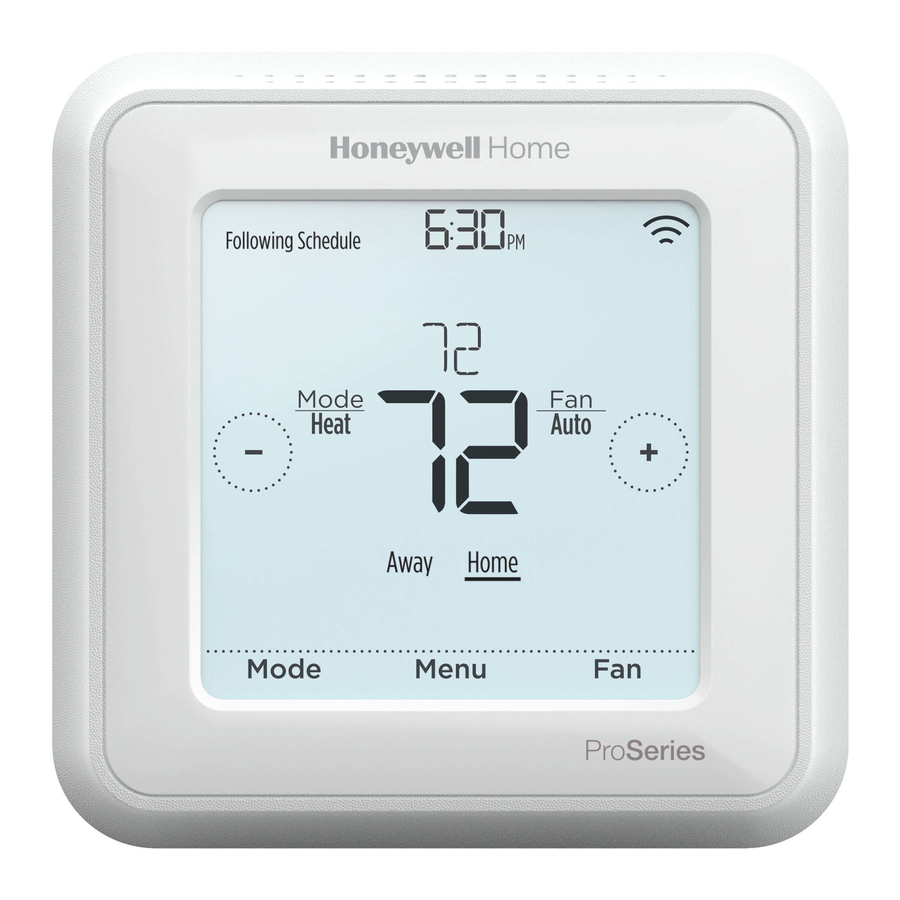
Page 4: Thermostat Overview
Thermostat overview Desired temperature Indoor Temperature/ Adjust temperature % Relative Indoor Shows desired Touch Humidity indoor temperature. set your desired Touch to display temperature. either the current indoor temperature or current % relative indoor humidity. Mode Heat Auto Mode Menu Mode Menu Touch to select... -
Page 5: Program Schedule Overrides
Program schedule overrides If the thermostat is included in Z-Wave network it typically follows the setting on your Z-Wave controller. If you adjust the temperature setpoint, it overrides the current setpoint until away state or new temperature setpoint is received from Z-Wave controller. -
Page 6: Adjusting The Temperature In Auto Mode
Adjusting the temperature in Auto mode Auto mode (when the thermostat automatically chooses heating or cooling to reach your desired temperature) is disabled by default. If your heating or cooling professional enabled it, you’ll see Auto appear as an option under Mode on the thermostat home screen. -
Page 7: Selecting System Mode
Selecting system mode Current system mode (Heat, Cool, Off, Em Following Schedule Heat) is displayed to the left of current indoor temperature on the thermostat home screen. Mode Heat Auto The mode that’s currently running (Heat On, Cool Away Home Sleep On, Em Heat On) is displayed in the upper-left corner of the thermostat home screen. -
Page 8: Built-In Compressor Protection
Built-in compressor protection If the compressor is restarted too soon after Cool On Following Schedule a shutdown, system damage can occur. The built-in compressor protection feature forces Mode Auto Cool the compressor to wait a few minutes before restarting, helping to prevent damage to the Away Home Sleep heating or cooling system. -
Page 9: Z-Wave Setup
• For other specific tasks, such as adding the thermostat to home automation scenes or groups, refer to the Z-Wave controller instructions. • The T6 Pro Z-Wave thermostat works in the optional Z-Wave battery mode or normal power mode based on its power source. The Z-Wave power mode can only be changed when thermostat is NOT included in Z-Wave network. -
Page 10: Z-Wave Connection Status
Z-Wave connection status Z-Wave connection status is located in the Wifi is on and connected Following Schedule upper-right corner of the screen. • Thermostat is included and connected to a Mode Heat Auto Wifi is disconnected Z-Wave network. or wifi is not setup Wifi... -
Page 11: Main Menu Overview
Main menu overview Touch Menu on the thermostat screen and then use the arrows to page through the following options. SCHEDULE CLEAN SCREEN Create and edit a schedule for your Disable the touchscreen for thermostat to follow. (Available to edit 30 seconds so you can clean it. -
Page 12: Scheduling Options
Scheduling options The T6 Pro Z-Wave thermostat offers flexible scheduling. The options available differ depending on whether the thermostat is included/excluded from Z-Wave network. 1 No schedule 3 Occupancy based schedule 4 Smart schedule 2 Time based schedule If the thermostat is not included in Z-Wave network: The thermostat can be set as non-programmable (1), or you can program and follow a Time based schedule (2) based on the time of day or day of the week. -
Page 13: Setting A Schedule
Schedule status Following Schedule Active Time based schedule or Smart schedule is Mode indicated by "Following Schedule" text in top left Heat Auto corner of the thermostat screen. Mode Menu Schedule period Following Schedule Shows current schedule period. Mode Heat Auto •... -
Page 14: Reset Schedule
Reset schedule To reset your schedule back to the default temperature setpoints (see page 12), follow steps below. Touch Menu on the thermostat screen. Touch the arrows until you see Back Select Back Select RESET, then touch Select. Touch the arrows until you see SCHEDULE, then touch Select. -
Page 15: Adjusting Backlight Brightness
Enabling/disabling Adaptive Intelligent Recovery Over time, your T6 Pro Z-Wave thermostat will learn how long it takes your system to reach the desired temperature. It can then turn on your heating or cooling equipment at the right time to make sure your home is comfortable by the time you expect. -
Page 16: Setting The Time And Date
Setting the time and date Setting the time Touch Menu on the thermostat home screen. Touch the arrows until you see CLOCK, then touch Select. Touch the arrows until you see SET TIME, then touch Select. Back Select Press to set the time (or press and hold the buttons to move more quickly). -
Page 17: Choosing Fahrenheit Or Celsius
Choosing Fahrenheit or Celsius To select a temperature scale, follow the steps below. Touch Menu on the thermostat home screen. Recovery Touch the arrows until you see TEMP SCALE, then touch Select. Touch the arrows to select FAHRENHEIT or CELSIUS then touch Done to Done Cancel Back... -
Page 18: Viewing Thermostat Information
Viewing thermostat information To see your thermostat’s technical information, follow the steps below. Touch Menu on the thermostat home screen. Touch the arrows until you see DEVICE INFO, then touch Select. Touch the arrows to view information such as: Back Select •... -
Page 19: Battery Replacement
Battery replacement Batteries are optional (to provide backup power) Following Schedule Auto Chg. On if your thermostat was wired to run on 24 VAC power when installed. If your thermostat was Mode Heat Auto wired to run on 24 VAC power, then batteries are NOT required. -
Page 20: Alerts And Maintenance Reminders
Alerts and maintenance reminders The T6 Pro Z-Wave thermostat comes with a set of Smart Alerts that helps keep your heating and cooling system running correctly and efficiently. If Smart Alerts are set up by your HVAC professional, you can get reminders when it’s time to change the filter and when your system is not running correctly. - Page 21 Number Alert/Reminder Definition Replace Replace humidifier pad. Reset the timer by touching Humidifier Pad the “dismiss” button on the thermostat screen after it is replaced. Replace Replace the dehumidifier filter. Reset the timer by Dehumidifier touching "dismiss" button on thermostat screen after Filter it is replaced.
-
Page 22: Troubleshooting
Troubleshooting Screen is blank • Check circuit breaker and reset if necessary. • Make sure power switch at heating and cooling system is on. • Make sure furnace door is closed securely. • If battery powered, make sure the batteries are fresh and correctly inserted. -
Page 23: 5-Year Warranty
This warranty does not cover removal or reinstallation costs. This warranty shall not apply if it is shown by Honeywell that the defect or malfunction was caused by damage which occurred while the product was in the possession of a consumer. -
Page 24: General System Information
CAUTION: MERCURY NOTICE If the T6 Pro Z-Wave thermostat is replacing a thermostat that contains mercury in a sealed tube, do not place the old thermostat in the trash. Please contact your local waste management authority for proper recycling or disposal instructions. -
Page 25: Customer Assistance
• Works with millivolt systems. • Does not work with electric baseboard heat (120-240V). User Guide Visit yourhome.honeywell.com for a complete user guide. Customer assistance For assistance with this product, please visit customer.honeywell.com. Or call Honeywell Customer Care toll-free at 1-800-468-1502. - Page 26 Introduction The Honeywell T6 Pro Z-Wave Programmable Thermostat is a Z-Wave Plus certi- fied thermostat capable of controlling up to three heat and two cool stages of heat pump, (incl. dual fuel heat pump systems) and up to two heat and two cool stages of conventional system (3H/2C HP, 2H/2C Conv.)
- Page 27 UWP Mounting System installation 1. Open package to find the UWP. See Figure 1. 2. Position the UWP on the wall. Level and mark hole positions. See Figure 2. Drill holes at marked positions, and then lightly tap supplied wall anchors into wall using a hammer.
-
Page 28: Power Options
NOTES: • The T6 Pro Z-Wave thermostat works in battery mode or normal power mode based on its power source. The Z-Wave power mode can only be changed when the thermostat is NOT included in a Z-Wave network. You can check the power mode in the thermostat menu under MENU/DEVICE INFO. - Page 29 Setting Slider Tabs Set R Slider Tab. UWP Mounting System • Use built-in jumper (R Slider Tab) to differentiate between one or two transformer systems. • If there is only one R wire, and it is connected to the R, Rc, or RH terminal, set the slider to the up position (1 wire).
- Page 30 Wiring conventional systems: forced air and hydronics 1H/1C System (1 transformer) 1H/1C System (2 transformers) Power [1] Power (heating transformer) [1] [R+Rc joined by Slider Tab] [2] Power (cooling transformer) [1] Compressor contactor Compressor contactor 24 VAC common [3] 24 VAC common [3, 4] Heat relay Heat relay Fan relay...
- Page 31 Wiring heat pump systems 1H/1C Heat Pump System 3H/2C Heat Pump System [10] Power [1] Power [1] [R+Rc joined by Slider Tab] [2] [R+Rc joined by Slider Tab] [2] Compressor contactor Compressor contactor (stage 1) 24 VAC common [3] 24 VAC common [3] O/B Changeover valve [7] O/B Changeover valve [7] Fan relay...
- Page 32 If needed, gently pull to remove the thermostat from the UWP. Turn the power on at the breaker box or switch. Initial installer setup • After the T6 Pro Z-Wave thermostat has powered up, touch START SETUP on the thermostat. • Touch to toggle between Installer Set Up (ISU) options.
- Page 33 Z-Wave setup After you finish the installer setup and set the date and time, you will be asked to set up a Z-Wave to include the thermostat into Z-Wave network. • Touch Yes to include the thermostat in to Z-Wave network, or touch No if you want this to Back Select be done later.
-
Page 34: System Modes
System operation setting Press the Mode button to cycle to the next available Following Schedule System mode. Cycle through the modes until the required System Mode Heat Auto mode is displayed and leave it to activate. Away Home Sleep System modes: Mode Menu •... - Page 35 Scheduling options The T6 Pro thermostat offers flexible scheduling options, which differ depending on whether the thermostat is included/excluded from Z-Wave network. 1 No schedule 3 Occupancy based schedule 2 Time based schedule 4 Smart schedule If the thermostat is not included in Z-Wave network: The thermostat can be set as non-programmable (1), or you can program and follow a schedule based on the time of day and day of the week (2).
-
Page 36: Indoor Temperature
Key features System status Z-Wave connection Time, ISU #, or information status Alert # Cool On, Heat On Shows actual Z-Wave Emergency Heat On, connection status. Recovery, or Auto Messaging Changeover On. Shows device setup Schedule information options, menu options, Heat On Recovery Following Schedule... -
Page 37: Advanced Menu Options
Installer setup – advanced menu To access the advanced menu, press and hold the Menu button for 5 seconds. Touch to go through the options in the advanced menu. Advanced menu options Following Schedule Device Setup This is used to access the device ISU setting. Mode Heat Auto... - Page 38 Installer setup options (ISU) – advanced menu Table 1.
- Page 39 Installer setup options (ISU) – advanced menu Table 2.
- Page 40 Installer setup options (ISU) – advanced menu Table 3.
- Page 41 Installer setup options (ISU) – advanced menu Table 4.
- Page 42 Installer setup options (ISU) – advanced menu Table 5.
- Page 43 If your gateway/hub/controller supports configuration function, you may remotely configure or change the default thermostat configuration parameters. For detailed table with all available Z-Wave configuration parameters go to http://customer.honeywell.com or search for T6 Pro Z-Wave Thermostat in the Z-Wave certified products section on http://Z-Wavealliance.org Performing a system test You can test the system setup in ADVANCED MENU under SYSTEM TEST option.
- Page 44 Alerts and reminders Alerts and reminders are displayed via the alert symbol and alert number in the clock area on the home screen. You can read more information about active alerts, snooze or dismiss non-critical alerts in Menu/Alerts. Number Alert/Reminder Definition Thermostat The sensor of the thermostat has encountered Humidity...
- Page 45 Alerts and reminders Number Alert/Reminder Definition Replace UV Replace UV Bulb (2). Reset the timer by touching Bulb (2) the "dismiss" button on thermostat screen after it is replaced. AC Power Lost If batteries used as backup power it would drain batteries quickly so Z-Wave communication needs to be turned off.
-
Page 46: Specifications
Specifications Model Nr.: TH6320ZW2003 Z-Wave Radio: Frequency (USA and Canada): 908.42 MHz Model Name: T6 Pro Z-Wave Thermostat Certified: Z-Wave Plus Generic Device Type: Thermostat Model Description: Programmable Z-Wave Node type (C-wire): Always On Slave (AOS) thermostat with touchscreen Node type (Battery): Listening Sleeping Slave (LSS) -
Page 48: Year Limited Warranty
If this product is replacing a control that contains mercury in a sealed tube, do not place the old control in the trash. Contact your local waste management authority for instructions regarding recycling and proper disposal. 5-year limited warranty For Warranty information go to http://customer.honeywell.com Regulatory information FCC REGULATIONS Operation is subject to the following two conditions: §...