Blackberry RIM 850 Installation And User Manual
Wireless handheld
Hide thumbs
Also See for RIM 850:
- Installation and user manual (176 pages) ,
- User manual (140 pages) ,
- Installation & getting started manual (104 pages)
Table of Contents
Advertisement
Quick Links
Download this manual
See also:
User Manual
Advertisement
Table of Contents

Related Manuals for Blackberry RIM 850


Summary of Contents for Blackberry RIM 850
- Page 1 Installation and User’s Guide RIM 850 Wireless Handheld...
- Page 2 Operating System 2.0.20, Applications 2.0, and Desktop 2.0. © 1999-2000 Research In Motion Limited. All rights reserved. RIM, the RIM logo, Research In Motion, RIM 850 Wireless Handheld, BlackBerry, BlackBerry Exchange Edition, the BlackBerry logo, the “envelope in motion” symbol and ‘Always On, Always Connected’ are trademarks of Research In Motion Limited.
-
Page 3: Fcc Compliance Statement (Usa)
FCC compliance statement (USA) FCC Class B Part 15 This device complies with Part 15 of the FCC Rules. Operation is subject to the following two conditions: • This device may not cause harmful interference, and • This device must accept any interference received, including interference that may cause undesired operation. -
Page 4: Industry Canada Certification
• Consult the dealer or an experienced radio/TV technician for help Industry Canada Certification This device complies with Industry Canada RSS 119, under certification number 2503 195 5551A. DOC Class B compliance This device complies with the Class B limits for radio noise emissions as set out in the interference-causing equipment standard entitled “Digital Apparatus,”... -
Page 5: Table Of Contents
Contents FCC compliance statement (USA) ...3 Industry Canada Certification ...4 IMPORTANT SAFETY INFORMATION...9 Welcome to your wireless solution ...13 New for version 2.0...14 Upgrading to version 2.0 ...15 Contents of your package ...15 System Requirements ...16 About this guide...16 About Research In Motion...17 Customer support ...17 Get to know your handheld...19 Handheld components ...19... - Page 6 Using the Desktop Software...57 Installation and setup ...57 Loading handheld applications ...58 Backing up files from handheld to the PC ...59 Synchronizing email and PIM...62 Redirecting email ...64 Summary ...67 Composing and sending messages...69 Setting message options ...69 Setting level of importance ...71 Sending peer-to-peer messages...72 Sending one-time messages...74 Sending messages to many contacts ...75...
- Page 7 Marking a message as unread...113 Marking all messages read ...114 Summary and tips...115 Using the Address Book ...117 Setting Address Book options ...117 Adding addresses ...118 Viewing addresses ...122 Editing addresses ...122 Deleting addresses ...123 Searching addresses...124 Summary and tips...124 Managing Tasks and Appointments...127 Using the Tasks function ...127 Using the Calendar function ...131...
- Page 8 Desktop Software ...173 Resetting the handheld ...176 Specifications...179 Research In Motion Limited Software License Agreement.183 Terms and Conditions...183 Limited Warranty ...187 Index ...193...
-
Page 9: Important Safety Information
Remember to follow any special regulations governing the use of the RIM 850 Wireless Handheld and always switch it off in areas where radio devices are forbidden, or when it may cause interference or danger. Any safety laws and regulations pertaining to the use of cell phones and two-way radios will likely apply to your use of the handheld. - Page 10 RIM in conjunction with the handheld is not permitted as it may cause hazards. Do not place the RIM 850 Wireless Handheld or its charging cradle on any unstable surface, such as a cart, stand, tripod, bracket, or table.
- Page 11 Never spill liquid of any kind on the handheld. Do not use the handheld near water (for example near a bathtub or a sink, in a wet basement, near a swimming pool, etc.). The RIM 850 Wireless Handheld and its charging cradle should be situated away from heat sources, such as radiators, heat registers, stoves, or other products (including amplifiers) that produce heat.
- Page 12 or water • the handheld or charging cradle has been dropped or damaged in any way • the handheld or charging cradle does not operate normally by following the instructions contained in this manual • the handheld or charging cradle exhibits a distinct change in performance Adjust only those controls that are covered in this manual.
-
Page 13: Welcome To Your Wireless Solution
Welcome to your wireless solution BlackBerry is a mobile email solution that includes the RIM 850 Wireless Handheld, cradle, Desktop Software, and flat-rate airtime on a nationwide wireless data network. Equipped with a 132X65 screen, RIM’s “always on, always connected” wireless technology... -
Page 14: New For Version 2.0
Welcome to your wireless solution — New for version 2.0 • Calculator: Perform basic mathematical operations. • Options: Customize the way the handheld notifies you of new messages; set the password; add, edit, and delete AutoText entries; set the current date; program the automatic on/off feature. -
Page 15: Upgrading To Version 2.0
Welcome to your wireless solution — Upgrading to version 2.0 recurring calendar appointments and offers you one of four views: Day, Week, Month, or Agenda. The updated Desktop Software lets you turn off email redirection if you are using the BlackBerry Enterprise Server. You can also specify the desktop folders from which you want email to be redirected. -
Page 16: System Requirements
Welcome to your wireless solution — System Requirements If something from this package is missing or not working properly, contact the point of purchase. System Requirements The following components are required to install the Desktop Software: • Intel-compatible 486 or higher desktop with an available serial port •... -
Page 17: About Research In Motion
Welcome to your wireless solution — About Research In Motion Tips provide information about performing tasks and offer different options to perform tasks. A summary, including a list of relevant tips, is included at the end of each chapter. The handheld has two display options: Large Font and Small Font. Throughout this guide, the graphics depicting the handheld’s LCD screen show the Large Font display option. -
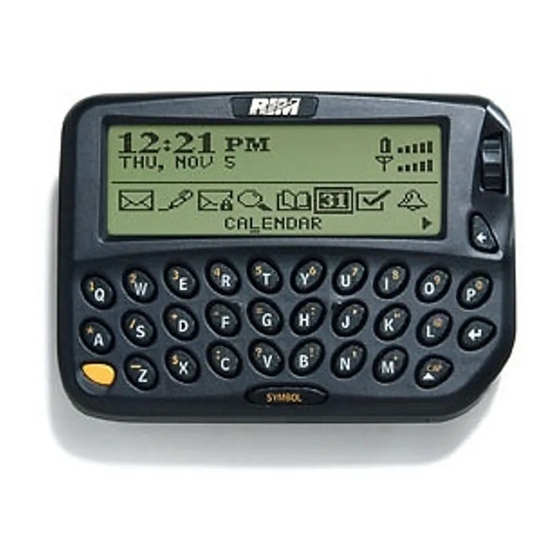
Page 19: Get To Know Your Handheld
Get to know your handheld This chapter will help you get acquainted with your handheld before you start sending and receiving email. Handheld components Figure 1: Front view of handheld Here are some details on the handheld’s main components: LCD screen The LCD screen is your interface with functions such as composing and reading messages, setting tasks and appointments, viewing and editing contact information, customizing device options, and... - Page 20 Get to know your handheld — Handheld components In low light conditions, you can increase the readability of the LCD by using the backlighting feature. To activate backlighting, press the key three times. The backlight will shut off automatically if you do not press any keys or use the trackwheel for more than 10 seconds.
-
Page 21: Charging Cradle
Get to know your handheld — Handheld components When you receive a new message and remove the handheld from the holster within five seconds, notification (based on how you’ve set it) stops and the most recently received message will be open. If you pull the handheld out of the holster and quickly replace it, notification stops but the message will remain marked unread. -
Page 22: Installing The Battery
RIM has also performed limited testing on NiMH batteries from Gold Peak Group and Radio Shack (Tandy). While not certified for general use in the RIM 850 Wireless Handheld, you may wish to try them as substitutes for the Sanyo or Energizer cells. If you encounter any difficulties when using these batteries, return to using the Sanyo or Energizer cells. - Page 23 Once you have removed the battery cover, remove the old battery and insert a new one. When inserting the new battery, make sure that the connectors are aligned for the correct polarity. The handheld will vibrate and beep if the battery has not been inserted properly.
- Page 24 Get to know your handheld — Installing the battery Recharging the battery The charging cradle contained in your package is used to recharge the NiMH battery that powers the handheld. Plug the supplied AC adapter into a power source. Place the handheld in the charging cradle so that the handheld’s serial port is securely connected to the charging cradle.
-
Page 25: Turning On Your Handheld
Get to know your handheld — Turning on your handheld • Allow the handheld to complete its charging cycle every time you attempt to charge it. Do not remove the handheld from the cradle while the green LED is flashing. A charging cycle is complete when the green LED is solid. -
Page 26: Turning Off The Handheld
Get to know your handheld — Turning off the handheld Turning off the handheld In the Home screen, scroll to the POWER OFF icon and click. Description of keys The following chart describes special keyboard and trackwheel combinations that will help you navigate, compose messages, and configure options on the handheld. - Page 27 Get to know your handheld — Description of keys Scroll through accented characters • When composing a message or entering text, press and hold a letter key while rolling the trackwheel to scroll through international characters/characters with accents. When the desired character appears, release the letter key.
- Page 28 Get to know your handheld — Description of keys SHIFT Installation and User’s Guide Function NUM lock • Press SHIFT Any key that you press in the upper row will be typed in its numeric form. Press again to return to regular mode. SHIFT An ‘N’...
- Page 29 Get to know your handheld — Description of keys Select multiple messages • Hold the trackwheel in the Messages screen to select more than one message. You can file, delete, or save these messages, mark them read or unread. Carriage returns, select highlighted items •...
- Page 30 Get to know your handheld — Description of keys SPACE Symbols screen As described in the chart above, you can press the Select Symbol screen. The following characters are available for you to insert into your message: Installation and User’s Guide Function Delete characters ahead of cursor, delete messages...
- Page 31 Get to know your handheld — Description of keys To select a symbol, either scroll to a symbol and click, or press the associated alpha key under the desired symbol. You will return to your message with the symbol inserted. LCD interface The handheld’s LCD screen is composed of the Home screen, function screens that are launched from the Home screen, and...
- Page 32 Get to know your handheld — Description of keys The following chart shows each function icon and describes the corresponding function: Icon Messages Compose Saved Messages Search Messages Address Book Calendar Tasks Installation and User’s Guide Description Receive, read, reply to, compose, forward, save, file, and delete messages.
- Page 33 Get to know your handheld — Description of keys Icon Set the alarm on the handheld to sound daily. Alarm Compose, edit, and delete important notes and memos. MemoPad Perform basic mathematical operations. Calculator Customize the way the handheld notifies you of messages;...
-
Page 34: Function Menus
Get to know your handheld — Description of keys Function menus Menus provide a list of options for the current function. You can open a function screen’s menu by clicking the trackwheel; the menu appears on top and covers approximately half of the screen’s width. Icons and graphical tools Home screen components The Home screen appears when you turn on the handheld. - Page 35 Handheld status icons These icons appear on the handheld’s LCD screen to indicate battery power, coverage levels, and keyboard modes. Icon Battery power indicator Coverage strength indicator Charging indicator Data is being sent Data is being received key mode is activated key mode is activated SHIFT lock mode is activated...
- Page 36 Get to know your handheld — Description of keys Message status icons These icons appear on the handheld’s LCD screen to indicate the status of pending, sent, and received messages. Icon Message is being sent Message has been sent out to the network Message sent to another handheld PIN number has been delivered Message pending (will be sent later)
- Page 37 Scrolling through options The handheld provides alternate methods of performing the same function (e.g. using hotkeys instead of the trackwheel). In particular, there are four ways to change the configurable options on your handheld. These alternatives apply to all screens where you can change options, such as in the Date/Time, the New Appointment, or the Daily Alarm screens.
-
Page 38: Setting The Date And Time
Get to know your handheld — Setting the date and time Icon You are at the bottom of a menu or screen; scroll the trackwheel up to view more items. You are at the top of a menu or screen; scroll the trackwheel down to view more items. -
Page 39: Setting Message Notification
Get to know your handheld — Setting message notification Setting message notification You can customize the way the handheld notifies you when you receive a message. In the Home screen, scroll to the OPTIONS icon and click. In the Device Options screen, scroll to Notify and click. The Notify screen appears. -
Page 40: Using Password Protection
Get to know your handheld — Using password protection Using password protection By setting a password for your handheld, you ensure greater security against others using the handheld. You can specify the length of time that the handheld is idle before the password security screen appears. - Page 41 Get to know your handheld — Using password protection To enable password protection You should set a password so that no one can use your handheld without knowing the password. In the Home screen, scroll to the OPTIONS icon and click. In the Device Options screen, scroll to Security and click.
- Page 42 Get to know your handheld — Using password protection Manager. With the handheld in the cradle, you must type your password before you can use the Desktop Manager tools. Note The password security screen will show your contact information (if you have entered it in the Owner screen) or it will prompt you to “Press any key”.
- Page 43 Get to know your handheld — Using password protection In the Device Options screen, scroll to Security and click. A dialog box appears, asking you to type your password. Once you do so, press ENTER Click to view the menu. Scroll to Change Password and click. A dialog box appears, prompting you to enter a new password (minimum 4 characters).
-
Page 44: Summary And Tips
Get to know your handheld — Summary and tips While in the Password field of the Security screen, press the key to change the password option to Disabled. SPACE Click the trackwheel to view the menu. Scroll to Save Options and click. - Page 45 Getting to know your handheld - Tips • Press C or BACKSPACE to select Cancel in a pop-up dialog box. • Press and click the trackwheel to select an icon. Roll the trackwheel to move the icon to another position, and click the trackwheel to “drop”...
-
Page 47: Start Sending Email
Start sending email Now that you’re more familiar with the handheld, you can start sending and receiving email! The following steps will help you get started: Turn on the radio. Register with the wireless network (if necessary). Install the Desktop Software on your PC. Connect the handheld to your PC using the cradle. -
Page 48: Registering With The Network
Start sending email — Registering with the network You will notice that the TURN WIRELESS ON icon was an antenna, but when you select the icon, the function name changes to TURN WIRELESS OFF and the icon changes to an airplane. The airplane icon is a reminder to turn off your handheld’s radio when on an airplane, in a hospital, or any place where it may interfere with other radio transmissions and frequencies. -
Page 49: Installing The Desktop Software
Start sending email — Installing the Desktop Software In the Network Settings screen, ensure that the Roaming field is set to your country (U.S. or Canada) and that the Radio field is set to On. Verify that the Status field is set to Active. Click to view the menu. -
Page 50: Connect The Handheld To Your Pc
Start sending email — Connect the handheld to your PC screen, using the default paths and names recommended for the Desktop Software. When Setup is complete, you may choose to open the README file and run the Desktop Software right away. After installation when you have restarted your PC, you will be prompted to choose an email box profile from a drop-down list (your profile is usually your name). - Page 51 Start sending email — Connect the handheld to your PC In the Desktop Manager, ensure that your PC recognizes a connection with the handheld. Select Options>Serial Settings to open the Settings window. Click Detect. Note The message “Handheld not found” will appear if the PC cannot detect the handheld on a serial port.
-
Page 52: Enabling Email Redirection
Start sending email — Enabling email redirection Generate a security key for the handheld The first time you connect successfully to your PC, a dialog box will prompt you to generate an encryption key by moving your mouse. Note You will be prompted to generate a key the first time you install the Desktop Software. -
Page 53: Sending A Message
redirection status. The Status field will show the name of the BlackBerry Enterprise Server that is redirecting your email. Sending a message You can send a message to an existing contact or add a new contact while composing your message. Note You can also compose a message while in the Messages, Address Book, or Saved Messages screens. -
Page 54: Reading A Message
Start sending email — Reading a message Type a subject line and press message. When you are finished composing your message, click the trackwheel to view the menu; select Send Message by clicking again. The Messages screen shows a list of message headers for each message you’ve sent or received;... - Page 55 In the Messages screen, scroll to the new message (the message header with an unread message icon beside it) and click to view the menu. Select Open Message by clicking again. Open messages quickly by double-clicking the trackwheel. The new message appears on your screen. Scroll down to read the entire message.
-
Page 56: Summary
Start sending email — Summary Note If you slide the handheld out of the holster within five seconds of notification, the notification stops and the most recently-received message will be open. If you pull the handheld out of the holster and quickly replace it, notification stops but the message will remain closed and marked unread. -
Page 57: Using The Desktop Software
Using the Desktop Software The Desktop Software can synchronize your messages, contacts, appointments, memos, and tasks between your PC and handheld. You can also backup any important information from the handheld to your PC, edit the Address Book and AutoText files, restore data back to the handheld, configure email redirection settings, and load new applications onto the handheld, all using the Desktop Software’s convenient Windows interface. -
Page 58: Loading Handheld Applications
Using the Desktop Software — Loading handheld applications Loading handheld applications If necessary, use the Application Loader tool to update the software on the handheld and add any new applications that might be available. Note Before updating your handheld with new software using the Application Loader, use the Backup and Restore tool to save any important information from the handheld to your PC. -
Page 59: Backing Up Files From Handheld To The Pc
Using the Desktop Software — Backing up files from handheld to the PC delete the information on your handheld (including your messages and address book entries). If you select this check box, ensure that any important information is backed up first. In the Applications section, select the check box if you wish to erase the applications from your handheld before loading updated ones. - Page 60 Using the Desktop Software — Backing up files from handheld to the PC the entries on your PC. You can also import your PC’s Address Book entries onto your handheld. Note Before updating your handheld with new software using the Application Loader, use the Backup and Restore tool to save any important information from the handheld to your See the online help topic “Advanced backup and restore”...
- Page 61 Using the Desktop Software — Backing up files from handheld to the PC To restore files back to the handheld Place your handheld in the cradle and connect it to your PC. In the Desktop Manager, double-click Backup and Restore. The Backup and Restore window appears.
-
Page 62: Synchronizing Email And Pim
Using the Desktop Software — Synchronizing email and PIM Synchronizing email and PIM Using the Intellisync tool, you can reconcile email messages and synchronize your PIM applications. Note See the online help for complete instructions on reconciling your email and for specific information based on the PIM application you use on your PC. - Page 63 Using the Desktop Software — Synchronizing email and PIM and deletes on either system by selecting “Synchronize moves and deletes”. Note If you select the second option, you need to select which location should dominate if a message has been moved or deleted on both the handheld and the desktop.
-
Page 64: Redirecting Email
Using the Desktop Software — Redirecting email In the Intellisync window, click Configure PIM... to customize your Configuration window appears. Select a PIM application (Address Book, Calendar, MemoPad, or Tasks) and click Choose. In the Choose Translator window, select the PC program (called the “translator”) that you use and click OK. - Page 65 Redirector Status window, which displays the status of any email transactions between the handheld and your PC. WARNING If you’re using the Desktop Redirector, your computer must be powered ON at all times with the Desktop Redirector running. If your computer is turned off, your email will not be redirected to the handheld.
- Page 66 Using the Desktop Software — Redirecting email BCC fields of the message. Note If the body of your messages aren’t being redirected from your PC to the handheld, check to see how these messages are addressed to you. If you are addressed in the Cc field of the message, the default filter will not redirect the body of the message to you.
-
Page 67: Summary
arriving at your desktop that meets the condition(s) will be subject to this filter. When you have selected the conditions that must be fulfilled for this filter, decide whether the message will be forwarded to the handheld, forwarded with Level 1 notification, forwarded with only the header, or held at your PC. -
Page 69: Composing And Sending Messages
Composing and sending messages In the previous chapters of this guide, you learned about your handheld’s main components, the general procedures required for sending and reading messages, and the Desktop Software’s tools. This chapter explains the different features that the handheld offers for advanced composing and sending capabilities. - Page 70 Composing and sending messages — Setting message options To set message options In the Home screen, scroll to the MESSAGES icon and click. In the Messages screen, click the trackwheel to view the menu. Scroll to Options and click. The Message List Options screen appears. Scroll to the field you would like to set, then press the through your options.
-
Page 71: Setting Level Of Importance
Composing and sending messages — Setting level of importance Click to view the menu. Scroll to Options and click. In the Message List Options screen, set the Delete On field to Desktop and Handheld. To test this feature, delete a message on your handheld which you no longer need. -
Page 72: Sending Peer-To-Peer Messages
Composing and sending messages — Sending peer-to-peer messages The Current Message Options screen appears. In the Importance field, press the level of the message you are composing from Normal to High. Click to view the menu. Scroll to Save Options and click. You return to the message you are composing. - Page 73 Composing and sending messages — Sending peer-to-peer messages number. If you know the PIN of another handheld, you can use that number to send a peer-to-peer message to that handheld directly. Note PIN messages do not go through your desktop. They will not appear in your desktop Inbox or Sent Items lists.
-
Page 74: Sending One-Time Messages
Composing and sending messages — Sending one-time messages number, the checkmark will change to a “D” when the message has been delivered to all the recipients’ handhelds. Note To find your PIN number, check the information in the Status screen of the Options function. You can also find out your PIN number by placing your handheld in the cradle and running the Desktop Software. -
Page 75: Sending Messages To Many Contacts
Composing and sending messages — Sending messages to many contacts Sending messages to many contacts You can send a message to more than one recipient and choose whether recipients are addressed directly (To), carbon copied (CC), or blind carbon copied (BCC). See the Address Book chapter for information on adding contacts to your Address Book. -
Page 76: Customizing The Auto Signature
Composing and sending messages — Customizing the auto signature Note When you add a recipient to your message, the same send method (Email or PIN) must be used for all. By default, the send method selected for the main recipient will be used for all. -
Page 77: Attaching Address Book Entries
Composing and sending messages — Attaching Address Book entries Select the recipients of the message by following the standard email message procedure (shown on page 53). In the Subject field, type <confirm>, followed by your subject line. Note You will have to use the Select Symbol screen (press SPACE See page 85 for more information. -
Page 78: Using Autotext
Composing and sending messages — Using AutoText The Attach: screen appears, listing all of your contacts’ names. Scroll to a contact and click to view the menu. Scroll to Use Address and click. You return to the To: screen and you can see that your message now contains an Address Book attachment. - Page 79 Composing and sending messages — Using AutoText • Automatically insert punctuation and symbols into your message without using the Note There are several shortcuts built into the AutoText function for inserting macros into messages. These shortcuts include inserting the time, date, etc. See page 80 for more information on creating AutoText entries using macros.
- Page 80 Composing and sending messages — Using AutoText To add a new AutoText entry You may want to customize your AutoText database by adding specific AutoText entries. In the Home screen, scroll to the OPTIONS icon and click. The Device Options screen appears. Scroll to AutoText and click.
- Page 81 Composing and sending messages — Using AutoText You will be prompted with two fields: When I type (for the keyword) and Replace it with (for what should appear instead). For this example, enter a short form for the date in the When I type field.
- Page 82 Composing and sending messages — Using AutoText to edit. Click the trackwheel to view the menu. Scroll to Edit Item and click. The Edit AutoText screen appears. Press trackwheel to scroll horizontally while you make your edits. Make your changes to the current entry. Click the trackwheel to view the menu.
-
Page 83: Automatic Formatting
Composing and sending messages — Automatic formatting You return to the AutoText screen and you can see that the entry is no longer listed. To perform an AutoText search Rather than scrolling through your list of AutoText entries, you can perform a search to find an entry quickly. - Page 84 SPACE time you press the Number fields You can type numbers in the PIN, Work, Home, Mobile, Pager, and Fax fields without pressing the To type a number in one of these fields, simply press the associated character key. For example, to display the number ‘4’, press the ‘R’...
-
Page 85: Inserting Symbols
Composing and sending messages — Inserting symbols Number lock You can activate number lock (num lock) mode to type numbers without holding down the mode is activated and you can enter numbers in any screen. Press again to turn off num lock mode SHIFT Inserting symbols You can enhance your messages by inserting symbols from the... -
Page 86: Summary And Tips
Composing and sending messages — Summary and tips You return to your message in the To: screen and the symbol has been inserted. You can also insert international characters/characters with accents into your messages. When composing a message or entering text, press and hold a letter key while rolling the trackwheel to scroll through international characters/ characters with accents. - Page 87 Composing and sending messages — Summary and tips Composing and sending messages - Tips AutoText • While composing a message, press br + bracket. • While composing a message, press ld + date. • While composing a message, press lt + time.
-
Page 89: Receiving And Reading Messages
Receiving and reading messages In this chapter, you will learn about your options for received messages, how to receive more of a long message, and how to open file and Address Book attachments. When you receive a new message, the handheld will display visual notification on the Home screen, and may provide other notification, depending on how you have set your notification options. - Page 90 Receiving and reading messages — Received message options Reply to Message — Send a reply to the sender of the open message, without including the original text. (See Reply with Text below.) Reply to Message is the default menu option. Reply to All —...
-
Page 91: Receiving Long Messages
Receiving and reading messages — Receiving long messages Next Unread — Close the current message and opens the next unread message if unread messages exist. Previous Message — Close the current message and opens the previous message. Next Message — Close the current message and opens the next message. -
Page 92: Sending File Attachments
Receiving and reading messages — Sending file attachments Once you have selected More, the remaining part of the message will be sent to you. It will appear at the end of the existing part of the message. Press G to resume reading the message where you last left off. -
Page 93: Managing Address Book Attachments
Receiving and reading messages — Managing Address Book attachments You can type a message before you click to view the menu and select Send Message. The sent message will include the file attachment. You return to the Messages screen where you can view the sent message’s status. -
Page 94: Adding Contacts To Address Book
Receiving and reading messages — Adding contacts to Address Book Click the trackwheel to view the menu. Scroll to Save Address and click. The attachment is added to your Address Book and you return to the open message. Adding contacts to Address Book When you receive a new message from someone who is not currently in your handheld’s Address Book, you can add the address from the open message. -
Page 95: Summary And Tips
Receiving and reading messages — Summary and tips Summary and tips In this chapter, you’ve learned about reading and receiving messages. You can set received message options, retrieve long messages, manage file attachments, open address book attachments, and add attachments to your Address Book. Now that you know the basics of reading and receiving email, you are ready to learn more about managing messages. -
Page 97: Managing Messages
Managing messages Chapters 4 and 5 discuss the features and functions that the handheld provides for sending and receiving messages. Now, find out how you can organize, customize, and search your list of messages more efficiently. Filing messages Once you have installed the Desktop Software and have synchronized your handheld and your PC, you can file messages into folders. - Page 98 Managing messages — Filing messages In the File Message screen, select the folder in which you want to store the message. You can expand the folders that appear in the File Message screen to go to one of your Inbox subfolders. Click to view the menu, then select Open Folder by clicking again.
-
Page 99: Saving Messages
To review filed messages After a message has been filed, you can verify the message placement by opening the message and scrolling to the top of the screen. The Folder field will indicate in which folder the message is filed. Saving messages Save important messages by copying them to a separate list. - Page 100 Managing messages — Saving messages Return to the Messages screen by clicking to view the menu, scrolling to and clicking Close. Exit to the Home screen. In the Home screen, scroll to the SAVED MESSAGES icon and click. The Saved Messages screen appears and you can see that the message has been copied to this folder.
- Page 101 Scroll to Delete Message and click. A dialog box appears, asking if you want to delete the message. Click Yes. Note If you have deleted the message from the Messages screen and then delete it from the Saved Messages screen, the message will no longer be on your handheld. If you have chosen to delete messages from both the handheld and the desktop during email reconciliation, the message will be moved to the Deleted Items folder on your...
-
Page 102: Searching Messages
Managing messages — Searching messages When you’ve finished composing, click the trackwheel to view the menu. Choose to save again or to send the message. Searching messages Use the handheld’s search function to locate specific messages. You can specify and save the terms of several searches and use them at any time. - Page 103 In the In field, press the search for the name that you have entered. Choose from From Field, Any Address Field, To Field, Cc Field, or Bcc Field. Select the folder in which you want to search for messages. The default is All Folders, but you can select a specific folder.
- Page 104 Managing messages — Searching messages only the received messages, or only the saved messages which match your search terms. After you have set the terms of your search, click the trackwheel to view the menu. To perform a one-time search without saving any of the terms that you have specified, scroll to Search and click.
- Page 105 To edit a search In the Home screen, scroll to the SEARCH MESSAGES icon and click. The Search Messages screen appears. Click the trackwheel to view the menu. Scroll to Recall Search and click. Your saved searches are listed. Select the search that you want to edit then click to view the menu.
- Page 106 Managing messages — Searching messages The Search Messages screen appears. Click the trackwheel to view the menu. Scroll to Recall Search and click. Your saved searches are listed. Select the search that you want to edit then click to view the menu. Scroll to Select Search and click.
- Page 107 A dialog box appears asking if you are sure you want to delete the selected searches. Click Yes to delete the search. You return to the Search Messages screen and you can see that the search is no longer listed. To search for the sender When you have a received message selected in the Messages screen, you can search for all messages received from that contact.
-
Page 108: Deleting Messages
Managing messages — Deleting messages Deleting messages Although the handheld has ample memory for storing messages, you should delete unnecessary messages in order to manage the list more efficiently. Note If the handheld’s memory is full and you receive new messages, the handheld will delete the oldest messages in the Messages screen to accommodate new ones. - Page 109 You return to the Messages screen and you can see that the message is no longer listed. Note If you request more of a message, you should not delete the message until you have received all the information. See page 91 for more information on receiving long messages.
- Page 110 Managing messages — Deleting messages To delete multiple messages You can delete all messages prior to a particular date by selecting a date field. In the Home screen, scroll to the MESSAGES icon and click. In the Messages screen, scroll to a date field. With the date field selected, click to view the menu.
- Page 111 To delete messages on the handheld and the desktop You can configure the Messages screen so that messages deleted on your handheld are deleted on your desktop (and vice versa) each time you reconcile email. In the Home screen, scroll to the MESSAGES icon and click. In the Messages screen, click to view the menu.
-
Page 112: Editing Messages
Managing messages — Editing messages Editing messages After you have a sent a message, you can edit its text, add or change the recipient, or change the send method. In the Home screen, scroll to the MESSAGES icon and click. In the Messages screen, scroll to a sent message that you want to edit and click to view the menu. -
Page 113: Marking A Message As Unread
Managing messages — Marking a message as unread In the Messages screen, scroll to the message that you want to resend and click to view the menu. Select Open Message by clicking again. The text of the message will appear. Click to view the menu. Scroll to Resend Message and click. -
Page 114: Marking All Messages Read
Managing messages — Marking all messages read The message will be marked unread. Note You can also mark an open message unread by clicking to view the menu, scrolling to Mark Unread and clicking again. You can also mark multiple messages as unread. In the Messages screen, hold the trackwheel trackwheel to view the menu. -
Page 115: Summary And Tips
All messages in the list will be marked as read. You can also mark a set of messages as read. In the Messages screen, hold the trackwheel to select more than one message. Click the trackwheel to view the menu. Scroll to Mark Read and click. Summary and tips In this chapter, you learned how to manage your messages more effectively. -
Page 117: Using The Address Book
The handheld contains an Address Book for storing various contact information. The Address Book allows you to keep a customized record of email addresses, mailing addresses, titles, and pager, fax, business, and home phone numbers. You can include PIN numbers for contacts who also have handhelds. -
Page 118: Adding Addresses
Using the Address Book — Adding addresses option is set to Yes. • Allow Duplicate Names: Select whether or not you want to allow more than one entry for the same name. By default, this is set to Yes. Scroll to the field you would like to set, then press the key to scroll through your options. - Page 119 Type your contact’s information and press field. You can also type your contact’s full name in the First or Last field and press First field and the last name will appear in the Last field. Note You can have up to three email addresses for the same Address Book entry.
- Page 120 Using the Address Book — Adding addresses Address Book fields The New Address screen has the following fields: First: Type your contact’s first name. This field supports alpha- numeric and symbol characters. Last: Type your contact’s last name. This field supports alpha- numeric and symbol characters.
- Page 121 ‘–‘, ‘+’, ‘x’ and ‘.’ characters without having to hold down the symbols library (press Pager: Type your contact’s pager number. This field supports numeric characters and the ‘–‘, ‘+’, ‘x’ and ‘.’ characters without having to hold down the...
-
Page 122: Viewing Addresses
Using the Address Book — Viewing addresses Country: Type your contact’s country. This field supports alpha- numeric and symbol characters. Notes: Type any reference notes you would like to keep about your contacts. This field supports alpha-numeric and symbol characters. Press the key for a new line. -
Page 123: Deleting Addresses
In the Address Book screen, select the Address Book entry that you want to edit and click to view the menu. Scroll to Edit Address and click. In the Edit Address screen, use the trackwheel to move from field to field. Press the through the text to make your edits. -
Page 124: Searching Addresses
Using the Address Book — Searching addresses You return to the Address Book screen and you can see that the entry is no longer listed. Note You can also delete addresses in the Edit Address and View Address screens. Searching addresses The handheld’s powerful search tool enables you to go directly to a specific contact so you do not have to scroll through a lengthy address list. - Page 125 chapter you will learn about managing your tasks and appointments. Using the Address Book - Tips • Press the associated key on the keyboard while in number fields (like PIN) to insert numbers without using the • Press to insert the “@” and “.” characters in an Email field. SPACE •...
-
Page 127: Managing Tasks And Appointments
Managing Tasks and Appointments The handheld includes a Tasks function and a Calendar function to help you manage and schedule appointments and tasks. Use the Tasks function to make a list of tasks to be completed. Use the Calendar function to keep track of appointments and events, including the duration of the appointment, the location, and any additional notes. - Page 128 Managing Tasks and Appointments — Using the Tasks function The Tasks Options screen appears, displaying the following two options: • Sort By: Select how you want to sort the tasks in your Tasks screen. Choose from Subject, Priority, Due Date, or Status.
- Page 129 Managing Tasks and Appointments — Using the Tasks function Release the SPACE preference. Click to view the menu, then scroll to Save Task and click. Your new task will be listed in the Tasks screen with one of the following three icons beside it, depending on the task’s status. Icon The task has been completed.
- Page 130 Managing Tasks and Appointments — Using the Tasks function Due: Select the date by when the task is to be completed. Your options are None or By Date. If you select None, no due date will be recorded for this task. If you select By Date, you can select the date on which this task is due.
-
Page 131: Using The Calendar Function
Managing Tasks and Appointments — Using the Calendar function You return to the Tasks screen and you can see that the task is no longer listed. Note Delete all completed tasks by scrolling to Delete Completed and clicking. You can also delete tasks in the Edit Task screen. To change a task’s status In the Home screen, scroll to the TASKS icon and click. - Page 132 Managing Tasks and Appointments — Using the Calendar function In the Calendar screen, click to view the menu. Scroll to Options and click. The Calendar Options screen appears, displaying the following three options: • First day of week: Set on which day your week starts. By default, this option is set to Sunday.
- Page 133 Managing Tasks and Appointments — Using the Calendar function Day view This view displays all appointments for the given day. The subject of the appointment appears beside the start hour and a sidebar spans the length of the appointment. Week view This view displays all appointments for the current week;...
- Page 134 Managing Tasks and Appointments — Using the Calendar function the bar for afternoon appointments will typically appear near the bottom of the date. Agenda view This view displays only the days on which you have appointments, allowing you to see your “agenda”. The appointments appear in chronological order starting with the earliest appointments at the top.
- Page 135 Managing Tasks and Appointments — Using the Calendar function In the Reminder field, select how early you want to be notified of the appointment. If you do not wish to be reminded of the appointment, set this field to None. If the appointment will occur regularly, set the Recurrence field to reflect how often the appointment should appear in your calendar.
- Page 136 Managing Tasks and Appointments — Using the Calendar function Appointment fields The New Appointment screen contains the following fields: Subject: Type the subject for the appointment. Location: Type the location where the appointment is to be held. Start Date: Select the start date of the appointment. The default is today’s date.
- Page 137 Managing Tasks and Appointments — Using the Calendar function In the New Appointment screen, add the information for your appointment. In the Recurrence field, press the Recurrence screen appears. In the Recur field, press the appears on screen. Your options are: Day, Week, Month, and Year.
- Page 138 Managing Tasks and Appointments — Using the Calendar function In the End field, set the specific date on which the recurring appointment should end. (By setting this field to Never, you will have a constant recurring appointment.) Note If you set your appointment to recur weekly, you can specify the day(s) of the week on which it should recur.
- Page 139 Managing Tasks and Appointments — Using the Calendar function In the Calendar screen, select a day that has appointments and click to view the menu. Scroll to View Appointments and click. The appointments for the selected day are listed. Note When you view appointments in Month view, you are not switching your view.
- Page 140 Managing Tasks and Appointments — Using the Calendar function To view next and previous In the Home screen, scroll to the CALENDAR icon and click. In the Calendar screen, click the trackwheel to view the menu. Scroll to Next (or Previous) and click. The next (or previous) day, week, or month is shown.
- Page 141 Managing Tasks and Appointments — Using the Calendar function (choose Edit all dates) or you can edit only the selected appointment (choose Edit this). The Edit Appointment screen appears, displaying all of the details for the appointment. Edit the information in any of the fields.
-
Page 142: Summary And Tips
Managing Tasks and Appointments — Summary and tips To delete appointments In the Home screen, scroll to the CALENDAR icon and click. In the Calendar screen, scroll to the appointment that you want to delete (in Day, Week, or Agenda view) or the day on which there are appointments to delete (in Month view). - Page 143 Managing Tasks and Appointments — Summary and tips Managing tasks and appointments - Tips • Press T to go to the top task or appointment in the list. • Press B to go to the bottom task or appointment in the list. •...
-
Page 145: Using The Memopad And Calculator
Using the MemoPad and Calculator The handheld contains a MemoPad for recording lists, notes, or other important information that you type aside from email messages. A Calculator function is also included, which helps you to perform simple mathematical operations. Using the MemoPad function You can use the MemoPad function to add, edit, view, and delete important memos. - Page 146 Using the MemoPad and Calculator — Using the MemoPad function Type a title for your memo and press body of the memo. Once you have finished composing the memo, click to view the menu. Select Save by clicking again. You return to the MemoPad screen where your new memo appears in alphabetical order.
-
Page 147: Using The Calculator Function
Using the MemoPad and Calculator — Using the Calculator function When you have finished making changes to your memo, click to view the menu. Select Save by clicking again. Note You can clear the Title field and the entire body of a memo. Scroll to the field that you want to clear (either the Title field or the body) and click to view the menu. -
Page 148: Summary And Tips
Using the MemoPad and Calculator — Summary and tips The Calculator screen appears. Use the keyboard to enter the first number of the mathematical calculation. Using the trackwheel, scroll to the operator you want and click. Enter the next number of the mathematical calculation. Using the trackwheel, scroll to the equal sign and click. - Page 149 Using the MemoPad and Calculator — Summary and tips operations in the Calculator screen. In the next chapter you’ll find out how to customize your handheld’s options. Using the MemoPad and Calculator - Tips MemoPad • Press T to go to the top memo in the list. •...
-
Page 151: Customizing Your Handheld's Options
Customizing your handheld’s options In the “Get to know your handheld” chapter, you learned about the procedure for setting message notification options. Now, refer to this chapter to learn how to customize the handheld’s many other options to suit your specific needs. Setting the alarm The handheld has an Alarm function that you can set to tone at the same time every day. -
Page 152: Customizing Handheld Options
Customizing your handheld’s options — Customizing handheld options Once you have set the Alarm to your preference, click to view the menu. Scroll to Save Options and click. Note When the alarm sounds, press any key to silence it. This action will not disable the alarm;... -
Page 153: Handheld Options
Customizing your handheld’s options — Handheld options Scroll to the field that you want to change, then press the key to scroll through your options. Release the you have set the field to your preference. Once you have set the options to your preference, click to view the menu. - Page 154 Customizing your handheld’s options — Handheld options Weekend On: Set the handheld to turn on automatically at a specific time on the weekend Weekend Off: Set the handheld to turn off automatically at a specific time on the weekend Note Both Weekday and Weekend options have an Enable/ Disable field.
- Page 155 Customizing your handheld’s options — Handheld options Format: Select a 12 hour or 24 hour clock Date: Set the current date Note The information that you set in the Time, Format, and Date fields will represent how the date and time appear on the handheld’s Home screen and on the password security screen.
- Page 156 Customizing your handheld’s options — Handheld options Status: Shows the status of the network. It is set to either Pending or Active, depending on what you have specified in the Roaming field. Note You can re-register with the network in the Network Settings screen.
- Page 157 Customizing your handheld’s options — Handheld options type to vibrate and set the Volume field to Low, the handheld will vibrate only once when a new message arrives. If you set this field to Medium, High, or Escalating, the handheld will vibrate twice when a new message arrives.
- Page 158 Customizing your handheld’s options — Handheld options Consider PIN Level 1: Select whether or not you want PIN messages to be considered level 1 priority. Choose from either Yes or No. The default is Yes. If you set this field to Yes and have the Level 1 Notify Only field set to Yes, you will be notified of Level 1 messages, PIN messages, and pending appointments only.
- Page 159 Customizing your handheld’s options — Handheld options Key Rate: Set the speed (Slow, Fast, or Off) at which your cursor moves whenever the and held. The default setting is Slow. Note For all other keys, the Key Rate setting controls an auto capitalization feature.
- Page 160 Customizing your handheld’s options — Handheld options Battery: Shows the percentage of remaining battery life. Memory Free: Shows the amount, in bytes, of available RAM. File Free: Shows the amount, in bytes, of available memory to store messages, address entries, and AutoText entries. PIN: Shows the handheld’s address number.
-
Page 161: Summary
Customizing your handheld’s options — Summary Serial Db Access: Shows the current version of the Backup and Restore protocol DLL. UI: Shows the current version of the User Interface. Summary In this chapter, you discovered how to customize your handheld’s options. -
Page 163: Frequently Asked Questions
Frequently asked questions This chapter includes answers to some common questions about the handheld. Alarm Why is my alarm not sounding when I’ve set the time? • Ensure that you have enabled the alarm by setting the Alarm On/Off field to ‘On.’ When the alarm is set, a bell icon appears on the Home screen. - Page 164 Frequently asked questions — Battery person, use multiple recipients in one message rather than transmitting the same message more than once. See page 75 for information on composing a message to multiple recipients. Remember that battery consumption is reflected in the amount of use.
-
Page 165: Storage
Storage Are there any special storage instructions for my handheld? Products that use alkaline or NiMH batteries require special storage procedures as presented below. Note Before storing your handheld for an extended period of time, you should save information on the handheld to your PC using the Desktop Software’s Backup/Restore tool. -
Page 166: Charging Cradle
Frequently asked questions — Charging Cradle or to update this information automatically, simply synchronize the handheld with the Desktop Software’s Intellisync tool. Charging Cradle My battery is a NiMH rechargeable AA but the charging cradle won’t charge it. • Ensure that you are following the recommended practices on page 24 for charging your handheld in order to get maximum battery performance. - Page 167 A solid green light will display when you first insert the handheld in the charging cradle and when the battery is fully charged. How long will it take to recharge the battery? It will take approximately 8 hours to fully charge a completely drained battery.
-
Page 168: Home Screen
Frequently asked questions — Home screen Home screen How can I return to the Home screen? The screen that displays the functions list and the date and time is called the Home screen. • Press the Home screen. See page 26 for more information on other shortcuts. -
Page 169: Messages
Messages Why did I have two messages on my handheld before I turned on the radio? • These messages are pre-loaded to help you learn about the handheld when you first receive it. Why are my messages not being sent out? You can tell that messages have not been sent because they have a clock icon beside them. - Page 170 Frequently asked questions — Messages to leave your PC turned on. • Is the Desktop Redirector running? Desktop Redirector to forward your email, verify that it is running; its icon should be in the Windows SysTray (in the bottom right corner of your PC). If your company is using the BlackBerry Enterprise Server to forward your email, check the Desktop Redirector for possible error messages.
- Page 171 What should I do if a message is returned? A returned message will have an ‘x’ beside it in the Messages screen. • Open the message and scroll to the top. The Message Status field indicates why the message was returned. Follow the instructions given there.
-
Page 172: Punctuation
Frequently asked questions — Punctuation response option. When you have finished composing your list of responses, press after the last response. Click the trackwheel to view the menu. Scroll to Send Message and click. Note You can also send messages containing a response list from your desktop email or from a dispatch system. -
Page 173: Desktop Software
See page 26 for information on the functions. • Other punctuation marks are included in the symbols library which you can open by pressing information on how to insert a symbol. • You can also insert international/accented characters into your messages. - Page 174 Frequently asked questions — Desktop Software messages might not be redirected to your handheld unless you have specified email redirection from the folder. See the Redirector Settings online help for more information. • Check the Filter rules that you have set through the Redirector Settings tool.
- Page 175 Frequently asked questions — Desktop Software The Address Book Import window appears. Select names from the Global Address List and click Import names over. Once you’ve copied all the names you want, click the OK button. The Advanced window now shows a file called Address Book in the Desktop File Databases list.
-
Page 176: Resetting The Handheld
Frequently asked questions — Resetting the handheld Why should I generate new keys? How often should this be done? • Messages are encrypted when they are sent between your PC and the handheld. Your handheld can only receive messages that were sent with the correct encryption. You need to generate keys to establish the random encryption codes that enable your PC to communicate with your handheld. - Page 177 Frequently asked questions — Resetting the handheld inserted into this hole to press the reset button, restarting and restoring the handheld to normal operation. Note You can also reset the handheld by simultaneously pressing Messages and other information stored on the handheld will not be lost.
-
Page 179: Specifications
Specifications Mechanical Properties Weight: Size (LXWXH): Memory: Display and control features Display: Controls: Message Notification: 4.1oz (115g) (without AA battery) 3.5”X2.5”X0.89” landscape, (width 0.94” at battery compartment) R850-2 - 2 MB Flash memory, 304 kB R850-4 - 4 MB Flash memory, 512 kB Full graphic LCD with custom annunciators and backlighting;... - Page 180 Specifications Other features: Ports: Power Battery: Power Supply: Temperature Operating: Storage: Relative Humidity: Radio specifications Network Support: Air Protocol Support: Installation and User’s Guide Real-time clock; audible alarm; AutoText and Address Book updates RS-232 compatible serial port at operating speeds up to 115 200 baud •...
- Page 181 Interface Protocols: Frequency Transmitting: Receiving: Charging cradle properties Weight: Size (LXWXH): Serial cable: AC adapter: Straight plug in: Operating temperature: NCL (Native Control Language) RAP (RIM’s Radio Access Protocol) 806 to 825 MHz 851 to 870 MHz 6.7 oz. (191g) (cradle and serial cable) 1.5 oz.
-
Page 182: Regulatory Compliance
Specifications Regulatory compliance Handheld complies with: Cradle complies with: AC Adapter Complies with: Installation and User’s Guide FCC part 15, 90 – FCC ID: L6AR800D-2- Industry Canada RSS 119 FCC part 15 – FCC Class B Part 15 Declaration of Conformity (DoC) UL - Direct Plug-in and Cord Connected Class 2 Power Units E117924 CSA –... -
Page 183: Research In Motion Limited Software License Agreement
Research In Motion Limited Software License Agreement Terms and Conditions This is a legal agreement between you, the Customer (“You”), and Research In Motion Limited (“RIM”). BY INSTALLING, USING OR MAKING ONE OR MORE COPIES OF THIS SOFTWARE (OR ANY COMBINATION OF THE FOREGOING), YOU ARE AGREEING TO BE BOUND BY THE TERMS OF THIS AGREEMENT. - Page 184 Research In Motion Limited Software License Agreement This does not imply any rights future upgrades SOFTWARE. COPYRIGHT; RESTRICTIONS 3.1 The SOFTWARE is owned by RIM and is protected by Canadian, US and international copyright laws. therefore, treat the SOFTWARE like other material.
- Page 185 Research In Motion Limited Software License Agreement implied warranties conditions relating SOFTWARE to the extent they are not disclaimed below are limited days. warranty does not extend to any disk or other media that has been damaged as a result of accident, misuse, abuse, or as a result of service or modification by anyone other than RIM.
- Page 186 Research In Motion Limited Software License Agreement DOES APPLY REGARD TO WHETHER SUCH DAMAGES ASSERTED OR BROUGHT IN ACTION SOUNDING CONTRACT, WARRANTY, OR UNDER ANY OTHER LAW OR FORM OF ACTION. SHALL RIM'S LIABILITY TO YOU EXCEED THE COST OF REPLACING UPON WHICH...
-
Page 187: Limited Warranty
Limited Warranty Research In Motion Limited (“RIM”), the manufacturer and provider of the BlackBerry Solution, comprising the BlackBerry Handheld, which together with the BlackBerry Cradle and Holster comprise the BlackBerry Hardware, the BlackBerry Desktop Software, associated wireless data service documentation, warrants to YOU, the end-user (“YOU”), that the BlackBerry Hardware will be free from defects in workmanship and materials for a period that is the shorter of (i) one (1) year from the date that the BlackBerry Hardware was first purchased by YOU as... - Page 188 Limited Warranty the later of the 91st day after repair or replacement or one year from the date of original purchase. If the Applicable Warranty Period is a Rental Warranty Period, the Applicable Warranty Period will expire upon the earlier of YOU failing to pay any applicable charge or fee or three years from the date the BlackBerry Hardware was first put into service.
- Page 189 Limited Warranty synchronization software. In as much as the wireless data service provided as part of the BlackBerry Solution is provided via RIM from a third party provider, we cannot guarantee or warrant that the wireless data service will always be available or will always function properly.
- Page 190 Limited Warranty CONSEQUENTIAL OR INCIDENTAL DAMAGES INCLUDING DAMAGES FOR LOSS OF BUSINESS PROFITS, BUSINESS INTERRUPTION, LOSS OF BUSINESS INFORMATION AND THE LIKE AND PERSONAL INJURY OR WRONGFUL DEATH DAMAGES) ARISING FROM OR IN CONNECTION WITH THE USE OR PERFORMANCE OF THE BLACKBERRY HARDWARE, EVEN IF RIM OR A RIM WIRELESS SOLUTION PROVIDER ARE AWARE OF THE POSSIBILITY OF SUCH DAMAGES.
- Page 191 Limited Warranty the warranty to be voided. Thus, the above limitations or exclusions may not apply to YOU. This Limited Warranty is to be construed in Canada under the laws of the Province of Ontario and in the United States under the laws of the State of Texas, except for any body of law governing conflicts of law.
-
Page 193: Index
Index about Research In Motion, 17 this guide, 16 activating your handheld, 25 adding addresses, 118 appointments, 134 attachments from messages, 93 attachments to messages, 77 autotext entries, 80 autotext entries using a macro, 80 contacts from messages, 94 memos, 145 tasks, 128 address book adding entries, 118... - Page 194 Index automatic on/off, description of, 153 autotext adding entries, 80 adding entries using a macro, 80 deleting entries, 82 description of, 79 editing entries, 81 searching for entries, 83 using to compose messages, 78 backlighting, 31 backup and restore backing up handheld files, 60 importing address book entries from PC, 60...
- Page 195 searches, 105 sent messages, 112 task status, 131 tasks, 130 charging cradle FAQs, 166 tips, 24 chart of hot keys, 26 components handheld, 19 LCD screen, 31 composing description of, 13, 32 messages, 53, 69 messages to multiple contacts, 75 one-time messages, 74 peer to peer messages, 72 saving messages while...
- Page 196 Index messages, 13, 32 options, 14, 33 power on/off, 14, 33 saved messages, 13, 32 search messages, 13, 32 serial port, 21 tasks, 13, 32 trackwheel, 20 turn radio on/off, 14, 33 desktop redirector adding a filter, 66 checking settings, 65 desktop software application loader, 58 backup and restore, 59...
- Page 197 getting confirmation of messages, 76 customer support, 17 started, 19 handheld battery compartment, 20 changing password, 42 components, 19 connecting to your PC, 50 cradle, 21 customizing options, 151 generating a security key, 52 getting started, 19 holster, 20 keyboard, 20 LCD screen, 19 locking, 42 package contents, 15...
- Page 198 Index key assignment chart, 26 key rate, 159 keyboard description, 20 hot keys, 26 LCD screen backlighting, 31 components, 31 description of, 19 FAQs, 168 function menus, 34 function screens, 31 graphics, 37 level of importance, setting, 71 license agreement, 183 limited warranty, 187 locking the handheld, 14, 33, 42 managing...
- Page 199 FAQs, 169 filing, 97 formatting automatically, 83 managing, 97 managing address book attachments, 93 managing tips, 115 marking as read, 114 marking as unread, 113 options for received messages, 89 reading, 54, 89 receiving, 89 receiving and reading tips, 95 receiving confirmation, 76 receiving long messages, 91...
- Page 200 Index password security screen changing password, 42 disabling, 43 enabling, 41, 42 PC, connecting to your handheld, 50 performing mathematical operations, 147 one-time search, 102 search by sender, 107 searches, 102 personal identification number (PIN) finding, 51, 159 hexadecimal characters, 84, sending messages to other handhelds, 72 power on/off, description...
- Page 201 reviewing filed messages, 99 safety information, 9 saved messages description of, 13, 32 removing, 100 saving address book attachments, 93 messages, 99 messages while composing, 101 received messages, 99 sent messages, 99 searches deleting, 106 description of, 13, 32 editing, 105 editing once, 105 performing, 102 performing one-time, 102...
- Page 202 Index password security screen, 42 recurring appointments, 136 task options, 127 specifications, 179 charging cradle, 181 specifying search terms, 102 storing received or saved messages, 99 style conventions, 16 symbols, inserting, 85 synchronizing email, 62 PIM, 62 system requirements, 16 tasks adding, 128 changing status, 131...
- Page 203 backup and restore, 59 calculator, 147 calendar, 131 desktop software, 57 intellisync, 62 lock, 42 macro to add an autotext entry, 80 memopad, 145 password protection, 40 tasks, 127 viewing addresses, 122 appointments, 138 appointments for a specific date, 140 memos, 146 messages, 54 next and previous...