
Related Manuals for LG LAS655K


Summary of Contents for LG LAS655K
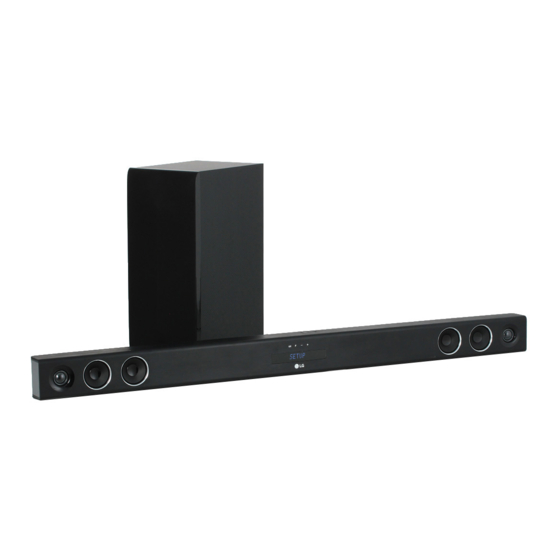
- Page 1 OWNER’S MANUAL WIRELESS SOUND BAR Please read this manual carefully before operating your set and retain it for future reference. LAS655K (LAS655K, S55A1-D) www.lg.com...
-
Page 3: Getting Started 30
Getting Started Safety Information WARNING: Do not install this equipment in a confined space such as a book case or similar unit. CAUTION: Do not use high voltage products CAUTION around this product. (ex. Electrical swatter) This product may malfunction due to electrical shock. RISK OF ELECTRIC SHOCK DO NOT OPEN CAUTION: Do not block any ventilation openings. - Page 4 Getting Started This device is equipped with a portable battery or Disposal of waste batteries/accumulators accumulator. 1. This symbol may be combined with Safety way to remove the battery from the chemical symbols for mercury(Hg), equipment: Remove the old battery or battery cadmium(Cd) or lead(Pb) if the pack, follow the steps in reverse order than battery Contains more that 0.0005%...
-
Page 5: Declaration Of Conformity
Directive 1999/5/EC. The complete Declaration of Conformity may be requested through the following postal address: LG Electronics European Shared Service Center B.V. Krijgsman 1 1186 DM Amstelveen The Netherlands or can be requested at our dedicated DoC website: http://www.lg.com/global/support/cedoc/cedoc#... -
Page 6: Table Of Contents
– Deleting a saved station – [LANGUAGE] menu – Deleting all the saved stations – [AUDIO] menu – Improving poor FM reception – [OTHERS] menu – See information about a radio station Sound Effect LG AV Remote – Setting the sound mode... - Page 7 Table of Contents Private Sound Mode Using BLUETOOTH® technology – Listening to music stored on the BLUETOOTH devices LG Sound Sync Troubleshooting Troubleshooting – General – Network – Picture – Sound – Customer Support – OPEN SOURCE SOFTWARE NOTICE Appendix...
-
Page 8: Getting Started
Main Features Introduction Term Symbol Description LG Sound Sync Controls volume level of this unit by the remote Indicates special control of your LG TV that is compatible with LG Note notes and operating Sound Sync. features. Bluetooth® Indicates cautions >... -
Page 9: Front Panel
Getting Started Front Panel > Caution a 1/! (Standby/On) Precautions in using the touch buttons b F (Function) Press it repeatedly to select other function. y Use the touch buttons with clean and dry hands. c p/o (Volume) - In a humid environment, wipe out any Adjusts speaker volume. -
Page 10: Remote Control
Getting Started Remote Control • • • • • • a • • • • • • • • • • • • c • • • • • HOME ( ): Displays or exits the 1 (Power): Switches the unit ON or OFF. -
Page 11: Installing The Sound Bar
Getting Started Installing the sound Mounting the main unit on a wall You can hear the sound by connecting the unit to the other device : TV, Blu-ray disc player, DVD player, etc. Place the unit in front of the TV and connect it to the device you want. - Page 12 Getting Started 2. When you mount it on a wall (concrete), use 5. Hang the main unit onto the bracket as shown the wall plugs (Not supplied). You should drill below. some holes. A guide sheet (Wall Mount Bracket Installation Guide) is supplied to drill. Use the sheet to check the point to drill.
-
Page 13: Connecting
Connecting Wireless Subwoofer 3. If the LED of the wireless subwoofer already blinks in yellow-green continually, you can skip Connection this step. Press and hold PAIRING on the back of the wireless subwoofer for more than 5 seconds. - The LED of the wireless subwoofer lights up Pairing wireless subwoofer alternately in red and yellow-green. -
Page 14: Connecting To Your Tv
Connecting Note Connecting to Your TV y If a connected HDMI device does not accept the audio output of the unit, the HDMI device’s audio sound may be distorted or HDMI Connection may not output. y When you use HDMI connection, you can If you have a HDMI TV or monitor, you can connect change the resolution for the HDMI output. -
Page 15: What Is Simplink
[Settings] menu. Some functions of this unit are controlled by the 1. Press HOME ( ). TV’s remote control when this unit and LG TV’s with SIMPLINK are connected through HDMI connection. 2. Use A/D to select the [Settings] and press ENTER (b). -
Page 16: Optical In Connection
Connecting Connections with OPTICAL IN connection external device You can enjoy the sound from your TV with a optical digital audio connection. OPTICAL IN connection You can enjoy the sound from your component with a digital optical connection through the speakers of this system. -
Page 17: Antenna Connection
Connecting Antenna connection Connecting to your Home Network Connect the supplied antenna for listening to the radio. This unit can be connected to a local area network (LAN) via the LAN port on the rear panel or the internal wireless module. By connecting the unit to a broadband home network, you have access to services such as software updates. -
Page 18: Wired Network Setup
Connecting 1. Select [Connection Setting] option in the [Settings] menu then press ENTER (b). Broadband service Router 2. Read the preparations for the network settings and then press ENTER (b) while [Start] is highlighted. DLNA certified servers Network will automatically be connected to the unit. -
Page 19: Wireless Network Connection
Connecting Wireless network connection 2. Use W/S/A/D to select the IP mode between [Dynamic] and [Static]. Another connection option is to use an Access Point Normally, select [Dynamic] to allocate an IP or a wireless router. The network configuration and address automatically. -
Page 20: Wireless Network Setup
Connecting Wireless network setup For the wireless network connection, the unit needs to be set up for network communication. This adjustment can be done from the [Settings] menu. Adjust the [NETWORK] setting as follow. Setting up the access point or the wireless router is required before connecting the unit to the network. - Page 21 Connecting Advanced Setting Notes on network connection If you want to set the network settings manually, y Many network connection problems during set use W/S to select [Advanced Setting] on the up can often be fixed by re-setting the router or [Network Setting] menu and press ENTER (b).
- Page 22 Connecting y The use of a “Router” may not be allowed or its usage may be limited depending on the policies and restrictions of your ISP. For details, contact your ISP directly. y The wireless network operate at 2.4 GHz radio frequencies that are also used by other household devices such as cordless telephone, Bluetooth devices, microwave oven, and can be...
-
Page 23: System Setting
System Setting Initial Setup 5. Use W/S/A/D to select the IP mode between [Dynamic] and [Static]. Normally, select [Dynamic] to allocate an IP When you turn on the unit for the first time, the address automatically. initial setup wizard appears on the screen. Set the display language and network settings on the initial setup wizard. -
Page 24: Settings
Operating Settings 9. Check all the settings that you have set in the previous steps. Adjust the setup settings You can change the settings of the unit in the [Settings] menu. 1. Press HOME ( ). Press ENTER (b) while [Finish] is highlighted to finish the initial setup settings. -
Page 25: [Network] Menu
System Setting [NETWORK] menu [DISPLAY] menu The [NETWORK] settings are needed to use the TV Aspect Ratio software update. Select a TV aspect ratio option according to your TV Connection Setting type. If your home network environment is ready to [4:3 Letter Box] connect, the unit needs to be set up via wireless Select when a standard 4:3 TV is connected. -
Page 26: [Language] Menu
System Setting Resolution [LANGUAGE] menu Sets the output resolution of the HDMI video signal. Display Menu Refer to page 15 for details about the resolution setting. Select a language for the [Settings] menu and on- screen display. [Auto] If the HDMI OUT jack is connected to [AUDIO] menu TVs providing display information (EDID), automatically selects the resolution best suited... -
Page 27: [Others] Menu
System Setting DRC (Dynamic Range Control) [OTHERS] menu This function allows you to listen to a movie at a Quick Start lower volume without losing clarity of sound. [Auto] This player can stay in standby mode with low power consumption, so that the player can The dynamic range of the Dolby Digital and instantly boot without delay when you turn on this Dolby Digital Plus are operated as same as the... - Page 28 [Off ]. Select [OK] and press ENTER (b). Note - The SIMPLINK function allows you to control this unit with LG TV’s remote control. When [TV Sound Connecting] and [Quick Start] functions are on and this unit is turned - The ARC function enables an HDMI capable TV...
-
Page 29: Sound Effect
System Setting Sound Effect Using Microphone Connect your microphone to the microphone jack. You can adjust the microphone’s volume, echo mode or sound mode. Setting the sound mode Adjusting the microphone’s volume You can select a sound mode that suits you and the contents you are playing. -
Page 30: Operating
Operating Home Menu Display Playing the Linked Devices Using [HOME] menu The home menu appears when you press HOME Playing a USB device ( ). Use W/S/A/D to select a category and press ENTER (b). This unit can play video, audio and photo files contained on a USB device. - Page 31 Operating Notes on USB device y This unit supports USB flash drive/external HDD formatted in FAT32 and NTFS when accessing files (music, photo, movie). y This unit can support up to 4 partitions of the USB device. y Do not extract the USB device during operation (play, etc.).
-
Page 32: Playing A File On Android Device
Operating Playing a file on Android Notes on Connecting Android device device y This unit can support only the MTP (Media Transfer Protocol) Android device. This player can play video, audio and photo files y Do not extract the Android device during contained in the Android device. -
Page 33: Playing A File On A Network Server
4. Select DLNA media server in the category using your PC by the disc. A/D and press ENTER (b). 1. Start up your computer, visit http://www.lg.com. If necessary, select your region. 2. Click support tab. 3. Fill your model name on the cover of owner’s manual in search bar. -
Page 34: Sharing Files And Folders
Operating Note System requirements y SmartShare PC software is not supported with Mac OS. Minimum System y The SmartShare PC software is a customized y CPU : Intel® 2.0 GHz or AMD Sempron™ 2000+ software edition only for sharing files and processors folders to this player. -
Page 35: General Playback
Operating General Playback Basic operations for photo content To play a slide show Basic operations for video and audio content Press d (Play) to start slide show. To stop a slide show To stop playback Press Z (Stop) while slide show. Press Z (Stop) during playback. -
Page 36: On-Screen Display
Operating On-Screen Display Displaying content information on- screen You can display and adjust various information and settings about the content. 1. During playback, press INFO/MENU (m). 2. Select an [Option] using A/D, and press To control video playback ENTER (b). You can control playback and set options while watching videos. -
Page 37: To Control Photo View
Operating To control photo view Setting the slide show option You can use various options during viewing a Controls playback and sets options while viewing photo in full screen. pictures in full screen. 1. While viewing pictures, press INFO/MENU (m). You can control playback and set options while viewing pictures in full screen. -
Page 38: Advanced Playback
Operating Advanced Playback Repeating a specific portion This unit can repeat a portion you have selected. Repeat playback 1. During playback, press REPEAT (h). 2. Select [A-B] and press ENTER (b). Video files 3. Press ENTER (b) at the beginning of the portion you wish to repeat. -
Page 39: Selecting A Subtitle Language
Operating Selecting a subtitle language Changing the TV Aspect Ratio 1. During playback, press INFO/MENU (m). You can change the TV aspect ratio setting during playback. 2. Select an [Option] using A/D, and press ENTER (b) 1. During playback, press INFO/MENU (m). 3. -
Page 40: Changing The Picture Mode
Operating Changing the Picture Mode Viewing content information You can change the [Picture mode] option during The unit can display the content information. playback. 1. Select a file using W/S/A/D. 1. During playback, press INFO/MENU (m). 2. Press INFO/MENU (m) to display the option 2. -
Page 41: Selecting A Subtitle File
Operating Selecting a subtitle file Listening to music during slide show If the subtitle file name is different from the video file name, you need to select the subtitle file on the You can display photo files while listening to audio [Movie] menu before playing the movie. -
Page 42: Radio Operations
Operating Radio Operations Deleting a saved station 1. Press PRESET (- / +) to select a preset number you want to delete. Be sure that the antenna is connected. (Refer to the page 17) 2. Press CLEAR, the preset number will blink in the display window. -
Page 43: Lg Av Remote
Visit Bluetooth is wireless communication technology “Apple iTunes” or “Google Android Market (Google Play Store)” for detailed information of “LG AV for short range connection. Remote”. The sound may be interrupted when the... -
Page 44: Listening To Music Stored On The Bluetooth Devices
Bluetooth connection may be display depending on the type of Bluetooth disconnected. You should reconnect the device. Your unit appears as “LG HTS (XX:XX)”. Bluetooth device to use this function. 3. When this unit successfully paired with your y The sound may be interrupted when Bluetooth device, “PAIRED”... -
Page 45: Lg Sound Sync
You can control some functions of this unit by sound through this unit : your TV’s remote control with LG Sound Sync. It is TV setting menu [ [Sound] [ [TV Sound compatible with the LG TV that is supported LG output] [ [LG Sound Sync (Wireless)] Sound Sync. -
Page 46: Troubleshooting
Troubleshooting Troubleshooting General Symptom Cause & Solution The Power does not turned on. y Plug the power cord into the wall outlet securely. The connected USB storage y Try using different USB cable, some USB cables may not support device is not recognized. enough current for normal USB operation. -
Page 47: Network
Troubleshooting Network Symptom Cause & Solution Streaming video services (such y Your broadband service speed may not be fast enough to stream as YouTube™, etc.) are often video services. Contact your Internet Service Provider (ISP) and stopped or “buffer” during increase the broadband speed is recommended. -
Page 48: Picture
In addition to the source code, all referred license terms, warranty disclaimers and copyright notices are available for download. LG Electronics will also provide open source code to you on CD-ROM for a charge covering the cost of performing such distribution (such as the cost of media, shipping and handling) upon email request to opensource@lge.com. -
Page 49: Appendix
Appendix Controlling a TV with Setting up the remote to control your TV the Supplied Remote You can operate your TV with the supplied remote Control control. If your TV is listed in the table below, set the appropriate manufacturer code. You can control your TV using the buttons below. -
Page 50: Network Software Update
Appendix Network Software Software update Update You can update the unit using the latest software to enhance the products operation and/or add new features. You can update the software by connecting the unit directly to the software update Network update notification server. - Page 51 Note The Software Update function may not work properly depending on your internet environment. In this case, you can obtain the latest software from the authorized LG Electronics Service Center then update your unit. Refer to “Customer Support” on page...
-
Page 52: Additional Information
Appendix Additional Information File requirement Video files File File Audio Codec Format Subtitle Location Extension Format “.avi”, “.mpg”, “.mpeg”, XVID, MPEG1 SS, H.264/ Dolby SubRip (.srt / .txt), SAMI “.mkv”, “.mp4”, “.m4v” MPEG-4 AVC, MPEG2 PS, Digital, DTS, (.smi), SubStation Alpha (DRM free), “.vob”, MPEG2 TS, VC-1 SM MP3, WMA,... - Page 53 Appendix Note Note y The file name is limited to 180 characters. y A “avi” file which is encoded “WMV 9 codec” is not supported. y Maximum files/Folder: Less than 2000 (total number of files and folders) y This unit supports UTF-8 files even it contains Unicode subtitle content.
-
Page 54: About Dlna
Appendix About DLNA This Player is a DLNA Certified digital media player that can display and play video, photo and audio content from your DLNA-compatible digital media server (PC and Consumer Electronics). The Digital Living Network Alliance (DLNA) is a cross-industry organization of consumer electronics, computing industry and mobile device companies. -
Page 55: Audio Output Specifications
Appendix Audio Output Specifications Jack/Setting HDMI OUT Source Auto DTS Re-encode Dolby Digital PCM 5.1ch Dolby Digital Dolby Digital Plus PCM 5.1ch Dolby Digital Plus Dolby TrueHD PCM 5.1ch Dolby TrueHD PCM 2ch DTS-HD PCM 2ch DTS-HD Linear PCM 2ch PCM 2ch Linear PCM 2ch Linear PCM 5.1ch... -
Page 56: Trademarks And Licenses
Limited. DTS, the Symbol, & DTS and the Symbol by the Bluetooth SIG, Inc. and any use of such together are registered trademarks, and DTS marks by LG Electronics is under license. Digital Surround is a trademark of DTS, Inc. © DTS, Inc. All Rights Reserved. -
Page 57: Specifications
Appendix Specifications General (LAS655K) Power requirements Refer to the main label on the unit. Refer to the main label on the unit. Power consumption Networked standby : 1.5 W (If all network ports are activated.) Dimensions (W x H x D) Approx. -
Page 58: Maintenance
Appendix Maintenance Important Information relating to Network Services Handling the unit When shipping the unit All information, data, documents, communications, downloads, files, text, images, photographs, Please save the original shipping carton and packing materials. If you need to ship the unit, for graphics, videos, webcasts, publications, tools, resources, software, code, programs, applets, maximum protection, re-pack the unit as it was...