Advertisement
Table of Contents
- 1 Table of Contents
- 2 Important Precautions
- 3 Before You Begin
- 4 Assembly
- 5 How to Operate the Recumbent Cycle
- 6 Maintenance and Trouble-Shooting
- 7 Conditioning Guidelines
- 8 Exercise Guidelines
- 9 Part List
- 10 Exploded Drawing
- 11 How to Order Replacement Parts
- 12 Limited Warranty
- Download this manual
Model No. PFEX34310
Serial No.
QUESTIONS?
If you have questions, or if there
are missing parts, we will guar-
antee complete satisfaction
through direct assistance from
our factory.
TO AVOID UNNECESSARY
DELAYS, PLEASE CALL DIRECT
TO OUR TOLL-FREE CUSTOMER
HOT LINE. The trained techni-
cians on our customer hot line
will provide immediate assis-
tance, free of charge to you.
CUSTOMER HOT LINE:
1-800-999-3756
Mon.–Fri., 6 a.m.–6 p.m. MST
Patent Pending
CAUTION
Read all precautions and
instruc tions in this manual
before using this equipment.
Keep this manual for future
reference.
Serial
Number
Decal
USER'S MANUAL
Visit our website at
www.proform.com
new products, prizes,
fitness tips, and much more!
Advertisement
Table of Contents

Related Manuals for Pro-Form PFEX34310


Summary of Contents for Pro-Form PFEX34310
- Page 1 Model No. PFEX34310 Serial No. Serial Number Decal QUESTIONS? If you have questions, or if there are missing parts, we will guar- antee complete satisfaction through direct assistance from our factory. TO AVOID UNNECESSARY DELAYS, PLEASE CALL DIRECT TO OUR TOLL-FREE CUSTOMER HOT LINE.
-
Page 2: Table Of Contents
TABLE OF CONTENTS IMPORTANT PRECAUTIONS .............3 BEFORE YOU BEGIN . -
Page 3: Important Precautions
IMPORTANT PRECAUTIONS WARNING: To reduce the risk of serious injury, read the following important precau- tions before using the recumbent cycle. 1. Read all instructions in this manual before using the recumbent cycle. 2. It is the responsibility of the owner to ensure that all users of the recumbent cycle are ade- quately informed of all precautions. -
Page 4: Before You Begin
Mountain Time (excluding holidays). To help us assist you, please mention the product model number and serial number when calling. The model number is PFEX34310. The serial number can be found on a decal attached to the recumbent cycle (see the front cover of this manual). -
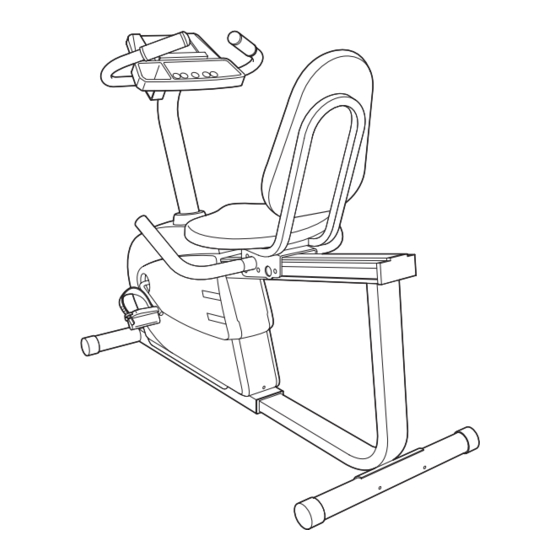
Page 5: Assembly
ASSEMBLY Assembly requires two persons. Place all parts of the recumbent cycle in a cleared area and remove the pack- ing materials. Do not dispose of the packing materials until assembly is completed. In addition to the included tools, assembly requires an adjustable wrench Use the part drawings below to identify the small parts used in assembly. - Page 6 2. Attach the Rear Stabilizer (3) to the Rear Frame (44) with two M8 x 70mm Carriage Bolts (66), two M8 Curved Washers (28), and two M8 Acorn Nuts (56). 3. Slide the Rear Frame (44) partially out of the Frame (1).
- Page 7 6. Attach the Seat (12) to the Seat Carriage (11) with four M6 x 25mm Hex Screws (29) and four M8 Flat Washers (18). 7. Attach a Seat Handle (14) to one side of the Seat Carriage (11) with two M8 x 20mm Button Screws (31), two M8 Flat Washers (18), and two M8 Nylon Locknuts (35).
- Page 8 9. Pull the knob on the Seat Carriage (11), and slide the Seat Carriage onto the Seat Rail (7). Move the Seat Carriage to the desired position and release the knob. Move the Seat Carriage forward or back- ward slightly until it locks into place. Attach the two Bumpers (62) and the Bumper Axle (72) to the Seat Rail (7) with the M5 x 12mm Screws (61) as shown.
-
Page 9: How To Operate The Recumbent Cycle
HOW TO OPERATE THE RECUMBENT CYCLE HOW TO ADJUST THE SEAT For effective exercise, the seat should be in the proper position. As you pedal, there should be a slight bend in your knees when the pedals are in the farthest posi- tion. - Page 10 Mode Arrow Resistance Buttons DESCRIPTION OF THE CONSOLE The innovative console offers a manual mode and three preset workout programs. When the manual mode is selected, the pedaling resistance can be changed with a touch of a button. When a preset pro- gram is selected, the console will automatically control the pedaling resistance to give you an effective work- out.
- Page 11 Adjust the pedaling resistance as desired. As you exercise, adjust the pedaling resistance by press- ing the resistance but- tons. The indicators on the left side of the console will show which resistance level is selected. When the lowest indicator is dimly lit, resistance level 1 is selected;...
-
Page 12: Maintenance And Trouble-Shooting
HOW TO USE A PRESET WORKOUT PROGRAM Plug in the power supply. See step 1 on page 10. Turn on the power. See step 2 on page 10. Select one of the three preset programs. When the power is turned on, the man- ual mode will be selected and the manual indicator will... -
Page 13: Exercise Guidelines
CONDITIONING GUIDELINES The following guidelines will help you to plan your exercise program. Remember that proper nutrition and adequate rest are essential for successful results. WARNING: Before beginning this or any exercise program, consult your physician. This is especially important for persons over the age of 35 or persons with pre-existing health problems. -
Page 16: How To Order Replacement Parts
Friday, 6 a.m. until 6 p.m. Mountain Time (excluding holidays). To help us assist you, please be prepared to give the following information when calling: • The MODEL NUMBER of the product (PFEX34310) • The NAME of the product (PROFORM •...