
Related Manuals for NEO argento esee

Summary of Contents for NEO argento esee
- Page 1 ASSEMBLY, OPERATION & MAINTENANCE INSTRUCTIONS NEO ARGENTO ESEE, FIGURA ESEE & CURVA ESEE F O R O U T D O O R U S E O N L Y where barbecuing meets art...
- Page 2 ASSEMBLY, OPERATION AND MAINTENANCE INSTRUCTIONS FOR EVERDURE 4 BURNER GAS BARBECUE RANGE ARGENTO ESEE, FIGURA ESEE AND CURVA ESEE OUTDOOR BARBECUES CONTENTS SECTION PAGE NO. General Safety Instructions Appliance Details Gas Connections Outdoor Installation Guide Operating Instructions for Barbecue Lighting Procedure Cooking Cleaning &...
- Page 3 IMPORTANT SAFETY INSTRUCTIONS (GAS) IMPORTANT: Read the assembly instruction section and safety precautions of this booklet carefully before removing the contents of this carton. This barbecue and wok burner is for OUTDOOR USE ONLY. This appliance must NOT be used indoors. Unsupervised children or pets should not be near a barbecue while cooking or during warm up or cool down.
-
Page 4: Appliance Details
NATURAL GAS Neo 4 burner barbecues can be converted to use natural gas ONLY with a Neo NG 4 burner conversion kit. Fit the NG cross-over adaptor, NG manifolds, regulator and NG hose. This conversion can ONLY be performed by an authorised person in accordance with AS5601 / AG601 and local gas regulations. -
Page 5: Outdoor Installation Guide
OUTDOOR INSTALLATION GUIDE This Appliance shall only be used in an above ground open-air situation with natural ventilation, without stagnant areas, where gas leakage and products of combustion are rapidly dispersed by wind and natural convection. This appliance must not be used indoors. Do not use your barbecue in garages, porches, sheds or other enclosed areas. -
Page 6: Lighting Procedure
OPERATING INSTRUCTIONS GAS TYPE AND CONSUMPTION The barbecue is designed to operate on Universal LP Gas (Propane and/or Butane gas) or Natural Gas (via a conversion kit). Gas consumption, Pressure and Injector Orifice size are shown on the Data Plate found on the left-hand side of the barbecue. -
Page 7: Cooking
COOKING GENERAL COOKING GUIDE A fairly protected location is desirable for pleasant and efficient cooking. IMPORTANT! Strong winds will drastically reduce cooking efficiency. As a guide, allow 10 minutes with the burners on high, to heat cooking area. A little cooking fat (or olive oil) on the grill will prevent sticking. Cooking time for a 20mm thick steak cooked to medium on the char grill is approximately 15 minutes (7.5 minutes per side) with the burners on high. -
Page 8: Operating Instructions For Wok Burner
STORE CYLINDER IN A WELL VENTILATED AREA OUT OF REACH OF CHILDREN When the gas cylinder is disconnected, replace the plug or cap on the valve outlet. For extended storage it is suggested that the primary air port of the burners be covered against the penetration of insects or vermin. -
Page 9: Troubleshooting
TROUBLESHOOTING Burner will not ignite when using the igniter: Cylinder valve is not on Turn cylinder valve on. Cylinder is empty Replace with a full cylinder. Igniter button is not working Check connections. Igniter is not sparking Remove plate and visually check ignition box for a spark. If there is no spark contact, check connections. -
Page 10: Barbecue Assembly
BARBECUE ASSEMBLY CHECK AND REMOVE THE BBQ PARTS FROM THE CARTONS NEO Argento Esee & Figura Esee 2.FAT TRAY HANDLE 6.COOKING PLATE 3.WARMING RACK 4.GRILL 1.FAT TRAY 5.VAPOURISER 7.SIDE SERVERY AND DRAWER 25.BURNERS 23.WOK SERVERY 27.SERVERY BRACKET 24.MATCH HOLDER 22.REAR PANEL 8.BODY AND HOOD ASS'Y WITH LIGHTS... - Page 11 NEO Curva Esee 2.FAT TRAY HANDLE 6.COOKING PLATE 3.WARMING RACK 4.GRILL 1.FAT TRAY 5.VAPOURISER 7.SIDE SERVERY 25.BURNERS 23.WOK SERVERY 24.MATCH HOLDER 8.BODY AND HOOD ASS'Y WITH LIGHTS 22.REAR PANEL 9.TROLLEY TOP PANEL 10.MAGNETS (2PCS) 21.LEFT SIDE PANEL 11.RIGHT SIDE PANEL 12.DOORPOSTS (2PCS)
- Page 12 STEP 1: Fitting the wheels and castors to the trolley bottom plate. PARTS REQUIRED ITEM FIGURE NAME AND QUANTITY ITEM FIGURE NAME AND QUANTITY SCREW M6X16…..….14PCS F NUT M6......14PCS SPRING WASHER..14PCS LOCK NUT M10……...…2PCS Fix the axle to the trolley bottom panel using six screws, spring washers and nuts. Fit the wheels onto the axle with the large lock nuts, and cover with the wheel decals.
- Page 13 STEP 3: Fitting the trolley rear panel to the trolley bottom panel & power adaptor. PARTS REQUIRED ITEM FIGURE NAME AND QUANTITY ITEM FIGURE NAME AND QUANTITY SCREW M5X15…..…..2PCS LOCK NUT M4……..…..2PCS SCREW M4X15……..2PCS Align the trolley rear panel over the rear edge of the trolley bottom panel and fix into place with two M5 screws (the edges should be flush).
- Page 14 STEP 5: Fitting the door posts to the trolley bottom panel and side panels. PARTS REQUIRED ITEM FIGURE NAME AND QUANTITY SCREW M5X15…....6PCS Align a door post so that the larger face is at the front, and the large return is against the trolley side panel. Fix into place with one M5 screw through the bottom of the door panel into the trolley bottom panel, and two M5 screws through the front edge of the side panel and into the door post.
- Page 15 STEP 7: Fitting the door handles and doors. PARTS REQUIRED ITEM FIGURE NAME AND QUANTITY SCREW M4X8..…....4PCS Screw the two door handles to the fronts of the doors using two M4 screws each. To fit the doors into the trolley, firstly place the bottom (fixed) hinge into the door hole in the trolley bottom panel, then fit the top hinge by squeezing the spring hinge down and angling the door into place (the spring hinge will extend to fit the hole in the trolley top panel).
- Page 16 STEP 9: Fitting the fat tray handle and fat tray. PARTS REQUIRED ITEM FIGURE NAME AND QUANTITY SCREW M4X8…....2PCS Screw the fat tray handle to the fat tray, and slide the fat tray into the bottom of the barbecue body. STEP 10A (ARGENTO &...
- Page 17 STEP 10B (CURVA MODEL ONLY) Fitting the wok servery, and the servery. PARTS REQUIRED ITEM FIGURE NAME AND QUANTITY SCREW M5X15…....8PCS Secure the wok servery to the left hand side of the barbecue body by threading four M5 screws through the mounting holes in the wok servery, screwing them into the body.
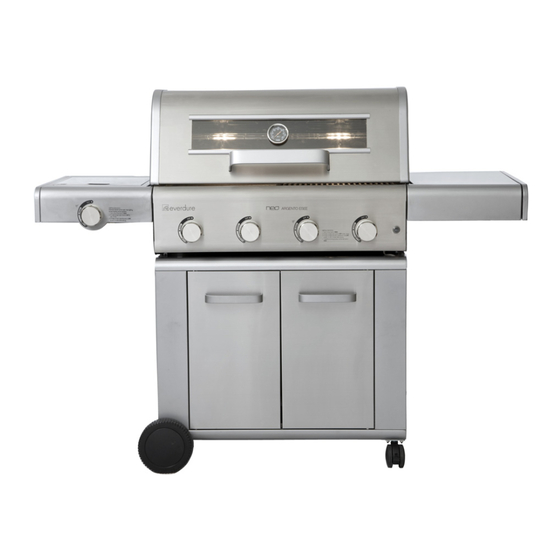
- Page 18 Fully Assembled Product (Argento)
- Page 19 Fully Assembled Product (Figura)
- Page 20 All Service, Assembly and Warranty Enquiries: Telephone: 1300 766 066 Neo by Everdure A division of Shriro Australia Pty Ltd 23-27 Chaplin Drive Lane Cove NSW 2066 Telephone: 1300 766 066...