Kyocera ECOSYS M6035cidn Operation Manual
Hide thumbs
Also See for ECOSYS M6035cidn:
- Operation manual (433 pages) ,
- Printer driver user manual (99 pages) ,
- Service bulletin (11 pages)

Related Manuals for Kyocera ECOSYS M6035cidn


Summary of Contents for Kyocera ECOSYS M6035cidn
-
Page 1: Operation Guide
PRINT COPY SCAN ECOSYS M6035cidn ECOSYS M6030cdn OPERATION GUIDE ECOSYS M6535cidn PRINT COPY SCAN ECOSYS M6530cdn... -
Page 2: Table Of Contents
Installing and Setting up the Machine This chapter provides information for the administrator of this machine, such as part names, cable connection, and software installation. Part Names ........... 2-2 Command Center RX ........2-38 Machine Exterior ......... 2-2 Accessing Command Center RX ..2-39 Connectors/Interior ...... -
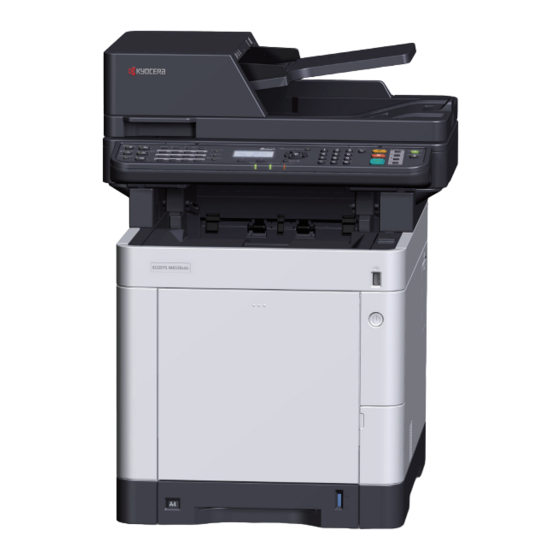
Page 3: Part Names
Installing and Setting up the Machine > Part Names Part Names Machine Exterior 1 Document Processor 9 Original Eject Table 2 Inner Tray 10 Original Table 3 Paper Stopper 11 Original Width Guides 4 Cassette 1 12 Slit Glass 5 Power Switch 13 Handles 6 USB Memory Slot 14 Operation Panel... - Page 4 Installing and Setting up the Machine > Part Names 17 Handles 18 Rear Cover 1...
-
Page 5: Connectors/Interior
Installing and Setting up the Machine > Part Names Connectors/Interior 1 Network Interface Connector 8 Size Dial 2 USB Port 9 Paper Length Guide 3 USB Interface Connector 10 Paper Width Guides 4 Option Interface 11 Multi Purpose Tray 5 LINE Connector 12 Paper Width Guides 6 TEL Connector 13 Fuser Cover... - Page 6 Installing and Setting up the Machine > Part Names 14 Toner Container (Black) 18 Toner Container Lock Lever 19 Waste Toner Cover 15 Toner Container (Magenta) 16 Toner Container (Cyan) 20 Waste Toner Box 17 Toner Container (Yellow)
-
Page 7: With Optional Equipments Attached
Installing and Setting up the Machine > Part Names With Optional Equipments Attached 1 Cassette 2 5 Rear Cover 2 2 Cassette 3 6 Rear Cover 3 3 Cassette 4 7 Rear Cover 4 4 Manual stapler Optional Equipment (page 11-2) -
Page 8: Connecting The Machine And Other Devices
Installing and Setting up the Machine > Connecting the Machine and Other Devices Connecting the Machine and Other Devices Prepare the cables necessary to suit the environment and purpose of the machine use. When Connecting the Machine to the PC via USB When Connecting the Machine to the PC on the Network Network Network... -
Page 9: Connecting Cables
Installing and Setting up the Machine > Connecting Cables Connecting Cables Connecting LAN Cable IMPORTANT If the power is on, turn the power switch off. Power Off (page 2-10) Connect the cable to the machine. Connect the LAN cable to the network interface connector. Connect the other end of the cable to the hub. -
Page 10: Connecting Usb Cable
Installing and Setting up the Machine > Connecting Cables Connecting USB Cable IMPORTANT If the power is on, turn the power switch off. Power Off (page 2-10) Connect the cable to the machine. Connect the USB cable to the USB interface connector located on the left side of the body. Connect the other end of the cable to the PC. -
Page 11: Power On/Off
Installing and Setting up the Machine > Power On/Off Power On/Off Power On Turn the power switch on. IMPORTANT When turning off the power switch, do not turn on the power switch again immediately. Wait more than 5 seconds, and then turn on the power switch. Power Off IMPORTANT When the [Processing] indicator or [Memory] indicator is lit up or blinked, the machine is operating. -
Page 12: Using The Operation Panel
Installing and Setting up the Machine > Using the Operation Panel Using the Operation Panel Operation Panel Keys Displays the Status/Job Numeric keys. Cancel screen. Enter numbers and Displays the function menu screen. symbols. Increments or decrements Displays the Document numbers, or selects menu Box/USB screen. -
Page 13: Operation Method
Installing and Setting up the Machine > Using the Operation Panel Operation Method This section explains how to operate the setting menus on the message display. Displaying the Menus and Configuring Settings Select the [System Menu/Counter] key or [Function Menu] key to display the setting menus. Select the [▲] key, [▼] key, [◄] key, [►] key, [OK] key, or [Back] key to select a menu, and perform settings. -
Page 14: Display For Originals And Paper
Installing and Setting up the Machine > Using the Operation Panel Display for Originals and Paper The copy screen displays the selected paper source. 1 Original size Ready to copy. 2 Original orientation Copies: 3 Paper source Quiet Paper 4 Paper size 5 Paper orientation Help Screen If you have difficulty operating the machine, you can check how to operate it using the operation panel. -
Page 15: Login/Logout
Installing and Setting up the Machine > Login/Logout Login/Logout If you are setting a function that requires administrator rights, or if user login administration is enabled, you must enter your login user name and login password. NOTE The factory default login user name and login password are set as shown below. Login User Name: 3000 Login Password:... -
Page 16: Logout
Installing and Setting up the Machine > Login/Logout Logout To logout from the machine, select the [Authentication/Logout] key to return to the login user name/login password entry screen. Users are automatically logged out in the following circumstances: • When the machine enters the sleep state. •... -
Page 17: Default Settings Of The Machine
Installing and Setting up the Machine > Default Settings of the Machine Default Settings of the Machine Before using this machine, configure such settings as date and time, network configuration, and energy saving functions as needed. NOTE The default settings of the machine can be changed in System Menu. For settings that are configurable from System Menu, refer to the following: Setup and Registration (System Menu) (page 8-1) Setting Date and Time... -
Page 18: Network Setup (Lan Cable Connection)
Installing and Setting up the Machine > Default Settings of the Machine Network Setup (LAN Cable Connection) The machine is equipped with network interface, which is compatible with network protocols such as TCP/IP (IPv4), TCP/IP (IPv6), NetBEUI, and IPSec. It enables network printing on the Windows, Macintosh, UNIX and other platforms. Set up TCP/IP (IPv4) to connect to the Windows network. - Page 19 Installing and Setting up the Machine > Default Settings of the Machine [▲] [] key > [Subnet Mask] > [OK] key Set the subnet mask. NOTE You can set any value between 000 and 255. Use the numeric keys or select the [▲] or [▼] key to enter a number. Select the [◄] or [►] key to move the position being entered, which is shown highlighted.
-
Page 20: Wireless Network Settings
Installing and Setting up the Machine > Default Settings of the Machine Wireless Network Settings When the optional Wireless Network Interface Kit is installed on the machine and the connection settings are configured, it is possible to print in a wireless network (wireless LAN) environment. The following is an introduction to the settings for connecting using the Quick Setup. -
Page 21: Energy Saver Function
Installing and Setting up the Machine > Energy Saver function Energy Saver function If a certain period of time elapses after the machine is last used, the machine automatically enters sleep mode, which minimizes power consumption. If the machine is not used while in sleep mode, the power automatically turns off. Sleep and Auto Sleep NOTE If user login administration is enabled, you can only change the settings by logging in with administrator privileges. - Page 22 Installing and Setting up the Machine > Energy Saver function Set the Sleep time. Enter the Sleep time. NOTE You can set any value between 1 and 240. Use the numeric keys or select the [▲] or [▼] key to enter a number. Select the [OK] key.
-
Page 23: Installing Software
This is a utility that enables monitoring of the machine on the network. Status Monitor This is a utility that monitors the printer status and provides an ongoing reporting function. KYOCERA Net Direct Print This makes it possible to print a PDF file without starting Adobe Acrobat/ Reader. FONTS These are display fonts that enable the machine's built-in fonts to be used in a software application. -
Page 24: Installing Software In Windows
Installing and Setting up the Machine > Installing Software Installing Software in Windows Express Install The following procedure is an example for installing the software in Windows 7 using [Express Install]. For details on Custom Installation, refer to the following: Custom Install (page 2-26) Insert the DVD. - Page 25 Installing and Setting up the Machine > Installing Software Install using [Express Install]. You can also select [Use host name for port name] and set to use the host name of the standard TCP/IP port. (A USB connection cannot be used.) NOTE •...
- Page 26 Installing and Setting up the Machine > Installing Software Finish the installation. When "Your software is ready to use" appears, you can use the software. To print a test page, click the "Print a test page" checkbox and select the machine. Click [Finish] to exit the wizard.
-
Page 27: Custom Install
Installing and Setting up the Machine > Installing Software Custom Install The following procedure is an example for installing the software in Windows 7 using [Custom Install]. Insert the DVD. NOTE • Installation on Windows must be done by a user logged on with administrator privileges. •... - Page 28 Installing and Setting up the Machine > Installing Software Select the driver to be installed. Select the utility to be installed. Click [Install]. NOTE • To install Status Monitor, it is necessary to install Microsoft .NET Framework 4.0 beforehand. 2-27...
- Page 29 Installing and Setting up the Machine > Installing Software Finish the installation. When "Your software is ready to use" appears, you can use the software. To print a test page, click the "Print a test page" checkbox and select the machine. Click [Finish] to exit the wizard.
-
Page 30: Uninstalling The Software
Click [Start] button on the Windows and then select [All Programs], [Kyocera], and [Uninstall Kyocera Product Library] to display the Uninstall Wizard. NOTE In Windows 8, click [Search] in charms, and enter "Uninstall Kyocera Product Library" in the search box. Select [Uninstall Kyocera Product Library] in the search list. Uninstall the software. -
Page 31: Installing Software In Mac Computer
Insert the DVD. Double-click the [Kyocera] icon. Display the screen. Double-click [Kyocera OS X x.x] depending on your Mac OS version. Install the Printer Driver. Install the printer driver as directed by the instructions in the installation software. This completes the printer driver installation. - Page 32 Installing and Setting up the Machine > Installing Software Configure the printer. Open System Preferences and add the printer. Select [Default] and click the item that appears in "Name". 3 Select the driver in "Use". NOTE When using an IP connection, click the IP icon for an IP connection and then enter the host name or IP address.
-
Page 33: Setting Twain Driver
Register this machine to the TWAIN Driver. Instructions are based on interface elements as they appear in Windows 7. Display the screen. Select [Start] button on the Windows, [All Programs], [Kyocera] and then [TWAIN Driver Setting]. TWAIN Driver screen appears. - Page 34 Installing and Setting up the Machine > Installing Software NOTE When the machine's IP address or host name is unknown, contact Administrator. Finish registering. NOTE Click [Delete] to delete the added machine. Click [Edit] to change names. 2-33...
-
Page 35: Setting Wia Driver
Installing and Setting up the Machine > Installing Software Setting WIA Driver Register this machine to the WIA Driver. Instructions are based on interface elements as they appear in Windows 7. Display the screen. Click [Start] button on the Windows and enter [Scanner] in [Program and File Search]. Click [View scanners and cameras] in the search list then the Scanners and Cameras screen appears. -
Page 36: Checking The Counter
Installing and Setting up the Machine > Checking the Counter Checking the Counter Check the number of sheets printed and scanned. Display the screen. [System Menu/Counter] key > [▲] [] key > [Counter] > [OK] key Check the counter. Select the item you want to check, and select the [OK] key. 2-35... -
Page 37: Additional Preparations For The Administrator
Installing and Setting up the Machine > Additional Preparations for the Administrator Additional Preparations for the Administrator In addition to the information provided in this chapter, the administrator of this machine should check the following, and configure the settings as needed. Sending Documents to a PC To Send to a Shared Folder (Send to Folder (SMB)) To send a document that has been loaded, you need to create a shared folder to receive the document on your computer. - Page 38 Installing and Setting up the Machine > Additional Preparations for the Administrator I want to... Function Reference page Protect the transmission from interception and IPP over SSL page 8-27 wiretapping. HTTPS page 8-27 LDAP Security Refer to the Command Center RX User Guide.
-
Page 39: Command Center Rx
Installing and Setting up the Machine > Command Center RX Command Center RX If the machine is connected to the network, you can configure various settings using Command Center RX. This section explains how to access Command Center RX, and how to change security settings and the host name. Command Center RX User Guide NOTE To fully access the features of the Command Center RX pages, enter the User Name and Password and click [Login]. -
Page 40: Accessing Command Center Rx
Installing and Setting up the Machine > Command Center RX Accessing Command Center RX Display the screen. Launch your Web browser. In the address or location bar, enter the machine's IP address or the host name. Print the status page to check the machine's IP address and the host name. [System Menu/Counter] key >... -
Page 41: Changing Security Settings
Installing and Setting up the Machine > Command Center RX Changing Security Settings This section explains how to change the security settings. Display the screen. Launch your Web browser. In the address or location bar, enter the machine's IP address or the host name. Print the status page to check the machine's IP address and the host name. - Page 42 Installing and Setting up the Machine > Command Center RX Configure the Security Settings. From the [Security Settings] menu, select the setting you want to configure. NOTE For details on settings related to certificates, refer to the following: Command Center RX User Guide 2-41...
-
Page 43: Changing Device Information
Installing and Setting up the Machine > Command Center RX Changing Device Information Change the device information of the machine. Display the screen. Launch your Web browser. In the address or location bar, enter the machine's IP address or the host name. Print the status page to check the machine's IP address and the host name. - Page 44 Installing and Setting up the Machine > Command Center RX Specify the host name. Enter the device information, and then click [Submit]. IMPORTANT After changing the setting, restart the network or turn the machine OFF and then ON. To restart the network interface card, click [Reset] in the [Management Settings] menu, and then click [Restart Network] in "Restart".
-
Page 45: E-Mail Settings
Installing and Setting up the Machine > Command Center RX E-mail Settings By configuring the SMTP settings, it is possible to send the images scanned by the machine as E-mail attachments and to send E-mail notices when jobs have been completed. To use this function, this machine must be connected to a mail server using the SMTP protocol. - Page 46 Installing and Setting up the Machine > Command Center RX From the [Network Settings] menu, click [Protocol]. Configure the settings. Set "SMTP (E-mail TX)" to [On] in the "Send Protocols". 2-45...
- Page 47 Installing and Setting up the Machine > Command Center RX Display the screen. Display the E-mail Settings screen. From the [Function Settings] menu, click [E-mail]. 2-46...
- Page 48 Installing and Setting up the Machine > Command Center RX Configure the settings. Enter "SMTP" and "E-mail Send Settings" items. Setting Description SMTP Set to send e-mail from the machine. SMTP Protocol Displays the SMTP protocol settings. Check that "SMTP Protocol" is set to [On].
-
Page 49: Registering Destinations
Installing and Setting up the Machine > Command Center RX Registering Destinations You can register destinations to the machine's Address Book, from Command Center RX. Display the screen. Launch your Web browser. In the address or location bar, enter the machine's IP address or the host name. Print the status page to check the machine's IP address and the host name. -
Page 50: Creating A New Custom Box
Installing and Setting up the Machine > Command Center RX Creating a New Custom Box You can register a custom box from Command Center RX. NOTE To use Custom Box, an optional SSD must be installed in the machine. Display the screen. Launch your Web browser. -
Page 51: Printing A Document Stored In A Custom Box
Installing and Setting up the Machine > Command Center RX Printing a document stored in a Custom Box A document stored in a Custom Box can be printed from Command Center RX. Display the screen. Launch your Web browser. In the address or location bar, enter the machine's IP address or the host name. Print the status page to check the machine's IP address and the host name. - Page 52 Installing and Setting up the Machine > Command Center RX Print the document. Select the document you wish to print. Select the checkbox of the document to be printed. Click [Print]. Configure settings for printing, click [Print]. 2-51...
-
Page 53: Transferring Data From Our Other Products
This section explains how to transfer data between our products. Migrating the Address Book The Address Book registered on the machine can be backed up or migrated using the KYOCERA Net Viewer on the included DVD. For details on operating the KYOCERA Net Viewer, refer to the following:... - Page 54 Installing and Setting up the Machine > Transferring Data from Our Other Products Select [Create from device] and remove the checkmark from [Overwrite settings on target device], and then click [Next]. Select the model you want to back up, and click [Next]. NOTE If the "Admin Login"...
- Page 55 Please note that selecting [Finish] will write the data to the machine's Address Book. Writing Address Book Data to the Machine Launch the KYOCERA Net Viewer. Load the Address Book data. Right-click on the model name to which you want to transfer the Address Book, and select [Advanced] - [Set multiple devices].
- Page 56 Installing and Setting up the Machine > Transferring Data from Our Other Products Select [Create from file] and remove the checkmark from [Overwrite settings on target device], and then click [Next]. Selecting the [Overwrite settings on target device] checkbox will overwrite the machine's Address Book from entry No.1.