Audiovox AVXMTGHR1D Installation Manual And Owner's Manual
7 inch lcd monitor
with dvd player build
in for rear entertaiment
Hide thumbs
Also See for AVXMTGHR1D:
- Operating and installation manual (28 pages) ,
- Operation manual (28 pages)

Related Manuals for Audiovox AVXMTGHR1D


Summary of Contents for Audiovox AVXMTGHR1D
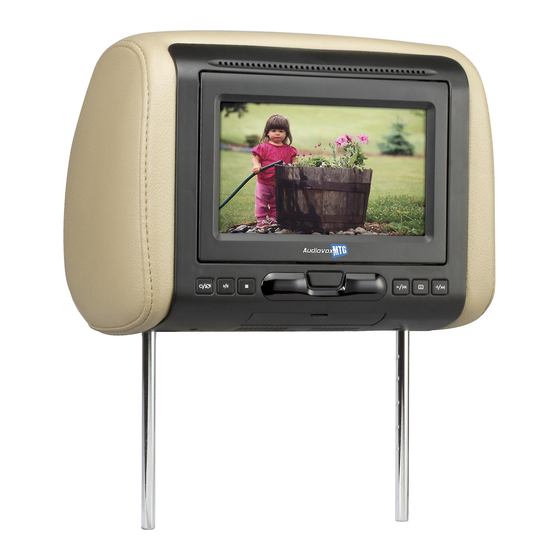
- Page 1 AVXMTGHR1D 7“ LCD Monitor with DVD Player Build In for Rear Entertaiment Owner’s Manual / Installation Guide...
-
Page 2: Table Of Contents
IMPORTANT NOTICE ------------------ MATERIAL TO USE IN THIS PACKAGE ------------------- HEADREST COVER REPLACEMENT ---------------------------- VEHICLE PREPARATION ------------------------------ Wireless FM Modulator --------------------- AVXMTGHR1D WIRING DIAGRAM ------------------------------------------ FEATURES ------------------------------------ SPECIFICATIONS ------------- CONTROLS AND INDICATORS DIAGRAM -------------------- REMOTE CONTROL OPERATION -------------------------------- MENU ADJUSTMENT... -
Page 3: Important Notice
Damage to air bag wiring can result in personal injury to vehicle occupants. If you have any questions regarding wire routing or installation in a vehicle, please contact Audiovox Technical Support at 1-800-225-6074. When connecting power and ground in a mobile video installation, insure that the ACC wire is fused at the point where it is connected to the vehicle ACC wiring. -
Page 4: Material To Use In This Package
System Monitor ( AVXMTGHR1D Monitor with DVD Player Note: The AVXMTGHR1D monitor has been designed to be interchangeable from one headrest to the other. The headrests will still have the Green and Blue DIN cables on them and should be connected to their respective connectors. -
Page 5: Headrest Cover Replacement
HEADREST COVER REPLACEMENT: 1.Unscrew the two screws,and removed the screen. Unscrew 2.Remove the Hearest cover Remove 3.replace the leather with the matching color cover. 4.connected the cable,lock the monitor's buttons into position and push it in place to lock. Push 5.Tighten screws Tighten screws... -
Page 6: Vehicle Preparation
VEHICLE PREPARATION 1) Read the manuals and get familiar with the electrical requirements and connections. 2) Prepare the vehicle by removing any interior trim necessary to gain access to the vehicle's wiring as well as all areas where interconnecting wire harnesses will be located. -
Page 7: Wireless Fm Modulator
Make sure that no wiring was pinched, or connected improperly during the final installation. Wireless FM Modulator The AVXMTGHR1D is equipped with a built-in wireless FM Modulator*, that allows you to listen to the DVD audio signal by tuning your vehicle’s radio to the selected frequency,(,88.5 MHz,88.9MHz,106.7MHz,107.1MHz, 107.5MHz,107.9MHz... -
Page 8: Avxmtghr1D Wiring Diagram
AVXMTGHR1D WIRING DIAGRAM Headrest Monitor Headrest Monitor GREEN (P/N.: 45-2S-08230G) (P/N 45-2Z-08200G Note: The headrests will still have the Red and Green DIN cables on them and should be connected to their respective connectors. -
Page 9: Features
FEATURES • 7” Digital TFT (Thin Film Transistor) Active Matrix LCD (Liquid Crystal Display) Monitor • Built-in DVD Player • OSD (On Screen Display) for control of picture quality and functions • Three Audio / Video Source nputs (DVD/USB/SD CARD, AV and AUX). -
Page 10: Controls And Indicators Diagram
CONTROLS AND INDICATORS DIAGRAM (FRONT VIEW) PUSH POWER/SOURCE VOLUME /NEXT PUSH PLAY/PAUSE MENU STOP VOLUME PREVIOUS COVER IR HEADPHONE open IR SENSOR TRANSMITTER LENS HEADPHONE JACK USB PORT AUX IN SD Card Reader... -
Page 11: Remote Control Operation
REMOTE CONTROL OPERATION POWER SOURCE DVD SOURCE MUTE VOLUME ENTER PREV NEXT PAUSE PLAY STOP SETUP REPEAT SUBTITLE AUDIO ZOOM SYSTEM MENU DISC MENU DISPLAY FMM ON/OFF CHANNEL SELECT 14. FMM CHANNEL SELECT 1. POWER 2. SOURCE 15. DISC MENU 3. -
Page 12: Menu Adjustment
MENU ADJUSTMENT The System Menu Contains features and options that let you customize your system to change the screen mode display and OSD language. 1) Press the “ ” button on unit or the SYSTEM MENU button on the remote control, the main page of the system menu will appear on screen. -
Page 13: Settings And Adjustments
SETTINGS AND ADJUSTMENTS The Setup Menu contains features and options that let you customize your DVD player. For example, you can set a language for the on-screen display or prevent DVD playback for children. Using the Setup Menu 1. Press the SETUP button on the remote. The Setup Menu appears on the screen as shown per diagram. -
Page 14: Selecting Folders And Songs
Selecting Folders and Songs When an MP3 is loaded in the player, the navigation menu appears automatically. Press to move the highlight to the desired folder and press ENTER to display the songs in the folder. Press to move the highlight to the desired folder and press ENTER to begin playback of the highlighted song. -
Page 15: Troubleshooting
TROUBLESHOOTING PROBLEM SOLUTION IR remote inoperative Verify that the batteries in the remote are fresh. Verify that the remote sensor eye is not obstructed. Disc won't play Insert a disc with the label side facing upwards. Check the type of disc you put into disc tray. This DVD only plays DVD, audio CD and Mp3. - Page 16 © 2010 Audiovox Electronic Corp., Hauppauge, Ny11788 XXX-XXXX...