3Com 4200G Getting Started Manual
4200g family
Hide thumbs
Also See for 4200G:
- Datasheet (8 pages) ,
- Installation manual (4 pages) ,
- Quick reference manual (43 pages)

Related Manuals for 3Com 4200G


Summary of Contents for 3Com 4200G
-
Page 1: Getting Started Guide
® 3Com Switch 4200G Family Getting Started Guide 4200G 12-Port 4200G 24-Port 4200G 48-Port 4200G PWR 24-Port www.3Com.com Part No. 10014914 Rev. AB Published October 2007... - Page 2 All other company and product names may be trademarks of the respective companies with which they are associated. ENVIRONMENTAL STATEMENT It is the policy of 3Com Corporation to be environmentally friendly in all operations. To uphold our policy, we are committed to: Establishing environmental performance standards that comply with national legislation and regulations.
- Page 3 SOFTWARE AND DOCUMENTATION FOR YOUR OM SWITCH Thank you for purchasing a 3Com Switch 4200G. As part of our commitment to bringing you the most capable and dependable network equipment, 3Com offers free software maintenance updates and documentation updates on our website.
-
Page 5: Table Of Contents
Related Documentation Documentation Comments 4200G F NTRODUCING THE WITCH AMILY About the Switch 4200G Switch 4200G—Front View Detail Switch 4200G — Rear View Detail Default Settings NSTALLING THE WITCH Package Contents Rack-mounting the Switch The Power-up Sequence SFP Operation Connecting a Redundant Power Supply... - Page 6 Solving Communication Problems OUTS Null Modem Cable PC-AT Serial Cable Modem Cable Ethernet Port RJ-45 Pin Assignments ECHNICAL PECIFICATIONS Switch 4200G 12-Port Switch 4200G 24-Port Switch 4200G (48-Port) Related Standards BTAINING UPPORT FOR YOUR RODUCT Register Your Product Purchase Value-Added Services...
- Page 7 ONTENTS ETWORK ANAGEMENT 3Com Network Supervisor 3Com Network Director 3Com Network Access Manager 3Com Enterprise Management Suite Integration Kit with HP OpenView Network Node Manager EDUNDANT OWER UPPLY AFETY NFORMATION Important Safety Information L’information de Sécurité Importante Wichtige Sicherheitsinformationen Información de Seguridad Importante Importanti Informazioni di Sicurezza Wa¿ne informacje o zabezpieczeniach...
- Page 8 ONTENTS...
-
Page 9: About This Guide
® 3Com Switch 4200G Family. For information on upgrading your software to the latest version, refer to the Switch 4200G Release Notes available on 3Com’s Web site at www.3com.com. The guide is intended for use by network administrators who are responsible for installing and setting up network equipment;... -
Page 10: Related Documentation
Information that alerts you to potential loss of data or potential damage to an application, system, or device Warning Information that alerts you to potential personal injury Related In addition to this guide, Switch 4200G documentation set includes the Documentation following: Switch 4200G Configuration Guide ■... -
Page 11: Documentation Comments
Switch 4200G Family Getting Started Guide Page 21 Please note that we can only respond to comments and questions about 3Com product documentation at this e-mail address. Questions related to technical support or sales should be directed in the first instance to your network supplier. - Page 12 BOUT UIDE...
-
Page 13: Introducing The Switch 4200G Family
4200G F WITCH AMILY This chapter contains introductory information about the Switch 4200G and how it can be used in your network. It covers summaries of hardware and software features as well as the following topics: About the Switch 4200G ■... -
Page 14: About The Switch 4200G
Switch 4200G 12-Port unit. This requires an optional XFP. Two optional module slots for a 10 Gigabit Ethernet port module on ■ the Switch 4200G 24-Port and 48-Port units. This requires an optional XFP. One RJ-45 connector for serial management ■... -
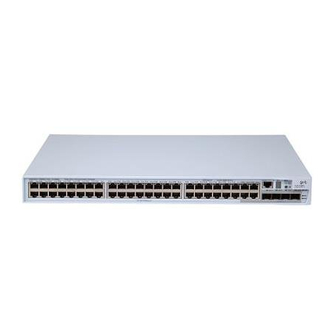
Page 15: Switch 4200G-Front View Detail
Mounting 19-inch rack or standalone mounting Clustering Up to 32 units can be linked together (members and 1 commander) Switch 4200G—Front View Figure 1 Switch 4200G 12-Port—front view Detail Unit Status Display Port Status LEDs Console SFP Status Power LED... - Page 16 You can connect either shielded or unshielded data cables with shielded or unshielded jacks to these data sockets. 10/100/1000BASE-T The Switch 4200G provides 12, 24, or 48 auto-negotiating Ports 10BASE-T/100BASE-TX ports configured as Auto MDIX (crossover). When auto-negotiation is enabled these ports automatically operate in MDI or MDIX mode as needed.
- Page 17 Switch 4200G—Front View Detail 1000BASE-X SFP Ports SFP (Small Form Factor Pluggable) ports support fiber Gigabit Ethernet long-wave (LX), long-haul (LH70) and copper (T) SFP Transceivers in any combination. This offers you the flexibility of using SFP transceivers to provide connectivity between the Switch and remote 1000 Mbps workgroups or to create a high capacity aggregated link backbone connection.
- Page 18 1: I 4200G F HAPTER NTRODUCING THE WITCH AMILY Table 3 Status Display (continued) Display Mode LED Color Description Flashing “F” Mode LED steady red Fan failure detected. Flashing “t” Mode LED flashing red The switch is too hot; temperature is critical.
-
Page 19: Switch 4200G - Rear View Detail
Switch 4200G — Rear View Detail Table 4 LED Behavior (continued) Color Indicates Duplex Green Full duplex, blinking off for every packet received or transmitted. Yellow Half duplex, blinking off for every packet received or transmitted. Yellow flashing The port has failed POST. -
Page 20: Default Settings
1: I 4200G F HAPTER NTRODUCING THE WITCH AMILY Default Settings Table 5 shows the default settings for the Switch 4200G Family. Table 5 Default Settings Feature Switch 4200G Automatic IP Configuration Enabled Port Status Enabled Port Speed Auto-negotiated Duplex Mode... -
Page 21: Installing The Switch
Connecting the Console Cable ■ WARNING: Safety Information. Before installing or removing any components from the Switch 4200G or carrying out any maintenance procedures, you must read the safety information provided in Appendix A of this guide. AVERTISSEMENT: Consignes de sécurité. Avant d'installer ou d'enlever tout composant du Switch 4200G ou d'entamer une procédure de... -
Page 22: Package Contents
■ 4 x Rubber feet ■ Rack-mounting the The Switch 4200G is 1 rack unit (1U) high and will fit in most standard Switch 19-inch racks. CAUTION: Disconnect all cables from the switch before continuing. Remove all self adhesive pads from the underside of the switch if they have been fitted. - Page 23 The switch’s unique MAC address (Ethernet address) ■ The switch’s serial number ■ You may need this information if you contact 3Com Technical Support. Mounting the rear Mount a screw on the back of the switch to closely connect the switch bracket with the rear bracket to support the switch.
- Page 24 2: I HAPTER NSTALLING THE WITCH Figure 6 Positions for mounting the screw on the switch Three positions for screw mounting Three positions for screw mounting Follow the steps below to mount the rear bracket: 1 Use screws to fix the rear bracket to the rear mount angle. 2 Determine the position for mounting the screw on the switch according to the position of the mount angle.
-
Page 25: The Power-Up Sequence
Screw 1: Fix the rear bracket to the mount Mount screw 2 to the switch. angle. The Power-up The following sections describe how to powered-up your Switch 4200G Sequence and prepare it for operation. Powering-up the To power up the switch, perform the following steps: Switch 4200G 1 Plug the power cord into the power socket at the rear of the switch. -
Page 26: Sfp Operation
■ 3CSFP93 SFP (1000BASE-T) ■ To access the latest list of approved SFP transceivers for your switch refer to the 3com web site at www.3com.com. Inserting an SFP The SFP transceiver must have the following characteristics: Transceiver 1000BASE-LX SFP transceiver ■... - Page 27 If the SFP transceiver is faulty, it will not operate within the Switch. See “Solving Hardware Problems” on page 59. 3Com recommends that you only use SFPs supplied by 3Com. If the SFP transceiver is invalid it will not be recognized by the Switch.
-
Page 28: Connecting A Redundant Power Supply
2 Move the wire release lever downwards until it is pointing toward you. 3 Pull the wire release lever toward you to release the catch mechanism; the transceiver will then easily slide out. Connecting a The Switch 4200G Family has a -48V DC Redundant Power Supply Redundant Power socket. Supply WARNING: Only properly trained and qualified personnel should install the Redundant Power Supply (RPS). - Page 29 Connecting a Redundant Power Supply WARNING: When powering any Switch 4200G from an RPS, make sure that the unit is earthed (grounded) by either connecting the power cord to the unit or by connecting the earth terminal on the rear of the unit to a reliable electrical earth (or by connecting both).
- Page 30 Redundancy The unearthed -48V DC power distribution provides a mechanism to connect to the Switch 4200G. The distribution consists of several circuit breakers and connection terminals for the positive (common) and negative -48V outputs. Individually connect each Switch 4200G to a circuit breaker terminal.
- Page 31 Switch to the cables need to be matched to the switch’s power rating. Table 8 shows Redundant Power the recommended circuit breaker and cable rating for the Switch 4200G. System The recommended cable length should not exceed three metres (9.84 feet).
- Page 32 2: I HAPTER NSTALLING THE WITCH Figure 10 RPS Connection to the Switch N U LL 0 V ;2 .0 -4 8 -6 z ;1 .0 A 0 /6 0 H 4 0 V ;5 1 0 0 -2 Cable Tie NULL -48 -60V;2 0A Null...
- Page 33 Connecting a Redundant Power Supply RPS LED The RPS status LED on the front of the Switch 4200G indicates the status of the RPS and AC supplies as shown in Table 9. Table 9 RPS LED Colors Color State Green The AC and RPS supply is connected.
-
Page 34: Connecting The Console Cable
NSTALLING THE WITCH The Switch 4200G supports 3Com 802.3af equipment. For the latest list of supported devices, refer to the product page on the 3Com web site at http://www.3com.com/ For additional information on Power over Ethernet, refer to the Power over Ethernet Configuration chapter in the Configuration Guide available on the 3Com Web site. - Page 35 Connecting the Console Cable When you want to use the terminal to configure the switch, follow these steps to connect a terminal device to your switch using console cables: 1 Plug the DB-9 female connector of the Console cable to the serial port of the PC or terminal where the switch is to be configured.
- Page 36 2: I HAPTER NSTALLING THE WITCH...
-
Page 37: Setting U P For Management
ETTING P FOR ANAGEMENT To make full use of the features offered by your Switch 4200G, and to change and monitor the way it works, you have to access the management software that resides on the switch. Managing the switch can help you to improve its efficiency and therefore the overall performance of your network. - Page 38 This view enables you to configure the system parameters. To display this view, from user view enter system-view. The prompt for system view is [S4200G]. Command Line The Switch 4200G supports Secure Shell version 1.5 (SSHv1.5), allowing Interface secure access to the switch’s command line interface. Management using...
-
Page 39: Setting Up Your Switch
You can manage a switch using any network management workstation running the Simple Network Management Protocol (SNMP) as shown in Figure 15. For a description of 3Com network management applications, refer to “3Com Network Management” on page 75. Figure 15 SNMP Management over the Network... - Page 40 How do you want to connect to the Switch? configured IP information? Connect to a front panel port Connect to the con- Use 3Com Network Connect to the console sole port and use the and use the Web Interface or Director (3ND).
- Page 41 Refer to the documentation that accompanies your DHCP server. For a detailed description of how automatic IP configuration operates on the Switch 4200G, refer to the Configuration Guide available in PDF format on 3Com’s Web site at www.3com.com.
-
Page 42: Manually Configuring Ip Information
“Methods of Managing a Switch” on page 37. For detailed information about the specific web interface functions, the command line interface, and problem solving, refer to the “Switch 4200G Command Reference Guide” available in PDF format on 3Com’s Web site at www.3com.com. - Page 43 Manually Configuring IP Information Prerequisites A workstation with terminal emulation software such as Microsoft ■ Hyperterminal installed. This software allows you to communicate with the switch directly through the console port. Documentation supplied with the terminal emulation software. ■ The console cable (RJ-45) supplied with your switch. ■...
- Page 44 3: S HAPTER ETTING P FOR ANAGEMENT no hardware flow control ■ Refer to the documentation that accompanies the terminal emulation software for more information. 3 Power up the switch. The Power on Self Test (POST) runs automatically. Setting Up the Switch with IP Information To manually set up the switch with IP information using the command line interface, perform the following steps: 1 The command line interface login sequence begins as soon as the switch...
- Page 45 Manually Configuring IP Information (where xxx.xxx.xxx.xxx is the IP address of the default gateway) 7 From the User View, type save to save the switch’s configuration (this information is not saved automatically when the switch is powered down). You can to set up your chosen management method. See “Methods of Managing a Switch”...
- Page 46 3: S HAPTER ETTING P FOR ANAGEMENT Connecting the Workstation to the Switch 1 Connect the workstation to a front panel port using an Ethernet cable as shown in Figure 19. Figure 19 Connecting a Workstation to the Switch through a Front Panel Port Switch Workstation (with a Network...
- Page 47 Manually Configuring IP Information address and subnet mask that you want the switch to use when it is connected to the network. The final page displays a summary of the information entered. 5 Select Save Configuration to save the configuration to your switch. The initial set up of your switch is now complete and you can now set up your chosen management method.
-
Page 48: Viewing Automatically Configured Ip Information
IP information. Each method is described in detail below. Using 3Com Network You can use the 3Com Network Director application (available from the Director 3Com website) to discover the automatically allocated IP information. 1 Connect your switch to the network. - Page 49 DHCP or BootP serverfor more informaiton. If your network does not have a DHCP or BootP server, the workstation running 3Com Network Director must be on the same subnet as the switch because Auto-IP addresses are non-routable. Connecting to the...
-
Page 50: Setting Up Command Line Interface Management
Command Line management using a local console port connection or over the network. Interface You can configure and manage the Switch 4200G’s port data through its Management two user interfaces: Use the AUX User Interface to log in to your switch using the ■... - Page 51 Setting Up Command Line Interface Management CLI Management over To manage your switch using the command line interface over a network the Network using Telnet: 1 Ensure that you have already set up the swwitch with IP information as described in “Methods of Managing a Switch” on page 37. 2 Check that you have the IP protocol correctly installed on your management workstation.
-
Page 52: Setting Up Command Line Interface Management Using Ssh
4 Install an SSH client application on the workstation you want to use to access the switch. 3Com recommends the PuTTY, OpenSSH, and SSH Communications Security Corp Secure Shell SSH clients. 5 Open an SSH session and access the switch using the its IP address and port number. -
Page 53: Setting Up Web Interface Management
Setting Up Web Interface Management For further information on generating a host key on your switch and transferring keys to the switch using TFTP server, refer to the Configuration Guide that is supplied with your switch. Setting Up Web This section describes how you can set up web interface management Interface over the network. -
Page 54: Setting Up Snmp Management
VLAN. By default, the management VLAN is 1, and all ports on the switch are in VLAN 1. For a description of 3Com’s network management applications, see “3Com Network Management” on page 75. Prerequisites The default read community string is public. -
Page 55: Default Users And Passwords
You can do this using the command line interface system management snmp community command. Refer to the command line interface section of the Switch 4200G Command Reference Guide” for more information. These switches support SNMP V1, V2, and V3. SNMP V3 is the default. All commands are in the snmp menu in System View. - Page 56 To set a password for the admin user in the CLI, enter the following from system view: [S4200G]local-user admin <cr> [S4200G-luser-admin]password simple xxxxxxxx (where xxxxxxxx is your chosen password). Save the configuration in the User View. For information about the lost password procedure refer to the “Switch 4200G Configuration Guide” available at www.3Com.com.
-
Page 57: Problem Solving
■ If you experience a problem that is not listed here, it may be included in the Support section of the Switch 4200G Command Reference Guide available in PDF format on 3Com’s Web site at www.3com.com. For Technical Support information, see Appendix . -
Page 58: Solving Problems Indicated By Leds
4: P HAPTER ROBLEM OLVING Solving Problems If the LEDs on the switch indicate a problem, refer to the list of suggested Indicated by LEDs solutions below. The PWR LED does not light Check that the power cable is firmly connected to the switch and to the supply outlet. -
Page 59: Solving Hardware Problems
Solving Hardware Problems Auto-negotiation problems will occur with 10BASE-T or 100BASE-T where auto-negotiation is disabled and incorrect cables are being used (cross-over or straight). Auto-negotiation problems occur with fiber if: The Receiver (RX) and Transceiver (TX) cable connectors are ■ swapped Fibers are broken ■... -
Page 60: Solving Communication Problems
3 Power cycle the unit. To do this, remove and reconnect the AC mains supply. If another fan failure warning message is generated using the Command Line Interface or the Web interface, return the unit to 3Com. Unit fails, no SNMP fan failure message is received 1 Power cycle the unit. - Page 61 If your IP network is internal to your organization only, that is, you do not access the Internet, you may use any arbitrary IP address as long as it is not being used by another device on your network. 3Com suggests that you use addresses in the range 192.168.0.0 to 192.168.255.255 with a subnet mask of 255.255.255.0.
- Page 62 4: P HAPTER ROBLEM OLVING...
-
Page 63: Pin - Outs
OUTS Null Modem Cable RJ-45 to RS-232 25-pin 3Com Switch PC/Terminal Cable connector: RJ-45 female Cable connector: 25-pin male/female Screen only required if screen Screen Shell always required Ground Ground required for handshake PC-AT Serial Cable RJ-45 to 9-pin 3Com Switch... -
Page 64: Modem Cable
A: P PPENDIX OUTS Modem Cable RJ-45 to RS-232 25-pin 3Com Switch RS-232 Modem Port Cable connector: RJ-45 female Cable connector: 25-pin male Screen Screen Shell RT S Ground Ground Ethernet Port RJ-45 10/100 and 1000BASE-T RJ-45 connections. Pin Assignments... - Page 65 Ethernet Port RJ-45 Pin Assignments Pin Number 10/100 1000 Transmit Data + Bidirectional Data A+ Not assigned Bidirectional Data A- Not assigned Bidirectional Data D+ Transmit Data – Bidirectional Data D- Not assigned Bidirectional Data C+ Not assigned Bidirectional Data C-...
- Page 66 A: P PPENDIX OUTS...
-
Page 67: Specifications
–10 ° to +70 °C (14 ° to 158 °F) Operating Humidity 95% non-condensing Standards EN60068 to 3Com schedule (Package testing: paras 2.1, 2.2, 2.30, and 2.32. Operational testing: paras 2.1, 2.2, 2.30 and 2.13). Safety Agency Certifications UL 60950-1, EN 60950-1, CSA 22.2 No. 60950-1, IEC 60950-1. -
Page 68: Switch 4200G 24-Port
–10 ° to +70 °C (14 ° to 158 °F) Operating Humidity 95% non-condensing Standards EN60068 to 3Com schedule (Package testing: paras 2.1, 2.2, 2.30, and 2.32. Operational testing: paras 2.1, 2.2, 2.30 and 2.13). Safety Agency Certifications UL 60950-1, EN 60950-1, CSA 22.2 No. 60950-1, IEC 60950-1. -
Page 69: Switch 4200G (48-Port)
–10 ° to +70 °C (14 ° to 158 °F) Operating Humidity 95% non-condensing Standards EN60068 to 3Com schedule (Package testing: paras 2.1, 2.2, 2.30, and 2.32. Operational testing: paras 2.1, 2.2, 2.30 and 2.13). Safety Agency Certifications UL 60950-1, EN 60950-1, CSA 22.2 No. 60950-1, IEC 60950-1. - Page 70 B: T PPENDIX ECHNICAL PECIFICATIONS...
-
Page 71: Obtaining S Product
More information on 3Com maintenance and Professional Services is available at http://www.3com.com/ Contact your authorized 3Com reseller or 3Com for a complete list of the value-added services available in your area. -
Page 72: Troubleshoot Online
PPENDIX BTAINING UPPORT FOR YOUR RODUCT Troubleshoot You will find support tools posted on the 3Com web site at Online http://www.3com.com/. 3Com Knowledgebase helps you troubleshoot 3Com products. This query-based interactive tool is located at and contains thousands of technical http://knowledgebase.3com.com... -
Page 73: Contact Us
Contact Us To send a product directly to 3Com for repair, you must first obtain a return authorization number (RMA). Products sent to 3Com, without authorization numbers clearly marked on the outside of the package, will be returned to the sender unopened, at the sender’s expense. If your... - Page 74 You can also obtain support in this region using the following URL: http://emea.3com.com/support/email.html Latin America Telephone Technical Support and Repair Antigua 1 800 988 2112 Guatemala AT&T +800 998 2112 Argentina 0 810 444 3COM Haiti 57 1 657 0888 Aruba 1 800 998 2112 Honduras AT&T +800 998 2112 Bahamas...
-
Page 75: 3Com Network Supervisor
3NS is configured with intelligent defaults and the ability to detect network misconfigurations. It can also offer optimization suggestions, making this application ideal for network managers with all levels of experience. To find out more about 3Com Network Supervisor and to download a trial version, go to: www.3com.com/3ns... -
Page 76: 3Com Network Director
By using 3ND you can discover, map, and monitor all your 3Com devices on the network. It simplifies tasks such as backup and restore for 3Com device configurations as well as firmware and agent upgrades. -
Page 77: 3Com Enterprise Management Suite
The client-server offering operates on Windows and UNIX (Linux and Solaris) systems. 3Com EMS is available in four packages, varying in the maximum number of devices actively managed. These include SNMP-capable devices such as switches, routers, security switches, the 3Com VCX™ IP Telephony server,... - Page 78 D: 3C PPENDIX ETWORK ANAGEMENT...
-
Page 79: Supply Safety Information
EDUNDANT OWER UPPLY AFETY NFORMATION Important Safety Information WARNING: This device has more than one power input. Disconnect all power inputs to power off this device. WARNING: The installation of the Redundant Power Supply (RPS) should only be carried out by properly trained and qualified personnel. WARNING: These instructions must be read in conjunction with the RPS flyer and the safety and installation instructions supplied with your RPS. -
Page 80: L'information De Sécurité Importante
WARNING: Do not use a standard 'positive-earthed' -48V redundant power system suitable for use with telecommunications equipment with the 3Com Power-over-Ethernet (PoE) network switches. In order to meet the IEEE 802.3af (PoE) specification, the -48V output must be isolated from earth (ground) and meet the isolation requirements in that specification. - Page 81 à 48 V relié à la terre convenant aux équipements de télécommunication avec les commutateurs réseau PoE (Power-Over-Ethernet) de 3Com. En vue de respecter la spécification IEEE 802.3af (PoE), la sortie 48 V doit être isolée de la terre (masse) et se...
-
Page 82: Wichtige Sicherheitsinformationen
E: R PPENDIX EDUNDANT OWER UPPLY AFETY NFORMATION Wichtige Sicherheitsinformationen VORSICHT: Dieses Gerät besitzt mehrere Eingänge zur Stromversorgung. Trennen Sie das Gerät zum Ausschalten von allen Stromquellen. VORSICHT: Die RPS (Redundant Power Supply, redundante Stromversorgung) darf nur von entsprechend geschultem und qualifiziertem Fachpersonal installiert werden. -
Page 83: Información De Seguridad Importante
Información de Seguridad Importante VORSICHT: Stellen Sie sicher, dass sich der Schutzschalter an der RPS beim Anschließen des RPS-Kabels und des Steckers des 3Com Switch in der geöffneten Stellung (Aus) befindet. VORSICHT: Verwenden Sie mit den 3Com PoE-Netzwerkswitches kein "positiv geerdetes" redundantes Standard-Netzsystem mit -48 Volt, wie es für Telekommunikationsgeräte geeignet ist. -
Page 84: Importanti Informazioni Di Sicurezza
-48 V con conexión a tierra positiva, adecuado para su uso con equipos de telecomunicaciones, con los conmutadores de red alimentados a través de Ethernet (PoE) de 3Com. Para cumplir con la especificación IEEE 802.3af (PoE), la salida de -48V debe estar aislada de la de tierra y cumplir con los requisitos de aislamiento de dicha especificacion. -
Page 85: Wa¿Ne Informacje O Zabezpieczeniach
(salvavita) dell'RPS. AVVERTENZA: prima di collegare il cavo RPS e il connettore allo switch 3Com, verificare che il salvavita si trovi in posizione Acceso (spento). AVVERTENZA: Non usare con gli switch di rete PoE... - Page 86 -48-woltowego nadmiarowego systemu zasilania odpowiedniego przy użyciu ze sprzętem telekomunikacyjnym wraz z przełącznikami siecio- wymi firmy 3Com w technologii Power-over-Ethernet (PoE). Aby spełnić wymagania specyfikacji IEEE 802.3af (PoE), -48-woltowy przewodnik wyjścia musi być odizolowany od ziemi (uziomu) i spełnił wymagania...
-
Page 87: Regulatory Notices
A copy of the signed Declaration of Conformity can be downloaded from the Product Support web page for the Switch 4210 Product Family at http://www.3com.com. Also available at http://support.3com.com/doc/Switch_4210_EU_DOC.pdf. - Page 88 E: R PPENDIX EDUNDANT OWER UPPLY AFETY NFORMATION...
- Page 89 Numbers 3C number 23 hardware features 14 access levels of default users 55 installing the Switch 21 automatic setup 48 IP addressing 3Com Network Director 48 registered 61 console port 49 IP configuration 40 browsers LEDs 18 choosing 53 logging in as a default user 55...
- Page 90 NDEX IP addressing 59 LEDs 58 Web browsers choosing 53 web interface choosing a browser 53 rack mounting a Switch 5500 22 web interface management 39 related documentation 10 setting up 53 safety information English 79 French 80 German 82 Italian 84 Spanish 83 serial number of the Switch 23...