
Related Manuals for LG PH30JG


Summary of Contents for LG PH30JG
- Page 1 Owner's Manual LG MiniBeam DLP Projector Please read the safety information carefully before using this product. PH30JG www.lg.com P/NO : SAC37034674 (1709-REV00)
-
Page 2: Licenses
LICENSES Supported licenses may differ by model. For more information about licenses, visit www.lg.com. Manufactured under license from Dolby Laboratories. Dolby, Dolby Vision, Dolby Audio, and the double-D symbol are trademarks of Dolby Laboratories. This DivX Certified device has passed rigorous ®... -
Page 3: Safety Precautions
SAFETY PRECAUTIONS Please take note of the safety instructions to prevent any potential accident or misuse of the projector. • Safety precautions are given in two forms, i.e., WARNING and CAUTION as detailed below. WARNING Failure to follow the instructions may cause serious injury and even death. - Page 4 • Do not allow children to cling to or • Ensure good ventilation around the climb up to the projector. projector. The distance between the - This may cause the projector to projector and the wall should be at fall, causing injury or death. least 30 cm.
- Page 5 • When moving the projector, make • The power plug should be inserted sure to switch it off and remove the fully into the power outlet. power plug and cords. - An unstable connection may - The power cord may be cause a fire.
- Page 6 • Only use the official power cord bent, twisted, pulled, sandwiched or provided by LG Electronics. Do not hot. Do not use the product if the use other power cords. power outlet is loose. - This may result in fire or electric - This may result in fire or electric shock.
- Page 7 Always use the AC adapter provided batteries out of reach of children. or any AC adapters approved and - If a child swallows a battery, certified by LG Electronics. consult a doctor immediately. - Any other AC adapter connected may result in the screen •...
- Page 8 • Do not use the projector near • Be careful not to allow any impact electronic devices that generate a to the lens during transport. strong magnetic field. • Do not touch the lens of the • Keep the plastic film used for projector.
- Page 9 • Do not block the light beam emitted CAUTION from the projector using a book or • Contact your seller or our service other object. center once a year to clean the - Lengthy exposure to the internal parts of the projector. projector beam may result in - If you do not clean the projector fire.
- Page 10 Others • Do not wipe the optical system (lens, mirror) right after the product WARNING has been turned off or while the product is being operated. When • When you go out, place the cleaning each part of the product, projector out of reach of animals, remove the power cord and wipe and remove the power plug from...
- Page 11 • Do not touch the lens; doing so can CAUTION result in burns or damage to lens. • Do not use or store the projector Lens and unit may be HOT during outdoors for long periods of time. and immediately after use. Use •...
- Page 12 • Do not throw or disassemble the battery. - This may result in fire or explosion due to damage to the battery. • Store batteries away from metallic objects, such as keys and paper clips. - Excess current may cause a rapid increase in temperature, resulting in fire or burns.
-
Page 13: Table Of Contents
CONTENTS LICENSES USING THE PROJECTOR Using The Battery SAFETY PRECAUTIONS Battery using time information 30 PREPARATION Watching Projector - Turning on the Projector Accessories - Focus of the Screen Image Optional Extras CONNECTING DEVICES Parts and Components - Main Unit HDMI Connection - Side 1 - Connecting to HD Receiver, DVD,... -
Page 14: Preparation
PREPARATION The pictures may differ slightly from the actual product. Accessories Accessories included with the projector are show below. Accessories are subject to change without prior notice. New accessories may be added or old ones removed.  Remote Control Owner's Manual Two AAA Batteries * Depending on country AC-DC Adaptor... -
Page 15: Optional Extras
Optional Extras To purchase optional accessories, visit an electronics store or online shopping site or contact the retail store where you purchased the product. Optional accessories are subject to change without prior notice. Projection Screen Tripod HDMI Cable MHL Cable USB-C Cable... -
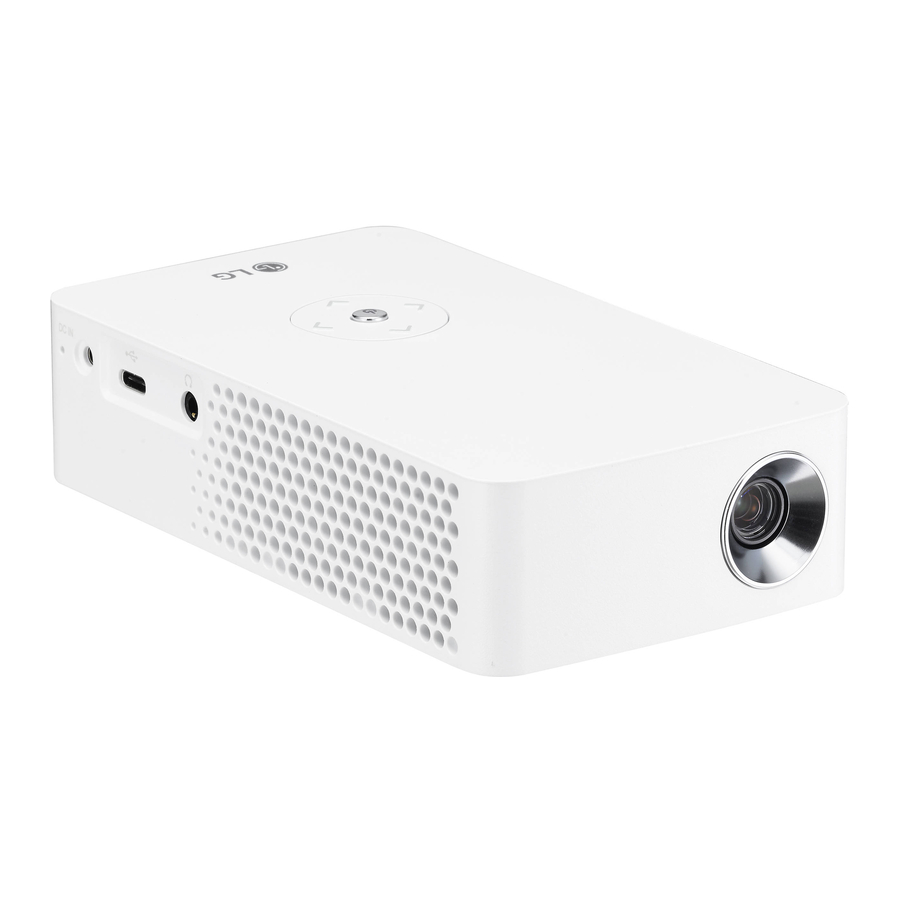
Page 16: Parts And Components
Parts and Components This projector is manufactured using high-precision technology. You may, however, see tiny black dots and/or bright colored dots (red, blue, or green) that continuously appear on the projector screen. This is a normal result of the manufacturing process and does not indicate a malfunction. Main Unit Buttons Inlet Vent... -
Page 17: Side 1
Side 1 Description Battery Charge Indicator - Red: Charging - Green: Charging complete Port (USB-C port) (Headphone Port) -
Page 18: Side
Side 2 Description Port (USB 2.0 port) -
Page 19: Back
Back Description IR Receiver OFF/ON Switch - ON: Turns the projector on and the projector goes into Standby mode. - OFF: Turns the projector off completely. Place the switch to OFF when you move the projector or when you intend not to use the projector for long periods of time. -
Page 20: Using The Buttons
Using the Buttons You can operate the projector by pressing the button. Basic functions Power On Press the Power button once while the projector is off. Power Off Press and hold the Power button for a few (Press and seconds while the projector is on. Hold) (However, if the Menu button is shown on the screen during button use, pressing and... -
Page 21: Projector Status Indicators
Projector Status Indicators LED Power Indicator LED Power Indicator Power standby state The projector is operating with the power on. -
Page 22: Installation
Installation - Leave an adequate open area (30 cm or more) around the projector. Installation Precautions • Place the projector in a well- ventilated environment. - To prevent internal overheating, install the projector in a well- ventilated place. Do not place anything near the projector. -
Page 23: Projection Distance Per Screen Size
Projection Distance per Screen Size 1 Place the projector on a sturdy, level surface, together with the PC or audio/ video source. 2 Place the projector an appropriate distance away from the screen. The distance between the projector and the screen determines the actual size of the image. 3 ... -
Page 24: How To Install The Projector On A Tripod
How to Install the Projector On a Tripod • You can install the projector using a camera tripod. • As shown below, you can mount the projector instead of a camera on the tripod. • When stabilizing the tripod, we recommend using a locking bolt of standard size 4.5 mm or less. -
Page 25: Kensington Security System
Kensington Security System • This projector has a Kensington Security Standard connector as an anti-theft mechanism. Connect a Kensington Security System cable as shown below. • For more information on installation and use of the Kensington Security System, refer to the user’s guide provided with the Kensington Security System. •... -
Page 26: Remote Control
REMOTE CONTROL Open the battery cover on the back of the remote control and insert the batteries which ② are specified in the battery room with poles pointing in the correct direction. The new and same type of batteries (1.5 V AAA) must ①... - Page 27 Adjusts the volume level. Moves to the previous/next page. Resizes an image. Displays a blank screen. Mutes the sound of the projector. Displays or closes the Settings menu. Freezes the moving image. (Available in any mode other than USB mode.) Enters the quick menu.
- Page 28 NOTE • When using the remote control, the optimal operation range is 6 meters or less (left/right) and within a 30 degree arc of the remote control IR receiver. • If a cable is connected to the back port, the 30°...
-
Page 29: Using The Projector
USING THE PROJECTOR Using The Battery The battery is low. Connect a power supply for charging. • It is displayed when the battery is low (Energy Saving will be changed Maximum mode and will be disabled). • If the screen shows a low battery message, be sure to charge the battery. The device powers off due to insufficient battery. -
Page 30: Battery Using Time Information
• As the battery is consumable, its lifetime gradually decreases. When the battery’s life is reduced by half, replace it with a new battery from an LG Electronics Customer Support Center. • Do not charge the battery using any equipment other than that supplied with the product. -
Page 31: Watching Projector
Watching Projector Turning on the Projector The menu screen display in this owner's manual is an example to help users understand how to operate the product and may look different from the actual screen. 1 Connect the power cord correctly. 2 ... -
Page 32: Focus Of The Screen Image
Focus of the Screen Image When an image appears on the screen, check if it is in focus and fits the screen properly. Adjust the focus of the image by rotating the Focus Ring to the up or down. Make sure the product does not move when adjusting the focus. Focus Ring... -
Page 33: Connecting Devices
CONNECTING DEVICES You can connect various external devices to the projector. Computer/Notebook Digital Device USB-C Headphones Mobile Phone Game Console   HDMI - Page 34 USB-C - Page 36 Headphone - Page 37... -
Page 34: Hdmi Connection
HDMI Connection Connecting a PC The projector supports Plug and Play. Connect an HD receiver, DVD, or Your PC will automatically detect external devices to the projector and the projector and requires no driver select an appropriate input mode. installation. →... -
Page 35: Connecting A Laptop
Connecting a Laptop The table below shows examples of switching the output. For more You can connect the projector to a information, refer to the External laptop to use various functions. Output, Connecting to an External Monitor, or similar sections of the Using an HDMI cable, connect the owner's manual of your computer. -
Page 36: Connecting With A Usb-C Cable
Connecting with a NOTE USB-C Cable • PD (Power Delivery) and DP → USB-C • Alternate Mode are supported. - A USB-C gender changer Computer/Laptop and may be necessary depending Phone Connections on the cable used if using PD Use a USB-C cable to connect to (Power Delivery). -
Page 37: Connecting Headphones
Connecting Headphones Connecting Headphones You can listen to the audio through a headphone. * Not provided... -
Page 38: Maintenance
MAINTENANCE Clean your Projector to keep it in optimal condition. Cleaning Cleaning the Lens If there is any dust or staining on the lens surface, you must clean the lens. Use an air spray or a cleaning cloth to clean the lens. To remove dust or stains on the lens, use a compressed air duster, cotton swab, or soft cloth to gently wipe the lens. -
Page 39: Specifications
SPECIFICATIONS MODEL PH30JG (PH30JG-GL) Resolution (Pixel) 1280 (Horizontal) × 720 (Vertical) Aspect ratio 16:9 (Horizontal:Vertical) Panel size 7.93 mm Projection distance 585 mm to 2950 mm (508 mm to 2540 mm) (Screen size) Ratio of upward 100 % projection Working range of... - Page 40 Supported HDMI (PC) / USB-C (PC) Modes Horizontal Frequency Vertical Frequency Resolution (kHz) (Hz) 640 x 350 31.468 70.09 720 x 400 31.469 70.08 640 x 480 31.469 59.94 800 x 600 37.879 60.31 1024 x 768 48.363 60.00 1152 x 864 54.348 60.053 1280 x 720...
- Page 41 In addition to the source code, all referred license terms, warranty disclaimers and copyright notices are available for download. LG Electronics will also provide open source code to you on CD-ROM for a charge covering the cost of performing such distribution (such as the cost of media, shipping, and handling) upon email request to opensource@lge.com.
-
Page 42: Symbols
SYMBOLS Refers to alternating current(AC). Refers to direct current(DC). Refers to class II equipment. Refers to stand-by. Refers to “ON” (power). Refers to dangerous voltage. - Page 44 USING THE PROJECTOR Image shown may differ from your projector. Your projector’s OSD (On Screen Display) may differ slightly from that shown in this manual. Green : the buttons and the text to be displayed on the projector screen.
- Page 45 CONTENTS USING THE PROJECTOR MY MEDIA Watching Projector Before Using - Turning on the Projector - Connecting a USB Device - Removing a USB Device Additional Options - Adjusting Aspect Ratio To Use My Media - Using the Keystone Function 5 - Watching the Videos - Changing Input Device - Viewing the Photos...
-
Page 46: Using The Projector
USING THE PROJECTOR Watching Projector Turning on the Projector The menu screen display in this owner's manual is an example to help users understand how to operate the product and may look different from the actual screen. Connect the power cord correctly. After waiting for a moment, press the button on the remote control or the joystick button. -
Page 47: Additional Options
Additional Options Adjusting Aspect Ratio Resize an image to view at its optimal size by pressing while you are using the projector. NOTE • Available picture size may differ depending on the input signal. • You can also use the button. -
Page 48: Using The Keystone Function
Using the Keystone Function To prevent the screen image from becoming trapezoidal, Keystone adjusts the top and bottom width of the image if the projector is not set up at a right angle to the screen. Because the Keystone function may cause inferior screen image quality, use this function only when it is not possible to set up the projector at an optimal angle. -
Page 49: Changing Input Device
Changing Input Device To select an external input Selects external input. The illustration of the menu may differ from the actual screen on the product. • Press the button on the remote control to display the input selection screen. - Connected inputs are displayed first. However, SCREEN SHARE is always activated. -
Page 50: Blank Function
Selecting an Input Label Displays which devices are connected to which input ports. Input Label HDMI1 Close Press the button on the remote control to display the input selection screen. Press the Red button. Use the button to scroll to one of the input sources. Blank Function Using the Blank Function This function may be effective when you need to draw attention during a meeting... -
Page 51: Using The Quick Menu
Selecting a Blank Image Press the button. Press the , or buttons to select OPTION 2 and press the button. Blank Image Press the buttons to select and press the button. Press the button to move to the setting or option you want and press the button. -
Page 52: Entertainment
Windows, and some other operating systems, may not be compatible with SCREEN SHARE. • Ice Cream Sandwich, Jellybean, Kitkat, Lolliop, Marshmallow and Nougat versions of LG’s Android devices are guaranteed to be compatible. • When connecting via SCREEN SHARE, place the device close to the projector. -
Page 53: Setting Up Bluetooth On The Projector
NOTE • The devices that can be connected are as follows: LG BTS1, LG HBS-700, LG HBS-730, LG HBS-800 (Models available for purchase may vary by region.) • Products from other manufacturers may not be compatible. • You can use the remote control to adjust the volume of the connected device. -
Page 54: Searching For Bluetooth Devices
The time it takes to search for devices may vary according to the signal strength and the number of devices. WIRELESS ꔂ Move ꔉ OK • SCREEN SHARE : [PJTR][LG]PH30JG[0000] • Group • Channel • Bluetooth : On • Search Device •... -
Page 55: Connecting, Disconnecting, Or Deleting Bluetooth Devices In
When a Bluetooth device is connected, you will hear sound from the projector through the connected device. • List of The connected Bluetooth device will be added automatically to the registered devices. Once registered, Bluetooth devices can be connected simply List of registered devices by selecting them from the without having to search... -
Page 56: Adjusting Av Sync. Adjust
Disconnecting Select Disconnect to disconnect the device. • You can only disconnect a device from the List of registered devices. Deleting Select Delete Marked Delete All to delete any registered devices. • Delete Marked: Press the red button in List of registered devices to delete the selected device. -
Page 57: My Media
MY MEDIA Before Using Connecting a USB Device Connect a USB device (external HDD, USB memory) to the USB port of projector to enjoy the content files stored in the USB device with your projector. You cannot write or delete data in the USB device. Connect a USB flash drive as shown below. - Page 58 Tips for using a USB device • If the USB storage device has a built-in auto recognition program or uses its own driver, it may not work. • Some USB storage devices may not work or may work incorrectly. • If you use a USB extension cable, the USB device may not be recognized or may not work properly.
-
Page 59: To Use My Media
To Use My Media Press the button on the remote control. MEDIA. Select Select desired file from the list. Watch the chosen file. Sets play related settings by checking option during disk playback. My Media supporting file • Maximum data transmission rate: 20 Mbps (Mega bit per second) •... - Page 60 Extension Codec Video MPEG-1, MPEG-2 .vob Audio Dolby Digital, MPEG-1 Layer I, II, DVD-LPCM Video MPEG-1 .mpg .mpeg Audio MPEG-1 Layer I, II Audio File File type Item Info Bit rate 32 Kbps to 320 Kbps Sampling rate 32 kHz to 48 kHz Bit rate 32 kbps to 640 kbps Sampling rate...
- Page 61 Available photo file File type Item Info Support SOF0: Baseline, SOF1: Extend Sequential, SOF2: File type Progressive jpeg, jpg, Minimum: 64 x 64 Picture Maximum: Normal Type: 15360 (W) x 8640 (H) Size Progressive Type: 1920 (W) x 1440 (H) Minimum: 64 x 64 Picture Size...
-
Page 62: Watching The Videos
Watching the Videos In the Movie List, you can watch movies stored on the connected USB device. Controls playback and sets options while viewing videos. Tips for Playing Video Files • Some subtitles created by users may not work properly. •... - Page 63 Use the , or button to select the file you want and press the button. Page 1/1 Movie List Page Change PAGE USB STORAGE DEVICE Drive1 Drive2 Drive3 Drive4 Drive5 Page 1/1 Butterfly_... 01:34:33 Change device Go to root folder Go to upper folder Exit Description...
- Page 64 Control playback by using the following buttons. Exit Option Hide Item Description Shows the current playing position. Use buttons to move forward or backward. Stops playing and returns to Movie List. Returns to normal playback. Pauses the media player. If no button is pressed on the remote control for 10 minutes after pausing, the playback is restarted.
- Page 65 Options for Movie List Press the button. Use the button to move to a desired option and press the button. Use the , or button to set up each item. Set Video Play. • Picture Size Selects the size of a playback screen. - Full: Files are played in full screen mode according to the aspect ratio of video.
- Page 66 Registering the DivX code Checks DivX Reg. Code for replaying DivX protected videos. Register at http://vod. divx.com. Use Reg. Code to rent or purchase movies at www.divx.com/vod. OPTION 1 DivX(R) VOD. In the Settings menu, move to and press Registration Deregistration Close Registration...
- Page 67 To deregister the DivX code Use the DivX deregistration code to deactivate the DivX DRM function. In the Settings menu, move to OPTION 1 and press DivX(R) VOD. Use the button to go to Deregistration and press the button. Select Yes. Your device is already registered.
-
Page 68: Viewing The Photos
Viewing the Photos You can view photos stored on a connected device. Supported Photo Files PHOTO (*.JPEG) Baseline: 64-pixel (width) x 64-pixel (height) - 15360-pixel (width) x 8640-pixel (height) Progressive: 64-pixel (width) x 64-pixel (height) - 1920-pixel (width) x 1440-pixel (height) •... - Page 69 Description Thumbnails Abnormal file File not supported File List Moves to the upper level folder. Current page/Total no. of folder pages Displays the remaining battery life. Current page/Total no. of file pages Changes the device. Moves to the top level folder. Moves to the upper level folder.
- Page 70 Item Description You can listen to music while viewing photos in full size. • Set the Option Set Photo View. menu. Rotates photos. • Rotates a photo 90°, 180°, 270°, 360° clockwise. • Photos cannot be rotated if their width is greater than the height of the max.
-
Page 71: Listening To Music
Set Video. You can change video settings. (Refer to PICTURE Settings on page 36.) Set Audio. You can change audio settings. (Refer to AUDIO Settings on page 42.) BLUETOOTH You can change Bluetooth settings. (Refer to Setting Up Bluetooth on the Projector on page 10.) Listening to Music You can play audio files stored on the connected device. - Page 72 Description Thumbnails Abnormal file File not supported File List Moves to the upper level folder. Current page/Total no. of folder pages Displays the remaining battery life. Current page/Total no. of file pages Changes the device. Moves to the top level folder. Moves to the upper level folder.
- Page 73 Item Description Returns to normal playback. Pauses the media player. Plays the previous/next file. Reduces power consumption by adjusting peak screen brightness. (If the screen shows a low battery message, the Energy Saving mode will be changed to Maximum and will be disabled) Sets up the options of Music List.
-
Page 74: Viewing Files
Viewing Files You can see document files stored on a connected device. Supported File Formats XLS, XLSX, DOC, DOCX, PPT, PPTX, TXT, PDF, HWP Microsoft Office: 97/2000/2002/2003/2007 Version Adobe PDF: 1.0/1.1/1.2/1.3/ 1.4 Version Hangul: 97/2000/2002/2005/2007 Version • File Viewer realigns a document, so it may look different from what is displayed on a PC. - Page 75 Browsing File List Connect a USB storage device. Press the button. Use the button to select File List and press the button. Use the , or button to select the file you want and press the button. Page 1/1 File List Page Change PAGE USB STORAGE DEVICE...
- Page 76 Control playback by using the following buttons. • Click Page, then the pop-up window for selecting the number of page appears. Input the page to move to the page you want. • Press the button to zoom in or zoom out. Press the button and then use the buttons to move to...
- Page 77 Options for File List Press the button. Use the , or button to set up each item. Set FileViewer Option • Single Page Loading : Loads and displays pages one by one. The initial loading time is short but a content-heavy page may be displayed slowly. : Loads all pages of a file to memory before it starts to display them.
-
Page 78: Customizing Settings
CUSTOMIZING SETTINGS SETTINGS Press the button. Use the , or button to select the desired item and press the button. Use the , or button to set up the desired item and press the button. Press the button when completed. Menu Description PICTURE... -
Page 79: Picture Settings
PICTURE Settings Press the button. PICTURE ꔂ Move ꔉ OK Use the , or buttons to select PICTURE • ꕊ Energy Saving : Minimum press the button. • Picture Mode : Standard Use the , or • Contrast 100 button to set up the desired •... - Page 80 • Picture Mode Selects the picture mode optimized for the viewing environment or the program. You can also customize advanced options for each mode. Vivid Maximizes the visual effect of video. Heightens contrast, brightness, and sharpness to display vivid images. Standard Displays images in standard levels of contrast, brightness, and sharpness.
- Page 81 • Tint Adjusts the balance between red and green levels. • Advanced Control Customizes the advanced settings. • Picture Option Sets optional settings. • Picture Reset Resets values customized by the user. Each picture mode is reset. Select the picture mode you wish to reset. •...
- Page 82 Advanced Control • Dynamic Contrast Adjusts contrast and color to the optimal level according to the screen’s brightness. • Dynamic Color Adjusts colors for more natural-looking colors. • Color Gamut Selects the range of colors that can be expressed. - Standard: Displays the original colors of an input signal regardless of the display features.
- Page 83 Expert Control • Dynamic Contrast Adjusts contrast and color to the optimal level according to the screen’s brightness. • Color Gamut Selects the range of colors that can be expressed. - Standard: Displays the original colors of an input signal regardless of the display features.
- Page 84 • Color Management System Adjusts Red/Green/Blue/Cyan/Magenta/Yellow colors. Allows an expert to adjust the tint using a test pattern. Six colors (Red/Green/Blue/Cyan/Magenta/ Yellow) can be selectively adjusted without affecting other colors. You may not see colors change on a normal picture even after adjustment. Saturation Red/Green/Blue/Cyan/Magenta/Yellow, Tint...
-
Page 85: Audio Settings
AUDIO Settings Press the button. AUDIO ꔂ Move ꔉ OK Use the , or button to select AUDIO • Sound Mode : Standard press the button. • Clear Voice II Use the , or • Auto Volume : Off button to set up the desired item and press the button. -
Page 86: Time Settings
TIME Settings Press the button. TIME ꔂ Move ꔉ OK Use the , or button to select TIME and press • Sleep Timer : Off button. • Auto Off : 60 min. Use the , or • Automatic Standby : 4 hours button to set up the desired item and press the button. -
Page 87: Wireless Settings
WIRELESS ꔂ Move ꔉ OK Use the , or button to select WIRELESS • SCREEN SHARE : [PJTR][LG]PH30JG[0000] and press the button. • Group • Channel Use the , or • Bluetooth : Off button to set up the desired •... - Page 88 • Bluetooth Bluetooth to On. Sound is output through the Bluetooth headset. First, set Search Device Search for the device to connect to. List of registered devices List of registered devices. The saved list Connected devices are saved in the of registered devices can be displayed.
-
Page 89: Option 1 Settings
OPTION 1 Settings Press the button. OPTION 1 ꔂ Move ꔉ OK Use the , or button to select OPTION 1 • Language press the button. • DivX(R) VOD Use the , or • Initial Setting button to set up the desired •... -
Page 90: Option 2 Settings
OPTION 2 Settings Press the button. OPTION 2 ꔂ Move ꔉ OK Use the , or button to select OPTION 2 • Keystone press the button. • Auto Keystone : On Use the , or • PJT Mode : Front button to set up the desired •... - Page 91 • PJT Mode This function turns the projected image upside down or flips horizontal. - Select Rear when projecting from the back of the transparent screen purchased separately. - Select Front Ceiling when installing the product on the ceiling. PJT Mode Rear Ceiling/Front Ceiling, the left/right of the - When the...