Advertisement
1
®
QuickTouch
II
Wireless Remote
®
®
®
(For EasyTouch
, IntelliTouch
SunTouch
and
®
Compool
CP3800 Series Control Systems)
Installation and User's Guide
IMPORTANT SAFETY INSTRUCTIONS
READ AND FOLLOW ALL INSTRUCTIONS
SAVE THESE INSTRUCTIONS
®
QuickTouch
II Wireless Remote Installation and User's Guide
Advertisement
Table of Contents

Related Manuals for Pentair Pool Products QuickTouch II

Summary of Contents for Pentair Pool Products QuickTouch II
- Page 1 ® QuickTouch Wireless Remote ® ® ® (For EasyTouch , IntelliTouch SunTouch ® Compool CP3800 Series Control Systems) Installation and User’s Guide IMPORTANT SAFETY INSTRUCTIONS READ AND FOLLOW ALL INSTRUCTIONS SAVE THESE INSTRUCTIONS ® QuickTouch II Wireless Remote Installation and User’s Guide...
-
Page 2: Technical Support
Technical Support Phone: (800) 831-7133 - Fax: (800) 284-4151 visit www.pentairpool.com and www.staritepool.com: © 2010 Pentair Water Pool and Spa, Inc. All rights reserved. 1620 Hawkins Ave., Sanford, NC 27330 • (919) 566-8000 10951 West Los Angeles Ave., Moorpark, CA 93021 • (805) 553-5000 ®... -
Page 3: Important Notice
Always disconnect the AC power to the control system load center and power center at the circuit breaker before installing or servicing the QuickTouch II wireless remote. Failure to do so could result in death or serious injury to serviceman, pool users or others due to electrical shock. - Page 4 WARNING AND IMPORTANT SAFETY INSTRUCTIONS CAUTION: IMPORTANT BATTERY INFORMATION • Danger of explosion if battery is incorrectly replaced. • ONLY USE a Pentair Water Pool and Spa replacement battery. Order Battery Replacement Kit (P/N 520815Z). • Rechargeable Lithium-ion battery disposal: Unwanted lithium ion battery pack may be returned to your local recycling center or the manufacturer for disposal.
-
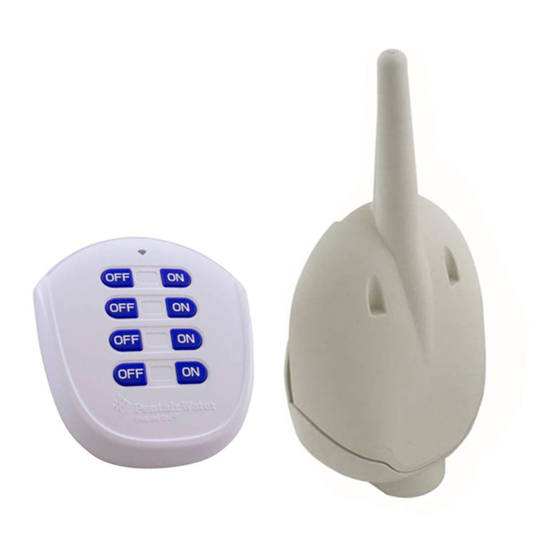
Page 5: Quicktouch Ii Wireless Remote Overview
User’s and Installation Guide (this manual) QuickTouch II Antenna Receiver Location The QuickTouch II wireless remote has an operating range of up to 500 ft. from the QuickTouch II antenna receiver, which is typically located near the load center. The optimum wireless transmit and receive range may be affected by physical obstructions, (especially those containing metal), and geographical features. - Page 6 QuickTouch II Wireless Remote Buttons/LEDs Auxiliary Circuit Buttons (1-4): Circuit button one is assigned to spa/heat control. Buttons 1 - 4 are assigned to AUX 1- AUX 4). Note: Circuit buttons can be reassigned to any relay circuit. Auxiliary Circuit Buttons (5-6): Circuit button six is assigned to pool/filter control.
- Page 7 For more information about connecting and configuring multiple remotes, see page 15. QuickTouch II in “Learn” Mode To setup QuickTouch II secure wireless remote receiver: Open up Receiver Case. Press the White Receiver button (shown below) - LED will flash three (3) times (once pressed you have 60 seconds to learn).
- Page 8 Connecting QuickTouch II To enter the ID programming mode press buttons 2 and 6 at the same time. The LED will flash slowly 4 times while entering the ID programming mode. At a 1 second on/off pulse rate. Enter the 8 bits of identification number where Switch 1 is button 1, switch 2 is button 2 through to switch 8 as button 8.
- Page 9 The example in figure 2 shows an ID number equal to button one (1) only active or equal to a press during programming. Buttons 2 through 8 do not required a press. Switch 9 and 10 on the receiver are always in the off position.
- Page 10 INTELLIBRITE 5g POOL LED LIGHT FIXTURE INSTALLATION WIRING THE QUICKTOUCH II TRANSCEIVER TO THE LOAD CENTER (NEW POOL CONSTRUCTION) All electrical installation, including electrical wiring methods and materials used to complete the electrical installation of the EasyTouch and IntelliTouch Pool/Spa control system...
- Page 11 Insert the four-wire cable into the plastic grommet on the bottom of the enclosure and route the wire up through the low voltage raceway to the main circuit board. Strip back the cable jacket 1-inch and the cable conductors ¼-inch. EasyTouch System: Insert the wires into the COM PORT (J20) screw terminals located on the top of the EasyTouch circuit board (see diagram below).
-
Page 12: Quicktouch Ii Wireless Remote Receiver Antenna Location
QuickTouch II Wireless Remote Receiver Antenna Location The optimum wireless transmit and receive range for the QuickTouch II receiver may be affected by physical obstructions, (especially those containing metal), weather conditions, and geographical features. The QuickTouch II wireless remote has an operating range of up to 500 ft. -
Page 13: Installing The Receiver
Installing the Receiver The QuickTouch II wireless remote has an operating range of up to 500 ft. (line-of-sight) from the receiver. To install the receiver: Choose an installation location for the receiver near the load center. Remove the two lower retaining screws from the receiver and slide the receiver case up to remove it from the back plate. - Page 14 REPLACING THE INTELLIBRITE 5G POOL LED LIGHT FIXTURE (AFTER ELECTRICAL REQUIREMENTS ARE MET) Case Antenna Transceiver circuit board Upper mounting point Upper mounting point (screw) (screw) Back plate Lower mounting Lower mounting point (screw) point (screw) Left-side Transceiver circuit board support Lower exit hole (left side) Retaining screws...
-
Page 15: Personality Board
Optional Serial COM Port Expansion Board ® (for use with IntelliTouch control systems) If there is not an available COM port for the Transceiver cable plug on the IntelliTouch Personality board, the optional Serial COM port Expansion Board (P/N 520818) can be used for additional COM ports connections. Mounting the Expansion Board Remove the inside terminal connectors (with wires attached) from the Expansion board and connect it to a COM port on the Personality... - Page 16 Connecting the Transceiver cable plug to the Serial Com Port Expansion Board Connect the Transceiver cable plug onto one of the available Serial COM port expansion board connector terminals. Note: If you have existing accessories (IntelliChlor, IntelliFlo) connected to the IntelliTouch Personality board and need to free up connectors for additional equipment, remove one of the existing connectors (with the attached wires to equipment) from the Personality board and plug it into an available connector...
- Page 17 Setting up QuickTouch II Wireless Remote (EasyTouch) From the EasyTouch control panel menu, you can specify any SpaCommand spa-side remote button to control different functions by assigning each button to a specific circuit. The spa-side remote has 10 assignable circuit buttons; five button on the top row and five buttons on the bottom row.
- Page 18 COMPOOL SS8 REMOTE UPGRADE INSTALLATION Connecting the spa-side remote to a CP3xxx load center using adapter Strip back the cable 1-inch and ends of leads ¼-inch. Open the cable adapter (P/N 520000, included in kit). Insert the spa-side remote cable into the adapter and attach wires to the terminals (see the wiring diagram below).
-
Page 19: Changing The Battery
Changing the Battery With normal use the battery should last for several years. In the event the battery must be replaced, slide the coverfrom the bottom of the Hand-held Remote. Slide the battery from the retainer clip and discard in accordance withlocal and/or state ordinances. Replace with 3V lithium battery number CR2032 or equivalent. - Page 20 Troubleshooting QuickTouch II wireless remote (P/N 520189) Replacement Kit Part Numbers ® QuickTouch II Wireless Remote Installation and User’s Guide...
- Page 21 ® QuickTouch II Wireless Remote Installation and User’s Guide...
- Page 22 P/N 521362 Rev A ® QuickTouch II Wireless Remote Installation and User’s Guide...