Dish Network Wireless Joey Getting Started Manual
Hide thumbs
Also See for Wireless Joey:
- User manual ,
- Getting started manual (59 pages) ,
- Quick start manual (2 pages)
Table of Contents
Advertisement
Advertisement
Table of Contents

Related Manuals for Dish Network Wireless Joey


Summary of Contents for Dish Network Wireless Joey
- Page 1 Wireless Joey GETTING STARTED GUIDE...
- Page 2 For Your Safety Warning: Do not try to open the case of the Wireless Joey™ receiver. There is risk of electrical shock, which may cause damage to the Wireless Joey and/or personal injury or death to you. There are no user-serviceable parts inside the Wireless Joey receiver.
- Page 3 Copyright © 2014. EchoStar Technologies L.L.C., Englewood, Colorado 80112. All rights reserved. The information in this Wireless Joey Getting Started Guide may change without notice. Revisions may be issued to tell you about such changes. Send comments or questions about this Wireless Joey Getting Started Guide to techpubs@echostar.com or...
- Page 4 The power plug must be readily accessible so that the apparatus can be easily disconnected from the AC power. The Wireless Joey™ receiver is still connected to the AC power whenever it is plugged into a live power outlet, even if it is turned off using the remote control or front panel buttons.
- Page 5 Important Safety Instructions, continued Never insert objects of any kind into the receiver through openings, as the objects may touch dangerous voltage points or short out parts. This could cause fire or electrical shock. Do not locate the antenna near overhead light or power circuits, or where it can fall into such power lines or circuits.
- Page 6 Important Safety Instructions, continued If this equipment does cause harmful interference to radio or television reception, which can be determined by turning the equipment off and on, the user is encouraged to try to correct the interference by one or more of the following measures: •...
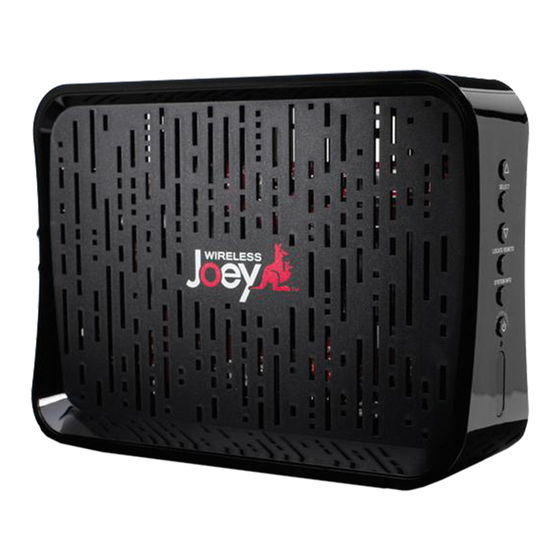
- Page 7 Wireless Joey Receiver With the Wireless Joey™ receiver, watch and record up to 6 channels of high-definition (HD) and standard-definition (SD) programming, while having the next-generation of TV content delivered, including multimedia services over IP-based networks. The Wireless Joey receiver uses WiFi signals to connect to the Wireless Joey Access Point™, which uses...
-
Page 8: Front Panel Controls
Wireless Joey Receiver, continued The front and back panels of the Wireless Joey receiver are provided below. Front Panel Controls Rear Panel Connections Ethernet Connects to the broadband home Up/Down Arrows network Navigate through menus or channels USB Port Connects to... - Page 9 SAT Mode To use the features described in this section, make sure you are in SAT mode by pressing the SAT Mode button. Use SAT Mode to control the Wireless Joey receiver. Note: Some features may not be available. Power & TV Power...
- Page 10 TV Mode To use the features described in this section, make sure you are in TV mode by pressing the TV Mode button. Remote programming is required. Note: Some features may not be available depending on your model. Press this button Power &...
- Page 11 DVD Mode To use the features described in this section, make sure you are in DVD mode by pressing the DVD Mode button. In addition to operating a DVD player, you can also use this mode to operate a VCR or Blu-ray Disc™ (BD) player. Remote programming is required.
- Page 12 DVR Functions • Displays a list of recorded programs. • Plays a live or recorded program. • Pauses a live or recorded program. • Stops recording a program or playing a recorded program. • Records a program. • Press BACK once to reverse the program four times as fast as normal play.
- Page 13 DVR Functions, continued • Press FWD (Forward) once to fast-forward through the program four times normal speed. Press FWD twice to forward at 15 times normal speed, three times to forward at 60 times normal speed, and four times to forward at 300 times normal speed. The on- screen bar shows how far you have gone.
- Page 14 Using Remote Button Shortcuts In addition to their normal functions, some buttons on your remote control have special shortcut functions. These shortcuts are enabled while navigating the on-screen Electronic Program Guide (EPG) or viewing the scrollable list of events. DVR Buttons The following table lists some of these shortcuts for the gray set of buttons that normally control your DVR functions.
- Page 15 Using Remote Button Shortcuts, continued Colored Buttons The following table lists some of the shortcuts for the colored set of buttons on your remote control. Note: Scheduled updates to your receiver software may add to or modify these shortcuts. Buttons From Live TV Elsewhere Jumps to menu bar and...
- Page 16 Inserting the Batteries Pull the remote battery cover off. Insert 4 AAA batteries of the same type and kind, making sure to match the plus (+) ends with the plus markings on the battery case. Replace the remote battery cover.
- Page 17 Connecting to Home Network The Wireless Joey receiver uses Wi-Fi to connect to a Wireless Joey Access Point, which uses an Ethernet connection to connect to your Home Network, making it possible to share programming and recorded content. Note: Using the Wireless Joey Access Point Installation Instructions, set up your Wireless Joey Access Point first before starting this procedure.
- Page 18 Connecting to Home Network, continued Turn on the Wireless Joey receiver and TV. Change your TV to the correct input or source using the remote that came with the TV. Consult your TV user’s guide for assistance. Turn up the volume on your TV and confirm you have sound.
- Page 19 Connecting to Home Network, continued Press SELECT on the front panel of the Wireless Joey to begin the Wireless Joey Installation Wizard. Press the WPS button on the front panel of the Wireless Joey Access Point to begin the Wireless Joey...
- Page 20 Connecting to Home Network, continued When the Wireless Joey connects to the Wireless Joey Access Point, it then connects to a Hopper receiver. The Starting Up screen appears. The cursor appears on the screen. After a few minutes, the Receiver Setup Wizard screen appears.
- Page 21 Press PAIR on your remote. The Pair Remote option becomes highlighted. Select a Location Name for the Wireless Joey and select Next. The system updates the software and reboots; this process takes several minutes. If your connection is recognized, the video resolution is correctly selected;...
- Page 22 If the Wireless Joey finds more than one Hopper, select the Hopper to which you want to link the Wireless Joey. To link the Wireless Joey to the Hopper receiver, press Select. Select Save. This step takes several minutes to complete.
- Page 23 Programming Remote to Control Another Device You can program your DISH remote to control another device, such as a TV, DVD, Blu-ray Disc™ player, VCR, audio receiver, or ampliflier. The receiver scans the database of codes for the particular device and tries each code.
- Page 24 Programming Remote to Control Another Device, continued Scroll the Sort By (or Aux Device) list to Sort by position the selected option within the blue highlight bar. Highlight the device’s name in the Brand list Brand and select Next. RadioShack Realistic Reoc RevolutionHD...
- Page 25 Programming Remote to Control Another Device, continued Using the remote, turn the device on and try some other remote buttons to make sure they work. When finished, press and release SAT to switch modes. If the code worked for other buttons, select Yes and continue to step 11.
- Page 26 Setting Parental Controls To place parental controls on the programming coming to the TV connected to this Wireless Joey receiver, you can either copy the settings from the Hopper or Hopper with Sling receiver, or you can set different parental controls for your Wireless Joey receiver. To...
- Page 27 Setting Parental Controls, continued Select one of the following from Ratings Ratings Restrictions: Restrictions • None None • • Medium Medium • High High Select Yes to hide adult channels or Hide Adult leave No selected. Channels Select Yes to restrict purchases or Restrict leave No selected.
- Page 28 Sharing Content If all tuners are in use, you may either join one of the events or watch a program found under PrimeTime Anytime™, On Demand, or recorded on the DVR. Press the red button to display the TV Viewing Status screen. You may join a program that is being displayed on another TV on your home network or...
- Page 29 Backing Up Settings After setting up the remote and the Wireless Joey receiver, you can back up your settings. If you back up your settings, you can easily restore your settings. Press MENU, select Settings, and then select System Wizard.
- Page 30 Restoring Settings If you should lose settings that have been backed up (see Backing Up Settings on page 23), you can restore the remote and receiver settings. Press MENU, select Settings, and then select System Wizard. If you are setting up a new remote Restore and used Backup with the previous remote, click on Restore to restore...
- Page 31 Locating the Remote When you are looking for the remote, try the LOCATE REMOTE feature on the front panel of the Wireless Joey receiver. Press LOCATE REMOTE on the front panel of the Wireless Joey receiver. LOCATE REMOTE If the missing remote control is paired to...
- Page 32 • Visit mydish.com/support. There is no picture on the TV after connecting it to the Wireless Joey receiver. What to do: Check that all connections are hand-tightened. Verify that DISH programming is displaying on the Hopper or the Hopper with Sling receiver.
- Page 33 What to do: Make sure your TV is tuned to the correct channel. Make sure the cables are completely and correctly connected from the Wireless Joey receiver to the TV and from the Wireless Joey receiver to the home network.
- Page 34 Troubleshooting, continued If your remote is showing that it is paired but isn’t working, select Un-Pair on the System Info screen and listen for the confirmation tone. Press PAIR to pair the remote again. If you do not hear the tone, continue with the next suggestion.
- Page 35 This warranty extends only to the original user of the equipment and is limited to the purchase price of each part. DISH Network L.L.C. and its affiliated companies (“DISH”) warrant this system against defects in materials or workmanship as follows:...
- Page 36 Limited Warranty, continued Legal Limitations REPLACEMENT AS PROVIDED UNDER THIS WARRANTY IS YOUR EXCLUSIVE REMEDY. DISH SHALL NOT BE HELD LIABLE FOR ANY INCIDENTAL OR CONSEQUENTIAL DAMAGES FOR BREACH OF ANY EXPRESSED OR IMPLIED WARRANTY ON THIS SYSTEM, NOR FOR ANY INCIDENTAL OR CONSEQUENTIAL DAMAGES RESULTING FROM THE USE OF, OR INABILITY TO USE, THIS SYSTEM.
- Page 37 DISH Exchange Program DISH offers two options if you need to replace your satellite receiver equipment or its accessories. Advance Exchange Program The Advance Exchange Program allows you to have replacement equipment shipped immediately to you (depending upon where you live, it could take three to five business days). Along with replacement equipment, you will receive a prepaid shipping label and instructions on how to return the defective equipment.
- Page 38 FCC Compliance The following text is extracted from Federal Communications Commission (FCC) regulations, as of the publication date of this User’s Guide. Contact the FCC (see following) or your library for the complete text of the regulations. This device complies with Part 15 of FCC Rules. Operation is subject to the following two conditions: This device may not cause harmful interference This device must accept any interference received, including interference that...
- Page 39 The software contained in the receiver may reference, display, link to, and provide users access to web services, sites, and information located worldwide through the Internet. Because EchoStar Corporation and DISH Network have no control over such sites and information, we make no representations, warranties or guarantees as to...
- Page 40 If You Need Help 1. Review the Hopper, Hopper with Sling, and Wireless Joey receiver guides available at mydish.com/ manuals. 2. See Troubleshooting on page 26. 3. On your receiver, select the Help tile from the Main Menu 4. Visit mydish.com/chat for 24/7 support. 5.
- Page 41 Pause 6 Restore Settings 24 Play 6 Record 6 Skip Back 6 SAT mode 3 Skip Forward 7 Set up Wireless Joey Receiver 11 Stop 6 Share Content 22 Exchange Program 31 Troubleshooting 26 TV mode 4 FCC 32 Front Panel Controls 2...
- Page 42 Center. Note: Some of the items listed below may not be used at this time. Purchase Location Name: Purchase Location Telephone Number: Wireless Joey Receiver Serial Number: Wireless Joey Receiver Smart Card Conditional Access Number: Remote Control Settings Television Code (TV Mode):...
- Page 43 For all your customer needs, go to www.mydish.com/chat or call the Customer Service Center at 1-800-333-DISH (3474)