Advertisement
Quick Links
Please Contact Moen First
For Installation Help, Missing or
Replacement Parts
(USA)
1-800-BUY-MOEN (1-800-289-6636)
Mon - Fri 8:00 AM to 7:00 PM, Eastern
Sat. 9:00 AM to 3:00 PM Eastern
WWW.MOEN.COM
(Canada)
1-800-465-6130
Mon - Fri 7:30 AM to 8:00 PM, Eastern
WWW.MOEN.CA
Por favor, contáctese primero con Moen
Para obtener ayuda de instalación, piezas
faltantes o de recambio
011 52 (800) 718-4345
Lunes a viernes de 8:00 a 20:00 hs.
(Costa Este)
Sáb. 8:00 a 18:30 hs. (Costa Este)
WWW.MOEN.COM.MX
Veuillez d'abord contacter Moen
En cas de problèmes avec l'installation, ou pour
obtenir toute pièce manquante ou de rechange
1-800-465-6130
Du lundi au vendredi :
de 7 h 30 à 20 h, HE
WWW.MOEN.CA
HELPFUL TOOLS
For safety and ease of faucet replacement, Moen recommends the use of these
helpful tools.
HERRAMIENTAS ÚTILES
Para que el cambio de la llave sea fácil y seguro, Moen le recomienda usar estas
útiles herramientas.
OUTILS UTILES
Par mesure de sécurité et pour faciliter l'installation, Moen suggère l'utilisation des
outils suivants.
Size 1-1/4" (32 mm)
Sellador
Tamaño 1-1/4" (32 mm)
Taille 1-1/4" (32 mm)
Sealant
Mastic
Installation Guide
Guía de Instalación
Guide d'installation
TWO-HANDLE ROMAN TUB VALVE WITH
DURA-GRIP™ MOUNTING SYSTEM
MODEL 4793
VÁLVULA PARA TINA ROMANA DE DOS
MANERALES CON SISTEMA DE MONTAJE
DURA-GRIP™
MODELO 4793
SOUPAPE DE BAIGNOIRE ROMAINE À
DEUX POIGNÉES AVEC LE SYSTÈME DE
MONTAGE DURA-GRIP
MODÈLE 4793
CAUTION — TIPS FOR REMOVAL OF OLD FAUCET:
Always turn water supply OFF before removing existing faucet or disassembling the valve.
Open faucet handle to relieve water pressure and ensure that complete water shut-off has been
accomplished.
PRECAUCIÓN — CONSEJOS PARA CAMBIAR LA LLAVE MEZCLADORA:
Siempre CIERRE la toma de agua antes de quitar la llave existente o desmontar la válvula. Abra la
llave para liberar la presión, y asegúrese de que esté bien cerrada el agua.
ATTENTION — SUGGESTIONS POUR ENLEVER L'ANCIEN ROBINET:
Toujours couper l'alimentation en eau avant d' e nlever ou de démonter le robinet. Ouvrir le robinet
pour libérer la pression d' e au et pour s'assurer que l'alimentation en eau a bien été coupée.
INS2091C - 6/16
MC
Advertisement

Related Manuals for Moen 4793


Summary of Contents for Moen 4793
- Page 1 MODÈLE 4793 HERRAMIENTAS ÚTILES Para que el cambio de la llave sea fácil y seguro, Moen le recomienda usar estas CAUTION — TIPS FOR REMOVAL OF OLD FAUCET: útiles herramientas. Always turn water supply OFF before removing existing faucet or disassembling the valve.
-
Page 2: Parts List
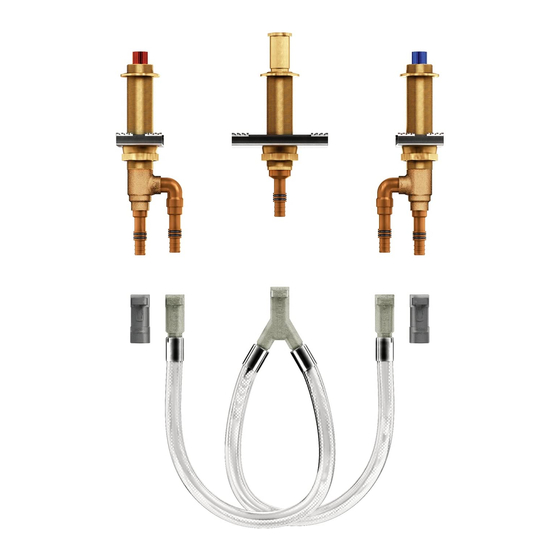
Parts List A. Protective Cap (x2) J. Adjustable Shank Assembly B. Test Plug K. Hose Assembly C. Protective Tube L. CPVC Adapter (x2) D. Top Mounting Nut (x3) M. Clip, Quick Connect (x5) E. Bracket, Valve (x2) N. Tool, Adjustable Shank F. - Page 3 INS2091C - 6/16 " x 3 (32mm) Assemble nuts (H), tapered bushings (G) and brackets (E & F) onto valves (I & O) and shank (J). Drill holes for the valves and spout 5" minimum on center. Position the spout hole so that spout delivers the water to the desired place in the tub.
- Page 4 1/8" (3mm) above 1/8" (3 mm) de 1/8 po (3 mm) au-dessus de la plate-forme une deck when complete. por encima de fois le montage terminé. la cubierta al completar el trabajo. Nut below groove on 1/8” valve (x2). (3mm) Tuerca debajo de la muesca de la válvula (x2).
- Page 5 INS2091C - 6/16 1-3/4" MAX. 1-1/4" MIN. Secure the hose assembly (K) with quick connect clips (M). For 5" – 8" centers between the For Finished Deck Only: Adjust spout shank (J) to 1-1/4"-1-3/4" above finishetd deck. Tighten valve and spout shank, loop the hose (K) as shown. For 9" – 12" centers, do not loop. nut with tool (N) †...
- Page 6 Install test plug (B). Place protective tube (C) over center shank assembly (J) and protective caps (A) over valves (I & O). Coloque un tapón de prueba (B). Coloque el tubo protector (C) sobre el conjunto del tubo roscado central (J), y las tapas protec- Installer le bouchon d’...
- Page 7 INS2091C - 6/16 NOTES NOTAS NOTES...
- Page 8 Il suffit d’écrire area code and telephone number. estado a otro o de una provincia o nación a otra. Moen lo à Moen inc. à l’adresse indiquée ci-dessous, pour expli- asesorará en el procedimiento a seguir para hacer válida quer le défaut, d’inclure une preuve d’achat, d’inscrire...