Table of Contents
Advertisement
Advertisement
Table of Contents

Related Manuals for NEC Dterm DTZ-8R-1


Summary of Contents for NEC Dterm DTZ-8R-1
- Page 1 term Cordless DECT ® Owner’s Manual DTZ-8R-1 NDA-31627 ISSUE 1.0...
- Page 3 Corporation of America. This document has been prepared for the use of employees and customers of Corporation of America and may not be reproduced without prior written approval of Corporation of America. term is a registered trademark of NEC Corporation. Copyright 2017 Corporation of America 3929 W John Carpenter Fwy Irving, TX 75063...
-
Page 5: Table Of Contents
TABLE OF CONTENTS Chapter 1 Specifications and Safety Information Section 1 Regulatory Information ............1-1 Certification Label ............. 1-1 Safety Information ............1-1 Radio Frequency Interference ..........1-1 Hearing Aid Compatibility and Volume Control ...... 1-2 Section 2 Specifications ................. 1-2 General ................ - Page 6 Issue 1.0 Handset ................2-4 Base Unit ................. 2-5 Cordless Handset/Desk Phone Switch (Base Key Option) ..2-6 Charging Unit ..............2-7 Chapter 3 Installation Section 1 Selecting a Location ............... 3-1 Section 2 Installation Precautions ............3-1 Section 3 Connecting the Telephone Cords ..........
- Page 7 Issue 1.0 Chapter 6 Setup and Operation Section 1 Setting Up and Programming the DTZ-8R-1 ......6-1 Programming Mode ............6-1 1.1.1 Training Mode (Entry) ............ 6-1 1.1.2 Training Mode (Next Key [Softkey1] – Select Item) ... 6-2 1.1.3 Training Mode (Func Key [Softkey2] – Change Item) ..6-2 1.1.4 Training Mode (Back Key [Softkey4] –...
- Page 8 Issue 1.0 Chapter 7 Handset Feature Settings Section 1 Handset Features ..............7-1 Section 2 Main Menu ................7-2 Accessing the Main Menu ........... 7-2 Section 3 Main Menu Selections ............. 7-3 Contacts ................7-3 3.1.1 List All Contacts ............7-3 3.1.2 Show Individual Contacts ..........
- Page 9 Issue 1.0 Section 4 Additional Handset Features ..........7-26 Virtual Function Keys ............7-26 Owner’s Manual...
- Page 10 Issue 1.0 Table of Contents...
- Page 11 LIST OF FIGURES AND TABLES term Chapter 2 About the D Cordless DECT term Figure 2-1 System Overview .............. 2-1 term Figure 2-2 Items Included with the D Cordless DECT ........ 2-2 Figure 2-3 DTZ-8R-1 Handset Controls and Functions ........2-4 Figure 2-4 Base Unit Controls and Functions ..........
-
Page 12: Issue
Issue 1.0 Chapter 5 Optional Equipment Installation Figure 5-1 Optional Accessories and Replacement Parts ......... 5-1 Figure 5-2 Installing the Headset ..............5-2 viii List of Figures and Tables... -
Page 13: Chapter 1 Specifications And Safety Information
Chapter 1 Specifications and Safety Information This chapter provides specification and safety information for the DTZ-8R-1. ECTION EGULATORY NFORMATION Certification Label The product certification label can be found on the bottom surface of the main unit and inside the battery compartment of the handset. These labels have important safety and regulatory compliance information. -
Page 14: Hearing Aid Compatibility And Volume Control
Issue 1.0 Reorient or relocate the receiving antenna. Increase the separation between the equipment and receiver. Connect the equipment into an outlet on a circuit different from that to which the receiver is connected. Consult the dealer or an experienced radio/TV technician for help. ... -
Page 15: Handset
Issue 1.0 Handset Any Key Answer Yes (White) Back Light - LCD Yes (White) Back Light - Keys Yes (Orange) Battery Capacity 910 mAh, 2.4V Channel Change Auto Handsfree Handsfree Volume Control Headset Jack Headset Volume Control Hearing Aid Compatible LCD Display 240 x 320 dots (QVGA) Out of Range Detection... -
Page 16: Battery Safety
Issue 1.0 ECTION ATTERY AFETY To reduce the risk of fire or injury to persons by the batteries, read and follow these instructions. NOTE This equipment contains rechargeable nickel-metal hydride (Ni-MH) batteries. Do not short-circuit the batteries. Do not charge the rechargeable Ni-MH batteries used in this equipment in any ... - Page 17 Issue 1.0 To protect the product from overheating, do not block or cover any slots or openings in the base unit. This product should never be placed near or over a radiator or heat register. This product should not be placed in a small enclosure unless proper ventilation is provided.
-
Page 18: Privacy
This telephone is no exception. Changes or modifications to this product not expressly approved by NEC Corporation of America, or operation of this product in any way other than as detailed by this manual, could void your authority CAUTION to operate this product. -
Page 19: Radio Interference
Issue 1.0 the operation of your unit. However, your telephone company must give adequate notice in writing prior to such actions to allow you time for making necessary arrangements to continue uninterrupted service. If you are having trouble with your telephone service, you must first disconnect your telephone to determine if it is the cause of your problem. - Page 20 Issue 1.0 Multiple base and handset units should not be closer than 20 feet (6m) at any time. Radio interference causes interruptions in conversation. When this happens, your unit is not defective. When noise continues, move to a different location while you talk.
-
Page 21: Chapter 2 About The D
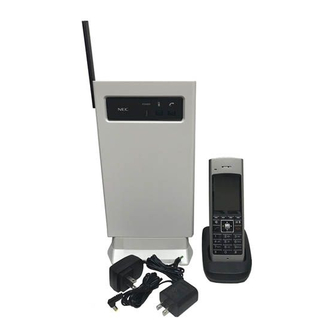
ECTION VERVIEW term The DTZ-8R-1 (D Cordless DECT) is a cordless telephone for the NEC PBX (Private Branch Exchange) or key telephone system. It is designed for use in the term office environment. Optionally, an NEC D multiline (wired) desk phone (such as DT400 series) can be connected. -
Page 22: Items Included With The D
Issue 1.0 The Cordless Handset and wired telephone cannot be used at the same ❍ time. CAUTION The Handset and Base Station must have the original ID that is written ❍ on each unit at the factory. term DECT ECTION TEMS NCLUDED WITH THE ORDLESS... -
Page 23: Features Of The Cordless Telephone
Wall Mountable Separate Charging Unit Easy Installation Compact Handset Design Use with an NEC Digital Multiline Telephone On the SV9100, the Dterm Cordless DECT can be used in conjunction with the DTL and DTZ multiline telephones. term... -
Page 24: Handset
Issue 1.0 Handset The handset is used to make/receive calls. The various buttons and LCD provide access to and provide indication of the various functions and operations of the phone. Figure 2-3 DTZ-8R-1 Handset Controls and Functions on page 2-4 provides a layout of various controls and functions available with the handset. -
Page 25: Base Unit
Issue 1.0 Base Unit term The Base Unit allows users to switch between the D Cordless DECT phone and the wired (desk) phone by using the Desk/Cordless buttons on the unit. Figure 2-4 Base Unit Controls and Functions BOTTOM VIEW FRONT VIEW Power LED Modular Jacks... -
Page 26: Cordless Handset/Desk Phone Switch (Base Key Option)
Issue 1.0 Cordless Handset/Desk Phone Switch (Base Key Option) It is possible to select between cordless handset operation and desk phone operation using the cordless handset. To enable this feature, the Base Key Option setting must be set to On. (Base Key Option is set to Off by default.) To enter the Base Key Option setting: Press the Mute/Menu key followed by 1, 2, 3, # on the numeric keypad. -
Page 27: Charging Unit
Issue 1.0 Charging Unit The Charging Unit is used to recharge the batteries in the handset. Figure 2-5 Charging Unit Owner’s Manual... - Page 28 Issue 1.0 term About the D Cordless DECT...
-
Page 29: Chapter 3 Installation
Chapter 3 Installation ECTION ELECTING A OCATION term Select a location for the D Cordless DECT to avoid excessive heat or humidity. term The base unit of the D Cordless DECT can be placed on a desk or tabletop near a standard 120 Vac outlet and telephone line jack. - Page 30 Issue 1.0 To connect the telephone cords: Connect one line cord from NEC’s PBX (or key system) digital station port to term the Line In connector on the D Cordless DECT base unit. Connect another term line cord from the Line Out connector to a qualified D multiline telephone.
-
Page 31: Applying Power To The Charging Unit
Issue 1.0 ECTION PPLYING OWER TO THE HARGING The unique design of the telephone allows the user to place the handset in the charging unit with or without the belt clip attached. Connect the AC adapter with the green tip to the charging unit and to a suitable AC power source. -
Page 32: Wall Installation
Issue 1.0 ECTION NSTALLATION The DTZ-8R-1 does not support wall plate mounting. IMPORTANT Mounting the Base Directly to the Wall Before mounting the telephone, consider the following: Select a location away from electrical cables, pipes, or other items behind the ... - Page 33 Plug one end of the short telephone cord (locally supplied) into the LINE jack on the base unit. If the NEC multiline (wired) phone is used, connect a line cord from the LINE OUT jack on the base unit to the multiline phone.
-
Page 34: Attaching And Removing The Belt Clip
Issue 1.0 ECTION TTACHING AND EMOVING THE A belt clip can be used to attach the handset to a belt or pocket for convenient portability. Slide the clip into the tab slots. Press firmly until it snaps into place. The belt clip is designed to fit snugly onto the handset. -
Page 35: Section 3 Battery Safety
Issue 1.0 ECTION NSTALLING THE ANDSET ATTERIES Before installing batteries, refer to Chapter 1 Specifications and Safety Information, Section 3 Battery Safety on page 1-4. It is important to follow safety regulations when handling batteries. Remove the battery cover by pressing the latch and sliding the cover down and off of the handset. -
Page 36: Charging Batteries
Issue 1.0 Replace the cover and slide it up until it latches onto the handset. Figure 3-9 Replacing the Battery Cover ECTION HARGING ATTERIES Charging the Handset Batteries The rechargeable batteries must be fully charged before using the handset for the first time. -
Page 37: Low Battery Indicator
Issue 1.0 ECTION ATTERY NDICATOR Low Battery The handset has visual and audible indicators to warn of a low battery condition. Figure 3-11 Low Battery Indicator Low Battery Indication In Standby Mode The Battery Status icon in the LCD changes to battery low. The “Charge Battery”... -
Page 38: Section 10 Cleaning The Battery Charging Contacts
Issue 1.0 The following table indicates what occurs and the action to be taken during a call or in Standby Mode when low battery indication is displayed. On a Call In Standby Mode What occurs when Battery icon message blinks: Handset beeps once every 30 seconds Charge Battery message blinks Action:... -
Page 39: Chapter 4 D Term Handset, Base Unit And Charging Unit
Chapter 4 term Handset, Base Unit and Charging Unit ECTION ANDSET ONTROLS term The operations of the D are performed using the handset. The HOLD, CONF (conference), TRANS (transfer), REDIAL, TALK, MUTE and ringer volume are located on the handset and are used to control various functions. Refer to Figure 4-1 Handset Controls for a diagram of the Handset controls and to... -
Page 40: Handset Controls
Issue 1.0 Handset Controls Table 4-1 Handset Control Functions Condition Action Press HOLD on the front of the handset to place an existing call on hold. HOLD Press CONF on the front of the handset to add a call to a conference. CONF Press TRANS on the front of the handset to transfer a call. - Page 41 Issue 1.0 Table 4-1 Handset Control Functions (Continued) Condition Action Ringer Volume To adjust the ringer volume press the Volume softkey (in Standby mode), then use the Up/Down arrow keys to adjust the ringer volume. You can choose from four different settings: ...
- Page 42 Issue 1.0 Figure 4-2 Base Unit Controls and Functions FRONT VIEW BACK VIEW BOTTOM VIEW Power LED Stand Cordless Phone Select Power Adapter Jack Button and LED Desk Phone Select Modular Jacks Button and LED term Handset, Base Unit and Charging Unit...
-
Page 43: Chapter 5 Optional Equipment Installation
Chapter 5 Optional Equipment Installation ECTION EPLACEMENT ARTS AND PTIONAL CCESSORIES Optional accessories and replacement parts can be obtained by contacting your NEC representative. Figure 5-1 Optional Accessories and Replacement Parts AAA Ni-MH Belt Clip Telephone Cord Adapter for Base Unit... -
Page 44: Installing The Optional Headset
Issue 1.0 ECTION NSTALLING THE PTIONAL EADSET term The optional headset provides a handsfree option for the D Cordless DECT. With the headset installed, the user can use the belt clip the carry the handset and conduct a conversation using the headset. The second handset must be keyed to operate with the base unit. -
Page 45: Chapter 6 Setup And Operation
Chapter 6 Setup and Operation DTZ-8R-1 ECTION ETTING P AND ROGRAMMING THE The screens in this section are system-dependent and may not match your handset. IMPORTANT Programming Mode 1.1.1 Training Mode (Entry) To enter Training mode: Press and hold and # at the same time and then press the TALK key. The handset emits a confirmation tone and enters Training mode. - Page 46 Issue 1.0 1.1.2 Training Mode (Next Key [Softkey1] – Select Item) To select an item: Press the Next key. The items in the display change in the following sequence: F1(TALK) F2(TALK) F3(TALK) F4(TALK) F5(TALK) F6(TALK) ...
- Page 47 Issue 1.0 F 1 = L K 0 1 [▼] press up key F 1 = L K 0 2 [▼] press up key F 1 = L K 0 3 [▼] press up key F 1 = L K 0 4 [▼] press up key F 1 = L K 0 5 [▼] press up key...
- Page 48 Issue 1.0 F 1 = L K 1 0 [▼] press up key F 1 = L K 1 1 [▼] press up key F 1 = L K 1 2 [▼] press up key F 1 = L K 1 3 [▼] press up key F 1 = L K 1 4 [▼] press up key...
-
Page 49: Handset Operation
ANDSET PERATION This operation is one of the examples for the DTZ-8R-1 with an NEC PBX. As a result, it might be different from actual operation on your system. Operation of DTZ-8R-1 in digital mode depends on each PBX specification. -
Page 50: Making A Call To Another Extension
Issue 1.0 Making a Call to Another Extension To make a call to another extension: Press the TALK key on the handset. The handset tries to connect to the base station while the “ACQUIRING LINK” message blinks on the LCD. When connected, the handset goes into Talk mode and theTalk icon is turned on and displays the current volume. - Page 51 Issue 1.0 If the user dials 1,2, 3 the LCD displays the dialed number as they are pressed. Talk Speaker When Base Station is not connected to a PBX, the handset displays “DISCONNECT”. D I S C O N N E C T When the handset cannot connect to the base station, an error tone is emitted and ...
- Page 52 Issue 1.0 The LCD displays the message, indicating the call is taking place. Talk Speaker When the called party answers, the LCD displays a message to indicate the phone is in Talk mode. Talk Speaker Setup and Operation...
-
Page 53: Connection Considerations
Issue 1.0 2.2.1 Connection Considerations When the base station is not connected to the PBX, the handset displays “DISCONNECT”. When the handset does not connect to the base station, an error tone is emitted and “Out of Range” message is displayed for five seconds. The handset then goes to standby mode. -
Page 54: Retrieving A Call To Another Extension
Issue 1.0 Retrieving a Call to Another Extension To retrieve a call from another extension: When an incoming call is received from another extension, the handset goes into Incoming Call mode. The display indicates there is an incoming call. Answering a call on the secondary line will differ depending on ❍... -
Page 55: Making Call To Outside Line
Issue 1.0 Once the handset connects to the base station, the Talk icon and the volume indicator display. After you answer the call, the station number of the calling party displays. Making Call to Outside Line To make an external call: Press the Select key on the handset and select F1. - Page 56 Issue 1.0 When the RF connection is established, the handset goes into Talk mode and the Talk icon and the volume indicator display. The F1 LED also lights. When the outside line is not connected with the PBX, “HANG UP” is ...
-
Page 57: Receiving A Call From An Outside Line (Depends On Pbx Line)
Issue 1.0 If the user dials 1,2, 3 the LCD displays the dialed number as they are pressed. Talk Speaker Receiving a Call from an Outside Line (Depends on PBX Line) To receive a call from an external line: When you receive an incoming external call, the F1 LED blinks. Owner’s Manual 6-13... - Page 58 Issue 1.0 If you press either the Talk or dial pad keys (0~9, #) or pick the handset from the cradle, the handset connects to the base station and “ACQUIRING LINK” displays. If you press the F1 (select key up/down select key), the handset ...
-
Page 59: Redial (Option)
Issue 1.0 Redial (Option) When the RF link is established between the handset and the base station, you can press the REDIAL key. The last number dialed is shown and the digits dialed are sent to the base station. An error tone is emitted when redial is empty. ❍... -
Page 60: Pbx No Service
Issue 1.0 PBX No Service When the base station is linked to a wired telephone and you press the TALK or Speaker key, there is know acknowledgment from the PBX. The handset goes into Standby mode and the LCD displays “ACQUIRING LINK”. The handset does not emit a tone when it goes into Standby mode. - Page 61 Issue 1.0 When Establishing an RF Link If the TALK or Speaker key is pressed but the handset cannot establish an RF Link with the base station, the handset emits an error tone and displays the message “Out of Range”. ...
-
Page 62: 2.10 Low Battery
Issue 1.0 2.10 Low Battery The handset has visual and audible indicators to warn of a low battery condition. In Standby Mode The Battery Status icon in the LCD changes to battery low. The “Charge Battery” message blinks on the LCD (ON: 600msec, OFF: 600msec). -
Page 63: 2.14 Headset
Issue 1.0 2.14 Headset To put the handset into Headset mode: Insert the headset plug in headset jack while in Talk mode or Handsfree Talk mode. The handset switches to the headset. In the headset condition, the user can change Handsfree mode to Talk mode. ... -
Page 64: 2.17 Ringer Mute
Issue 1.0 The handset remains in Ringer Volume Setting mode for two seconds ❍ unless keys are pressed. You can use the handset to change the ringer volume while in NOTE ❍ Incoming Call mode. The ringer volume does not appear on the display. -
Page 65: Section 1 Handset Features
Chapter 7 Handset Feature Settings ECTION ANDSET EATURES The screens in this section are system-dependent and may not match your handset. IMPORTANT The handset menu provides access to various features, which you can customize. These features include: Contacts List - allows you to add and modify your contacts list. ... -
Page 66: Main Menu
Issue 1.0 ECTION The screens in this section are system-dependent and may not match your handset. IMPORTANT The handset main menu provides access to the various features. The features that are available from the Main menu, allow you to modify various settings as well as access to administrative features. -
Page 67: Main Menu Selections
Issue 1.0 ECTION ELECTIONS Contacts The screens in this section are system-dependent and may not match your handset. IMPORTANT The Contacts menu item allows you to add, edit, delete or dial your contact members. Use the up/down keys to select the Contacts menu item. Once the Contact menu is displayed, you can make the appropriate changes using the Select key. -
Page 68: Show Individual Contacts
Issue 1.0 3.1.2 Show Individual Contacts Keys available for showing individual contact members include: To select contacts: ▲ ▼ up ( ) / down ( ) - accesses the next contact in the list (forward/backward). Back key - returns to the List screen. To edit contacts: Delete key (Softkey 1) - deletes the contents of the selected contact. -
Page 69: Delete Contacts
Issue 1.0 3.1.3 Delete Contacts Select the contact using the Select key. Once the contact is selected, you can delete it. Keys available for deleting a a contact include: To delete contacts: Yes key - deletes the contact from the list, emits a confirmation tone and returns the display to the previous screen. - Page 70 Issue 1.0 Keys available for editing/adding contact members include: Back key - returns to the previous screen. Next key - accesses the Number Edit screen. 123/abc key - toggles between numeric and alphabetic ‘keypad’. 123 - allows numeric input. abc - allows alphabetic input. Delete key - deletes a character.
- Page 71 Issue 1.0 Contact Numbers If adding a new contact, enter the number you wish to assign to the contact. If you are editing an existing contact, change the number used to dial the contact. A contact number is a maximum of 24 digits. If the number is over 16 ...
-
Page 72: Settings
Issue 1.0 Settings The settings menu items allows you to access and modify the DTZ-8R-1 settings. Use the up/down keys to select the setting options. Once the settings menu is displayed, select the settings using the Select key. 3.2.1 List Settings Keys available for listing settings options include: To select settings:... -
Page 73: Brightness Settings
Issue 1.0 3.2.3 Brightness Settings Keys available for brightness settings include: Default = MAX. MAX = 100% HIGH = 80% MID = 60% LOW = 20% To select settings: ▲ ▼ up ( ) / down ( ) - accesses the next setting in the list (forward/backward). -
Page 74: Key Lock Settings
Issue 1.0 3.2.5 Key Lock Settings This menu item allows you to enable/disable the handset Key Lock function. To enable/disable the Key Lock function: Use up/down arrow to access On (to enable) or Off (to disable). Press Select. Enable/Disable Key Lock: Keys available for key lock settings include: Default = Off. -
Page 75: Sounds
Issue 1.0 Sounds The sounds menu items allows you to access and modify the DTZ-8R-1 ring tones, out of range alerts, key tones and turn vibrate on and off. Use the up/down keys to select the menu items. Once the settings menu is displayed, you can make the appropriate changes using the Select key. -
Page 76: Sounds Vibrate Settings
Issue 1.0 3.3.3 Sounds Vibrate Settings Keys available for listing vibrate settings include: Default = On. On = Vibrates when incoming calls are received Off = The phone does not vibrate. To select settings: ▲ ▼ up ( ) / down ( ) - accesses the next setting in the list (forward/backward). -
Page 77: Sounds Key Tone Settings
Issue 1.0 3.3.5 Sounds Key Tone Settings Keys available for sounds settings include: Default = On. On = Key Tone function is enabled Off = Key Tone function is disabled To select settings: ▲ ▼ up ( ) / down ( ) - accesses the next setting in the list (forward/backward). -
Page 78: Language
Issue 1.0 Language The language menu items allows you to access and modify the DTZ-8R-1 language settings. There are three languages available; English, French and Spanish. Use the up/down keys to select the menu items. Once the settings menu is displayed, you can make the appropriate changes using the Select key. -
Page 79: Administrator List Settings
Issue 1.0 3.5.1 Administrator List Settings Keys available for listing the administrator settings include: ▲ ▼ up ( ) / down ( ) - accesses the next setting in the list (forward/backward). Select key - selects the desired setting and displays the screen. - Page 80 Issue 1.0 Handset searches for the base station: Keys available when registering the handset include: Cancel key - exits registration mode. Enter Registration Pin: Keys available when registering the handset include: Default = 1234. Delete key - deletes one digit. Dial (0~9) key - numeric keys to used to enter the pin code.
- Page 81 Issue 1.0 Finish Registration: Keys available when registering the handset include: After five seconds, the handset switches to one of the following modes; depending on the success or failure of handset registration. If registration is successful, the handset switches to Standby mode. If the registration fails, the handset switches to De-register or Standby mode.
-
Page 82: Administrator De-Registration Settings
Issue 1.0 3.5.3 Administrator De-registration Settings This setting allows the administrator to de-register the handset. To de-register the handset: Use the up/down key to select the handset you want to de-register. Select Yes to de-register the handset. Select handset: The handset number is displayed. Keys available when de-registering the handset include: ▲... - Page 83 Issue 1.0 Finish Registration: Keys available when de-registering the handset include: If de-registration is successful, the LCD displays the message indicating the handset is not registered. You can register the handset again using the Regist key. Regist key - starts registration. If de-registration failed, the handset switches to Standby mode after five seconds have elapsed.
-
Page 84: Administrator Change Pin Code Settings
Issue 1.0 3.5.4 Administrator Change Pin Code Settings This setting allows the administrator to change the pin code. To change the pin code: Select Change Pin Code from the Administrator Setting List. Press the Select key. Change the pin code on the Change Pin Code screen. Press OK to register the new pin code. -
Page 85: Administrator Site Survey Settings
Issue 1.0 3.5.5 Administrator Site Survey Settings This setting allows the administrator to initiate a site survey to collect information about the handsets. To change the pin code: Select Site Survey from the Administrator Setting List. Press the Select key. On the Site Survey screen, press the Scan key. -
Page 86: Administrator Site Survey Settings - Sync Display Mode
Issue 1.0 Scan complete; information displayed: The results of the scan are displayed in the LCD. Band - the carrier band for the handset. Condition - Good / Fair / Poor Clear Slot - number of clear slots (total number of slots is 12). Number of Base - the number of the base station. -
Page 87: Function Key Labels
Issue 1.0 Function Key Labels The Key Label menu item allows you to assign, edit or delete labels for the eight function keys. To access the Key Labels menu: Select Key Labels from the main menu using the Select key. 3.6.1 Key Label List Settings This screen allows you to access the function key labels. -
Page 88: Key Label Name Edit Settings
Issue 1.0 3.6.2 Key Label Name Edit Settings This menu item allows you to edit the name of the function key label. A maximum of eight characters can be stored for each label. Keys available when changing the label name include: 123/abc key - toggles between numeric and alphabetic ‘keypad’. -
Page 89: Key Label Delete Label Settings
Issue 1.0 3.6.3 Key Label Delete Label Settings This menu item is used to delete a function key label name. This screen is displayed when the Delete key is pressed on the Edit Function Key Label screen. To delete the label name: Press Yes. -
Page 90: Virtual Function Keys
Issue 1.0 ECTION DDITIONAL ANDSET EATURES The screens in this section are system-dependent and may not match your handset. IMPORTANT Virtual Function Keys You can access virtual function keys by entering Virtual Function Key mode. You can enter Virtual Function Key mode while the handset is in Standby mode, when receiving an incoming call or while talking. - Page 91 INDEX Numerics certification label 1-1 change channel 1-3 16-hour talk time 1-3 channel 4-day standby time 1-3 automatic selection channel change 1-3 charger unit 2-7 buttons AC adapter 1-2 charging adapter 5-1 handset battery pack administrator stand change pin code 7-20 unit de-registration...
-
Page 92: Section 2 Installation Precautions
6-10 retrieve call from extension display 6-19 ring volume 6-20 ringer mute cordless switch to cordless NEC multiline terminal switch to wired phone 6-19 power volume setting line problems 1-6 power requirements lock keys 7-1 receive frequency size... - Page 93 2-3 power save single access key 2-3 site location 3-1 soft keys 1-3 NEC multiline terminal LED 4-3 sounds nickel-metal hydride batteries 1-4 7-13 key tone nickel-metal hydride battery 1-3 7-11 list Ni-MH batteries 1-4...
- Page 94 virtual function keys 7-26 volume control high maximum medium handset handsfree headset 6-19 setting wall mounting charging unit direct wall plate adapter 2-2 Index...
- Page 96 ® Cordless DECT Owner’s Manual DTZ-8R-1 NEC Corporation of America Issue 1.0...