
Related Manuals for GlucoRx 311-4277100 SERIES


Summary of Contents for GlucoRx 311-4277100 SERIES
- Page 1 Part no. 311-4277100-XXX Product name 機器說明書/GlucoRx Nexus & GlucoRx Nexus Blue/英文(DiME) Spec L148*W105mm/模造紙80P/黑/共44頁/騎馬釘 Designer Color K100...
- Page 2 & TD-4277 TD-4277B OWNER'S MANUAL...
- Page 4 Regular monitoring of your blood glucose levels can help you and your doctor gain better control of your diabetes. Due to its compact size and easy operation, you can use the GlucoRx Nexus / GlucoRx Nexus Blue Blood Glucose Monitoring System to easily monitor your blood glucose levels by yourself anywhere, any time.
-
Page 5: Important Safety Precautions
10.Proper maintenance and periodic control solution testing is essential to the longevity of your device. If you are concerned about your accuracy of measurement, please contact GlucoRx Customer Care on 01483 755133 for help. KEEP THESE INSTRUCTIONS IN A SAFE PLACE... -
Page 6: Table Of Contents
TABLE OF CONTENTS IMPORTANT SAFETY PRECAUTIONS BEFORE YOU BEGIN Important Information Intended Use Test Principle Contents of System Meter Overview Display Screen Test Strip SETTING YOUR METER THE FOUR MEASURING MODES BEFORE TESTING Control Solution Testing Performing a Control Solution Test TESTING WITH BLOOD SAMPLE Preparing your Lancing Device for Blood Testing Preparing the Puncture Site... - Page 7 MAINTENANCE Batteries Replacing the Batteries Caring for Your Meter Caring for Your Test Strips Caring for Your Carry Case Important Control Solution Information SYSTEM TROUBLESHOOTING Result Readings Error Messages Troubleshooting DETAILED INFORMATION SYMBOL INFORMATION SPECIFICATIONS...
-
Page 8: Before You Begin
Times 18 = mg/dL For example: 1) 120 mg/dL ÷ 18 = 6.6 mmol/L 2) 7.2 mmol/L x 18 = 129 mg/dL approximately. Your GlucoRx Nexus / GlucoRx Nexus Blue meter is preset to display results in mmol/L only. -
Page 9: Intended Use
Intended Use Your system is intended for use outside the body (in vitro diagnostic use) by people with diabetes at home and by healthcare professionals in clinical settings as an aid to monitor the effectiveness of diabetes control. It is intended to be used for the quantitative measurement of glucose (sugar) in fresh whole blood samples (from the finger, palm, forearm and upper arm). -
Page 10: Contents Of System
Contents of System Your new GlucoRx Nexus / GlucoRx Nexus Blue system kit includes: Meter Lancing Device with AST cap 2 x 1.5V AAA Alkaline Batteries Owner’s Manual Control Solution Warranty Card 10 Glucose Test Strips Quick Start User Guide... -
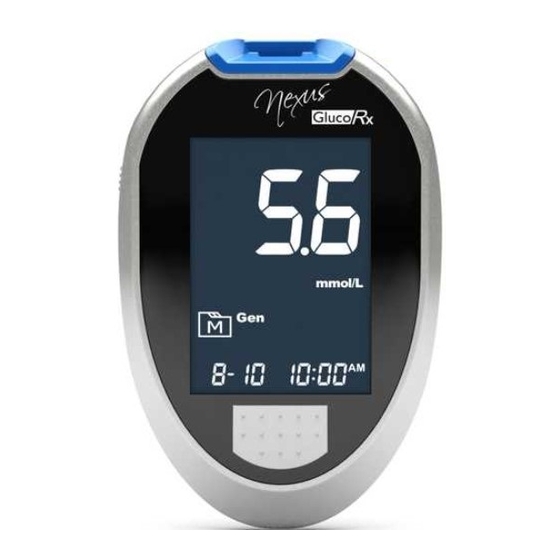
Page 11: Meter Overview
Enter the meter memory and silence a reminder alarm. TEST STRIP SLOT WITH STRIP INDICATION LIGHT Insert test strip here to turn the meter on for testing. BLUETOOTH INDICATOR LIGHT (for GlucoRx Nexus Blue) SET BUTTON Enter and confirm the meter settings. -
Page 12: Display Screen
Display Screen Blood Drop Symbol Low Battery Symbol Buzzer Measurement Unit Blood Glucose Test Result Reminder Alarms Ketone Warning Day Average Error Message Time Memory Mode Symbol Date Control Solution Mode AC/PC Measuring modes Test Strip Symbol... -
Page 13: Test Strip
The front side of the test strip should face up when inserting the test strip. Front Back NOTE The GlucoRx Nexus / GlucoRx Nexus Blue meter should only be used with GlucoRx Nexus Test Strips. Using other test strips with your meter can produce inaccurate results. -
Page 14: Setting Your Meter
SETTING YOUR METER Before using your meter for the first time or if you change the meter battery, you should check and update these settings. Make sure you complete the steps below and have your desired settings saved. To Enter the Setting Mode Start with the meter off (no test strip inserted). - Page 15 2. Setting the time format Press M button to select the desired time format --- 12h or 24h. Press SET. 3. Setting the time With the hour flashing, press and release M button to choose the correct hour. Press SET. With the minute flashing, press and release M button to choose the correct minute.
- Page 16 5. Setting a reminder alarm You may set up any or all of the reminder alarms (1-4). The meter displays “On” or “OFF” and press M button to turn on or turn off the first reminder alarm. Press M button to select “On”, then press SET to set the hour.
-
Page 17: The Four Measuring Modes
THE FOUR MEASURING MODES Your meter provides you with four modes for measuring General, AC, PC and QC. Modes Use when any time of day, regardless of time since General (displays as “Gen”) last meal no food intake for at least 8 hours 2 hours after a meal testing with the control solution You can switch between each mode by:... -
Page 18: Before Testing
BEFORE TESTING Control Solution Testing TaiDoc Control Solution contains a known amount of glucose that reacts with your test strips and is used to ensure your meter and strips are working together correctly. Do a control solution test when: you first receive your meter, at least once a week to routinely check your meter and test strips, you begin using a new vial of test strips, you suspect your meter or test strips are not working properly,... - Page 19 2. Press M button to mark this test as a control solution test. With “QC” displayed, the meter will store your test result in memory under “QC”. If you press M button again, the “QC” will disappear and this test is no longer a control solution test. WARNING When doing a control solution test, you have to mark it so that the test result will NOT mix with the blood glucose TEST RESULTS...
- Page 20 If you continue to have test results fall outside the range printed on your test strip vial, the meter and strips may not be working together properly. Do NOT test your blood. Contact GlucoRx Customer care on 01483 755133 for help.
-
Page 21: Testing With Blood Sample
TESTING WITH BLOOD SAMPLE NOTE To reduce the chance of infection: ■ Never share a lancet or the lancing device. GlucoRx Lancing device is for self-use only. ■ Always use a new, sterile lancet. Lancets are for single use only. -
Page 22: Performing A Blood Glucose Test
■ Fingertip testing Press the lancing device’s tip firmly against the side of your fingertip. Press the release button to prick your finger. A click indicates that the puncture is complete. ■ Blood from sites other than the fingertip Replace your lancing device cap with the clear cap for alternative site testing. - Page 23 2. Select the appropriate measuring mode by pressing M button. For selecting the measuring mode, please refer to the “FOUR MEASURING MODES” section. 3. Obtain a Blood Sample Use your pre-set lancing device to puncture the desired site. After penetration, discard the first drop of blood with a clean cotton swab.
- Page 24 Discard the used test strip and retest with a new one. If you have trouble filling the confirmation window, please contact your healthcare professional or GlucoRx Customer care on 01483 755133 for assistance. 5.Read the Result The result of your blood glucose test will appear after the meter counts to 0.
-
Page 25: About Alternative Site Testing (Ast)
About Alternative Site Testing (AST) Important: There are limitations with doing AST. Please consult your healthcare professional before you do AST. What is AST? Alternative site testing (AST) means that people use parts of the body other than fingertips to check their blood glucose levels. This system allows you to test on the palm, forearm and the upper arm with equivalent results to fingertip testing. -
Page 26: Meter Memory
METER MEMORY Your meter stores the 1000 most recent blood glucose test results along with respective dates and times in its memory. To enter the meter memory, start with your meter off. Reviewing Test Results 1. Press and release M button. will appear on the display. -
Page 27: Reviewing Blood Glucose Day Average Results
Reviewing Blood Glucose Day Average Results 1. Press and release M button When appears on the display, keep pressing M button for 3 seconds until the flashing “ ” appears. Release M button and then your 7-day average result measured in general mode will appear on the display. -
Page 28: Downloading Results Onto Acomputer
DOWNLOADING RESULTS ONTO A COMPUTER You can use Your GlucoRx Nexus meter with a USB cable and the GlucoRx Healthcare Software System to view test results on a personal computer. To learn more about this system or to obtain a USB cable separately, please contact GlucoRx Customer care on 01483 755133. -
Page 29: Bluetooth Pairing
Bluetooth indicator will turn to flash which means that the Bluetooth has been activated automatically. 3. Follow the instruction of your APP (GlucoRx Nexus Blue) to pair the device. (For example: Search to find the meter and then add it into app.) -
Page 30: Maintenance
MAINTENANCE Batteries Your meter comes with two 1.5V AAA size alkaline batteries. Low Battery Signal Your meter will display one of the below messages to alert you when the meter power is getting low. 1. The symbol appears along with display messages: Your meter is functional and the result remains accurate, but it is time to change the batteries. - Page 31 NOTE Replacing the batteries does not affect your test results stored in memory. As with all batteries, these batteries should be kept away from children. If swallowed, promptly seek medical assistance. Batteries may leak chemicals if unused for a long time. Remove the batteries if you are not going to use the device for an extended period (i.e.
-
Page 32: Caring For Your Meter
Caring for Your Meter To avoid your meter and test strips attracting dirt, dust or other contaminants, please wash and dry your hands thoroughly before use. Cleaning 1. To clean your meter exterior, wipe it with one disinfecting wipe (Example:Micro-Kill Plus™) to clean exposed surfaces thoroughly and remove any visible dirt, blood or any other body fluid with the wipe. -
Page 33: Caring For Your Test Strips
Keep the strip vial away from children since the cap and the test strip may be a choking hazard. If swallowed, promptly see a doctor for help. For further information, please refer to the GlucoRx Nexus test strip package insert. -
Page 34: Caring For Your Carry Case
Caring for Your Carry Case 1. Remove protective film attached to the sticky sheet before using for first time. 2. If the stickiness of the sticky sheet eventually worsens when too dirty, please remove the sticky sheet lightly. NOTE To prevent splitting, do not forcefully pull the sticky sheet out. -
Page 35: Important Control Solution Information
5. After drying completely, the sticky sheet can be restored. Place it back in the carry case for use. NOTE The sticky sheet will become less sticky the more you touch it, through transfer of your skin oils. Important Control Solution Information Use only TaiDoc control solution with your meter. -
Page 36: System Troubleshooting
SYSTEM TROUBLESHOOTING If you follow the recommended action but the problem persists, or error messages other than the ones below appear, please call GlucoRx Customer care on 01483 755133. Do not ever attempt to repair or dissemble your meter. Result Readings... -
Page 37: Error Messages
Repeat the test with a new test strip. If the meter still does Problem in operation. not work, please contact GlucoRx Customer care on 01483 755133 for assistance. Review the instructions and Appears when test repeat test with a new test strip is removed while strip. -
Page 38: Troubleshooting
Test strip inserted upside down or Insert the test strip with contact bar incompletely. end first and facing up. Please contact GlucoRx Customer Defective meter or test strips. care on 01483 755133. 2. If the test does not start after applying sample:... - Page 39 Control solution that is too warm or strips should be at room too cold. temperature (20°C-25°C / 68°F- 77°F) before testing. Defective test strip. Repeat the test with a new strip. Please contact GlucoRx Customer Meter malfunction. care on 01483 755133.
-
Page 40: Detailed Information
DETAILED INFORMATION Your meter provides you with plasma equivalent results. Normal blood glucose range for people with Time of day diabetes (mmol/L) Fasting and before meal 4 to 7 mmol/L 2 hours after meals < 9 mmol/L Source: Diabetes UK. Blood glucose target. Balance: No.234, 2010 April. P.69 Please work with your doctor to determine a target range that works best for you. -
Page 41: Specifications
Dimensions & Weight: 96 (L) x 61 (W) x 26 (H) mm, 67.2 g Power source: Two 1.5V AAA alkaline batteries Display: LCD Memory: 1000 measurement results with respective date and time External output: USB Cable (GlucoRx Nexus TD-4277) or Bluetooth (GlucoRx Nexus Blue TD-4277B) Auto electrode inserting detection Auto sample loading detection... - Page 45 B1-7F, No. 127, Wugong 2nd Rd., Wugu Dist., 24888 New Taipei City, Taiwan www.taidoc.com MedNet GmbH Borkstraβe 10, 48163 Mϋnster, Germany Distributed by GlucoRx Ltd. 4 Wintonlea, Monument Way West Woking, Surrey, GU21 5EN, UK Website: www.glucorx.co.uk Customer careline: 01483 755133 For self-testing.