Table of Contents
Advertisement
Advertisement
Table of Contents

Related Manuals for Baldor MicroFlex e100

Summary of Contents for Baldor MicroFlex e100
-
Page 3: Table Of Contents
......... 3-19 3.5.2 Motor power cable pin configuration - Baldor BSM rotary motors ..3-19 3.5.3... - Page 4 ..........6.1.1 Connecting the MicroFlex e100 to the PC ......
- Page 5 Starting the MicroFlex e100 ......6.2.1 Preliminary checks ..........
- Page 6 D.1.2 MicroFlex e100 compliance ........
-
Page 7: General Information
MicroFlex e100 is UL listed; file NMMS.E128059. Limited Warranty For a period of two (2) years from the date of original purchase, Baldor will repair or replace without charge controls and accessories that our examination proves to be defective in material or workmanship. -
Page 8: Safety Notice
www.baldormotion.com Product notice Only qualified personnel should attempt the start-up procedure or troubleshoot this equipment. This equipment may be connected to other machines that have rotating parts or parts that are controlled by this equipment. Improper use can cause serious or fatal injury. Safety Notice Intended use: These drives are intended for use in stationary ground based applications in industrial power installations according to the standards EN60204 and VDE0160. - Page 9 Peak torque of several times the rated motor torque CAUTION can occur during control failure. If the drive enable signal is already present when power is applied to the MicroFlex e100, the motor could begin to move immediately. CAUTION The metal heatsink on the left side of the MicroFlex e100 can become very hot during normal operation.
- Page 10 Violent jamming (stopping) of the motor during operation may damage the motor and drive. NOTICE Operating the MicroFlex e100 in Torque mode with no load attached to the motor can cause the motor to accelerate rapidly to excessive speed. NOTICE Do not tin (solder) exposed wires.
-
Page 11: Introduction
ETHERNET Powerlink devices. Programmable in Mint. MicroFlex e100 will operate with a large range of brushless rotary and linear servo motors. It can also operate induction motors using closed-loop vector control. For information on selecting Baldor servo motors, please see the sales brochure BR1202 available from your local Baldor representative. -
Page 12: Receiving And Inspection
MicroFlex e100. 5. If MicroFlex e100 is to be stored for several weeks before use, be sure that it is stored in a location that conforms to the storage humidity and temperature specifications shown in section 8.1.15. -
Page 13: Units And Abbreviations
www.baldormotion.com 2.3 Units and abbreviations The following units and abbreviations may appear in this manual: ....Volt (also VAC and VDC) ....Watt . - Page 14 www.baldormotion.com 2-4 Introduction MN1942...
-
Page 15: Basic Installation
Without the regeneration resistor, the drive may produce an overvoltage fault. All MicroFlex e100 models have overvoltage sensing circuitry. Regeneration resistors may be purchased separately - see Appendix A. A cooling fan may be required to allow operation of the MicroFlex e100 at full rated current (see section 3.2.2). MN1942... -
Page 16: Tools And Miscellaneous Hardware
* The Ethernet configuration used by a normal office PC is not suitable for direct communication with the MicroFlex e100. It is recommended to install a separate dedicated Ethernet adapter in the PC, which can be configured for use with the MicroFlex e100. See section 6.2.4. -
Page 17: Mechanical Installation And Cooling Requirements
The MicroFlex e100 must be secured by the slots in the flange. The protective earth/ground (the threaded hole on the top of the MicroFlex e100) must be bonded to a safety earth/ground using either a 25 A conductor or a conductor of three times the peak current rating - whichever is the greater. -
Page 18: Dimensions
www.baldormotion.com 3.2.1 Dimensions (3.2) 63.5 (0.4) (2.5) (0.2) Mounting hole and slot detail 5.5 mm Dimensions shown as: mm (inches). Depth: 157 mm (6.2 in) Weight: 3 A: 1.45 kg (3.2 lb) 6 A: 1.50 kg (3.3 lb) 9 A: 1.55 kg (3.4 lb) Figure 1 - Mounting and overall dimensions 3-4 Basic Installation MN1942... -
Page 19: Mounting And Cooling The Microflex E100
For effective cooling, the MicroFlex e100 must be mounted upright on a smooth vertical metal surface. The MicroFlex e100 is designed to operate in an ambient temperature of 0 °C to 45 °C (32 °F to 113 °F). Output current must be derated between 45 °C (113 °F) and the absolute maximum ambient temperature of 55 °C (131 °F). -
Page 20: Derating Characteristic - 3 A Model
www.baldormotion.com 3.2.3 Derating characteristic - 3 A model The following derating characteristics are for model MFE230A003. Single-phase AC supply 1 m/s forced air Natural cooling Ambient temperature (°C) Three-phase AC supply 1 m/s forced air Natural cooling Ambient temperature (°C) Notes: Load power factor = 0.75. -
Page 21: Derating Characteristic - 6 A Model
www.baldormotion.com 3.2.4 Derating characteristic - 6 A model The following derating characteristics are for model MFE230A006. Single-phase AC supply 1.5 m/s forced air 1 m/s forced air Natural cooling Ambient temperature (°C) Three-phase AC supply 1.5 m/s forced air 1 m/s forced air Natural cooling Ambient temperature (°C) Notes:... -
Page 22: Derating Characteristic - 9 A Model
3.2.6 Overtemperature trips The MicroFlex e100 contains internal temperature sensors that will cause it to trip and disable if the temperature exceeds 80 °C on the 3 A model, or 75 °C on the 6 A and 9 A models. This limit can be read using the TEMPERATURELIMITFATAL keyword - see the Mint help file for details. -
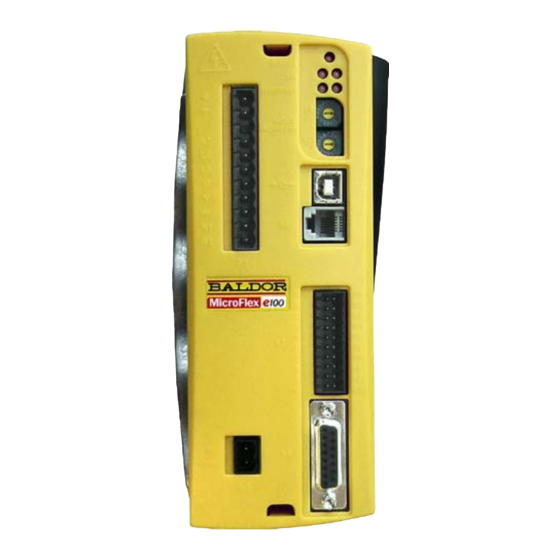
Page 23: Connector Locations
Earth/Ground Earth/Ground (NC) Node ID AC Phase 1 / L These switches set the MicroFlex e100’s AC Phase 2 / N node ID for ETHERNET Powerlink, and the final value of the IP address when using AC Phase 3 TCP/IP. See sections 5.7.1 and 6.2.4. -
Page 24: Top Panel Connectors
www.baldormotion.com 3.3.2 Top panel connectors 1 (NC) 2 CAN- 3 CAN GND 4 (NC) 5 Shield 6 CAN GND 7 CAN+ 8 (NC) 9 CAN V+ Ethernet 1 TX+ Both connectors 2 TX- have identical 3 RX+ pinouts. 4 (NC) 5 (NC) 6 RX- 7 (NC) -
Page 25: Power Connections
Basic insulation. 3.4.1.2 Earth leakage Maximum earth leakage from the MicroFlex e100 is 3.4 mA per phase (230 V, 50 Hz supply). This value does not include the earth leakage from the AC power filter, which could be much larger (see section A.1.4). If the MicroFlex e100 and filter are mounted in an enclosure, it is recommended the enclosure is earthed using a 10 mm conductor. -
Page 26: Single-Phase Or Three-Phase Power Connections
For CE compliance, an AC filter must be connected between the AC power supply and the MicroFlex e100. If local codes do not specify different regulations, use at least the same gauge wire for earth/ground as is used for L1, L2 and L3. -
Page 27: Input Power Conditioning
MicroFlex e100 to limit the maximum symmetrical short circuit current to 5000 A. If the feeder or branch circuit that provides power to the MicroFlex e100 has power factor correction capacitors that are switched on line and off line, the capacitors must not be switched while the drive is connected to the AC power line. -
Page 28: Power Disconnect And Protection Devices
L2 for example). When supplying AC power in this way, the voltage between the two phases must not exceed the rated input voltage of the MicroFlex e100. A two pole breaker must be used to isolate both lines. Fuses must be fitted in both lines. -
Page 29: Recommended Fuses, Circuit Breakers And Wire Sizes
Line wires. 3.4.6 Drive overload protection The MicroFlex e100 will immediately trip and disable if there is an overload condition. The parameters for managing drive overloads are configured automatically by the Commissioning Wizard (see section 6.4.3). If they need to be changed, use the Parameters tool in Mint WorkBench (see section 6.5.2). -
Page 30: Power Supply Filters
Table 4 - Baldor filter part numbers Maximum earth leakage from the MicroFlex e100 is 3.4 mA per phase (230 V, 50 Hz supply). This value does not include the earth leakage from the AC power filter, which could be much larger (see section A.1.4). -
Page 31: Control Circuit Supply
I/O information. A separate fused 24 V supply should be provided for the MicroFlex e100. If other devices are likely to be powered from the same 24 V supply, a filter (Baldor catalog number FI0014A00) should be installed to isolate the MicroFlex e100 from the rest of the system. - Page 32 Baldor representative. The motor must be capable of being powered by an inverter PWM output - see section 8.1.3 for details. The motor can be connected directly to the MicroFlex e100 or through a motor contactor (M-Contactor). The motor outputs are conditionally short-circuit proof.
-
Page 33: Motor Circuit Contactors
If required by local codes or for safety reasons, an M-Contactor (motor circuit contactor) may be installed to provide a physical disconnection of the motor windings from the MicroFlex e100 (see section 3.5). Opening the M-Contactor ensures that the MicroFlex e100 cannot drive the motor, which may be necessary during equipment maintenance or similar operations. -
Page 34: Motor Cable Pin Configuration - Baldor Linear Motors
3.5.3 Motor cable pin configuration - Baldor linear motors The following table shows the pin colors used in a typical Baldor linear motor cable set, part number AY1763A00: Signal name Motor cable wire color Motor U Black Motor V... -
Page 35: Thermal Switch Connection
X3 (see section 3.3.1). Using the Mint WorkBench Digital I/O tool, the input can be configured to be the motor trip input. This allows the MicroFlex e100 to respond to motor over-temperature conditions. The Mint keyword MOTORTEMPERATUREINPUT can also be used to configure a digital input for this purpose. -
Page 36: Motor Brake Connection
You might wish to wire a motor’s brake, via relays, to digital outputs on connector X3 (see section 3.3.1). This provides a way for the MicroFlex e100 to control the motor’s brake. A typical circuit is shown in Figure 10. -
Page 37: Regeneration Resistor (Dynamic Brake Resistor)
POINT using 360° conductive clamp connected to enclosure backplane Figure 11 - Regeneration resistor connections 3.6.1 Regeneration capacity The regeneration capacity of the MicroFlex e100 can be calculated from the following formula: × Supply voltage ( Regen switching threshold ) E = 0.5 ×... -
Page 38: Regeneration Resistor Selection
www.baldormotion.com 3.7 Regeneration resistor selection The following calculations can be used to estimate the type of regeneration resistor that will be required for the application. 3.7.1 Required information To complete the calculation, some basic information is required. Remember to use the worst-case scenario to ensure that the regeneration power is not underestimated. -
Page 39: Regenerative Energy
www.baldormotion.com 3.7.2 Regenerative energy The regenerative energy to be dissipated, E, is the difference between the initial energy in the system (before deceleration begins) and the final energy in the system (after deceleration has finished). If the system is brought to rest then the final energy is zero. The energy of a rotating object is given by the formula: ×... -
Page 40: Resistor Choice
Dimensions are shown in section A.1.5. * The regeneration resistors listed in Table 6 can withstand a brief overload of 10 times the rated power for 5 seconds. Please contact Baldor if larger power ratings are required. 3.7.5 Resistor derating The regeneration resistors shown in Table 6 can achieve their stated power rating only when mounted on a heatsink. -
Page 41: Feedback
Feedback 4.1 Introduction MicroFlex e100 supports many feedback options for use with linear and rotary motors, including incremental encoder, encoder with BiSS (Bi-directional Synchronous Serial interface), encoder with SSI (Synchronous Serial Interface), EnDat absolute encoder or SinCos encoder. All suitable types of feedback device can be connected to the universal feedback interface available on connector X8. -
Page 42: Incremental Encoder Feedback
D-type connector. Connector X8 includes a ‘Sense’ pin, which is used to detect the voltage drop on long cable runs. This allows the MicroFlex e100 to increase the encoder supply voltage on pin 12 to maintain a 5 V supply at the encoder (200 mA max). - Page 43 Hall U+ MAX3096 to CPU Differential line receiver Hall U- DGND Figure 13 - Hall channel input circuit - U phase shown 4.1.1.1 Encoder cable configuration - Baldor rotary motors Motor Twisted pairs CHA+ CHA- CHB+ CHB- Encoder CHZ+ (INDEX)
- Page 44 4.1.1.3 Halls-only feedback devices Feedback devices using only Hall sensors may be connected to the MicroFlex e100. However, since there are no encoder connections, the MicroFlex e100 will not be able to perform smooth speed control or accurate positioning control.
- Page 45 4.1.1.4 Encoder cable pin configuration - rotary motors Figure 17 shows the pin configuration for a typical Baldor encoder feedback cable, part number CBL025SF-E2. Signal name MicroFlex e100 Motor / cable Baldor encoder cable X8 pin internal wire colors...
- Page 46 4.1.1.5 Encoder cable pin configuration - Baldor linear motors Baldor linear motors use two separate cables (encoder and Hall). The cores of these two cables must be wired to the appropriate pins of the 15-pin D-type mating connector (supplied):...
-
Page 47: Biss Interface
D-type connector. Connector X8 includes a ‘Sense’ pin, which is used to detect the voltage drop on long cable runs. This allows the MicroFlex e100 to increase the supply voltage on pin 12 to maintain a 5 VDC supply at the encoder (200 mA max). - Page 48 4.1.2.1 BiSS interface cable pin configuration Figure 26 shows the pin configuration for a typical Baldor BiSS feedback cable, part number CBL025SF-D2. Signal name MicroFlex e100 Motor / cable Baldor BiSS / EnDat / X8 pin SinCos cable internal...
-
Page 49: Ssi Feedback
D-type connector. Connector X8 includes a ‘Sense’ pin, which is used to detect the voltage drop on long cable runs. This allows the MicroFlex e100 to increase the encoder supply voltage on pin 12 to maintain a 5 V supply at the encoder (200 mA max). - Page 50 4.1.3.1 SSI cable pin configuration Figure 22 shows the pin configuration for a typical Baldor SSI feedback cable, part number CBL025SF-S2 Signal name MicroFlex e100 Motor / cable Baldor SSI cable X8 pin internal wire colors +5 V out...
-
Page 51: Sincos Feedback
D-type connector. Connector X8 includes a ‘Sense’ pin, which is used to detect the voltage drop on long cable runs. This allows the MicroFlex e100 to increase the encoder supply voltage on pin 12 to maintain a 5 V supply at the encoder (200 mA max). The Sin and Cos channel input circuits accept a nominal 1 V pk-pk sine wave centered on a 2.5 V reference. - Page 52 4.1.4.1 SinCos cable pin configuration Figure 24 shows the pin configuration for a typical Baldor SinCos feedback cable, part number CBL025SF-D2. Signal name MicroFlex e100 Motor / cable Baldor BiSS / EnDat / X8 pin SinCos cable internal wire colors...
-
Page 53: Endat (Absolute Encoder) Feedback
Connector X8 includes a ‘Sense’ pin, which is used to detect the voltage drop on long cable runs. This allows the MicroFlex e100 to increase the encoder supply voltage on pin 12 to maintain a 5 V supply at the encoder (200 mA max). Version 2.2 EnDat encoders do not use the Sin and Cos channels. - Page 54 4.1.5.1 Absolute encoder cable pin configuration Figure 26 shows the pin configuration for a typical Baldor absolute encoder feedback cable, part number CBL025SF-D2. Signal name MicroFlex e100 Motor / cable Baldor Biss / EnDat / X8 pin SinCos cable internal...
-
Page 55: Input / Output
Input / Output 5.1 Introduction This section describes the various digital input and output capabilities of the MicroFlex e100, with descriptions of each of the connectors on the front panel. The following conventions are used to refer to the inputs and outputs: . -
Page 56: Digital I/O
5.2 Digital I/O The MicroFlex e100 provides as standard: 3 general purpose digital inputs. 1 dedicated drive enable input. 1 general purpose digital output. 1 general purpose / drive status output. The general purpose digital inputs can be configured for typical input functions:... -
Page 57: Drive Enable Input
In all cases, the drive enable input must be active and there must be no errors present before the MicroFlex e100 can be enabled. It is recommended that an emergency stop switch or emergency stop control system is incorporated in the drive enable circuit. - Page 58 24 V ‘X11’ UDN2982 ‘X3’ USR V+ Mint Drive DRIVEENABLEOUTPUT DOUT0 Enable+ Drive Emergency 100R Enable- stop TLP280 USR GND User supply Figure 28 - Drive enable input - typical connection from a Baldor NextMove e100 5-4 Input / Output MN1942...
-
Page 59: General Purpose Digital Input Din0
DGND Figure 29 - General purpose digital input circuit When the MicroFlex e100 is connected to Mint WorkBench, the digital input can be configured using the Digital I/O tool. Alternatively, Mint keywords including RESETINPUT, ERRORINPUT and STOPINPUT can be used in the command window. The state of the digital input can be viewed using the Mint WorkBench Spy window’s Axis tab. - Page 60 NextMove e100 / controller MicroFlex e100 supply 24 V ‘X11’ UDN2982 ‘X3’ USR V+ Mint OUTX(0) DOUT0 DIN0+ 100R DIN0- TLP280 USR GND User supply Figure 30 - Digital input - typical connection from a Baldor NextMove e100 5-6 Input / Output MN1942...
-
Page 61: General Purpose Digital Inputs Din1 & Din2
DGND Figure 31 - General purpose fast digital input circuit When the MicroFlex e100 is connected to Mint WorkBench, the digital input can be configured using the Digital I/O tool. Alternatively, the Mint keywords RESETINPUT, ERRORINPUT and STOPINPUT can be used in the command window. The state of the digital input can be viewed using the Spy window’s Axis tab. -
Page 62: Special Functions On Inputs Din1 & Din2
DIN1 and DIN2 can be configured to perform special functions. 5.2.4.1 Step (pulse) and direction inputs Using the MASTERSOURCE keyword, the MicroFlex e100 can be configured to use DIN1 and DIN2 as step and direction inputs: DIN1 is used as the step input. The step frequency controls the speed of the motor. - Page 63 Incremental encoder MicroFlex e100 ‘X3’ Twisted pairs DIN1+ (Step) DIN1- DIN2+ (Dir) DIN2- DGND ‘X2’ Connect shields at one end only Drive Drive supply supply Figure 33 - Step and direction inputs - typical connection from an incremental encoder Note: When using an incremental encoder source, do not connect the A- or B- outputs;...
-
Page 64: General Purpose / Status Output Dout0
By default, DOUT0 is configured as an error status output, which becomes inactive in the event of an error. When the MicroFlex e100 is connected to Mint WorkBench, the active level of the output can be configured using the Digital I/O tool. - Page 65 User MicroFlex e100 NextMove e100 / controller ‘X3’ ‘X9’ supply 24 V DOUT0+ DOUT0- DIN4 TLP127 CREF1 TLP280 User supply Figure 35 - DOUT0 - typical connections to a Baldor NextMove e100 MN1942 Input / Output 5-11...
-
Page 66: General Purpose Output Dout1
User supply Figure 36 - DOUT1 output circuit When the MicroFlex e100 is connected to Mint WorkBench, the active level of the output can be configured using the Digital I/O tool. Alternatively, the Mint keyword OUTPUTACTIVELEVEL can be used in the command window. See the Mint help file for details. - Page 67 User MicroFlex e100 NextMove e100 / controller ‘X3’ ‘X9’ supply 24 V DOUT1+ DOUT1- DIN4 TLP127 CREF1 TLP280 User supply Figure 37 - DOUT1 - typical connections to a Baldor NextMove e100 MN1942 Input / Output 5-13...
-
Page 68: Usb Communication
USB1.1 specification of the MicroFlex e100. Ideally, the MicroFlex e100 should be connected directly to a USB port on the host PC. If it is connected to a hub shared by other USB devices, communication could be affected by the activity of the other devices. - Page 69 The Mint keyword Print can be used to send characters to the attached device. The Mint keyword InKey can be used to receive characters. The RS485 port can also be used to exchange data using the Baldor Host Comms Protocol (HCP/HCP2). See the Mint WorkBench help file for details.
-
Page 70: Ethernet Interface
TCP/IP allows the MicroFlex e100 to support standard Ethernet communication with a host PC running Mint WorkBench. The connection uses Baldor’s high level ICM (Immediate Command Mode) protocol to allow Mint commands, Mint programs and even firmware to be sent to the controller over the Ethernet network. -
Page 71: Ethernet Powerlink
Fast Ethernet (IEEE 802.3u) connection. This makes it suitable for the transmission of control and feedback signals between the MicroFlex e100 and other EPL enabled controllers such as NextMove e100. The EPL protocol implemented in Mint is based on the CANopen DS402 Device Profile for Drives and Motion Control. -
Page 72: Ethernet Connectors
(NC) (NC) To connect the MicroFlex e100 to other EPL devices use CAT5e Ethernet cables - either S/UTP (screened unshielded twisted pairs) or preferably S/FTP (screened fully shielded twisted pairs). The MicroFlex e100 Ethernet interface is galvanically isolated from the rest of the MicroFlex e100 circuitry by magnetic isolation modules incorporated in each of the Ethernet connectors. -
Page 73: Can Interface
120 Ω. This is to reduce reflections of the electrical signals on the bus, which helps a node to interpret the bus voltage levels correctly. If the MicroFlex e100 is at the end of the network then ensure that a 120 Ω resistor is fitted (normally inside the D-type connector). -
Page 74: Canopen
5.6.2.1 Opto-isolation On the MicroFlex e100 the CAN channel is opto-isolated. A voltage in the range 12-24 V must be applied between pin 9 (+24 V) and pin 3 or 6 (0 V) of the CAN connector. From this supply, an internal voltage regulator provides the 5 V at 100 mA required for the isolated CAN circuit. - Page 75 24 V Figure 43 - Typical CANopen network connections Note: The MicroFlex e100 CAN channel is opto-isolated, so a voltage in the range 12-24 V must be applied between pin 9 and pin 6 of the CAN connector. The configuration and management of a CANopen network must be carried out by a single node acting as the network manager (for example NextMove e100), or by a third party CANopen manager device.
-
Page 76: Other I/O
5.7 Other I/O 5.7.1 Node ID selector switches The MicroFlex e100 has two selector switches which determine the unit’s node ID on EPL networks. Each switch has 16 positions, allowing selection of the hexadecimal values 0 - F. In combination, the two switches allow node IDs of 0 - 255 (hexadecimal FF) to be selected. - Page 77 Figure 44 - Decimal node IDs and equivalent HI / LO hexadecimal switch settings Note: If the node ID selector switches are set to FF, the node’s firmware will not run on power up. However, Mint WorkBench will still be able to detect the MicroFlex e100 and download new firmware.
- Page 78 Node ID 240 (F0) is reserved for the EPL manager node (for example NextMove e100) so cannot be used by MicroFlex e100. Node IDs 241 - 255 (F1 - FF) are reserved for special purposes and cannot be used.
-
Page 79: Connection Summary - Recommended System Wiring
1) The MicroFlex e100 should be mounted on an earthed metal backplane. 2) Ensure cables do not obstruct airflow to the heatsink. 3) Motor represents a typical Baldor BSM motor. Linear motors may also be controlled by MicroFlex e100. 4) Conductive shield earth/ground clamps are not supplied. - Page 80 www.baldormotion.com 5-26 Input / Output MN1942...
-
Page 81: Configuration
Configuration 6.1 Introduction Before powering the MicroFlex e100 you will need to connect it to the PC using a USB or Ethernet cable and install the supplied Mint Machine Center software. This software includes a number of tools to allow you to configure and tune the MicroFlex e100. If you do not have experience of software installation or Windows applications you may need further assistance for this stage of the installation. -
Page 82: Starting The Microflex E100
5. To allow the Commissioning Wizard to function, the drive enable signal will need to be present on connector X3 to allow the MicroFlex e100 to be enabled (see section 5.2.1.). If you do not wish to enable the MicroFlex e100 yet, the Commissioning Wizard will inform you when this step is necessary. -
Page 83: Installing The Usb Driver
1. Follow the on-screen instructions to select and install the driver. The driver files are available on the supplied Baldor Motion Toolkit CD. If you are using a copy of the driver located on the hard disk, a floppy disk or another CD, the two driver files must be in the same folder. -
Page 84: Configuring The Tcp/Ip Connection (Optional)
6.2.4 Configuring the TCP/IP connection (optional) If you have connected the MicroFlex e100 to the PC using the Ethernet connection, it will be necessary to alter the PC’s Ethernet adapter configuration to operate correctly with the MicroFlex e100. You cannot connect an ordinary office PC to the MicroFlex e100 without first altering the PC’s Ethernet adapter configuration. -
Page 85: Mint Machine Center
The Mint Machine Center (MMC) is used to view the network of connected controllers in a system. Individual controllers and drives are configured using Mint WorkBench. Note: If you have only a single MicroFlex e100 connected to your PC, then MMC is probably not required. Use Mint WorkBench (see section 6.4) to configure the MicroFlex e100. - Page 86 MintDrive Mint WorkBench RS232 MintDrive Mint WorkBench RS485/422 Host PC Mint Machine Center NextMove e100 Mint WorkBench MicroFlex e100 Mint WorkBench Ethernet MicroFlex e100 Mint WorkBench Figure 47 - Typical network visibility provided by Mint Machine Center 6-6 Configuration MN1942...
-
Page 87: Starting Mmc
2. In the controller pane, ensure that Host is selected. In the information pane, click Scan. 3. When the search is complete, click once on ‘MicroFlex e100’ in the controller pane to select it, then double click to open an instance Mint WorkBench. -
Page 88: Mint Workbench
6.4 Mint WorkBench Mint WorkBench is a fully featured application for commissioning the MicroFlex e100. The main Mint WorkBench window contains a menu system, the Toolbox and other toolbars. Many functions can be accessed from the menu or by clicking a button - use whichever you prefer. -
Page 89: Help File
www.baldormotion.com 6.4.1 Help file Mint WorkBench includes a comprehensive help file that contains information about every Mint keyword, how to use Mint WorkBench and background information on motion control topics. The help file can be displayed at any time by pressing F1. On the left of the help window, the Contents tab shows the tree structure of the help file. -
Page 90: Starting Mint Workbench
www.baldormotion.com 6.4.2 Starting Mint WorkBench Note: If you have already used MMC to start an instance of Mint WorkBench then the following steps are unnecessary. Go to section 6.4.3 to continue configuration. 1. On the Windows Start menu, select Programs, Mint Machine Center, Mint WorkBench. 2. - Page 91 3. In the Select Controller dialog, click Scan to search for the MicroFlex e100. Mint WorkBench will scan the PC’s ports for the MicroFlex e100. When the search is complete, click ‘MicroFlex e100’ in the list to select it, then click Select. This check box is already selected for you. When you click Select, it means that the Commissioning Wizard will start automatically.
-
Page 92: Commissioning Wizard
MicroFlex e100 can be used to control the motor accurately, the MicroFlex e100 must be ‘tuned’. This is the process where the MicroFlex e100 powers the motor in a series of tests. By monitoring the drive’s output and the feedback from the motor’s encoder, the MicroFlex e100 can make small adjustments to the way it controls the motor. - Page 93 Select your Motor: Carefully enter the details of your motor. If you are using a Baldor Motor, the catalog number or spec. number can be found stamped on the motor’s nameplate. If you are using a motor with EnDat feedback, are not using a Baldor motor, or need to enter the specification manually, select the I would like to define a custom motor option.
- Page 94 Selecting Yes will cause the parameters to be saved in the MicroFlex e100’s non-volatile flash memory, to be retained when power is removed. If you select No, you must remember to use the Save Drive Parameters function before removing power from the MicroFlex e100;...
-
Page 95: Further Tuning - No Load Attached
6.4.4 Further tuning - no load attached The Autotune Wizard calculates many parameters that allow the MicroFlex e100 to provide good control of the motor. In some applications, these parameters may need to be fine-tuned to provide the exact response that you require. - Page 96 www.baldormotion.com Measured velocity Demand velocity Figure 50 - Typical autotuned response (no load) Figure 50 shows that the response reaches the demand quickly and only overshoots the demand by a small amount. This can be considered an ideal response for most systems. For further information about tuning with the load attached, see section 6.4.5.
-
Page 97: Further Tuning - With Load Attached
www.baldormotion.com 6.4.5 Further tuning - with load attached To allow Mint WorkBench to adjust the basic tuning to compensate for the intended load, it is necessary to attach the load to the motor and then perform the autotune procedure again. 1. -
Page 98: Optimizing The Velocity Response
www.baldormotion.com 6.4.6 Optimizing the velocity response It may be desirable to optimize the default autotuned response to better suit your application. The following sections describe the two main tuning issues and how to correct them. 6.4.6.1 Correcting overshoot Figure 51 shows a response where the measured velocity overshoots the demand by a significant amount. - Page 99 www.baldormotion.com 6.4.6.2 Correcting zero-speed noise in the velocity response Figure 52 shows a response where there is very little overshoot but a significant amount of zero-speed noise. This can cause undesirable humming or ringing in the motor. 1. Go to the Fine-tuning window’s Velocity tab.
- Page 100 www.baldormotion.com 6.4.6.3 Ideal velocity response Repeat the tests described in sections 6.4.6.1 and 6.4.6.2 until the optimal response is achieved. Figure 53 shows an ideal velocity response. There is only a small amount of overshoot and very little zero-speed noise. Measured velocity Demand velocity...
-
Page 101: Performing Test Moves - Continuous Jog
www.baldormotion.com 6.4.7 Performing test moves - continuous jog This section tests the basic operation of the drive and motor by performing a continuous jog. Note: To stop a move in progress, click the red stop button or the drive enable button on the toolbar. -
Page 102: Performing Test Moves - Relative Positional Move
www.baldormotion.com 6.4.8 Performing test moves - relative positional move This section tests the basic operation of the drive and motor by performing a positional move. Note: To stop a move in progress, click the red stop button or the drive enable button on the toolbar. -
Page 103: Further Configuration
Enter new values in the required boxes and then click Apply to download the values to the MicroFlex e100. To perform tests, go to the Test Parameters area at the bottom of the tab. Enter test values and then click Go to perform the test move. If you need help, just press F1 to display the help file. - Page 104 The Flux tab allows you to set gains and perform test moves when using induction motors. Enter new values in the required boxes and then click Apply to download the values to the MicroFlex e100. Click Go to perform the test move. If you need help, just press F1 to display the help file.
-
Page 105: Parameters Tool
The icon to the left of the item will become yellow to indicate that the value has been changed. Many of the MicroFlex e100’s parameters are set automatically by the Commissioning Wizard, or when tests are performed in the fine-tuning window. MN1942... -
Page 106: Spy Window
www.baldormotion.com 6.5.3 Spy window The Spy window can be used to monitor and capture parameters in real-time. If you tried the test moves in section 6.4.7 or 6.4.8 then you have already seen the Spy window, as it is displayed in conjunction with Edit &... -
Page 107: Other Tools And Windows
The Command window can be used send immediate Mint commands to the MicroFlex e100. If you tried the test moves in section 6.4.7 or 6.4.8, then you have already used Edit & Debug mode. Press Ctrl+N to open a new Mint program editing window. - Page 108 www.baldormotion.com 6-28 Configuration MN1942...
-
Page 109: Troubleshooting
7.1.3 Power-cycling the MicroFlex e100 The term “Power-cycle the MicroFlex e100” is used in the Troubleshooting sections. Remove the 24 V supply, wait for the MicroFlex e100 to power down completely (the Status LED will turn off), then re-apply the 24 V supply. -
Page 110: Status Led
If multiple errors occur at the same time, the lowest numbered error code will be flashed. For example, a MicroFlex e100 which has tripped on both feedback error (code 5) and over-current error (code 3) will flash error code 3. If the drive is already displaying an error code when a new error with a lower code occurs, the drive will start flashing the new code. -
Page 111: Can Leds
www.baldormotion.com 7.2.2 CAN LEDs The CAN LEDs display the overall condition of the CANopen interface, once the startup sequence has completed. The LED codes conform to the CAN in Automation (CiA) DR303_3 indicator standard. The green LED indicates the state of the node’s internal CANopen ‘state machine’. The red LED indicates the state of the physical CANopen bus. -
Page 112: Ethernet Leds
www.baldormotion.com 7.2.3 ETHERNET LEDs The ETHERNET LEDs display the overall condition of the Ethernet interface once the startup sequence has completed. The LED codes conform to the ETHERNET Powerlink Standardization Group (EPSG) standard at the time of production. Green (status) Off: Node in NOT ACTIVE state. -
Page 113: Communication
Try an alternative cable or different port on the PC. In the “Search up to Nodexx” option in Mint WorkBench’s Select Controller dialog, check that the MicroFlex e100’s node ID is not higher than the selected value, or search up to a greater node ID. -
Page 114: Tuning
7.2.9 CANopen The CANopen bus is ‘passive’: This means that the internal CAN controller in the MicroFlex e100 is experiencing a number of Tx and/or Rx errors, greater than the passive threshold of 127. Check: 12-24 V is being applied between pin 9 (+24 V) and pin 6 or 3 (0 V) of the CAN connector, to power the opto-isolators. - Page 115 Try power-cycling the node in question. If the node in question does not conform to DS401 or DS403 and is not a Baldor CANopen node, communication is still possible using a set of general purpose Mint keywords. See the Mint help file for further details.
- Page 116 www.baldormotion.com 7-8 Troubleshooting MN1942...
-
Page 117: Specifications
Nominal input current @ maximum rated output current * The MicroFlex e100 will operate at lower input voltages, although the drive will trip if the DC-bus voltage falls below 50 V or 60% of the no-load voltage, whichever occurs first. - Page 118 www.baldormotion.com 8.1.1.2 Effect of AC power supply voltage on DC-bus ripple Single-phase AC supply Three-phase AC supply AC supply voltage (rms) 8.1.1.3 Effect of output current on DC-bus ripple voltage Single-phase AC supply Three-phase AC supply 90 100 110 120 130 140 150 % of Drive Rated Current 8-2 Specifications MN1942...
-
Page 119: V Control Circuit Supply Input (X2)
www.baldormotion.com 8.1.2 24 V control circuit supply input (X2) Unit Nominal input voltage Minimum input voltage Maximum input voltage Maximum ripple ±10 Maximum continuous current @24 VDC Power on surge current (typical) @24 VDC, 100 ms 8.1.3 Motor output power (X1) Unit Nominal phase current Peak phase current... -
Page 120: Specifications
www.baldormotion.com 8.1.5 Digital inputs - drive enable and DIN0 general purpose (X3) Unit All models Type Opto-isolated inputs Input voltage Nominal Minimum Maximum Active > 12 Inactive < 2 Input current (maximum, per input) Sampling interval Minimum pulse width μs 8.1.6 Digital inputs DIN1, DIN2 - high speed general purpose (X3) Unit All models... -
Page 121: Incremental Encoder Feedback Option (X8)
BiSS encoder interface Differential Data and Clock Operating mode Single or multi-turn. A wide range of devices can be supported. Contact Baldor technical support before selecting a device. Output power supply to encoder 5 V (±7%), 200 mA max. Maximum recommended cable length 30.5 m (100 ft) -
Page 122: Rs485 Interface
All models Absolute encoder input EnDat / SinCos differential inputs and data input Operating modes Single or multi-turn. (Baldor motors) 512 or 2048 Sin/Cos cycles per turn, with absolute positioning resolution of up to 65536 steps. (Many other encoder specifications are supported - contact Baldor.) -
Page 123: Environmental
BS EN60068-2-2:1993 high temperature storage/transportation +85°C. BS 2011:part2.1 Cb: 1990: 45°C 93%RH humidity/high temperature operational. DIN IEC 68-2-6/29 ** MicroFlex e100 complies with EN61800-5-1:2003 part 5.2.2.5.3 (Impact test), provided all front panel connectors are inserted. 8.1.16 Weights and dimensions Description Weight 1.45 kg... - Page 124 www.baldormotion.com 8-8 Specifications MN1942...
-
Page 125: A Accessories
This section describes accessories and options that you may need to use with your MicroFlex e100. Shielded (screened) cables provide EMI / RFI shielding and are required for compliance with CE regulations. All connectors and other components must be compatible with the shielded cable. -
Page 126: Fan Tray
The fan tray (Baldor part FAN001-024) provides sufficient cooling for the 3 A, 6 A or 9 A MicroFlex e100. It requires 23 - 27.5 VDC at 325 mA, which may be sourced from the same filtered control circuit supply used for the MicroFlex e100. The MicroFlex e100 is UL listed (file NMMS.E128059) when used in conjunction with the fan tray, mounted exactly as shown in... -
Page 127: Footprint Filter (Single-Phase Only
The single-phase footprint AC power filter (Baldor part FI0029A00) provides mounting holes for the MicroFlex e100 and fan tray. This allows the filter, fan tray and MicroFlex e100 to use minimal panel mounting space. See section A.1.4 for details of filter FI0029A00. -
Page 128: Emc Filters
AC filters remove high frequency noise from the AC power supply, protecting the MicroFlex e100. These filters also prevent high frequency signals from being transmitted back onto the power lines and help meet EMC requirements. To select the correct filter, see sections 3.4.7 and 3.4.8. - Page 129 www.baldormotion.com Dimensions mm (inches) Dimension FI0014A00 FI0015A00 FI0015A01 FI0015A02 85 (3.35) 113.5 (4.47) 156 (6.14) 54 (2.13) 57.5 (2.26) 40 (1.57) 46.6 (1.83) 65 (2.56) 94 (3.70) 130.5 (5.14) 75 (2.95) 103 (4.06) 143 (5.63) 27 (1.06) 25 (0.98) 12 (0.47) 12.4 (0.49) 29.5 (1.16) 32.4 (1.28)
- Page 130 www.baldormotion.com Mounting keyhole and slot detail G 5.5 mm H 11 mm 10 mm K 5 mm Dimensions shown as: mm (inches). Dimensions mm (inches) Dimension FI0029A00 255 (10.04) 100 (3.94) 244.5 (9.63) 70 (2.76) 40 (1.57) 20 (0.79) Figure 58 - Filter dimensions, type FI0029A00 A-6 Accessories MN1942...
-
Page 131: Regeneration Resistors
A.1.5 Regeneration resistors Depending on the application, MicroFlex e100 might require an external regeneration resistor to be connected to pins R1 and R2 of connector X1. The regeneration resistor dissipates energy during braking to prevent an over-voltage error occurring. See sections 3.6 and 3.7 for details about choosing the correct resistor. -
Page 132: Cables
A.2 Cables A wide range of motor and feedback cables are available from Baldor. A.2.1 Motor power cables For easier installation, it is recommended that a color-coded motor power cable is used. A description of a BSM rotary motor power cable catalog number is shown here, using the... - Page 133 www.baldormotion.com A.2.1.2 Cables available in the rest of the world Length Cable Cable Cable assembly Cable assembly Catalog number Catalog number rated current description Power cable: CBL050-501 Available by the meter or on no connectors 100 m drum. CBL025SP-12 Power cable CBL050SP-12 16.4 12 Amps...
-
Page 134: A.2.2 Feedback Cable Part Numbers
15-pin D-type connector for all feedback types Note: Feedback cables have the outer shield tied to the connector housing(s). If you are not using a Baldor cable with your chosen feedback device, be sure to obtain a cable that is a shielded twisted pair 0.34 mm (22 AWG) wire minimum, with an overall shield. -
Page 135: A.2.4 Encoder / Hall Feedback Cables
www.baldormotion.com A.2.4 Encoder / Hall feedback cables A.2.4.1 Cables available in North and South America Length Cable assembly description Cable assembly description Catalog number Catalog number Encoder feedback cable: CBL043-501 Available by the foot or no connectors on 100 m (328 ft) drum. Feedback cable assembly: CBL025SF-E CE style threaded motor connector... -
Page 136: A.2.5 Biss, Endat And Sincos Feedback Cables
65.6 A.2.6 Ethernet cables The cables listed in this table connect MicroFlex e100 to other EPL nodes such as NextMove e100, additional MicroFlex e100s, or other EPL compatible hardware. The cables are standard CAT5e shielded twisted pair (S/UTP) ‘crossover’ Ethernet cables:... -
Page 137: B Control System
Control System B.1 Introduction The MicroFlex e100 can use two main control configurations: Servo (Position). Torque Servo (Current). Each configuration supports different control modes, selected by using the Tools, Control Mode menu item or by using the CONTROLMODE keyword in the Command window (see the Mint help file). -
Page 138: Servo Configuration
www.baldormotion.com B.1.1 Servo configuration The servo configuration is the default configuration for the drive, allowing the motor control system to operate as a torque controller, a velocity controller or a position controller. This configuration comprises 3 nested control loops; a current control loop, a velocity control loop and a position control loop, as shown in Figure 60. - Page 139 www.baldormotion.com MN1942 Control System B-3...
-
Page 140: Torque Servo Configuration
www.baldormotion.com B.1.2 Torque servo configuration Figure 61 shows the torque-servo control configuration. Here, the velocity loop has been removed and the output of the position controller is fed into the current loop via the torque filters. The torque servo configuration is useful when the drive is operating as a closed-loop position controller and settling time must be minimized. - Page 141 www.baldormotion.com MN1942 Control System B-5...
- Page 142 www.baldormotion.com B-6 Control System MN1942...
-
Page 143: C Mint Keyword Summary
The following table summarizes the Mint keywords supported by the MicroFlex e100. Note that due to continuous developments of the MicroFlex e100 and the Mint language, this list is subject to change. Check the latest Mint help file for full details of new or changed keywords. - Page 144 www.baldormotion.com Keyword Description Returns the next event in the bus event queue of a BUSEVENT specific bus. BUSEVENTINFO Returns the additional information associated with a bus event. To set or read the node ID used by this node for the BUSNODE specified bus.
- Page 145 www.baldormotion.com Keyword Description Accesses the reserved comms array. COMMS Accesses the reserved comms array, storing values as COMMSINTEGER integers. To enable/disable the position compare control of a COMPAREENABLE specific digital output. To specify the digital output used for position compare. COMPAREOUTPUT To write to the position compare registers.
- Page 146 www.baldormotion.com Keyword Description To define the deceleration rate of an axis. DECELTIMEMAX To return the nominal value of the DC bus voltage for the DRIVEBUSNOMINALVOLTS drive. To set or return the overvoltage trip level for the drive. DRIVEBUSOVERVOLTS To set or return the undervoltage trip level for the drive. DRIVEBUSUNDERVOLTS To return the current level of the DC bus.
- Page 147 www.baldormotion.com Keyword Description To set or read the scale factor for the encoder channel. ENCODERSCALE To set or read the feedback type of the motor. ENCODERTYPE To read the velocity from an encoder channel. ENCODERVEL To set or read the encoder wrap range for the encoder ENCODERWRAP channel.
- Page 148 www.baldormotion.com Keyword Description To read the release number of the firmware. FIRMWARERELEASE To return the instantaneous following error value. FOLERROR To set the maximum permissible following error before FOLERRORFATAL an error is generated. To determine the action taken on the axis in the event of FOLERRORMODE a following error.
- Page 149 www.baldormotion.com Keyword Description To set or read the status of a homing sequence. HOMESTATUS To return the state of the home input. HOMESWITCH To set the homing mode to be performed at start-up. HOMETYPE Indicates if a move has finished executing and the axis IDLE has finished moving.
- Page 150 www.baldormotion.com Keyword Description To set or read the integral gain of the flux controller for KFINT induction motor control. KFPROP To set or read the proportional gain of the flux controller for induction motor control. To set the integral gain used by the current controller. KIINT To set the servo loop integral gain.
- Page 151 www.baldormotion.com Keyword Description To select which of the fast latch inputs (or outputs) will LATCHTRIGGERCHANNEL trigger a fast latch channel. LATCHTRIGGEREDGE To define which edge polarity should cause the fast latch to be triggered. To select whether a fast latch is triggered by a digital LATCHTRIGGERMODE input or a digital output.
- Page 152 www.baldormotion.com Keyword Description To set or read the electrical direction of the motor. MOTORDIRECTION Reads the instantaneous value of commutation angle for MOTORFEEDBACKANGLE the motor. To set or read the electrical angle at which the absolute MOTORFEEDBACKOFFSET position read from an EnDat, BiSS or SSI encoder is zero.
- Page 153 www.baldormotion.com Keyword Description To set or read the stator leakage inductance of an MOTORSTATORLEAKAGEIND induction motor. MOTORSTATORRES To set or read the stator resistance of an induction motor. To set or read the action taken in the event of the motor MOTORTEMPERATUREMODE overtemperature trip input becoming active To read the state of the motor overtemperature trip input.
- Page 154 www.baldormotion.com Keyword Description To set or read an individual digital output. OUTX To select the back-off distance used to clear an end stop PHASESEARCHBACKOFF during the phase search sequence. To define the bandwidth used to design the ’debounce’ PHASESEARCHBANDWIDTH controller used during the initial alignment stage of the phase search sequence.
- Page 155 www.baldormotion.com Keyword Description To control the rate of change on a remote analog input REMOTEADCDELTA before a REMOTEADC message is sent. REMOTECOMMS Accesses the reserved comms array on another controller. Accesses the reserved comms array on another REMOTECOMMSINTEGER controller, storing values as integers. To control the value of a remote analog output channel REMOTEDAC (DAC).
- Page 156 Keyword Description To force a Baldor controller node to transmit a variable REMOTEPDOOUT length PDO message with a specific COB-ID. The PDO will contain up to 64 bits of data that can be passed in the form of two 32-bit values.
- Page 157 www.baldormotion.com Keyword Description To set or read the reverse software limit position on a SOFTLIMITREVERSE specified axis. SPEED To set or read the slew speed of positional moves loaded in the move buffer. To perform a controlled stop during motion. STOP To set or read the digital input to be used as the stop STOPINPUT...
- Page 158 www.baldormotion.com Keyword Description To set or read the maximum positive torque limit. TORQUELIMITPOS To set or read a torque reference for torque (constant TORQUEREF current) mode on a servo axis. To set or read the ’deceleration ramp’ for a torque profile TORQUEREFERRORFALLTIME in the event of an error.
-
Page 159: Dce & Ul
D.1.2 MicroFlex e100 compliance When installed as directed in this manual, MicroFlex e100 units meet the emission limits for an “industrial” environment, as defined by the EMC directives (EN61000-6-4: 2001). To meet the more stringent emission limits of the “residential, commercial and light industrial”... -
Page 160: Declaration Of Conformity
MicroFlex E100 Single-Axis Servo Drive, being one of: MFE230A0XXX (where XXX = product variant) when used in accordance with the guidance given in the corresponding MicroFlex E100 Installation Manual, MN1942, conforms with the protection requirements of the following Council Directives, by application of the relevant harmonized standards:... -
Page 161: Use Of Ce Compliant Components
With this technique, a good earth/ground shield can be achieved. EMC filters The filter should be mounted next to the MicroFlex e100. The connections between the MicroFlex e100 and the filter should use shielded (screened) cables. The cable shields should be connected to shield clamps at both ends. Earthing/grounding For safety reasons (VDE0160), all Baldor components must be connected to earth/ground with a separate wire. -
Page 162: Emc Installation Suggestions
www.baldormotion.com D.1.6 EMC installation suggestions To ensure electromagnetic compatibility (EMC), the following installation points should be considered to help reduce interference: Earthing/grounding of all system elements to a central earth/ground point (star point) Shielding of all cables and signal wires Filtering of power lines. -
Page 163: D.1.7 Wiring Of Shielded (Screened) Cables
D.1.7 Wiring of shielded (screened) cables Remove the outer insulation to expose the overall shield. Clamp should provide 360° Flat or p-type contact with the cable. conductive clamp Figure 62 - Earthing/grounding cable shields MicroFlex e100 Encoder Connector Cable Housing Twisted pairs CHA+ CHA- CHB+... -
Page 164: Ul File Numbers
D.2 UL file numbers The following table lists UL file numbers for Baldor products and other accessories. Note that UL file numbers for accessories that not manufactured by Baldor are beyond Baldor’s control and therefore subject to change without notice. - Page 165 Index power, 3-11, 3-12 Connectors Abbreviations. See Units and Abbreviations CAN, 5-19 Accessories, A-1 Ethernet, 5-16, 5-18 24 V power supplies, A-3 I/O, 5-3–5-12 EMC filters, A-4 locations, 3-9, 3-10 fan tray, A-2 RS485, 5-14 feedback cables, A-10, A-11, A-12 USB, 5-14 footprint filter, A-3 Control system, B-1...
- Page 166 EnDat, cable, A-12 EnDat (absolute) encoder Incremental encoder cable, 4-14 cable, 4-3, A-11 feedback, 4-13 feedback, 4-2 specification, 8-6 specification, 8-5 Environmental without Halls, 4-4 cooling, 3-3 Indicators location, 3-3–3-4 CAN LEDs, 7-3 specification, 8-7 ETHERNET LEDs, 7-4 Ethernet connector, 5-18 STATUS LED, 7-2 Ethernet interface Input / Output, 5-1...
- Page 167 disconnect and protection devices, 3-14 input conditioning, 3-13 Mint keyword summary, C-1 input cycling, 3-13, 7-1 Mint Machine Center (MMC), 6-5 inrush, 3-13 starting, 6-7 sources, 3-1 Mint WorkBench, 6-8 supply filters, 3-16, A-4 Commissioning Wizard, 6-12 using a variac, 3-14 fine-tuning tool, 6-23 Precautions, 1-2 help file, 6-9...
- Page 168 motor output, 8-3 Ethernet, 7-6 regeneration, 8-3 ETHERNET LEDs, 7-4 RS485 interface, 8-6 Mint WorkBench, 7-5 SinCos feedback, 8-6 power cycling, 7-1 SSI encoder feedback, 8-5 power on, 7-5 weights and dimensions, 8-7 problem diagnosis, 7-1 STATUS LED, 7-2 SupportMe, 7-1 cable, 4-10, A-10 tuning, 7-6 feedback, 4-9...
- Page 169 If you have any suggestions for improvements to this manual, please let us know. Write your comments in the space provided below, remove this page from the manual and mail it to: Manuals Baldor UK Ltd Mint Motion Centre 6 Bristol Distribution Park...
- Page 170 Thank you for taking the time to help us. Comments MN1942...