Table of Contents

Related Manuals for Planet WNAP-6308


Summary of Contents for Planet WNAP-6308
- Page 1 User’s Manual 802.11b/g/n Wireless Outdoor Access Point WNAP-6308 www.PLANET.com.tw...
- Page 2 Copyright Copyright 2014 by PLANET Technology Corp. All rights reserved. No part of this publication may be reproduced, transmitted, transcribed, stored in a retrieval system, or translated into any language or computer language, in any form or by any means, electronic, mechanical, magnetic, optical, chemical, manual or otherwise, without the prior written permission of PLANET.
- Page 3 CE Mark Warning This is a Class B product. In a domestic environment, this product may cause radio interference, in which case the user may be required to take adequate measures. Energy Saving Note of the Device This power required device does not support Standby mode operation. For energy saving, please remove the DC-plug to disconnect the device from the power circuit.
- Page 4 Revision User’s Manual for PLANET 802.11b/g/n Wireless Outdoor Access Point Model: WNAP-6308 Rev: 1.0 (February, 2014) Part No. EM-WNAP-6308_v1.0 (2081-E10570-000)
-
Page 5: Table Of Contents
CONTENTS Chapter 1. Product Introduction ......................1 Package Contents .......................1 Product Description......................2 Product Features......................... 5 Product Specifications ....................... 6 Chapter 2. Hardware Installation ......................9 Hardware Description ......................9 The Top/Bottom Panel ....................9 2.1.1 2.1.2 The Side Panel .......................10 Chapter 3. - Page 6 5.3.3.3. Client Router (WISP) ..................... 37 5.3.3.4. Client Bridge (Slave AP Bridge) ..................41 5.3.4 Advanced – System Log..................41 5.3.5 Advanced – Tools ....................42 5.3.5.1. Ping..........................42 5.3.5.2. Traceroute........................43 5.3.5.3. Throughput........................44 Firewall Settings........................44 5.4.1 MAC/IP/Port Filtering ....................44 5.4.2 Virtual Server ......................46 5.4.3 DMZ ........................47...
- Page 7 Windows XP (Wireless Zero Configuration)..............79 Windows 7 (WLAN AutoConfig)..................81 Mac OS X 10.x........................84 iPhone / iPod Touch / iPad ....................86 Appendix A: Planet Smart Discovery Utility..................90 Appendix B: Troubleshooting......................91 Appendix C: Specifications........................93...
- Page 8 ..................18 IGURE AILED RESULT OF ING COMMAND 4-5 L ....................18 IGURE OGIN BY DEFAULT ADDRESS 4-6 L ........................19 IGURE OGIN INDOW 4-7 WNAP-6308 W UI S ..................19 IGURE CREENSHOT 4-8 C ....................20 IGURE HOOSE PERATION 4-9 C ..................20 IGURE ONFIGURE...
- Page 9 5-28 T – C (WISP) M ...............37 IGURE OPOLOGY LIENT OUTER 5-29 O – C ...................37 IGURE PERATION LIENT OUTER 5-30 WISP S -1 ........................38 IGURE 5-31 WISP S -2 ........................38 IGURE 5-32 WISP S -3 ........................39 IGURE 5-33 WISP S -4 ........................39 IGURE 5-34 WISP S...
- Page 10 6-3 C .....................80 IGURE HOOSE A WIRELESS NETWORK 6-4 E ....................80 IGURE NTER THE ENCRYPTION KEY 6-5 W ..................81 IGURE IRELESS ETWORK ONNECTED 6-6 WLAN A ......................81 IGURE ONFIG 6-7 WLAN A ....................82 IGURE ONFIG WINDOW 6-8 WLAN A – .............83 IGURE ONFIG...
-
Page 11: Chapter 1. Product Introduction
Chapter 1. Product Introduction 1.1 Package Contents Thank you for choosing PLANET WNAP-6308. Before installing the AP, please verify the contents inside the package box. WNAP-6308 Quick Installation Guide CD-ROM (User Manual included) Plastic Strap x 2 PoE Injector & Power Cord *Straps received could be in white or black. -
Page 12: Product Description
As an IEEE 802.11b/g/n compliant wireless device, the WNAP-6308 is able to give stable and efficient wireless performance for outdoor application, while designed with IEEE 802.11n standard and 1T1R MIMO technology, it makes it possible to deliver three times faster data rate up to 150Mbps than the normal 802.11g wireless device. - Page 13 2.4GHz 802.11n Advanced Security and Management In aspect of security, besides 64/128- bit WEP encryption, the WNAP-6308 integrates WPA / WPA2, WPA-PSK / WPA2-PSK and 802.1x authority to secure and protect your wireless LAN. The wireless MAC filtering and SSID broadcast control consolidate the wireless network security and prevent unauthorized wireless connection.
- Page 14 Power over Ethernet (PoE) design, the WNAP-6308 can be easily installed in the areas where power outlets are not available. It is the best way to use the WNAP-6308 to build outdoor wireless access applications between buildings on campuses, business, rural areas, etc.
-
Page 15: Product Features
User Manual of WNAP-6308 1.3 Product Features Industrial Compliant Wireless LAN & LAN Compliant with IEEE 802.11n wireless technology capable of up to 150Mbps data rate Backward compatible with 802.11b/g standard Equipped with 10/100Mbps RJ-45 Ports for LAN & WAN, Auto MDI/ MDI-X supported Fixed-network Broadband Router ... -
Page 16: Product Specifications
User Manual of WNAP-6308 1.4 Product Specifications WNAP-6308 Product 2.4GHz 150Mbps 802.11n Wireless Outdoor Access Point Hardware Specifications IEEE 802.11b/g/n Wireless LAN IEEE 802.11i Wireless Security Standard IEEE 802.3 10Base-T Ethernet IEEE 802.3u 100Base-TX Ethernet IEEE 802.3x Flow Control 32 Mbytes DDR SDRAM... - Page 17 User Manual of WNAP-6308 IPSec Bridge Operating Mode Gateway WISP NAT firewall with SPI (Stateful Packet Inspection) Firewall Built-in NAT server supporting Virtual Server and DMZ Built-in firewall with Port / IP address / MAC / URL filtering ...
- Page 18 User Manual of WNAP-6308 Regulatory CE / FCC/ RoHS Accessory Passive PoE injector & Power Cord x 1 Plastic Strap x 2 Standard Accessories Quick Installation Guide x 1 CD (User’s Manual, Quick Installation Guide) x 1...
-
Page 19: Chapter 2. Hardware Installation
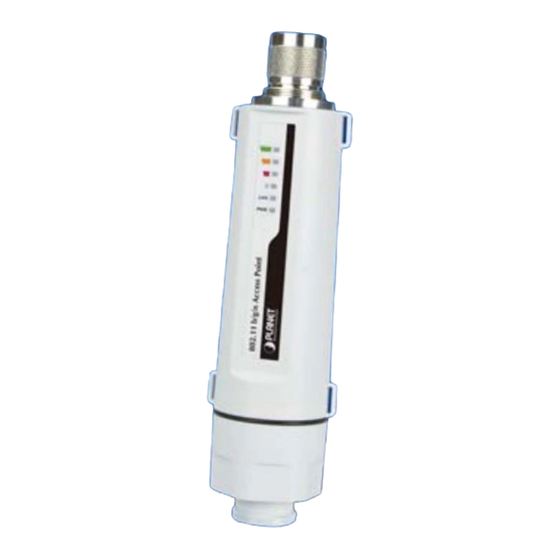
User Manual of WNAP-6308 Chapter 2. Hardware Installation Please follow the instructions below to connect the WNAP-6308 to the existing network devices and your computers. 2.1 Hardware Description Dimensions: 45 x 169 mm (Φ x H) Figure 2-1 Appearance 2.1.1 The Top / Bottom Panel... -
Page 20: The Side Panel
Connect N-Type (M) Antenna Connector with 2.4GHz Outdoor Antenna directly or through the N-male (male pin) to N-female (female pin) cable. Antenna Connector Planet supplied RF cable Model No.: WL-MF-0.6 or WL-N-10. Push continually the reset button about 15 seconds to reset the Reset configuration parameters to factory defaults. -
Page 21: Chapter 3. Connecting To The Ap
To keep you safe and install the hardware properly, please read and follow these safety precautions. If you are installing the WNAP-6308 for the first time, for your safety as well as others’, please seek assistance from a professional installer who has received safety training on the hazards involved. - Page 22 User Manual of WNAP-6308 OUTDOOR INSTALLATION WARNING IMPORTANT SAFETY PRECAUTIONS: LIVES MAY BE AT RISK! Carefully observe these instructions and any special instructions that are included with the equipment you are installing. CONTACTING POWER LINES CAN BE LETHAL. Make sure no power lines are anywhere where possible contact can be made.
-
Page 23: Installing The Ap
Please install the AP according to the following steps. Don't forget to pull out the power plug and keep your hands dry. Step 1. Connect the Antenna to the top of the WNAP-6308. Figure 3-1 Connect the Antenna Step 2. (1) Open the bottom of the WNAP-6308. -
Page 24: Injector
24V PoE Injector Figure 3-3 Connect the PoE injector Step 4. Pole Mounting: Place the straps through the slots on the sides of the WNAP-6308 and then around the pole. Tighten the straps to secure the WNAP-6308. Figure 3-4 Pole Mounting... -
Page 25: Chapter 4. Quick Installation Guide
Connect the WNAP-6308 with your PC by an Ethernet cable plugging in the LAN port of the PoE injector on one side and in the LAN port of the PC on the other side. Please power on the WNAP-6308 by PoE from PoE injector or PoE switch. -
Page 26: Tcp/Ip Setting
User Manual of WNAP-6308 Figure 4-1 TCP/IP Setting Now click OK to save your settings. Now, you can run the Ping command in the command prompt to verify the network connection between your PC and the AP. The following example is in Windows 7 OS. Please follow the steps below: Click on Start >... -
Page 27: Enu
User Manual of WNAP-6308 Figure 4-2 Windows Start Menu Open a command prompt, and type ping 192.168.1.1, and then press Enter. If the result displayed is similar to Figure 4-3, it means the connection between your PC and the AP has been established well. -
Page 28: Starting Setup In The Web Ui
DHCP request on newly installed adapters. 4.2 Starting Setup in the Web UI It is easy to configure and manage the WNAP-6308 with the web browser. Step 1. To access the configuration page, open a web-browser and enter the default IP address http://192.168.1.1... -
Page 29: Figure
After entering the username and password, the Status page screen appears as Figure 4-8 Figure 4-7 WNAP-6308 Web UI Screenshot Step 2. Go to “Easy Setup” to choose an Operation Mode. Please refer to the instructions in the next chapter for configuring the other Operation Mode. -
Page 30: Ode
User Manual of WNAP-6308 Figure 4-8 Choose Operation Mode Step 3. Please enter the SSID, configure your Encryption Settings, Pre-Shared Key, etc. Then click Done button to make the configuration take effect immediately. Figure 4-9 Configure Wireless Settings -20-... -
Page 31: Chapter 5. Configuring The Ap
Easy Setup, and Advanced) below, allowing you to manage the AP with ease. Figure 5-1 Main Menu 5.1 Status On this page, you can view information about the current running status of the WNAP-6308, including WAN interface, LAN interface, wireless interface, and firmware version information. Status ... - Page 32 User Manual of WNAP-6308 Object Description Internet Configuration Connected Type Displays current Internet connection type. Disconnected: Indicates that the Ethernet cable from your ISP side is / is not correctly connected to the WAN port on the AP or the AP is not logically connected to your ISP.
-
Page 33: Dhcp Clients
User Manual of WNAP-6308 This section allows you to view the AP’s statistics listed below: Figure 5-3 Statistics Object Description Memory Memory Left/ Displays the retain memory and total memory. Memory Total WAN/LAN WAN Rx packets Displays the real-time packets received from WAN port. -
Page 34: Dhcp Client List
User Manual of WNAP-6308 This section displays a DHCP dynamic client list, which includes MAC address, IP address, and lease time info. Figure 5-4 DHCP Client List Object Description MAC address Displays MAC address of a given host. Displays IP address(es) that client(s) obtained from the DHCP ... -
Page 35: Easy Setup
User Manual of WNAP-6308 5.2 Easy Setup The Easy Setup helps you configure the basic functions of your AP within minutes. Please refer to the Step 2 in the section “4.2 Starting Setup in the Web UI” for the detailed procedure. -
Page 36: Advanced - Management
User Manual of WNAP-6308 5.3.1 Advanced - Management This section allows you to manage the Wireless AP. 5.3.1.1. Web Interface Settings (Password) Figure 5-8 Web Interface Settings Object Description User Name Display the User Name info. Password Enter the new password that you prefer for login. -
Page 37: Firmware Upgrade
User Manual of WNAP-6308 5.3.1.2. Firmware Upgrade Figure 5-9 Firmware Upgrade Click the “Browse…” button to select the new firmware for upgrading. Object Description Software Version Display the current Software Version info. Location Click the “Browse…” button to select the new firmware in this field. -
Page 38: Configuration
User Manual of WNAP-6308 5.3.1.3. Configuration Figure 5-10 Configuration Backup/Restore Click the “Export” button to back up the configuration of the Wireless AP, and click “Import” to restore the configuration. Object Description Export Click the “Export” button to back up the configuration. -
Page 39: Reboot System
User Manual of WNAP-6308 5.3.1.5. Reboot System Figure 5-12 Reboot System Click the “Reboot Now!” button to restart the Wireless AP. 5.3.1.6. Scheduling Reboot Figure 5-13 Scheduling Reboot Select “Enable” to configure the system auto reboot according to the Duration Time (Time interval). -
Page 40: Advanced - Advanced Settings
User Manual of WNAP-6308 5.3.2 Advanced – Advanced Settings This section allows you to configure advanced settings of the Wireless AP. 5.3.2.1. Time Zone Settings Figure 5-14 Time Zone Settings The page includes the following fields: Object Description Current Time Display the current time. -
Page 41: Ddns Settings
Planet DDNS account. Please refer to the FAQ (http://www.planetddns.com/index.php/faq) on how to register a free account. Please refer to the procedure listed as follows to configure using Planet DDNS service. Step 1. Select “planetddns.com” to choose Planet DDNS service. -
Page 42: Ettings
In a remote computer, enter the DDNS host name as the figure is shown below. Then, you should be able to login the WNAP-6308 remotely. Please remember to enter the remote management port number that you have configured in Step 3. -
Page 43: Upnp Settings
Select “Enable” to enable the UPNP function. Figure 5-21 UPnP Settings In the computer connected with the WNAP-6308, go to “Network” to check whether the WNAP-6308 is displayed on the list. Double-click it to logon the Web UI of the WNAP-6308. -
Page 44: Snmp Settings
User Manual of WNAP-6308 Figure 5-22 UPnP – Network Location 5.3.2.4. SNMP Settings Enabling SNMP function will allow the network management station to retrieve statistics and status from the SNMP Agent in the device. Figure 5-23 SNMP Settings The page includes the following fields:... -
Page 45: Advanced - Operation Mode
WNAP-6308 that can share the internet connection by connecting the WNAP-6308 to a DSL/cable modem. Figure 5-24 Topology – AP Router Mode 1. Connect the LAN port of the WNAP-6308 to the POE port of the PoE Injector over an Ethernet cable. 2. Connect the DSL/cable modem to the WAN port of the WNAP-6308. -
Page 46: Ap Bridge (Ap+Wds)
Figure 5-26 Topology – WDS Repeater Mode 1. Connect the LAN port of the WNAP-6308 to the POE port of the PoE Injector over an Ethernet cable. 2. Connect the PC to the LAN port of the PoE Injector over an Ethernet cable. -
Page 47: Client Router (Wisp)
Figure 5-28 Topology – Client Router (WISP) Mode 1. Connect the LAN port of WNAP-6308 to the POE port of the PoE Injector over an Ethernet cable. 2. Connect the PC to the LAN port of the PoE Injector over an Ethernet cable. -
Page 48: F 5-30 Wisp S -1
User Manual of WNAP-6308 WISP Setup Procedure: Step 1. Go to Advanced-> Wireless Settings-> Profile Settings. Figure 5-30 WISP Step-1 Step 2. Click “Site Survey” to discover the Wireless Internet Service Provider. Step 3. Select the WISP’s AP, and the click “Select”. -
Page 49: F 5-32 Wisp S -3
User Manual of WNAP-6308 Figure 5-32 WISP Step-3 Step 5. The profile should be listed on the Profile List as the figure is shown below. Figure 5-33 WISP Step-4 Step 6. Go to “Advanced-> Network Settings-> LAN” to enable DHCP Server. -
Page 50: F 5-34 Wisp S -5
User Manual of WNAP-6308 Figure 5-34 WISP Step-5 Step 7. Go to “Advanced-> Network Settings-> WAN” to configure the WAN Connection. Figure 5-35 WISP Step-6 Step 8. Configure the wired client’s TCP/IP setting to “Obtain an IP address automatically”. Figure 5-36 WISP Step-7... -
Page 51: Client Bridge (Slave Ap Bridge)
Figure 5-37 Topology – Client Bridge Mode 1. Connect the LAN port of WNAP-6308 to the POE port of the PoE Injector over an Ethernet cable. 2. Connect the PC to the LAN port of the PoE Injector over an Ethernet cable. -
Page 52: Advanced - Tools
User Manual of WNAP-6308 Click “Refresh” to update the system log. Click “Clear” to erase the current system log. Figure 5-39 System Log 5.3.5 Advanced – Tools The Tools included Ping, Traceroute, and Throughput can help user diagnostic the network connection. -
Page 53: Traceroute
User Manual of WNAP-6308 Figure 5-40 Ping 5.3.5.2. Traceroute Traceroute is a computer network diagnostic tool for displaying the route (path) and measuring transit delays of packets across an Internet Protocol (IP) network. It can help identify connection problems. Enter the IP or Host Name, and click “Start”... -
Page 54: Throughput
5.3.5.3. Throughput Click “VISIT THE SITE TO TEST SPEED” button to go to http://www.speedtest.net/ to test the Internet connection speed. Figure 5-42 Speed Test 5.4 Firewall Settings 5.4.1 MAC/IP/Port Filtering -44-... -
Page 55: F Igure 5-43 Mac/Ip/P Ort F Iltering
User Manual of WNAP-6308 Figure 5-43 MAC/IP/Port Filtering The page includes the following fields: Object Description MAC/IP/Port Filtering Select Enable to enable the MAC/IP/Port Filtering function. Default Policy Select a policy for filtering rule. Fill in the MAC address of source NIC, to restrict data ... -
Page 56: Virtual Server
User Manual of WNAP-6308 5.4.2 Virtual Server Figure 5-44 Virtual Server -46-... -
Page 57: Dmz
User Manual of WNAP-6308 The page includes the following fields: Object Description Virtual Server Select Enable to enable the Virtual Server function. To forward data packets coming from WAN to a specific IP IP address address that hosted in local network behind the NAT firewall, fill in the IP address. -
Page 58: Firewall
User Manual of WNAP-6308 5.4.4 Firewall Figure 5-46 NAT Option The page includes the following fields: Object Description Remote Management Select Deny or Allow for remote management function. (via WAN) Remote Management Configure the port for remote management. -
Page 59: Qos
User Manual of WNAP-6308 connected to the Internet. PPPoE Passthrough Enable it to allow Multiple PPP connections on remote hosts. 5.4.5 QoS Quality of Service provides an efficient way for clients on the network to share the bandwidth with a promised quality of Internet service. -
Page 60: Content Filtering
User Manual of WNAP-6308 The page includes the following fields: Object Description QoS Setup Select Enable to enable the QoS function. Set the limit of total upload bandwidth in kbits. To disable Upload Bandwidth upload bandwidth limitation, input ‘0’ here. -
Page 61: Webs Url Filter Settings
User Manual of WNAP-6308 5.4.6.1. Webs URL Filter Settings The Webs URL Filter option allows you to set up a list of Web sites you would like to deny through your network. Please enter a URL for filtering. Figure 5-48 Webs URL Filter Settings 5.4.6.2. -
Page 62: Static (Fixed Ip)
User Manual of WNAP-6308 WAN Connection Types: 5.5.1.1. Static (Fixed IP) If your ISP provides a static or fixed IP Address, Subnet Mask, Gateway and DNS setting, select Static (Fixed IP). The Static IP settings page will appear as the figure is shown below. -
Page 63: Cable/Dynamic Ip (Dhcp)
User Manual of WNAP-6308 (Optional) Enter the DNS IP address in dotted-decimal notation Primary DNS Server provided by your ISP. (Optional) Enter another DNS IP address in dotted-decimal Secondary DNS Server notation provided by your ISP. 5.5.1.2. Cable/Dynamic IP (DHCP) If your ISP provides the DHCP service, please choose Cable/Dynamic IP (DHCP) type, and the AP Router will automatically obtain IP parameters from your ISP. -
Page 64: Pppoe (Adsl)
User Manual of WNAP-6308 5.5.1.3. PPPoE (ADSL) If local ISP provides a PPPoE connection, choose PPPoE (ADSL) and fill the necessary parameters below. Figure 5-52 WAN - PPPoE The page includes the following fields: Object Description WAN Connections Select PPPoE (ADSL) from the list. -
Page 65: Wan - Ips Ec
User Manual of WNAP-6308 Figure 5-53 WAN - IPSec Figure 5-54 WAN – IPv4 (IPSec Connection Type) The page includes the following fields: Object Description WAN Connections Select IPSEC from the list. (Optional) Enter the DNS IP address in dotted-decimal notation provided ... -
Page 66: Ipsec Connection Type
User Manual of WNAP-6308 For an IPSec connection, all host addresses must be of the same Connection address family Address Family (IPv4 and IPv6 use different Address Families). IPSec Operation Mode Select the IPSec Operation mode from the drop-down list. - Page 67 User Manual of WNAP-6308 Group 2 1024 bits MODP group RFC 2409 Group 3 EC2N group on GP(2^155) RFC 2409 Group 4 EC2N group on GP(2^185) RFC 2409 Group 5 1536 bits MODP group RFC 3526 IPSec Authentication The AP supports SHA1 & MD5 authentication algorithms.
-
Page 68: Pptp
User Manual of WNAP-6308 Lifetime settings determine when a new key is generated. Any time a key lifetime is reached, the associated SA is also renegotiated. The process of generating new keys at intervals is called dynamic rekeying or key ... -
Page 69: L2Tp
User Manual of WNAP-6308 The page includes the following fields: Object Description WAN Connections Select PPTP from the list. Server IP Enter the IP address of the PPTP server. Enter the User Name and Password provided by your ISP. -
Page 70: Lan
User Manual of WNAP-6308 The page includes the following fields: Object Description WAN Connections Select L2TP from the list. Server IP Enter the IP address of the L2TP server. Enter the User Name and Password provided by your ISP. -
Page 71: Dhcp Server
User Manual of WNAP-6308 MAC Address Display the LAN port MAC address of the Wireless AP. The Wireless AP’s LAN IP. IP Address The default is 192.168.1.1. You can change it according to your need. Subnet Mask Enter the subnet mask of the LAN IP. -
Page 72: Vlan
User Manual of WNAP-6308 The page includes the following fields: Object Description DHCP Server Select DHCP Relay to enable DHCP relay feature. A DHCP relay agent is any host that forwards DHCP packets DHCP Relay between clients and servers. -
Page 73: Advanced Routing
User Manual of WNAP-6308 Enable Management Check this box to enable the Management VLAN function. VLAN ID The ID of a VLAN. Only in the same VLAN can a wireless PC and a wired PC communicate with each other. The value can be between 1 and 4095. -
Page 74: Ipv6
User Manual of WNAP-6308 The page includes the following fields: Object Description Destination The IP address of packets that can be routed. Defines the type of destination. ( Host: Signal IP address / Net: Portion Type of Network ) ... -
Page 75: Wireless Settings
User Manual of WNAP-6308 The page includes the following fields: Object Description Choose the mode to be used by the AP/Router to the IPv6 Internet. There are 7 connection modes available: IPv6 Connection Mode Static, SLAAC, DHCPv6, 6to4 Tunnel, 6in4 Tunnel, PPPoE, and Pass Through. -
Page 76: Wireless Mode - Access Point
User Manual of WNAP-6308 5.6.1.1. Wireless Mode – Access Point Figure 5-63 Wireless Mode - AP The page includes the following fields: Object Description Click to select Wireless Mode from pull down menu. There are 4 options available: Access Point: This mode allows wireless clients or Stations(STA) to access ... - Page 77 It is the wireless network name. The SSID can be 32 bytes long. Network Name (SSID) User can use the default SSID or change it. The default SSID is WNAP-6308. WPS Choice Enable it to use WPS associating with AP or Client device.
-
Page 78: Wireless Mode - Wds Access Point
User Manual of WNAP-6308 5.6.1.2. Wireless Mode – WDS Access Point Figure 5-64 Wireless Mode – WDS AP The page includes the following fields: Object Description Click to select Wireless Mode from pull down menu. There are 4 options available:... - Page 79 It is the wireless network name. The SSID can be 32 bytes long. Network Name (SSID) User can use the default SSID or change it. The default SSID is WNAP-6308. Encryption Settings Select the encryption type that you would like to use.
-
Page 80: Wireless Mode - Wds Repeater
User Manual of WNAP-6308 5.6.1.3. Wireless Mode – WDS Repeater Figure 5-65 Wireless Mode – WDS Repeater The page includes the following fields: Object Description Click to select Wireless Mode from pull down menu. There are 4 options available: Access Point:... - Page 81 Network Name (SSID) User can use the default SSID or change it. The default SSID is WNAP-6308. It is the wireless network name of Root AP. Root AP SSID The SSID must be the same with Root AP so that the connection can be established successfully.
-
Page 82: Wireless Mode - Wds Client
User Manual of WNAP-6308 5.6.1.4. Wireless Mode – WDS Client Figure 5-66 Wireless Mode – WDS Client The page includes the following fields: Object Description Click to select Wireless Mode from pull down menu. There are 4 options available: Access Point:... - Page 83 User Manual of WNAP-6308 Set the channel you would like to use. The channel range will be Frequency (Channel) changed by selecting different domain. Select the operating channel width to WiFi 11gn (mixed), HT20 or Network Mode HT40MHz.
-
Page 84: Profile Settings
User Manual of WNAP-6308 5.6.2 Profile Settings In Client Bridge and Client Router operation modes, please go to “Advanced-> Wireless Settings-> Profile Settings” to configure the wireless client function to connect with the wireless AP. Figure 5-67 Client Bridge – Profile Settings... - Page 85 User Manual of WNAP-6308 SSID It is the wireless network name of Root AP. BSSID (optional) Indicate the Basic Service Set ID of the associated AP Encryption Settings Select the encryption type that you would like to use.
-
Page 86: Advanced
User Manual of WNAP-6308 5.6.3 Advanced Figure 5-68 Wireless Settings – Advanced The page includes the following fields: Object Description Wireless On/Off Click this button to switch the Wireless Radio On or Off. AP MAC Address Display the AP MAC Address of wireless interface. -
Page 87: Access Control
User Manual of WNAP-6308 interval of the beacons. You can specify a value between 20-1000 milliseconds. The default value is 100. This value determines the interval of the Delivery Traffic Indication Message (DTIM). You can specify the value between 1-255 ... -
Page 88: Logout
User Manual of WNAP-6308 Figure 5-69 Wireless Settings – Access Control The page includes the following fields: Object Description Select the SSID which you would like to configure access SSID control. Allow Listed: allow the packets not specified by any access control policy to pass through the AP Router. -
Page 89: Chapter 6. Quick Connection To A Wireless Network
User Manual of WNAP-6308 Chapter 6. Quick Connection to a Wireless Network Windows XP (Wireless Zero Configuration) Step 1: Right-click on the wireless network icon displayed in the system tray Figure 6-1 Wireless Zero Configuration Step 2: Select [View Available Wireless Networks]... - Page 90 User Manual of WNAP-6308 Figure 6-3 Choose a wireless network Step 4: Enter the encryption key of the Wireless AP (1) The Wireless Network Connection box will appear (2) Enter the encryption key that is configured in Section 5.6.2 (3) Click the [Connect] button Figure 6-4 Enter the encryption key Step 5: Check if “Connected”...
-
Page 91: Windows 7 (Wlan Autoconfig)
User Manual of WNAP-6308 Figure 6-5 Wireless Network Connected Some laptops are equipped with a “Wireless ON/OFF” switch for the internal wireless LAN. Make sure the hardware wireless switch is switched to “ON” position. 6.2 Windows 7 (WLAN AutoConfig) WLAN AutoConfig service is built-in in Windows 7 that can be used to detect and connect to wireless network. - Page 92 User Manual of WNAP-6308 (1) Select SSID [PLANET] (2) Click the [Connect] button Figure 6-7 WLAN AutoConfig window If you will be connecting to this Wireless AP in the future, check [Connect automatically]. Step 4: Enter the encryption key of the Wireless AP...
- Page 93 User Manual of WNAP-6308 Figure 6-8 WLAN AutoConfig – type the network security key Figure 6-9 WLAN AutoConfig – connecting Step 5: Check if “Connected” is displayed -83-...
-
Page 94: Mac Os X 10.X
User Manual of WNAP-6308 Figure 6-10 WLAN AutoConfig – Connected 6.3 Mac OS X 10.x Step 1: Right-click on the network icon displayed in the system tray The AirPort Network Connection menu will appear Figure 6-11 The AirPort Network Connection icon... - Page 95 User Manual of WNAP-6308 Figure 6-12 The AirPort Network Connection menu Step 4: Enter the encryption key of the Wireless AP (1) Enter the encryption key that is configured in Section 5.6.2 (2) Click the [OK] button Figure 6-13 The AirPort Network Connection – enter password If you will connect this Wireless AP in the future, check [Remember this network].
-
Page 96: Iphone / Ipod Touch / Ipad
User Manual of WNAP-6308 Figure 6-14 The AirPort Network Connection – connected 6.4 iPhone / iPod Touch / iPad Step 1: Tap the [Settings] icon displayed in the home screen Figure 6-15 The Wi-Fi Settings in iPhone/iPod Touch/iPad Step 2: Check Wi-Fi setting and select the available wireless network... - Page 97 User Manual of WNAP-6308 Figure 6-16 General Settings Figure 6-17 General Settings – Not Connected Step 3: Tap the target wireless network (SSID) in “Choose a Network…” (1) Turn on Wi-Fi by tapping “Wi-Fi” (2) Select SSID [PLANET] -87-...
- Page 98 User Manual of WNAP-6308 Figure 6-18 General Settings – Wi-Fi On Step 4: Enter the encryption key of the Wireless AP (1) The password input screen will be displayed (2) Enter the encryption key that is configured in Section 5.6.2 (3) Tap the [Join] button Figure 6-19 General Settings –...
- Page 99 User Manual of WNAP-6308 Step 5: Check if the iDevice is connected to the selected wireless network. If “Yes”, then there will be a “check” symbol in the front of the SSID. Figure 6-20 General Settings – Wi-Fi Network Connected...
-
Page 100: Appendix A: Planet Smart Discovery Utility
The following installation instructions guide you to running the Smart Discovery Utility. Step 1: Deposit the Planet Smart Discovery Utility in the administrator PC. Step 2: Run this utility. Step 3: Click “Refresh” button for current connected devices in the discovery list as shown in the following screen. -
Page 101: Appendix B: Troubleshooting
Appendix B: Troubleshooting If you found the AP is working improperly or stop responding to you, please read this troubleshooting first before contacting the Planet Tech Support for help,. Some problems can be solved by yourself within very short time. Scenario Solution a. - Page 102 User Manual of WNAP-6308 b. The antenna is properly secured. device. c. Are you too far from your AP? Try to get closer. d. Please remember that you have to input ESSID on your wireless client manually, if ESSID broadcast is disabled.
-
Page 103: Appendix C: Specifications
User Manual of WNAP-6308 Appendix C: Specifications WNAP-6308 Product 2.4GHz 150Mbps 802.11n Wireless Outdoor Access Point Hardware Specifications IEEE 802.11b/g/n Wireless LAN IEEE 802.11i Wireless Security Standard IEEE 802.3 10Base-T Ethernet IEEE 802.3u 100Base-TX Ethernet IEEE 802.3x Flow Control 32 Mbytes DDR SDRAM... - Page 104 User Manual of WNAP-6308 PPTP L2TP IPSec Bridge Operating Mode Gateway WISP NAT firewall with SPI (Stateful Packet Inspection) Firewall Built-in NAT server supporting Virtual Server and DMZ Built-in firewall with Port / IP address / MAC / URL filtering ...
- Page 105 User Manual of WNAP-6308 Operation Temperature -35 ~ 65 degrees C Operating Humidity 5 ~ 90% non-condensing Regulatory CE / FCC/ RoHS Accessory Passive PoE Injector & Power Cord x 1 Plastic Strap x 2 Standard Accessories Quick Installation Guide x 1 ...
- Page 106 WNAP-6308 *Model Number * Produced by: Manufacturer’s Name : Planet Technology Corp. Manufacturer’s Address: 10F., No.96, Minquan Rd., Xindian Dist., New Taipei City 231, Taiwan (R.O.C.) is herewith confirmed to comply with the requirements set out in the Council Directive on the 1999/5/EC R&TTE.
- Page 107 ΣΥΜΜΟΡΦΩΝΕΤΑΙ ΠΡΟΣ ΤΙΣ ΟΥΣΙΩΔΕΙΣ disposições da Directiva 1999/5/CE. ΑΠΑΙΤΗΣΕΙΣ ΚΑΙ ΤΙΣ ΛΟΙΠΕΣ ΣΧΕΤΙΚΕΣ ΔΙΑΤΑΞΕΙΣ ΤΗΣ ΟΔΗΓΙΑΣ 1999/5/ΕΚ Por medio de la presente, PLANET Technology Výrobca PLANET Technology Corporation, týmto Español Slovensky Corporation, declara que 802.11b/g/n Wireless deklaruje, že táto 802.11b/g/n Wireless Outdoor...