Hoover STEAMVAC Owner's Manual
Hide thumbs
Also See for STEAMVAC:
- Owner's manual (63 pages) ,
- Instructions manual (13 pages) ,
- Owner's manual (17 pages)

Related Manuals for Hoover STEAMVAC


Summary of Contents for Hoover STEAMVAC
- Page 1 Owner’s M a n u a l Spin ScrubTM with Powered Hand Tool The Easy to.Use Deep Cleaner with automatic tool conversion Review this manual before operating deep cleaner applying hot tap water and cleaning solution. www.hoover.com...
-
Page 2: Table Of Contents
Do not use with damaged cord or plug. If appliance Is not working as it should, has been dropped, damaged, left outdoors, or dropped Into water, take it to a Hoover Factory Service Center or Authorized Hoover Warranty Service Dealer. Close supervision isnecessary when any appliance is used by or near children. - Page 3 Grounding A temporary adapter (D) may be used to connect this plug to a 2-pole receptacle (E) if a properly grounded outlet is not Improper connection of the equipment- _ available. The temporary adapter should grounding conductor can result in the be used only until a properly grounded This appliance must be grounded.
- Page 4 Assemble The assembled cleaner-will look like this. drawing. handle Attach upper handle Remove clean solution tank (upper tank) from deep cleaner. push upper handle down onto lower hani dle. If bolts will not go tlirough hole e&i- When handle sections are completely Replace clean solution tank (upper Place nuts in recessed areas on back of together, squeeze trigger (B) on upper...
- Page 5 Attach tool holder Storing hose & tools Slide rack down into place. Insert screw at (D) and tighten with a Phillips screw- Remove tool and taped screw from rack. Store hose on holder by first positioning driver, Insert projections on rack into slots on hose in front section of holder.
-
Page 6: Deep Cleaner Description
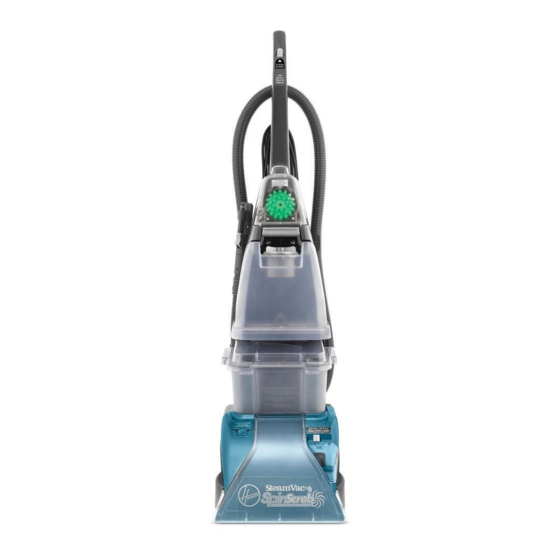
Deep cleaner description 1. Hand grip 14. Recovery tank: holds dirty 2. Solution trigger: press to solution. release clean solution. 3. Cord clip: place cord in clip 16. Brush speed selector: to keep it out of the way slide selector to set brush when using cleaner speed on HI, LO, or OFF. -
Page 7: Brush Speed Selector
Automatic &&shut off I9 The deep cleaner may also be lifted by placing a hand under the upper clean Your ‘SteamVac’ deep cleaner has three When the recovery tank (lower tank) is full solution tank handle as shown. agitator brush settings. -
Page 8: Recovery Tank
For heavy traffic areas: Pre-treat with HOOVER PreCleaner Spray. If you do not have access to the PreCleaner Spray, double the amount of HOOVER Detergent (use 2 capfuls or 10 ounces per 1 gallon tank). CAUTION: Detergents contain Anionic and Nonionic Surfactants. -
Page 9: Before You Begin
Do not use the vent wood finishes from staining carpet. minum foil to protect wood or metal sur- ‘SteamVac’ deep cleaner as a dry vac- Pin up furniture skirts and draperies. faces from possible water spray. -
Page 10: Picking Up Spills
Set tank aside (do not set 2. If the spill remains, place either the tank on furniture). Do not use the SteamVac deep cleaner stair/ upholstery nozzle or floor nozzle to pick up flammable or combustible liq- Refer to Fig. 2-17 to remove recovery with brushes turned OFF in front of the uids or chemicals. -
Page 11: Before Using Tool
Move speed selector to the Lo or HI B. Stair/upholstery nozzle has a built-in position for scrubbing or OFF-if brush to help provide the scrubbing scrubbing is not desired. action some spots may need for removal. Dry hands and plug deep cleaner into C. -
Page 12: After Cleaning
9. Replacement pads may also be pur- 2. Rinse tool and hose by filling sink with chased. Ask for HOOVER part no. a small amount of water. Turn 40308001. deep cleaner ON and pick up the water with the tool. -
Page 13: Removable Brushes
“W” or “W/S”. Place handle in upright position. Agitator brushes will not rotate while handle Is In upright position. Fill clean solution tank with HOOVER Turn deep cleaner on. Carpet/Upholstery Detergent according Gently press the tool (A) or (B) onto the to instructions on pages 7 and 8. -
Page 14: Lubrication
See ‘Before using tool” section, p. 11 To obtain approved HOOVER service and genuine HOOVER parts, locate the nearest Hoover Factory Service Center Possible cause or Authorized Hoover Warranty Possible solution... -
Page 15: Warranty
The Hoover Company on-line at www.hoover.com This warranty does not cover pick up delivery, or house calls; however, if you mail your appliance to a Hoover Factory Service Center for warranty service, transportation will be paid one way. While this warranty gives you specific legal rights, you may also have other rights which vary from state to state.