Pioneer DJM-900NXS2 Operating Instructions Manual
Hide thumbs
Also See for DJM-900NXS2:
- Operating instructions manual (184 pages) ,
- Quick start manual (6 pages) ,
- Operating instructions manual (16 pages)
Table of Contents
Advertisement
Available languages
Available languages
DJM-900NXS2
http://pioneerdj.com/support/
http://rekordbox.com/
The Pioneer DJ site shown above offers FAQs, information on software, and various other types of information
and services to allow you to use your product in greater comfort.
For various types of information and services regarding rekordbox™, see the Pioneer website above.
Le site Pioneer DJ indiqué ci-dessus propose une FAQ, des informations sur le logiciel et divers types
d'informations et de services qui permettent une utilisation plus confortable de ce produit.
Pour les différents types d'informations et de services concernant rekordbox™, consultez le site Pioneer
ci-dessus.
Die oben angegebene Pioneer DJ-Website enthält häufig gestellte Fragen, Informationen über Software und
andere wichtige Informationen und Dienste, die Ihnen helfen, Ihr Produkt optimal zu verwenden.
Weitere Informationen und Dienste bezüglich rekordbox™ finden Sie auf der oben angegebenen
Pioneer-Website.
Il sito Pioneer DJ indicato qui sopra offre una sezione FAQ, informazioni sul software ed informazioni e servizi
di vario tipo, per permettere un uso più confortevole dei nostri prodotti.
Per quanto riguarda vari tipi di informazione e servizi riguardanti rekordbox™, vedere il sito Pioneer
menzionato qui sopra.
Operating Instructions (Quick Start Guide)
Mode d'emploi (Guide de démarrage rapide)
Bedienungsanleitung (Kurzanleitung)
Istruzioni per l'uso (Guida di avvio veloce)
DJ MIXER
TABLE DE MIXAGE
DJ-MISCHPULT
MIXER PER DJ
Advertisement
Chapters
Table of Contents

Related Manuals for Pioneer DJM-900NXS2


Summary of Contents for Pioneer DJM-900NXS2
- Page 1 Weitere Informationen und Dienste bezüglich rekordbox™ finden Sie auf der oben angegebenen Pioneer-Website. Il sito Pioneer DJ indicato qui sopra offre una sezione FAQ, informazioni sul software ed informazioni e servizi di vario tipo, per permettere un uso più confortevole dei nostri prodotti.
-
Page 2: Operating Environment
CAUTION CAUTION TO PREVENT THE RISK OF ELECTRIC SHOCK, DO NOT The POWER switch on this unit will not completely REMOVE COVER (OR BACK). NO USER-SERVICEABLE shut off all power from the AC outlet. Since the power PARTS INSIDE. REFER SERVICING TO QUALIFIED cord serves as the main disconnect device for the SERVICE PERSONNEL. - Page 3 (2) this device must accept any interference received, including interference that may cause undesired operation. Product Name: DJ MIXER Model Number: DJM-900NXS2 Responsible Party Name: PIONEER ELECTRONICS (USA) INC. SERVICE SUPPORT DIVISION Address: 1925 E. DOMINGUEZ ST. LONG BEACH, CA 90810-1003, U.S.A. Phone: 1-800-421-1404 URL: http://www.pioneerelectronics.com...
-
Page 4: Table Of Contents
Thank you for buying this Pioneer DJ product. Be sure to read this manual and the Operating Instructions that is avail- able on the Pioneer DJ site. Both contain important information that you should understand before using this product. In particular, be sure to read “IMPORTANT SAFETY INSTRUCTIONS.”... -
Page 5: Acquiring This Unit's Operating Instructions
Instructions This unit is a mixer for professional DJ players that carries on the tradi- tion of the Pioneer DJM series, which has become a world standard in Various instructions are sometimes provided as files in PDF format. the disco and club scene. It is not only equipped with a wide range of ®... -
Page 6: Part Names And Functions
LINK terminal (page 9 ) Turns this unit’s power on and off. Connect this to the LINK terminals of a Pioneer DJ player or the LAN ports of a computer with rekordbox installed (PRO DJ LINK). 2 RETURN terminals (page 10 ) To connect multiple devices, use a switching hub (commercially Connect to the output terminal of an external effector. -
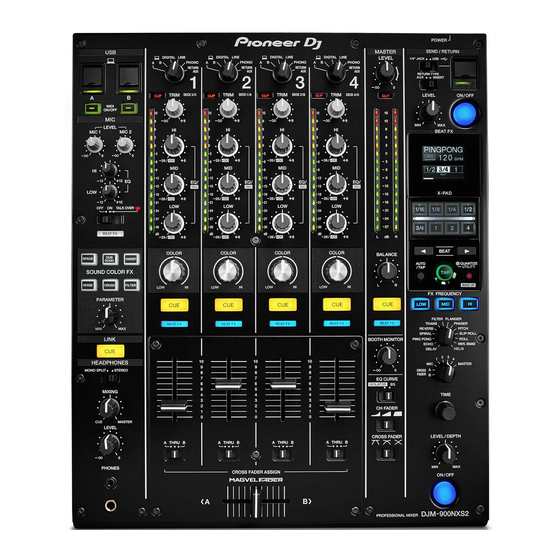
Page 7: Control Panel
Control Panel SEND / RETURN MASTER DIGITAL LINE DIGITAL LINE DIGITAL LINE DIGITAL LINE LEVEL PHONO PHONO PHONO PHONO RETURN RETURN RETURN RETURN TRIM TRIM TRIM TRIM ON / OFF CLIP DECK 3/C CLIP DECK 1/A CLIP DECK 2/B CLIP DECK 4/D CLIP LEVEL... - Page 8 terminals on the back of the unit or the device connected to the b EQ (HI, LOW) controls (page 11 ) mobile device connection terminal on the operation panel. These adjust the tone quality of the [MIC1] and [MIC2] channels. x RETURN TYPE (AUX, INSERT) selector switch c MIC LEVEL control (page 11 ) Selects the SEND/RETURN method.
-
Page 9: Connections
Analog player Analog player Analog player Microphone Digital audio output device Switching hub PRO DJ LINK rekordbox Computer To power outlet Pioneer DJ’s DJ player Pioneer DJ’s DJ player 1 For details on PRO DJ LINK, see the Operating Instructions. -
Page 10: Connecting Output Terminals
Connecting output terminals Digital audio Power amplifier Power amplifier Analog input Power amplifier input device External effector recording device (for booth monitor) 1 Also connect the external effector to the [RETURN] terminal (input terminal). 2 Be sure to use the [MASTER1] terminals only for a balanced output. Connection with an unbalanced input (such as RCA) using an XLR to RCA converter cable (or converter adapter), etc., may lower the sound quality and/or result in noise. -
Page 11: Operation
Operation Basic Operation Using a microphone 1 Connect a microphone to the [MIC1] or [MIC2] terminal. Outputting sound 2 Set the [OFF, ON, TALK OVER] selector switch to [ON] 1 Press [POWER] button. or [TALK OVER]. Turn on the power of this unit. ! When set to [TALK OVER], the sound of channels other than the [MIC] channel is attenuated by 18 dB (default) when a sound of –10 2 Switch the input selector switches. -
Page 12: Additional Information
Sometimes the problem may lie in another component. Inspect the other components and electrical appliances being used. If the problem cannot be rectified, ask your nearest Pioneer authorized service center or your dealer to carry out repair work. ! This unit may not operate properly due to static electricity or other external influences. In such cases, normal operation may be restored by unplug- ging the power cord then plugging it back in. -
Page 13: Specifications
......333 mm (width) x 107.9 mm (height) x 414.2 mm (depth) without notice. Tolerable operating temperature ........+5 °C to +35 °C ! © 2015 Pioneer DJ Corporation. All rights reserved. Tolerable operating humidity ...... 5 % to 85 % (no condensation) Audio Section Sampling rate ..................96 kHz... - Page 14 Si vous souhaitez vous débarrasser de cet appareil, ne le mettez pas à la poubelle avec vos ordures ménagères. Il existe un système de collecte séparé pour les appareils électroniques usagés, qui doivent être récupérés, traités et recyclés conformément à la législation. Les habitants des états membres de l’UE, de Suisse et de Norvège peuvent retourner gratuitement leurs appareils électroniques usagés aux centres de collecte agréés ou à...
- Page 15 Comment lire ce manuel Merci d’avoir acheté ce produit Pioneer DJ. Veillez à lire ce manuel et le mode d’emploi disponible sur le site Pioneer DJ. Ces deux documents contiennent des informations importantes que vous devez comprendre avant d’utiliser ce produit.
-
Page 16: Informations Préliminaires
Cet appareil est une table de mixage pour DJ professionnels qui perpé- tue la tradition de la série DJM de Pioneer, la référence mondiale pour Les différents modes d’emploi sont parfois fournis sous forme de les discothèques et les clubs. Il présente non seulement une grande ®... -
Page 17: Noms Et Fonctions Des Éléments
Prise LINK (page 8 ) Pour allumer et éteindre cet appareil. Raccordez aux prises LINK d’un lecteur DJ Pioneer ou aux ports LAN d’un ordinateur sur lequel rekordbox est installé (PRO DJ LINK). 2 Prises RETURN (page 9 ) Pour raccorder plusieurs dispositifs, utilisez un concentrateur-com- À... -
Page 18: Panneau De Commande
Panneau de commande SEND / RETURN MASTER DIGITAL LINE DIGITAL LINE DIGITAL LINE DIGITAL LINE LEVEL PHONO PHONO PHONO PHONO RETURN RETURN RETURN RETURN TRIM TRIM TRIM TRIM ON / OFF DECK 3/C DECK 1/A DECK 2/B DECK 4/D LEVEL CLIP CLIP CLIP... - Page 19 b Commandes EQ (HI, LOW) (page 10 ) w Sélecteur SEND/RETURN (1/4” JACK, Ajustent la qualité du timbre des canaux [MIC1] et [MIC2]. Bascule entre la source E/S du canal SEND/RETURN. Sélectionne le dispositif raccordé aux prises [SEND/RETURN] c Commande MIC LEVEL (page 10 ) à...
-
Page 20: Raccordements
Microphone Dispositif de sortie audio numérique Concentrateur commutateur PRO DJ LINK rekordbox Ordinateur À une prise Lecteur DJ de Pioneer DJ Lecteur DJ de Pioneer DJ d’ alimentation 1 Pour plus d’informations sur PRO DJ LINK, reportez-vous au mode d’emploi. -
Page 21: Raccordement Des Prises De Sortie
Raccordement des prises de sortie Amplificateur de Appareil audio Amplificateur de Amplificateur de Dispositif Générateur d’effets puissance numérique puissance puissance d’enregistrement de externe (pour le moniteur de l’entrée analogique cabine) 1 Raccordez aussi le générateur d’effets externe à la prise [RETURN] (prise d’entrée). 2 Veillez à... -
Page 22: Fonctionnement
Fonctionnement Opérations de base Utilisation d’un microphone 1 Raccordez un microphone à la prise [MIC1] ou [MIC2]. Restitution du son 2 Réglez le sélecteur [OFF, ON, TALK OVER] sur [ON] ou [TALK OVER]. ! Lorsque [TALK OVER] est spécifié, le son des canaux autres que le 1 Appuyez sur la touche [POWER]. -
Page 23: Informations Supplémentaires
Parfois, le problème peut provenir d’un autre composant. Examinez les autres composants et les appareils électriques utilisés. Si le problème ne peut pas être résolu, contactez votre service après-vente agréé Pioneer ou votre revendeur pour une réparation. ! Cet appareil peut ne pas fonctionner correctement à cause de l’électricité statique ou d’autres influences externes. Le cas échéant, le fonctionne- ment normal peut être rétabli en débranchant, puis rebranchant le cordon d’alimentation. -
Page 24: Spécifications
Température de fonctionnement tolérée ......+5 °C à +35 °C avis préalable, dans un souci d’amélioration. Humidité de fonctionnement tolérée ..5 % à 85 % (sans condensation) ! © 2015 Pioneer DJ Corporation. Tous droits de reproduction et de traduction réservés. Section audio Fréquence d’échantillonnage ............96 kHz... - Page 26 Mischen Sie dieses Produkt, wenn Sie es entsorgen wollen, nicht mit gewöhnlichen Haushaltsabfällen. Es gibt ein getrenntes Sammelsystem für gebrauchte elektronische Produkte, über das die richtige Behandlung, Rückgewinnung und Wiederverwertung gemäß der bestehenden Gesetzgebung gewährleistet wird. Privathaushalte in den Mitgliedsstaaten der EU, in der Schweiz und in Norwegen können ihre gebrauchten elektronischen Produkte an vorgesehenen Sammeleinrichtungen kostenfrei zurückgeben oder aber an einen Händler zurückgeben (wenn sie ein ähnliches neues Produkt kaufen).
- Page 27 Zum Lesen dieser Anleitung Vielen Dank, dass Sie sich für dieses Pioneer DJ-Produkt entschieden haben. Lesen Sie bitte unbedingt dieses Handbuch und die auf der Pioneer DJ-Website erhältliche Bedienungsanleitung. Beide enthalten wichtige Informationen, die Sie vor der Verwendung dieses Produkts verstehen sollten.
-
Page 28: Vor Der Inbetriebnahme
Einheit Diese Einheit ist ein Mixer für professionelle DJ-Player und setzt die Tradition der Pioneer DJM-Serie fort, die sich als ein Weltstandard in Die verschiedenen Anleitungen werden manchmal in Form von PDF- der Disco- und Clubszene etabliert hat. Sie ist nicht nur mit einem brei- ®... -
Page 29: Bezeichnungen Und Funktionen Der Komponenten
LINK-Buchse (Seite 8 ) Schalten Sie die Stromversorgung dieses Geräts ein und aus. Verbinden Sie diesen Anschluss mit den LINK-Buchsen eines Pioneer DJ-Players oder den LAN-Anschlüssen eines Computers, auf 2 RETURN-Buchsen (Seite 9 ) dem rekordbox installiert ist (PRO DJ LINK). -
Page 30: Bedienpult
Bedienpult SEND / RETURN MASTER DIGITAL LINE DIGITAL LINE DIGITAL LINE DIGITAL LINE LEVEL PHONO PHONO PHONO PHONO RETURN RETURN RETURN RETURN TRIM TRIM TRIM TRIM ON / OFF DECK 3/C DECK 1/A DECK 2/B DECK 4/D LEVEL CLIP CLIP CLIP CLIP CLIP... - Page 31 b EQ (HI, LOW)-Regler (Seite 10 ) w SEND/RETURN-Auswahlschalter (1/4” JACK, Diese stellen die Klangqualität von den Kanälen [MIC1] und [MIC2] Schaltet die E/A-Quelle des SEND/RETURN-Kanals um. ein. Wählt entweder das Gerät, das an die [SEND/RETURN]-Buchsen an der Rückseite der Einheit angeschlossen ist, oder das Gerät, das an c MIC LEVEL-Regler (Seite 10 ) den Mobilgeräteanschluss am Bedienfeld angeschlossen ist.
-
Page 32: Anschlüsse
Anschließen der Eingangsbuchsen Plattenspieler Plattenspieler Plattenspieler Plattenspieler Mikrofon Ausgabegerät mit digitalem Audioausgang Switching Hub PRO DJ LINK rekordbox Computer Zur Netzsteckdose DJ Player von Pioneer DJ DJ Player von Pioneer DJ 1 Entnehmen Sie Einzelheiten zu PRO DJ LINK der Bedienungsanleitung. -
Page 33: Anschließen Der Ausgangsbuchsen
Anschließen der Ausgangsbuchsen Dispositivo con Endstufenverstärker Endstufenverstärker Aufnahmegerät mit Endstufenverstärker ingresso audio Externer Effektor Analogeingang (für einen digitale Kabinenmonitor) 1 Schließen Sie auch den externen Effektor an die Buchse [RETURN] (Eingangsbuchse) an. 2 Verwenden Sie die [MASTER1]-Buchsen nur für symmetrische Ausgabe. Verbindung mit unsymmetrischer Eingabe (wie Cinch) mit einem XLR/ Cinch-Wandlerkabel (oder Wandleradapter) kann die Klangqualität verringern und/oder Rauschen verursachen. -
Page 34: Bedienung
Bedienung Grundlegender Betrieb Verwendung eines Mikrofons 1 Schließen Sie ein Mikrofon an die Buchse [MIC1] oder [MIC2] an. Tonausgabe 2 Stellen Sie den [OFF, ON, TALK OVER]-Wahlschalter 1 Drücken Sie die Taste [POWER]. auf [ON] oder [TALK OVER]. Schalten Sie die Stromversorgung dieses Geräts ein. ! Bei Einstellung auf [TALK OVER] wird der Sound anderer Kanäle als der des [MIC]-Kanals um 18 dB (Standard) gedämpft, wenn ein 2 Schalten Sie die Eingangswahlschalter ein. -
Page 35: Zusätzliche Informationen
Manchmal wird das Problem auch durch ein externes Gerät verursacht. Überprüfen Sie die anderen verwendeten Komponenten und elektrischen Geräte. Wenn Sie das Problem nicht beheben können, wenden Sie sich an die nächste Pioneer-Kundendienststelle oder an Ihren Händler zum Ausführen der Reparaturarbeit. -
Page 36: Technische Daten
! Änderungen der technischen Daten und das Design dieses Geräts Betriebstemperatur ............+5 °C bis +35 °C ohne vorherige Ankündigung bleiben vorbehalten. Betriebsluftfeuchtigkeit ......5 % bis 85 % (keine Kondensation) ! © 2015 Pioneer DJ Corporation. Alle Rechte vorbehalten. Audio-Sektion Abtastrate ....................96 kHz MASTER D/A-Wandler ................32 Bit Andere A/D- und D/A-Wandler ............ - Page 38 Se si vuole eliminare questo prodotto, non gettarlo insieme ai rifiuti domestici. Esiste un sistema di raccolta differenziata in conformità alle leggi che richiedono appositi trattamenti, recupero e riciclo. I privati cittadini dei paesi membri dell’UE, di Svizzera e Norvegia, possono restituire senza alcun costo i loro prodotti elettronici usati ad appositi servizi di raccolta o a un rivenditore (se si desidera acquistarne uno simile).
- Page 39 Indice Come leggere questo manuale Vi ringraziamo per avere acquistato questo prodotto Pioneer DJ. Leggere questo manuale e le istruzioni operative presenti sul sito Pioneer DJ. Entrambi contengono importanti informazioni che è neces- sario comprendere prima di usare il prodotto.
-
Page 40: Prima Di Cominciare
Questa unità è un mixer per lettori DJ professionali che continua la tradizione della serie Pioneer DJM, che si è affermata come standard di Varie istruzioni per l’uso sono a volte messe a disposizione in file di riferimento mondiale per la scena disco e club. -
Page 41: Nome Delle Varie Parti E Funzioni
Terminale LINK(pagina 8 ) Collegare al terminale LINK di un lettore Pioneer DJ o alla porta LAN di un computer in cui è installato rekordbox (PRO DJ LINK). Per collegare vari dispositivi, usare un hub con selettore (da acqui- starsi separatamente). -
Page 42: Pannello Di Controllo
Pannello di controllo SEND / RETURN MASTER DIGITAL LINE DIGITAL LINE DIGITAL LINE DIGITAL LINE LEVEL PHONO PHONO PHONO PHONO RETURN RETURN RETURN RETURN TRIM TRIM TRIM TRIM ON / OFF DECK 3/C DECK 1/A DECK 2/B DECK 4/D LEVEL CLIP CLIP CLIP... - Page 43 b Controlli EQ (HI, LOW) (pagina 10 ) x Selettore RETURN TYPE (AUX, INSERT) Regolano la qualità dei toni dei canali [MIC1] e [MIC2]. Seleziona il metodo SEND/RETURN. c Controllo MIC LEVEL (pagina 10 ) y Terminale di collegamento del dispositivo mobile Regola il livello audio emesso dal canale [MIC1] o dal canale [MIC2].
-
Page 44: Collegamento Dei Terminali Di Ingresso
Lettore analogico Microfono Dispositivo con uscita audio digitale Hub con selettore PRO DJ LINK rekordbox Computer Ad una presa Lettore DJ di Pioneer DJ Lettore DJ di Pioneer DJ 1 Per dettagli su PRO DJ LINK, vedere le Istruzioni per l’uso. -
Page 45: Collegamento Dei Terminali Di Uscita
Collegamento dei terminali di uscita Dispositivo con Amplificatore di Amplificatore di Dispositivo di Amplificatore di potenza ingresso audio Unità per effetti potenza potenza registrazione con (di monitoraggio in digitale esterna ingresso analogico cabina) 1 Collegare anche un’unità effetti esterna al terminale [RETURN] (terminale di ingresso). 2 Non mancare di usare i terminali [MASTER1] solo per una uscita bilanciata. -
Page 46: Uso Di Base
Impiego Uso di base Uso di un microfono 1 Collegare un microfono al terminale [MIC1] o [MIC2]. Emissione di suono 2 Portare il selettore [OFF, ON, TALK OVER] su [ON] o [TALK OVER]. ! Se regolato su [TALK OVER], l’audio diverso da quello del canale 1 Premere il pulsante [POWER]. -
Page 47: Informazioni Aggiuntive
A volte il problema risiede in un altro componente. Controllare tutti i componenti ed apparecchi elettronici usati. Se il problema non può venire eliminato, chiedere assistenza tecnica al più vicino centro assistenza o rivenditore autorizzato Pioneer. ! Questa unità potrebbe non funzionare correttamente per via di elettricità statica o altre influenze esterne. In questi casi, il funzionamento normale può... -
Page 48: Dati Tecnici
Temperature di funzionamento tollerabili ......Da +5 °C a +35 °C che senza preavviso. Umidità di funzionamento tollerabile ..Da 5 % a 85 % (senza condensa) ! © 2015 Pioneer DJ Corporation. Tutti i diritti riservati. Sezione audio Frequenza di campionamento ............96 kHz Convertitore MASTER D/A ..............32 bit... - Page 52 © 2015 Pioneer DJ Corporation. All rights reserved. © 2015 Pioneer DJ Corporation. Tous droits de reproduction et de traduction réservés. PIONEER ELECTRONICS (THAILAND) CO., LTD. 17th Fl., KPN Tower, 719 Rama 9 Road, Bangkapi, Huaykwang, Bangkok 10310 1-1, Shin-ogura, Saiwai-ku, Kawasaki-shi, Kanagawa 212-0031, Japan TEL: 66-2-717-0777 PIONEER TECHNOLOGY (MALAYSIA) SDN.