Honeywell TheraPro HR90 Instruction Manual
Electronic radiator controller
Hide thumbs
Also See for TheraPro HR90:
- Quick start manual (12 pages) ,
- Owner's manual (40 pages) ,
- User manual
Table of Contents
Advertisement
Quick Links
TheraPro HR90
Electronic
Radiator Controller
1. Scope of delivery
The radiator controller packaging contains:
1
1 Radiator controller with valve baseplate M30 x 1.5;
batteries included
2 Display support
3 Valve adapter type Danfoss RA
4 Screws for securing radiator controller and battery
compartment
Danger of suffocation!
f Keep packaging materials away from
children.
WARNING
2
4
3
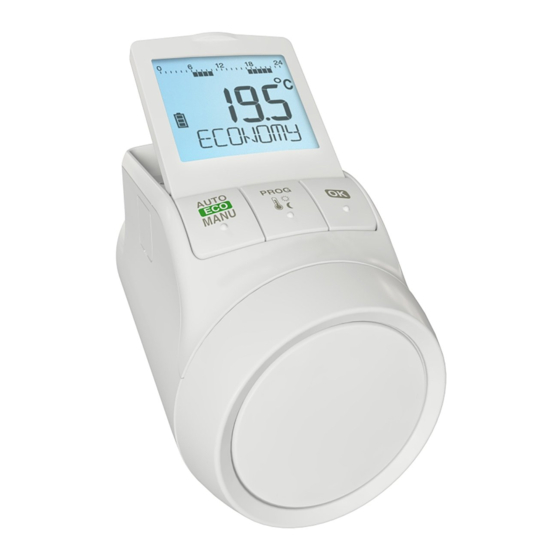
2. Brief description
With the electronic radiator controller, you can set your
room temperature exactly to your requirements while
additionally saving energy.
Please note: The HR90 radiator controller does not
directly switch your boiler on/off. It provides local room
temperature control whilst the boiler is running. The
boiler will be switched on/off by other controls such as
timer, thermostat, etc.
User-friendly
• Large, adjustable display with backlight.
• Convenient programming by removing the radiator
controller from the valve.
• Copy function for transferring the time program to
other HR90 radiator controllers.
Installation
• The radiator controller fits on the most common
radiator valves of the type M30 x 1.5.
• After mounting the radiator controller operates
immediately to the factory set program.
Features for your convenience
• Individual programs for each day of the week.
• Up to 6 setpoints per day and 3 different
temperatures.
• Holiday, party and special day operating modes can
be set easily.
• Parameters can be set individually, see Section 9.
• Operation lock/child-proofing to protect against
unauthorized operation.
• Optional connection to external sensors and window
position contact
Energy saving features
• With the window function, the radiator valve is closed
when ventilating the room.
• In ECO mode, the room temperature is lowered by
3 °C.
• Optimized control of the room temperature.
Care of use is required!
f Use the radiator controller only in
accordance with these operating
CAUTION
instructions.
f Do not let children play with the radiator
controller.
1
Advertisement
Table of Contents

Related Manuals for Honeywell TheraPro HR90


Summary of Contents for Honeywell TheraPro HR90
- Page 1 HR90 radiator controllers. Installation • The radiator controller fits on the most common radiator valves of the type M30 x 1.5. TheraPro HR90 • After mounting the radiator controller operates immediately to the factory set program. Electronic Features for your convenience Radiator Controller •...
-
Page 2: Device Overview
4. Installation 3. Device overview Ready to operate in three steps: Operating elements and display • Insert batteries • Set the language, time and date • Mount on radiator – FINISHED Inserting/changing batteries The radiator controller is set for the following battery type: •... -
Page 3: Setting The Time And Date
1. Pull off the adjustment dial. To do so, start at the notch 5. Use the adjustment dial to set the current day and on the bottom of the device. confirm with OK . 2. If used, unscrew any fastening screws from the The normal display with set temperature and selected battery compartment. - Page 4 M30 x 1.5. Adapters are required for some valve types. 1. Check whether an adapter is required and, if necessary, select the appropriate adapter. Brand Illustration Adapter Honeywell- Braukmann, required 2. Turn the adjustment dial of the valve baseplate MNG, Heimeier, counter-clockwise until it stops. Oventrop valves 3.
- Page 5 Securing the radiator controller Connecting optional sensors and window contact The radiator controller and the batteries can be The following external sensors and window contacts can secured against removal by using the supplied screws. be connected to the HR90 radiator controller: •...
-
Page 6: Operation
Cable connection 5. Operation For further information also refer to the Standard time program (factory setting) documentation for HCW23, RF20 and HCA30. In automatic mode, the radiator controller automatically fConnect the ACS90 cable as follows to the external controls the room temperature in accordance with the sensor and window contact: stored time program. -
Page 7: Programming - Operating Modes
Saving energy in ECO mode Selecting operating modes In ECO mode, the room temperature in automatic mode Selecting the "Party" or "Holiday" operating specified by the time program is lowered by 3 °C. mode fTo activate ECO mode, press the button AUTO/ 1. -
Page 8: Setting The Temperatures
7. Programming – Temperatures Operating hints Operating the radiator controller comfortably Three preset temperatures can be assigned to the set The radiator controller can be removed from the radiator points in the time program: to facilitate programming. • Comfort temperature 1 Factory setting 20 °C •... -
Page 9: Week Program
The example shows the following time program: • The end of a setpoint is also the beginning of the next setpoint. Set- • You can use the adjustment dial to change from point Time Temperature one setpoint to another and thus view the setting of all the programmed setpoints. - Page 10 Deleting a setpoint 1. Remove the side cover from all the radiator controllers. fWhen a setpoint is not required, select the and confirm with OK . temperature setting 2. Connect the master (with time program) and a further --.- HR90 radiator controller using the ACC90 cable. 3.
- Page 11 9. Controller operating parameters Par. Setting Meaning Upper temperature limit Overview The room temperature cannot be set higher than the specified upper temperature limit If required, the 16 basic settings (parameters) can be (Max Limit). adjusted. Factory setting: 30 °C Factory settings have a grey background.
-
Page 12: Changing Parameters
Changing parameters Set- point Time Temperature 1. Keep the PROG button pressed for at least 6:00 – 9:00 10 seconds until Parameter 1 flashes (left-hand digit). 20 °C (Comfort temperature 1) 9:00 – 12:00 16 °C (Setback temperature) 12:00 – 13:00 20 °C (Comfort temperature 1) 13:00 –... - Page 13 Parameters 5 to 7 – Window function In order to save energy, the radiator controller closes the °C radiator valve when you open a window resulting in a Without Optimum Optimum Optimization Start Stop large drop of the temperature. Without Optimization When you close the window so that the temperature rises the radiator controller opens the radiator valve...
-
Page 14: Further Functions
10. Further functions Manual override If you have switched off the central heating system Monitoring functions in summer and do not want to waste the batteries of the radiator controller, you can close the radiator valve continuously. Window function If you open a window causing the temperature to drop, Closing the valve the radiator controller closes the radiator valve in order 1. -
Page 15: Help With Problems
11. Help with problems 12. Technical data Error table Type HR90 Protection class IP30 Problem/ Cause Remedy Supply voltage Battery type LR6, AA, AM3 Display Alkaline: 2 x 1.5 V flashes Batteries flat Replace the batteries. Lithium: 2 x 1.5 V NiMH: 2 x 1.2 V Device defective Replace the device. -
Page 16: Programming Overview
Beginning Beginning Beginning Beginning Manufactured for and on behalf of the Environmental and Combustion Controls Division of Honeywell Technologies Sàrl, Rolle, Z. A. La Pièce 16, Switzerland by its Authorized Representative Honeywell The right is reserved to make modifications Honeywell House that serve improvement.