
Related Manuals for Diono Radian RXT


Summary of Contents for Diono Radian RXT
- Page 1 ® convertible + booster Instruction Manual Canadian English Version Please read carefully Store manual behind cover ono_CA_EN_RadianRXT_Manual_REBRAND 030416.indd 1 3/8/16 5:21 P...
-
Page 2: Table Of Contents
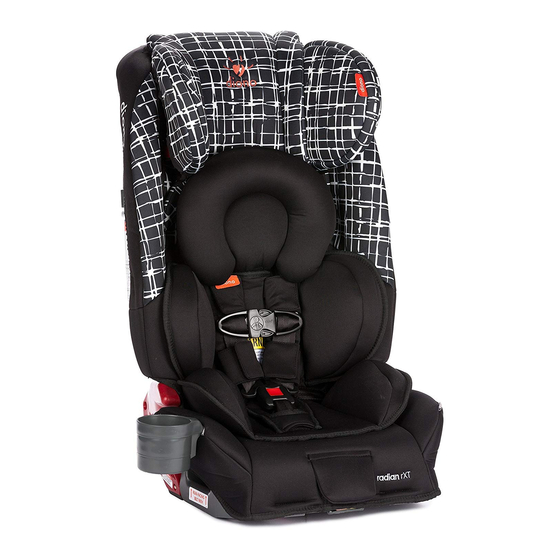
Table of Contents Page Warnings Seating Position Information Child Restraint Safety Information Seat Belt Information Carrying Restraint Unfolding and Folding Car Seat Installing and Removing Detachable Base Rear-facing Lower Connector System (UAS) Installation (2.3 to 20.5 kg/5 to 45 lbs) Rear-facing Lap-Shoulder Belt Installation (2.3 to 20.5 kg/5 to 45 lbs) Rear-facing Lap Belt Installation... - Page 3 Radian Features Cam lock access flap Rear-facing base UAS strap Backpack strap anchor UAS strap guide Safe Stop ® Release lever Shoulder carry strap anchor Locking clip Locking bolts Top tether Rear-facing tether Lap belt guide connector strap Harness adjuster Infant Support Cushion Shoulder belt guide ono_CA_EN_RadianRXT_Manual_REBRAND 030416.indd 3...
-
Page 4: Warnings
If you have any questions, visit ca.diono.com or contact Diono at 1-866-954-9786. • Use only with children weighing between 2.3 kg to 54 kg (5 lbs to 120 lbs) and who have a height of 144 cm (57”) or less. -
Page 5: Seating Position Information
• Based on accident statistics, Diono recommends the vehicle’s rear seat as the safest location for all children under age 13. • Register this restraint with the manufacturer using the attached registration card. -
Page 6: Child Restraint Safety Information
Fill out the included product registration card and mail it. You can register online at ca.diono.com. You can also register by sending your name, address, the restraint’s model and serial number to: Diono Canada, ULC... - Page 7 • This restraint is not a toy. Do not allow children to play with it. • Using any non-Diono product with this restraint, or any product not specifically approved by Diono for use with this restraint, is not allowed. Use of such products voids manu- facturer’s warranty and may seriously impact this product’s...
-
Page 8: Seat Belt Information
Seat Belt Information The information below applies only to installations using vehicle seat belts. IMPORTANT: • This restraint can be installed securely in most vehicles using the seat belt. However, some seat belts have an anchoring position for the lap belt that may not allow a secure restraint installation. -
Page 9: Carrying Restraint
• Do not carry restraint by harness adjuster strap (see diagram, page 3). This can damage the mechanism and the webbing. • Only the shoulder strap made by Diono is approved for use with this restraint. There are four ways to carry restraint: 1. -
Page 10: Unfolding And Folding Restraint
Unfolding and Folding Restraint WARNING: • Do NOT use restraint if release levers or locking bolts bind or do not move freely. When release levers are lifted, release levers and locking bolts should spring back immediately. • Do NOT oil or lubricate any part of restraint. •... -
Page 11: Folding Restraint
3. Pull harness adjusting strap until harness begins to tighten. (Fig. 3) If strap does not slide freely, fold restraint, remove harness adjusting strap from fold joint and repeat step 3. 4. Fasten both fabric side panels to center panel. (Fig. - Page 12 Folding Restraint (continued) 5. Place restraint on its back, push either release lever downward to release locking bolts. (Fig. 3) 6. Pull harness straps firmly toward top center restraint. Keep buckle extended toward top of restraint while folding seat bottom into back.
-
Page 13: Removing Base
Detachable Base WARNING: • Detachable base must be used when restraint is rear-facing. • Do NOT use detachable base when restraint is forward-facing. Installing base (Rear-facing only) 1. Confirm restraint is locked in its unfolded position (see page 10). 2. Confirm adjustable bottom is locked in its raised position (see page 29). - Page 14 2.3–20.5 kg (5 lbs – 45 lbs) WARNING: • You must use restraint rear-facing if child is less than 1 year and weighs less than 10 kg (22 lbs). Diono recom- mends keeping children rear-facing until they are at least 2 years old.
- Page 15 5. Route UAS belt through rear-facing belt path. Confirm UAS belt lays flat and is not twisted. Attach each connector to the UAS anchor closest to each side of the restraint. (Figs. 2 & 3) UAS connector will ‘click’ to confirm attachment to anchor.
-
Page 16: Rear-Facing Lap-Shoulder Belt Installation
2.3–20.5 kg (5 lbs – 45 lbs) WARNING: • You must use restraint rear-facing if child is less than 1 year and weighs less than 10 kg (22 lbs). Diono recom- mends keeping children rear-facing until they are at least 2 years old. - Page 17 4. Push restraint down firmly into vehicle seat while pulling shoulder portion of seat belt to remove slack and tighten lap portion of seat belt. (Fig. 4) Vehicle cushions should compress where there is contact with the car seat. WARNING: •...
-
Page 18: Rear-Facing Lap Belt Installation
2.3–20.5 kg (5 lbs – 45 lbs) WARNING: • You must use restraint rear-facing if child is less than 1 year and weighs less than 10 kg (22 lbs). Diono recom- mends keeping children rear-facing until they are at least 2 years old. - Page 19 4. Push restraint down firmly into vehicle seat while adjusting seat belt length. Tighten and lock seat belt according to vehicle owner’s manual. (Fig. 3) Vehicle cushions should compress where there is contact with the car seat. CHECK LIST: Confirm restraint is properly positioned. Confirm seat belt is tight and buckle is properly fastened.
- Page 20 • Remove detachable base when restraint is forward-facing. • Do NOT place infant in forward-facing restraint until 1 year and 10 kg (22 lbs). Diono recommends keeping children rear-facing until they are at least 2 years old. • ALWAYS use Safe Stop® with forward-facing child below 18 kg (40 lbs).
- Page 21 Installation Tip: Unfasten fabric side panels and reach behind restraint cover for easy access to belt path. (Fig. 3) 5. Confirm UAS belt lays flat and is not twisted. Attach each connector to the UAS anchor closest to each side of the restraint.
-
Page 22: Installation (10 To 29.5 Kg/22 To 65 Lbs)
• Remove detachable base when restraint is forward-facing. • Do NOT place infant in forward-facing restraint until 1 year and 10 kg (22 lbs). Diono recommends keeping children rear-facing until they are at least 2 years old. • Always use Safe Stop® with forward-facing child under 18 kg (40 lbs). - Page 23 3. Push on restraint to force it into vehicle seat while pulling shoulder portion of seat belt to remove slack and tighten lap portion of seat belt. (Fig. 5) The vehicle cushions should compress where there is contact with the car seat. WARNING: •...
-
Page 24: Forward-Facing Lap Belt Installation
10 kg–29.5 kg (22 lbs – 65 lbs) WARNING: • Do NOT place infant in forward-facing restraint until 1 year and 10 kg (22 lbs). Diono recommends keeping children rear-facing until they are at least 2 years old. • Always use Safe Stop® with forward-facing child under 18 kg (40 lbs) (see page 28). -
Page 25: Checking Restraint Stability
4. Push on restraint to force it into vehicle seat while pulling loose end of seat belt to remove slack and tighten lap portion of seat belt. (Fig. 5) The vehicle cushions should compress where there is contact with the car seat. CHECK LIST: Confirm restraint is properly positioned. -
Page 26: Booster (23 To 54 Kg/50 To 120 Lbs)
Booster for children 23–54 kg (50 lbs – 120 lbs) This restraint may also be configured for use as a belt positioning booster. WARNING: • Unsecured objects can become flying hazards and can cause serious injury in a accident. While not required, it is recommended to use UAS in vehicles equipped with such anchorages. - Page 27 6. Fasten seat belt across child: lap portion of seat belt should rest within both lower belt guides with buckle located on the outside of the restraint (Fig. 1). 7. Place shoulder portion into the upper belt guide on the headrest so that belt lays properly across child: on collar bone, interior to the shoulder (Fig.
-
Page 28: Aircraft Installation
Aircraft Installation This restraint is FAA certified for use in an aircraft only as a harnessed restraint. This restraint is NOT certified for use in an aircraft as a belt-positioning booster. Rear-facing aircraft installation (Fig. 1): • Adjust seat belt buckle to its shortest length to ensure buckle is accessible for release. -
Page 29: Forward-Facing Recline Adjustment
Forward-Facing Recline Adjustment WARNING: • Do not operate adjustable bottom when using detach- able base with rear-facing installation. • Only use adjustable bottom to position forward-facing restraint at a more reclined angle. Fig. 1 shows operation of adjustable base. Adjustable bottom must be operated before installation of restraint. -
Page 30: Top Tether
Top Tether • Diono recommends the use of the top tether anchor in rear-facing installations for better stability and performance of the child restraint. • If vehicle does not have tether anchorage points, consult vehicle owner’s manual or contact vehicle manufacturer with questions. -
Page 31: Tether Connecting Strap
3. Install restraint as shown in appropriate installation sections (see pages 14 to 24 for restraint installation instructions). 4. After installing restraint, pull top tether adjuster strap to remove all slack. Tether Connecting Strap WARNING: Tether connecting strap is ONLY to be used in rear facing installations. -
Page 32: Infant Support Cushions
Infant Support Cushion Infant Support: This restraint features a full infant head and body support. (Fig. 1) Fasten Velcro tabs through harness slots to keep infant head pillow in place. (Fig. 2) Toddler Body Support: Remove infant head pillow and place body support cushion in restraint for toddlers. -
Page 33: Using Harness Clip
Using Harness Clip IMPORTANT: Position harness clip at proper height for child: level with child’s armpits. (Fig. 1) For forward-facing children, ALWAYS utilize harness pads and attach them as shown. (Fig. 1A) To Fasten: Push both halves together until a ‘click’ confirms proper engagement. -
Page 34: Properly Securing Child
Properly Securing Child WARNING: Serious injury or death can result if child is not properly secured in restraint. Confirm harness is snug* before each use and after making any restraint adjustments. 1. Confirm proper restraint installation. 2. To loosen harness: lift harness adjuster and pull shoulder straps forward. -
Page 35: Proper Harness Height And Child Height
IMPORTANT: Give a firm, upward tug on both harness straps behind the child’s shoulders and close to the harness slots in the restraint, to confirm there is no harness slack behind the restraint. 8. Confirm harness is not twisted and lays flat against child. 9. -
Page 36: Adjusting Harness Height
Proper Harness Height & Child Height (continued) Maximum Height: Rear-facing child is too tall for restraint if top of head is less than 3.8 cm (1.5”) from top of restraint or if child is more than 112 cm tall (44”). Forward-facing child is too tall for restraint if tops of the ears are above the back of the restraint or... -
Page 37: Harness Buckle Removal And Installation
Harness Buckle Location Confirm location of harness buckle is correct, to insure proper harness fit: 1. Properly secure child in restraint (see page 34). 2. Check for correct position of harness buckle. For children 2.3-13.5 kg (5–30 lbs): Harness buckle can be directly above its buckle slot (Fig. A) or forward of its buckle slot. - Page 38 Harness Buckle Removal and Installation (continued) Removing harness buckle: 1. Make sure restraint is securely locked in its unfold- ed position. (See page 10, unfolding restraint.) 2. Unbuckle harness. 3. Push harness buckle strap down 2 inches into rear- facing belt path tunnel. 4.
-
Page 39: Locking Clip
Locking a Vehicle Lap-Shoulder Belt with a Locking Clip Proper use of a locking clip maintains a tight, secure installation by preventing the seat belt from becoming loose over time. WARNING: • Failure to properly lock the seat belt will result in an unsafe installation that will greatly increase the poten- tial for injury or death to the child in an accident. -
Page 40: Restraint Cover
Restraint Cover WARNING: Never remove buckle tongs or chest clip when removing and replacing restraint cover. This is dangerous and NOT necessary for removing or replacing the restraint cover. Removing restraint cover: 1. Unthread harness shoulder straps from back of restraint (see page 36, adjusting harness height). -
Page 41: Expandable Sides
Expandable Sides Sides may be rotated either inward (Fig. 1A) or outward (Fig. 1B) during use. Note: Before folding restraint, both sides must be adjusted to their inward position (Fig. 1A) Cup Holder Cup holders can be purchased as added accessories and attached to either expandable side. -
Page 42: Using Superlatch™ Uas Connector
SuperLATCH™ UAS SuperLATCH™ is a high-capacity child restraint installation system. Using SuperLATCH™ Connector: 1. Press red button to set connector to ‘open’ position for use. (Fig. 2) 2. Attach connector to vehicle anchor (audible ‘click’ confirms attachment, see pages 14 and 20 for complete instructions). -
Page 43: Replacing Harness Straps
Replacing Harness Straps 1. Remove harness clip and buckle tongs from harness straps. 2. Take out screws and remove access panels. (Fig. 1) 3. Remove old harness straps from seat. 4. Insert new harness strap through slot in metal frame (Fig. -
Page 44: Cleaning And Maintenance
Cleaning and Maintenance Cleaning / Maintenance of release mechanism and locking bolts: Periodically inspect release levers and locking bolts for cleanliness and proper functioning: When release levers are lifted, release levers and locking bolts should spring back immediately and completely. WARNING: •... -
Page 45: Washing The Cover
Cleaning the plastic shell: • Clean with damp cloth only: wet cloth with warm water and mild soap and wring thoroughly so it is NOT dripping water. • Towel dry. • Do use solvents or abrasive cleaners. Washing the cover: •... - Page 46 Cleaning and Maintenance (continued) Cleaning harness adjuster: Periodically inspect harness adjuster for cleanliness and proper functioning: When lifted, harness adjuster should spring back immediately. • Use a soft bristle brush to remove loose debris or clean more thoroughly if necessary. •...
-
Page 47: Warranty Information
Warranty Information The manufacturer of this child restraint, warrants this product only to the original retail purchaser. Visit ca.diono.com for complete warranty information and details. ono_CA_EN_RadianRXT_Manual_REBRAND 030416.indd 47 3/8/16 5:21 P... - Page 48 Diono Canada, ULC 50 Northland Road, Suite 400 Waterloo, Ontario N2V 1N3 Canada Customer Care Tel: 1.866.954.9786 Email: dionoCA@diono.com ca.diono.com © 2016 Diono Canada ULC. All rights reserved. Radian RXT CA EN 03042016 ono_CA_EN_RadianRXT_Manual_REBRAND 030416.indd 48 3/8/16 5:21 P...