
Related Manuals for Alpine INE-s900r


Summary of Contents for Alpine INE-s900r
- Page 1 FOR CAR USE ONLY Advanced Navi Station INE-S900R OWNER’S MANUAL Please read before using this equipment. Downloaded from Caradio-Manual.com Manuals...
- Page 2 Downloaded from Caradio-Manual.com Manuals...
-
Page 3: Important Information, Please Read Carefully Before Using This Product
PRODUCT. components. They contain instructions on how to use this product in a safe and effective manner. Alpine cannot be responsible for problems resulting from failure to observe the instructions in this This product is intended to safely provide turn-by-turn manual. -
Page 4: Caution
Failure to do so may cause personal injury or damage to the KEEP THE VOLUME AT A LEVEL WHERE YOU CAN STILL product. Return it to your authorized Alpine dealer or the nearest HEAR OUTSIDE NOISES WHILE DRIVING. Alpine Service Centre for repairing. -
Page 5: Precautions
(Bumps) Damaged Disc Installation Location Do not attempt to play cracked, warped, or damaged discs. Playing Make sure the INE-S900R will not be installed in a location a bad disc could severely damage the playback mechanism. subjected to: Maintenance • Direct sun and heat •... -
Page 6: Discs Playable On This Unit
This ensures the focus of the * Two-layer DVD disc compatible driver’s attention will be on the road and not on the INE-S900R. This has been done for the safety of the driver and passengers. - Page 7 Discs that cannot be played Tips for making your own CDs ® DVD-RAMs, CD-ROMs (excluding MP3/WMA/AAC files), Video The INE-S900R plays DVD Video, Audio CD, DivX and has a CD, photo CDs, etc. built in MP3/WMA/AAC decoder. The following information is designed to help you create your own...
- Page 8 • This unit is compatible with discs recorded in the standard DVD-Video formats. Alpine accepts no responsibility for lost data, etc., lost as a result of • Note that discs not finalised (processed to enable to play on using this product.
-
Page 9: Table Of Contents
Contents Changing between the NAVIGATION menu and the AUDIO/VISUAL menu ....19 Touch operation ..........19 Window operations ......... 19 Appearance of the NAVIGATION Operating Instructions Window ............ 19 Appearance of the AUDIO/VISUAL PRECAUTIONS Window ............ 20 Changing to the Info. Window ....20 IMPORTANT INFORMATION, PLEASE READ Resize the Window ........ - Page 10 Finding a Point of Interest (POI) ....32 Detour ............. 48 Finding a Place by Intersection ...... 33 Reroute ............48 Finding the Nearest Points of Interest Cancel Route ........... 48 (POI) ............34 Navigation Edit Function Finding by Postcode ........35 Displaying the Edit Address Screen ....
- Page 11 CD/MP3/WMA/AAC Up/Down Function ......... 75 Repeat Play ............. 76 Playback ............61 Random Play (Shuffle) ........76 Repeat Play ............. 61 Random Play (Shuffle All) ......76 Random Play (M.I.X.) ........61 Random Play (Shuffle Songs) (M.I.X. All) ..62 USB Memory Selecting Folders (concerning MP3/WMA/ Playback ............
- Page 12 Redial Function ........... 84 Adjusting the Rear Camera Guide line ..93 Calling from the Confirmation screen ..84 Adjusting the picture quality of the Rear Camera screen .......... 93 Operations During a Conversation ....84 System Setup ..........94 Changing the voice output ......
- Page 13 TMC icon display setting ......103 Phone Setup Country Setting ......... 104 Phone Setup Operation ......... 114 Station Setting ........... 104 Changing the Device information ....115 Performing the pay TMC Activation ..104 Editing device name ........115 Storing Region Selection ......105 Editing device passcode ......
- Page 14 Installation and Connections Warning ..........135 Caution ..........135 Precautions .......... 135 Installation ............ 136 Connections ..........140 System Example ........... 142 Downloaded from Caradio-Manual.com Manuals...
-
Page 15: Getting Started
Getting Started Two dimension positioning When GPS satellite reception is less than optimal positioning is Preface performed in two dimensions: latitude/longitude. In the latter case, since altitude cannot be determined, minor positioning discrepancies can occur three dimension positioning. There may be a delay before the actual vehicle’s position Navigation systems is displayed Determination of the present vehicle’s position starts when the ignition... -
Page 16: Navigation Terminology
About car positional accuracy on initial use Address book Locations you go to frequently can be stored into address book and Accurate Gyroscope/Speed sensor performance is not possible first marked on the map. The system can store up to 200 points. You can add without accumulating driving some data. -
Page 17: Features
Built-in RDS-TMC Receiver Features Real time traffic information from the Traffic Message Channel (TMC) will be automatically received. In the event of a traffic jam or traffic restriction, etc., you will be informed by voice and visual guidance. Large Touch-screen Monitor TMC traffic information is already broadcast in Austria, Andorra, This device is equipped with touch screen. -
Page 18: Before Using The System
• Do not insert the SD memory card into another device such as a Controllable with Remote Control computer. Doing so may cause data corruption. This unit can be controlled with an optional Alpine remote control (RUE-4202). Some operations are possible in Audio/ Visual mode. For details, consult your Alpine dealer. -
Page 19: Turning The System On
Turning the System On Initial System Start-Up With the Alpine navigation system, when the ignition key is turned to Be sure to press the RESET switch when using the unit for the first ACC or ON, the opening screen will be automatically displayed. -
Page 20: Basic Operation
Using the Front AUX Input Terminal Basic Operation Connect a portable music player, etc., by simply connecting it to the input on the front panel. An optional adapter cable is required (standard RCA to 3.5ø mini-phono plug or 3.5ø to 3.5ø mini phono plug). Turning Power On or Off You can also play back video connecting with an optional AV cable (4- pole mini AV plug to 3-RCA). -
Page 21: Adjusting The Volume Of The Sound (Beep) Guide
• In this Owner’s Manual, the navigation instructions assume that the Adjusting the volume of the Sound (Beep) NAVIGATION menu screen appears when the <MENU> button is Guide pressed. Also, the audio/visual instructions assume that the AUDIO/ VISUAL menu screen appears when the <MENU> button is pressed. Adjust on the Setup screen. -
Page 22: Appearance Of The Audio/Visual Window
Appearance of the AUDIO/VISUAL Window Changing to the Info. Window Audio mode view Touch the [(mode name)] switch on the Window. [(mode name)] switch The Window changes to the Info. Window. The current time and the calendar are displayed. Visual mode view Touch [Info.]. -
Page 23: Selecting An Item In A List
Selecting an Item in a List Using the On-Screen Keyboard To scroll through a list, perform the following operations. When you are required to input a character on the screen using the keyboard, the display changes to the keyboard. Use the displayed characters to input information. -
Page 24: Turn Off The Screen
Turn off the Screen Setting the Clock Display You can turn off the screen. Press <MENU>. Press <MENU>. Touch [Screen Off]. Touch [Screen Off]. Touch the screen to display the operation switch, then touch any of [Clock1] ~ [Clock3] or [Clock Off]. Touch the screen to display the operation switch, then touch [Screen Off]. -
Page 25: Navigation
Navigation switch Displays/hides the POI Icons. For details, see page 27. Basic Operations switch Displays the Destination screen. You cannot touch the switch while you are driving. For details, see page 30. @ AUDIO/VISUAL window How to View a Navigation Screen For details, see page 19 and 20. -
Page 26: Point Display
Point Display Displaying a Desired Place The point display appears on the screen after you have scrolled the map. You can search a map for a desired place by scrolling it. For how to find a destination by scrolling the displayed map, see “Finding a Destination by Scrolling Displayed Map”... -
Page 27: Changing The Map Scale
Changing the Map Scale Changing the Map Orientation The map scale can be adjusted from 50 m (50 yards) to 200 km (120 The map orientation can be set for either north up, or your current miles). direction heading up. A 3-dimensional map can also be displayed. The icon in the lower left of the screen above the map scale icon Map scale indicates the current orientation. -
Page 28: Changing The Map Mode
About the Manoeuvre List Screen Changing the Map Mode The map mode can be changed according to the situation. When the route is set, touch the Destination information switch. Touch [ ] or [ ] to scroll the manoeuvre list. Turn direction at the guidance point. -
Page 29: Display The Poi Icon
Display the POI Icon About Congestion Areas You can display the POI Icon on the map. You can also display the POI Areas in London, for example, where a congestion tax has been Icon in the Setup screen. introduced, display streets in a different colour on the map (scale 2 km/1 Refer to “Setting the POI Icon Display”... -
Page 30: About Dynamic Route Guidance
Touch [Detour] or [Current route]. About Dynamic Route Guidance The DRG (dynamic route guidance) updates traffic changes from moment to moment, providing you with a more accurate anticipated arrival time. The dynamic route guidance is performed based on TMC restriction event (accident, traffic congestion, etc.). -
Page 31: Finding Your Destination
Finding Your Destination Searching for a Destination/Route This flow chart shows the setting of destination, waypoint(s), and route search conditions, until the destination. Finding Your Destination (page 30 to 38) Confirm Destination (page 39) • Change Method (page 39) The route guidance begins •... -
Page 32: Displaying The Destination Menu Screen
Destination Displaying the Destination Menu Screen • Address (see page 31) • POI (Point of Interest) (see page 32) • Intersection (see page 33) Navigation operation starts from searching for a location. • Nearest POI (see page 34) When you display a map of the destination, it is possible to set the route •... -
Page 33: Finding By Address
A list of street names will be displayed. Touch the Finding by Address desired street name. If you know the address of the destination, the system can calculate a route to that address. Touch [Address search] on the Destination screen. The Address search screen is displayed. -
Page 34: Finding A Point Of Interest (Poi)
By category: Finding a Point of Interest (POI) 1 Touch [Category]. 2 The category selection menu appears. Touch the If you know the name of the desired point of interest (POI), you can desired category. easily display that point of interest on the map by just inputting its name. -
Page 35: Finding A Place By Intersection
Touch the desired street name. Finding a Place by Intersection • If intersections in two or more cities are found, the cities are displayed in the list. Touch the desired city. If you know an intersection near where you want to go, you can input •... -
Page 36: Finding The Nearest Points Of Interest (Poi)
The screen when [Nearest to you] is selected. Finding the Nearest Points of Interest (POI) You can search for facilities in the vicinity of the current position, destination, or route, based on a genre. Touch [Nearest POI] on the Destination screen. The Nearest Points of Interest screen is displayed. -
Page 37: Finding By Postcode
Finding by Postcode Finding by Coordinates You can search for a destination by inputting the postcode. (This If you know the latitude and longitude of the desired location, you can function can be used in the United Kingdom only.) display that location by just inputting those numbers. Touch [Postcode] on the Destination screen. -
Page 38: Finding A Destination Using The Address Book
Finding a Destination Using the Address Finding a Place from the Destination Book History If a location has already been placed into your personal address book, The system automatically stores up to 100 locations the system have you can recall this location for use as a destination. The Address Book searched for as destinations. -
Page 39: Finding A Destination By Home
Finding a Destination by Home Finding a Destination by Scrolling Displayed Map If your home has already been registered, you select it with a simple operation. For details about the registration method, see page 41. This feature allows quick and easy selection of a new destination directly from a street segment or Point of interest icon on the Detailed Press <MENU>. -
Page 40: Finding Facilities In The Vicinity Of The Specified Location By Scrolling The Displayed Map
Touch [OK]. Finding facilities in the vicinity of the The system will begin calculating the route. specified location by Scrolling the • For details on the Confirm Destination function, see Displayed Map page 39. You can scroll a map and specify a location to search for facilities in the Finding a Destination by POI icon vicinity of the location. -
Page 41: Confirm Destination
Change Method Confirm You can change the way the system calculates a route. Destination Touch [Change method] on the Confirm destination screen. After a destination is searched, use the Confirm destination screen to The Change method menu is displayed. customize the route. Setting a waypoint, storing Address book, making a call on the phone, etc., can be performed on the Confirm destination screen. -
Page 42: Set As Current Position
Touch [OK]. Scroll the map to correct the current position. The display returns to the Confirm destination screen. Touch [ ] or [ ] to correct the direction • Depending on traffic conditions, the system may set a route search of your car. -
Page 43: Save As Address Book
Save as Address Book Save as Home Up to 200 addresses can be stored in Address Book. Register any destination as home. By doing so, it can be instantly recalled for finding your way home. Touch [Option] on the Confirm destination screen. Touch [Option] on the Confirm destination screen. -
Page 44: Add A Waypoint
Add a Waypoint You can add waypoints you want to pass through on the way to the destination. You can add up to 4 waypoints. You can also arrange the waypoints or delete them. (See “Edit Route” on page 46.) Touch [Option] on the Confirm destination screen. -
Page 45: Route Guidance
Motorway junction guidance view Route Guidance While you are driving on a motorway/toll road, if the system has image data of the junction, the motorway junction guidance view is displayed. Guidance Display This section describes various guidance features presented as you drive along the route. -
Page 46: Border Guidance
Border guidance Voice Guidance When you have crossed a border, the national flag is displayed. While you are driving along the route, voice guidance is provided according to the driving conditions and the vehicle speed. During guidance to the destination, the system automatically provides voice guidance on intersections, turnings, waypoints, motorway entrance/exit ramps, junctions, the arrival at the destination, etc. -
Page 47: Personal Poi Guidance
Personal POI guidance You can display the Personal POI data (POI warning data/Custom POI data) on the map screen by updating the information via the USB memory. An alarm can be set to inform you of when you are nearing a POI warning location. -
Page 48: Edit Route
Delete Waypoint Edit Route This section explains how to delete waypoints you have previously set. Touch [Edit waypoints] on the Edit route screen. Displaying the Edit Route Screen The Edit waypoints screen is displayed. • Refer to “Displaying the Edit Route Screen” (page 46) on You can edit the route on the Edit route screen. -
Page 49: Arranges Waypoints Manually
Arranges Waypoints manually Change Method You can arrange waypoints. Change Method allows you to select the way the system calculates the drive to your destination. Touch [Edit waypoints] on the Edit route screen. Touch [Change method] on the Edit route screen. The Edit waypoints screen is displayed. -
Page 50: Detour
Detour Cancel Route You can calculate a new route from your current position around an This section explains how to delete a destination you have previously approaching detour on the current route. If there is a construction site set. Any waypoints for that destination will also be deleted. ahead, for example, search for a detour by estimating the distance from your current position to the site. -
Page 51: Navigation Edit Function
Editing the Address Book Navigation Edit You can change the names, locations, phone numbers and icons in the Function address book. Touch [Edit address book] on the Edit address screen. Displaying the Edit Address Screen • Refer to “Displaying the Edit Address Screen” (page 49) on how to display the Edit address screen. -
Page 52: Delete Address Book Entry
7 Show/Hide Delete All Address Book Entry You can set to display or not to display entry icons. (See “Icon Display Setting” on page 51.) 8 Location Touch [ ] on the address book list screen (Edit You can change the entry location. (See “Location Change” address book screen). -
Page 53: Icon Change
Icon Change Location Change Touch [Icon] on the Edit address book screen. Touch [Location] on the Edit address book screen. The select Icon screen is displayed. The map of the location is displayed. Touch the desired icon. Touch and scroll the map to display the desired location. -
Page 54: Editing The Home
Editing the Home Deleting the Last Destination Information registered in home can be changed or deleted. If you wish to delete a destination from destination history, you can use this feature. Touch [Edit home] on the Edit address screen. Touch [Delete last destination] on the Edit address •... -
Page 55: Tmc Operation
Symbol Legend TMC Operation Parking Available Parking Not Available To use the TMC function, set the Country and Station of the RDS-TMC first. (See “RDS-TMC Setup” on page 103.) Service Available Service Not Available About the TMC Information Objects On Road The TMC Information can be displayed on the map. -
Page 56: Displaying The Traffic Event Information
TMC event icon magnified display (when a route is Displaying the Traffic Event Information set) When a route is set, the closest icon from the current position is Up to 300 TMC events within 500 km from the current position can be magnified and an alarm sounds to notify. - Page 57 The detailed information of the selected event is displayed. Traffic event icon, street number or street name The location of the traffic event Traffic event information The length of the section affected by the traffic event The distance from the current position to the traffic event Touch [Map] to display the map of the Traffic event.
-
Page 58: Audio/Visual
Audio/Visual Turning off the Audio/Visual Source Basic Operation INE-S900R outputs the audio of the selected audio/visual source even when the navigation screen is displayed. You can turn off the audio/ visual source to stop the audio output. Selecting the Source Press <MENU>. -
Page 59: Radio
Presetting Stations Manually Radio Tune in a desired radio station you wish to store in Radio screen display example the preset memory by manual or automatic seek tuning. Touch and hold any one of the preset switches for at least 2 seconds. The selected station is stored. -
Page 60: Rds Operation
Receiving Traffic Information RDS Operation Automatically Touch [TA] to turn on the Traffic Information mode. The TA indicator lights up. When the traffic information station is tuned in, the TP indicator lights up. Traffic information is heard only when it is being broadcast. If traffic information is not being broadcast, the unit is set in the standby mode. -
Page 61: Pty (Programme Type) Tuning
PTY (Programme Type) Tuning Displaying Radio Text Text messages from a radio station can be displayed. Touch [PTY]. The Select PTY screen is displayed. Tune in a radio station that transmits text messages. Touch [ ] or [ ] to scroll the list. Touch [Info.] in the FM radio mode to activate the Radio Text mode. -
Page 62: Cd/Mp3/Wma/Aac
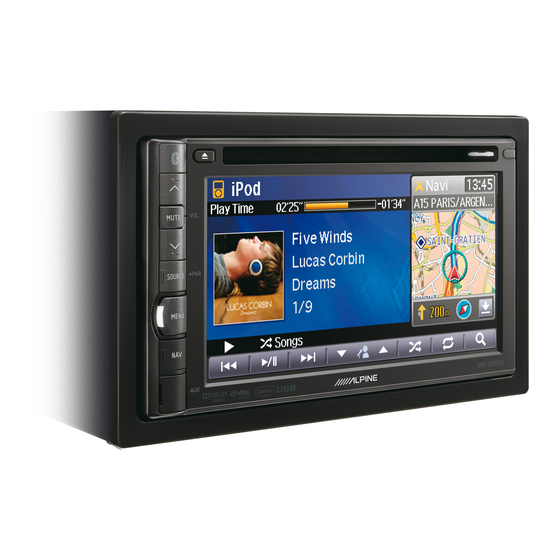
MP3/WMA/AAC screen display example CD/MP3/WMA/AAC CD screen display example(if CD text exists) 1 Mode display 2 Clock display 3 Elapsed time 4 Image display 5 Current song no./Total song no. CD screen display example (if no CD text exists) 6 Information display Tag information exists: Song name/Artist name/Album name No Tag information exists: “No title”... -
Page 63: Playback
Touch [CD/DVD]. Touch [ ] again and select OFF to deactivate Repeat play. The display shows the CD/Disc mode screen. When a Disc is inserted into the Disc Slot of the INE-S900R, Repeat (Off) Repeat with the label side facing up, the unit starts to play the CD/ MP3/WMA/AAC. -
Page 64: Random Play (Shuffle Songs) (M.i.x. All)
Random Play (Shuffle Songs) (M.I.X. File/Folder Name Search (Concerning All) MP3/WMA/AAC) Shuffle Songs plays all songs in the disc randomly. Touch [ (Search)] during playback. Touch [ (Search)] during playback. The search mode is activated, and the folder/file names are displayed in alphabetical order. -
Page 65: About Mp3/Wma/Aac
ID3 tags/WMA tags About MP3/WMA/AAC This device supports ID3 tag v1 and v2, and WMA tag. If tag data is in an MP3/WMA/AAC file, this device can display the title (track title), artist name, and album name ID3 tag/WMA tag data (maximum 64 characters). - Page 66 Order of files Files are played back in the order that the writing software writes them to the disc. Therefore, the playback order may not be what’s expected. Verify the writing order in the software’s documentation. The playback order of the folders and files is as follows.
-
Page 67: Dvd
6 Video/Audio changeover switch During CD-R/CD-RW/DVD-R/DVD-RW/DVD+R/ DVD+RW If the INE-S900R is not installed correctly, the driver disc playback, the Video and Audio mode can toggled. will be able to watch the DVD/TV/Video while driving Touch [ ]. -
Page 68: If A Menu Screen Appears
If a menu screen appears Caution On DVDs, menu screens may appear automatically. If this happens, • Not all functions will operate for every DVD. See the perform the operation described below to start playback. individual DVD’s instructions for details on the Direct Menu Operations features supported. -
Page 69: Numeric Keypad Input Operations
Numeric Keypad Input Operations Displaying the Menu Operation Mode Screen Touch [1/2]. Touch [1/2] on the DVD mode main screen. Touch [10KEY]. The operation screen changes. The numeric keypad input mode screen appears. Touch [Menu Cont]. The menu operation mode screen appears. •... -
Page 70: Finding The Beginnings Of Chapters/Files
Finding the Beginnings of Chapters/Files Slow Motion Playback When [ ] or [ ] is touched and held while in the pause mode, the 1/8th speed slow motion During playback, touch [ ] or [ playback mode is set. The chapter/file switches each time the switch is touched, Furthermore, when touched and held [ ] or and playback of the selected chapter/file starts. -
Page 71: Searching By Title Number
® DivX / ASF Searching Directly by Chapter Number During playback, touch [1/2]. The operation screen changes. Use this function to easily move to the beginnings of the chapters on the disc. Touch [ The repeat mode switches with each touch. Touch [1/2] in any mode other than stop mode. -
Page 72: Switching The Angle
Switching the Angle Switching the Subtitles (Subtitle Language) On DVDs in which scenes have been filmed from multiple angles, the angle can be switched during playback. For DVDs with multiple subtitle languages, the subtitle language can be switched during playback. Alternatively, subtitles can be hidden. During playback, touch [1/2]. -
Page 73: Switching Display Modes
® Switching Display Modes About DivX ® DivX is a codec (software) programme to compress moving images while maintaining image quality using a highly advanced compression ratio and operating speed. Touch [WIDE]. ® Each touch changes the display modes as follows: •... -
Page 74: Ipod/Iphone (Optional)
451iV) (sold separately). You can connect a video-capable iPod to enjoy not only Music but also Video files. When the INE-S900R is connected by using the cable, the controls on the iPod are not functional. • Internet or telephone functions, etc., of the iPhone or iPod touch are... -
Page 75: Playback
• If a audio file is playing on the iPod/iPhone when it is connected to the INE-S900R, it will continue playing after the connection. Install the INE-S900R correctly so that the driver • If a video file is playing on the iPod/iPhone when it is connected to cannot watch DVD/TV/Video unless the vehicle is the system, it cannot continue playing after the connection. -
Page 76: Searching For A Desired Music File
Touch the desired song. Searching for a desired Music File The selected song is played back. • Touching [All] will display all songs in the list when you are in a An iPod/iPhone can contain thousands of songs. The unit for this reason hierarchy with an asterisk “*”... -
Page 77: Searching For A Desired Video File
Searching for a desired Video File Up/Down Function You can select a movie, music video, etc., from the list screen. If you touch and hold an album name in the search mode, this album will be played back repeatedly. To go to the previous or next Album, use •... -
Page 78: Repeat Play
Repeat Play Random Play (Shuffle All) Only Repeat One is available for the iPod. All music files in the iPod are played back in random sequence. Touch [ Touch [ (Search)] during playback. The file will be played repeatedly. The Audio list screen is displayed. Repeat One (Off) Repeat One... -
Page 79: Usb Memory
Operating Auxiliary Devices The operations for Music files are the same as the operations for MP3/ To operate your devices connected to the AUX terminals of INE-S900R, WMA/AAC files stored in discs. For details, see “CD/MP3/WMA/ follow the procedure described below. -
Page 80: Operating An External Dvd Changer
AUX operation screen display during video file playback About the DVD changer operation screen Touch the screen. When the External DVD Changer playback screen is displayed, you can touch the screen to display the operation screen. For details on how to The AUX operation screen is displayed. -
Page 81: Operating Mobile Digital Tv Receiver (Dvb-T)
Mobile Digital TV Receiver (DVB-T) screen display Operating Mobile Digital TV Receiver example 2/2 (DVB-T) To operate the Mobile Digital TV Receiver (DVB-T) (Optional), set “Setting the Rear AUX Primary” (page 110) to “DVB-T”. Changing to the Mobile Digital TV Receiver (DVB-T) mode Press <MENU>. -
Page 82: Other Useful Features
Owner’s Manual are based upon the latest available information and are believed to be accurate at the time of printing. Alpine reserves the right to change or modify any information or specifications without notice or obligation. How to connect to a BLUETOOTH compatible device (Pairing) Touch [Connect]. -
Page 83: Using The Mobile Phone
Touch [Device list]. (page 115). The Device list screen appears. • The system’s device name is “INE-S900R” by default. You can also change a device name. See “Editing device name” (page 115). Touch the mobile phone name in the list you intend to disconnect from. -
Page 84: Updating The Device Information About Bluetooth
Clear all device information Updating the device information about BLUETOOTH Press <MENU>. Obtains the latest device information from the mobile phone with BLUETOOTH function to update it. Touch [Phone]. The Phone menu screen is displayed. Press <MENU>. Touch [Device list]. Touch [Phone]. -
Page 85: Adjusting The Volume
Touch [ Touch the [Dialled] tab, [Received] tab, or [Missed] tab. The call starts. • When “Setting to Receive Calls automatically” (page 88) is set to On, you can receive a call automatically. • While calling, Audio/Visual source will be automatically muted, and voice guidance will be cancelled. -
Page 86: Dialling A Number In The Phone Book
Dialling a Number In The Phone Book Calling from the Confirmation screen You can use the phone book of the mobile phone to make a phone call. For details on the Confirmation screen, see “Confirm Destination” Before using, you need to transfer the phone book from the mobile (page 39). -
Page 87: Adjusting The Speech Volume
• To stop the phone book transfer, touch [Cancel]. The phone book Adjusting the speech volume before starting transfer is displayed. • You can store up to 1,000 phone numbers in the phone book of the You can adjust the transmit volume and receive volume respectively. system. -
Page 88: Deleting The Phone Book Entries
Touch the phone number you intend to assign as the Deleting the phone book entries one-touch dialling number. The details screen of the Phone book is displayed. Deleting one entry from the phone book Touch [Save]. Press <MENU>. If 2 phone numbers are stored in the entry, touch the phone number you intend to assign, then touch [Save]. -
Page 89: Call History Function
Call History Function User setup User Setup Operation The following steps 1 to 5 are common operations to each “Setting item” of User Setup. Refer to each section for details. Press <MENU>. 1 Name/phone number Touch [Phone]. 2 Date/time The Phone menu screen is displayed. The date and time of making or receiving the call are displayed. -
Page 90: Setting To Receive Calls Automatically
Setting to Receive Calls automatically Setting the passcode for displaying Secret data When a call is received, you can set whether to receive it automatically or not. To display data that is classified as secret on the system’s screen, you need to enter a passcode. -
Page 91: Rear Camera Operation (Optional)
The marks are the extension lines of the width of the car, which provide guidance for the path of the car when you Rear Camera drive straight in reverse. The marks represent the distance from the rear of the car Operation (from the rear end of the bumper). - Page 92 <Situation of the car> • In the following conditions, screen visibility may be impaired. This is not a malfunction. Actual distances - When it is dark (during the night, etc.). - When the temperature around the camera lens is high or low. - When water drops adhere to the camera, or when the humidity is high (such as rainy weather, etc.).
-
Page 93: General Setup
Setup Touch [ ] or [ ] etc., to change its setting. General Setup The Parking Brake must be engaged to access the Setup screen. Attempting to access this screen while driving will display the warning “No operation while driving - for your safety.” General Setup Operation Touch [OK]. -
Page 94: Dimmer Setup
Setting the Wallpaper colour Dimmer Setup You can select any of 4 colours for the Wallpaper of the Audio mode [Dimmer] is selected on the General setup menu in step 4. See “General screen and the blank screen (when the screen is set to Off). Setup Operation”... -
Page 95: Auto Volume Adjustment
Auto volume Adjustment Adjusting the picture quality of the Rear Camera screen When you set this item to a value from 1 to 6, as you accelerate the volume of the system is automatically turned up. The higher setting You can adjust the picture quality of the rear camera screen. value brings about the higher rate of increase in volume. -
Page 96: System Setup
System Setup Clock Setup [System] is selected on the General setup menu in step 4. See “General [Clock] is selected on the General setup menu in step 4. See “General Setup Operation” (page 91). Setup Operation” (page 91). Setting the Language Setting the Clock Display You can set the language for the display and voice of the system. -
Page 97: Installation Setup
Enter a password, then touch [OK]. Installation Setup [Installation] is selected on the General setup menu in step 4. See “General Setup Operation” (page 91). Installation check The system status information are viewable. Setting item: Installation check • Enter the 6-digit number. •... -
Page 98: Adjusting The Touch Panel
Adjusting the Touch Panel Adjusting the Vehicle position calibration Adjustment becomes necessary when the display position on the LCD To provide accurate guidance, the system accumulates comparative data and the touch position on the touch panel do not match. between the GPS signal and the vehicle speed pulse signal. You can check the progress of accumulated data on the screen. -
Page 99: Setting Speed Pulse Type
As a result, normally you cannot use this function, and behind the actual movement, touch [ ] to calibrate. When only Alpine dealer formats the SD memory card. the movement on the map is premature, touch [ ] to calibrate. -
Page 100: Initializing The System
Initializing the System Restore default setting You can initialize all data such as marked positions, setting item values, [Restore default settings] is selected on the General setup menu in step etc., to restore the factory settings. Remove the DVD/CD disc, etc., 4. -
Page 101: Navigation Setup
Touch [OK]. Navigation Setup The setting is changed and the system returns to the previous screen. Navigation Setup Operation The following steps 1 to 6 are common operations to each “Setting item” of Navigation Setup. Refer to each section for details. -
Page 102: Map Setup
Adjusting the 3D view angle Map Setup You can change the view angle of the 3D map. [Map] is selected on the Navigation setup menu in step 4. See Setting item: 3D view angle “Navigation Setup Operation” (page 99). Setting the Map Colour Display Touch [Adjust]. -
Page 103: Setting The Direction Line Display
Setting the Direction line Display Setting the Vehicle Position Mark You can set whether or not to display the direction line that points to the You can change the vehicle position mark. destination during the route guidance. Setting item: Vehicle position mark Setting item: Direction line Setting contents: (Initial setting)/... -
Page 104: Setting The Poi Icons Display Category
Setting the POI Icons Display Category Guidance Setup When “Setting the POI Icons Display” is set to “Show”, you can select a [Guidance] is selected on the Navigation setup menu in step 4. See Sub category to be displayed with each POI icon. “Navigation Setup Operation”... -
Page 105: Setting The Average Speed
Setting the Average Speed Route Setup You can set the condition (speed) to estimate the arrival time at a [Route] is selected on the Navigation setup menu in step 4. See destination/waypoint. See “Setting the Arrival Time” (page 102). “Navigation Setup Operation” (page 99). Setting item: Estimated travel time Setting contents: Change Setting the Dynamic Route Guidance... -
Page 106: Country Setting
Country Setting Performing the pay TMC Activation Use this to set the country. You can perform pay TMC authentication. For Traffic Master (GB), the system has already been authenticated when it is shipped, so you do not Setting item: Country need to perform this operation. -
Page 107: Storing Region Selection
Storing Region Selection Personal POI Setup Perform this operation when you upgrade the map data, etc., of the [Personal POI] is selected on the Navigation setup menu in step 4. See system. For details on operation, refer to the Owner’s Manual of the “Navigation Setup Operation”... -
Page 108: Deleting Poi Warning Data
Deleting POI warning data Updating custom POI data You can delete POI warning data from the system. You can copy up to 40,000 locations stored in a USB memory to the SD memory card of the system. Setting item: Delete POI warning data Setting item: Update custom POI data Touch [ Touch [Update]. -
Page 109: Editing Custom Poi Data
Editing custom POI data Deleting custom POI data You can edit custom POI data. You can delete custom POI data. Setting item: Edit custom POI data Setting item: Edit custom POI data Delete custom POI data Touch [Edit]. The Edit custom POI data screen is displayed. Touch [Edit]. -
Page 110: Storing Custom Poi Data On A Usb Memory
You can copy tracking points stored in the system’s SD memory card to are viewable. Make note of this information and refer to it whenever you a USB memory. contact Alpine Tech Support or an Alpine-authorized dealer. Setting item: Read out SD data Setting item: Version information Touch [Read out]. -
Page 111: Audio Setup
Touch switch to change its setting. Audio Setup Audio Setup Operation The following steps 1 to 7 are common operations to each “Setting item” of Audio Setup. Refer to each section for details. Touch [OK]. The setting is changed and the system returns to the previous screen. -
Page 112: Aux Setup
AUX Setup Radio Setup [AUX setup] is selected on the Audio setup menu in step 4. See “Audio [Radio Setup] is selected on the Audio setup menu in step 4. See “Audio Setup Operation” (page 109). Setup Operation” (page 109). Setting the Rear AUX Primary Adjusting Source Signal Levels You can make settings for an external device (such as a portable music... -
Page 113: Dvd Setup
Setting of the Audio Language DVD Setup Set the audio language produced from the speakers. [DVD Setup] is selected on the Audio setup menu in step 4. See “Audio Setting item: Audio language Setup Operation” (page 109). Setting contents: Auto (Initial setting) / Deutsch / English •... -
Page 114: Setting The Rating Level (Parental Lock)
Setting the Rating Level (Parental Lock) Changing the Passcode This function can help restrict the viewing of movies to children of You can change the Passcode. appropriate age levels only. Setting item: Passcode Setting item: Parental Touch [Passcode] in the DVD Setup screen. Touch [Parental] in the DVD Setup screen. -
Page 115: Setting The Tv Screen Mode
TV monitor (rear monitor) being used. Setting item: Downmix mode This setting can also be applied for the INE-S900R. Setting contents: Surround (Initial setting) / Stereo If the rear monitor is not connected, the screen setting is 16:9. -
Page 116: Phone Setup
Touch switch to change its setting. Phone Setup Phone Setup Operation The following steps 1 to 6 are common operations to each “Setting item” of Phone Setup. Refer to each section for details. Touch [OK]. The setting is changed and the system returns to the previous screen. -
Page 117: Changing The Device Information
Editing device name Setting the Search Mode You can change the device name of the system. You can set whether the INE-S900R can be recognized or not from a BLUETOOTH compatible device. Normally set this to On. Setting item: Edit device name... -
Page 118: Sound Setup
Adjusting Balance/Fader Sound Setup Touch [ Sound Setup Operation The following steps 1 to 5 are common operations to each “Setting item” of Sound Setup. Refer to each section for details. Balance: L15 to R15 Press <MENU>. Fader: R15 to F15 •... -
Page 119: Visual Setup
Touch [Custom] to display the detailed setting screen. Visual Setup Touch [ ] or [ ] to change its setting. Visual EQ Setup Operation Press <MENU>. When the NAVIGATION menu is displayed, touch the [AUDIO/VISUAL] tab. Setting item: Bright, Contrast, Colour, Tint, Sharpness Depending on the source, the available setting items vary. -
Page 120: Storing And Recalling The Picture Quality Adjustment Values
Adjusting Brightness Storing and recalling the picture quality You can adjust the brightness between Min (–15) and Max (+15). When adjustment values it reaches the minimum or maximum point, the display shows “Min” or “Max” respectively. You can store Bright, Contrast, Ting, Colour and Sharpness that you Setting item: Bright adjusted for Visual source. -
Page 121: Fluctuation Of The Current Position Or Tracks
Information • In the following cases, the GPS satellite signals may not be Fluctuation of the Current Position or receivable. – A roof rack is used (GPS antenna installed on roof of car). Tracks – A metallic object is near the GPS antenna (GPS antenna installed inside car). -
Page 122: About Dvds
• When you have driven the roads of a grid About DVDs Music CDs and DVDs have grooves (tracks) in which the digital data is recorded. The data is represented as microscopic pits recorded into the track – these pits are read by a laser beam to play the disc. On DVDs, the density of the tracks and pits is twice that of CDs, so DVDs can contain more data in less space. -
Page 123: List Of Language Codes
List of Language Codes (For details, see page 111.) Abbreviation Language Language Abbreviation Code Language Code Abbreviation Code 6565 Afar 7369 Interlingue 8278 Kirundi 6566 Abkhazian 7375 Inupiak 8279 Romanian 6570 Afrikaans 7378 Indonesian 8285 Russian 6577 Amharic 7383 Icelandic 8287 Kinyarwanda 6582... -
Page 124: List Of Country Codes
List of Country Codes (For details, see page 111.) Abbreviation Code Country Abbreviation Code Country Abbreviation Code Country 6568 Andorra 6877 Dominica 7573 Kiribati 6569 United Arab Emirates 6879 Dominican Republic 7577 Comoros Afghanistan 6890 Algeria 7578 Saint Kitts and Nevis 6570 6571 Antigua and Barbuda... - Page 125 Abbreviation Code Country Abbreviation Code Country Abbreviation Code Country 8069 Peru 8374 Svalbard and Jan Mayen 8487 Taiwan, Province of China 8070 French Polynesia 8375 Slovakia 8490 Tanzania, United Republic of 8071 Papua New Guinea 8376 Sierra Leone 8565 Ukraine 8072 Philippines 8377...
-
Page 126: In Case Of Difficulty
If you encounter a problem, please review the items in the following checklist. This guide will help you isolate the problem if the unit is at fault. Otherwise, make sure the rest of your system is properly connected, or consult your authorized Alpine dealer. - Page 127 Perform finalisation and attempt playback again. DVD+R/DVD+RW playback not performed. possible. Error displays. Mechanical error. Press . After the Error disappears, insert the disc again. If the abovementioned solution does not solve the problem, consult your nearest Alpine dealer. Downloaded from Caradio-Manual.com Manuals...
- Page 128 Symptom Cause Solution MP3/WMA/AAC is not played Writing error occurred. The CD format is not Make sure the CD has been written in a supported back. compatible. format. Refer to “About MP3/WMA/AAC” (pages 63 and 64), then rewrite in the format supported by this device. Unit does not operate.
-
Page 129: If This Message Appears
• Turn up the heat at normal temperature. normal. Cannot locate SD Card, please check the • The SD card is malfunction. • Consult your nearest ALPINE dealer. card. • The unit does not support the SD card. • Use the SD card supplied with this system. - Page 130 Message Cause Solution Could not complete synchronising of phone The connected mobile phone does not support Connect the mobile phone that supports book. synchronising of its phone book. synchronising the phone book, then synchronise again. (See page 85.) Unable to complete peripheral Device search. There is no mobile phone with Bluetooth Check the Bluetooth setting of the Bluetooth setting activated near the system.
- Page 131 Message Cause Solution Route search failure. Calculation of the route failed, because it is too Set a shorter distance to the destination. far from the destination. Unable to calculate the final part of your route, Search of the destination failed, because there Set the destination closer to a road on the as there are no roads on the database close are no roads on the database close to your...
-
Page 132: Specifications
* Frequency response may differ depending on the encoder Specifications software/bit rate. CD/DVD SECTION NAVIGATION SECTION Frequency Response 5 – 20,000 Hz Reception frequency 1575.42 ±1 MHz Wow & Flutter (% WRMS) Below measurable limits Reception sensitivity -130 dB max. Total Harmonic Distortion 0.02% (at 1 kHz) Dynamic Range... - Page 133 DivX, Inc. and are used under license • The BLUETOOTH word mark and logos are registered trademarks owned by the Bluetooth SIG, Inc. and any use of such marks by Alpine Electronics, Inc. is under license. • “MPEG Layer-3 audio coding technology licensed from Fraunhofer IIS and Thomson.”...
-
Page 134: End User License Agreement (Microsoft)
Alpine Electronics, Inc. (collectively “ALPINE”) from Components”). an affiliate of Microsoft Corporation (collectively “MS”). Those • If ALPINE provides or makes available to you Supplemental installed software products of MS origin, as well as associated Components and no other EULA terms are provided along media, printed materials, and “online”... -
Page 135: End User License Agreement (Navteq)
Should you have any questions concerning this EULA, or if you COPY OF THE NAVTEQ NAVIGABLE MAP DATABASE, desire to contact ALPINE for any other reason, please refer to INCLUDING ASSOCIATED COMPUTER SOFTWARE, MEDIA the address provided in the documentation for the DEVICE. -
Page 136: The Marks Of Companies
LIMITED WARRANTY GOVERNING LAW NAVTEQ warrants that, subject to the warnings set out below, for This Agreement shall be governed by the laws of the jurisdiction, a period of 12 months after acquisition of your copy of the in which you reside at the date of acquisition of the Database. Database, it will perform substantially in accordance with Should you at that moment reside outside the European Union or NAVTEQ’s Criteria for Accuracy and Completeness existing on... -
Page 137: Warning
When connecting the INE-S900R to the fuse box, make installations or ground connections. Using such parts could disable sure the fuse for the intended circuit of the INE-S900R has the control of the vehicle and cause fire, etc. appropriate amperage. Failure to do so may result in damage to KEEP SMALL OBJECTS SUCH AS BOLTS OR SCREWS OUT the unit and/or the vehicle. -
Page 138: Installation
Do not block the unit’s fan or heat sink, thus preventing air circulation. If blocked, heat will accumulate inside the unit and may ×8 cause a fire. Alpine accepts no responsibility for lost data, etc., even Screw if data, etc., is lost while using this product. - Page 139 Mounting the Microphone. When your vehicle has the Bracket, mount the long hex bolt onto the rear panel of the INE-S900R and For safe use, make sure of the following: put the Rubber Cap on the hex bolt. If your vehicle •...
- Page 140 iPod/iPhone Connection (sold separately) Connect USB cable to an iPod/iPhone with KCU-451iV. Note The SD memory card is inserted into the left side of the system. Usually, you do not need to take the SD memory card out. To take it out, follow the instructions below.
- Page 141 • The diagram and the fuse amperage shown above are in the case when INE-S900R is used individually. • If the switched power (ignition) lead of the INE-S900R is connected directly to the positive (+) post of the vehicle’s battery, the INE-S900R draws some current (several hundred milliamperes) even when its switch is placed in the OFF position and the battery may be discharged.
-
Page 142: Connections
Connections (Yellow) To Video Input terminal (Red) To Audio Input terminals (R, L) (White) (Yellow) To Video Output terminal (Red) To Audio Output terminals (R, L) (White) Rear Left Amplifier Rear Right Front Left Amplifier Front Right Amplifier Subwoofers To Rear camera GPS Antenna REVERS (Orange/White) - Page 143 = ISO Power Supply Connector q Illumination Lead (Orange) This lead may be connected to the vehicle’s instrument cluster illumination lead. This will allow the backlighting of the INE-S900R to dim whenever the vehicle’s lights are turned on. Downloaded from Caradio-Manual.com Manuals...
-
Page 144: System Example
System Example Connection of a USB Memory USB connector USB Memory (Sold separately) USB cable (Included) • You cannot connect both a USB memory and an iPod/iPhone at the same time. • Do not leave the iPod in a vehicle for a long time. Heat and humidity may damage the USB memory and you may not be able to play it again. Connection of an iPod/iPhone iPod/iPhone USB connector... - Page 145 Connection of an External device External Interface Connector AUX/PRE OUT Connector AUX/PRE OUT connector cable To Video Output terminal (Yellow) (Red) DVD Changer (Sold separately) (White) To Audio Output terminal To Video Input terminal (Yellow) (Red) Rear monitor (Sold separately) (White) To Audio Input terminal REMOTE OUT...
- Page 146 Connection of a Mobile Digital TV Receiver and DVD Changer External Interface Connector AUX/PRE OUT Connector AUX/PRE OUT connector cable To Video Output Terminal To Video Input Terminal To Video Output Terminal (Yellow) Mobile Digital (Red) DVD Changer TV Receiver (Sold (Sold separately)
- Page 147 Connection of a Rear Camera AUX/PRE OUT Connector CAMERA Input Connector Camera extension cable (Included with camera) Rear Camera (Sold separately) AUX/PRE OUT connector cable HCE-C107D Connection of an External Amplifier External Interface Connector AUX/PRE OUT Connector AUX/PRE OUT connector cable Amplifier 4 ch (Sold separately) (Red) (White)
- Page 148 Fax: (+81) 246-36-6090 DECLARATION of CONFORMITY We, Alpine Electronics, Inc. of the above address, hereby declare, at our sole responsibility, that the following product conforms to the Essential Requirements of the Radio and Telecommunications Terminal Equipment Directive1999/5/EC in accordance with the tests conducted to the appropriate requirements of the relevant standards, as listed herewith.
- Page 149 Downloaded from Caradio-Manual.com Manuals...
- Page 150 Downloaded from Caradio-Manual.com Manuals...
- Page 151 Phone 1-800-ALPINE-1 (1-800-257-4631) Viale C. Colombo 8, 20090 Trezzano 1-888-NAV-HELP (1-888-628-4357) Sul Naviglio (MI), Italy Phone 02-484781 ALPINE ELECTRONICS OF AUSTRALIA PTY. LTD. 161-165 Princes Highway, ALPINE ELECTRONICS DE ESPAÑA, S.A. Hallam Victoria 3803, Australia Portal de Gamarra 36, Pabellón, 32...