LG LSE3090ST Owner's Manual
Hide thumbs
Also See for LSE3090ST:
- Owner's manual (93 pages) ,
- Service manual (84 pages) ,
- Installation manual (32 pages)

Related Manuals for LG LSE3090ST


Summary of Contents for LG LSE3090ST
- Page 1 OWNER’S MANUAL ELECTRIC RANGE Please read this owner's manual thoroughly before operating and keep it handy for reference at all times. LSE3090ST LSE3092ST LSES302ST www.lg.com (REV.00 140404)
-
Page 2: Table Of Contents
TABLE OF CONTENTS TABLE OF CONTENTS IMPORTANT SAFETY INSTRUCTIONS LOWER OVEN CONTROLS (ON SOME MODELS) Using the lower oven OVERVIEW Accessories CARE AND CLEANING Range overview Cleaning the glass/ceramic cooktop. Control panel overview Self clean Cleaning the exterior FEATURES Changing the oven light Clock Removing and replacing the oven door and Timer on/off... -
Page 3: Important Safety Instructions
Always contact your service agent or manufacturer about problems that you do not understand. Download this owner's manual at: http://www.lg.com. This is the safety alert symbol. This symbol alerts you to potential hazards that can result in property damage and/or serious bodily harm or death. -
Page 4: Safety Precautions
IMPORTANT SAFETY INSTRUCTIONS Wall plate bracket drawers and visually inspect that the Screw must enter wood rear leveling legs are fully inserted into approximately or concrete 0.65”(16.5mm) Be certain that your appliance is properly installed and grounded by a qualified technician. in the manual. - Page 5 IMPORTANT SAFETY INSTRUCTIONS WARNING range. the range itself. back against the wall. range could tip forward and cause injury. REMOVE FLAMMABLE AND EXPLOSIVE MATERIAL FROM THE APPLIANCE WARNING Keep plastic, clothes, paper, and other flammable materials away from parts of the appliance that may become hot.
-
Page 6: Pan Placement
IMPORTANT SAFETY INSTRUCTIONS ELECTRICAL SAFETY Do not use aluminum foil or any other material to line the oven bottom. Improper installation of these liners may result in a risk of electric shock or fire. allow aluminum foil or the temperature probe to contact heating elements. severe personal injury, death, or electrical shock. - Page 7 IMPORTANT SAFETY INSTRUCTIONS Should an oven fire occur, leave the oven door closed and turn the oven off. If the fire continues, throw baking soda on the fire or use a fire extinguisher. Should an oven fire occur, DO NOT put water or flour on the fire. F xplosiv DO NOT use the broiler pan without the grid.
- Page 8 IMPORTANT SAFETY INSTRUCTIONS NEVER store items of interest to children in cabinets above the range. Children climbing on the range or on the oven door to reach items could be seriously injured. Let hot utensils cool in a safe place, out of reach of children. Children should not be allowed to play with controls or other parts of the appliance.
- Page 9 IMPORTANT SAFETY INSTRUCTIONS If cabinet storage is provided directly above the cooking surface, limit it to items that are infrequently used and can be safely stored in an area subjected to heat. Temperatures may be unsafe for items such as volatile liquids, cleaners or aerosol sprays. When warming foods, do not use containers that seal.
-
Page 10: Overview
OVERVIEW OVERVIEW ACCESSORIES Accessories for cooking Draw M a Pr For Model : LSE3092ST, LSES302ST For Model : LSE3090ST Accessories for installation Accessories for maintenance r’ S r ws S r w... -
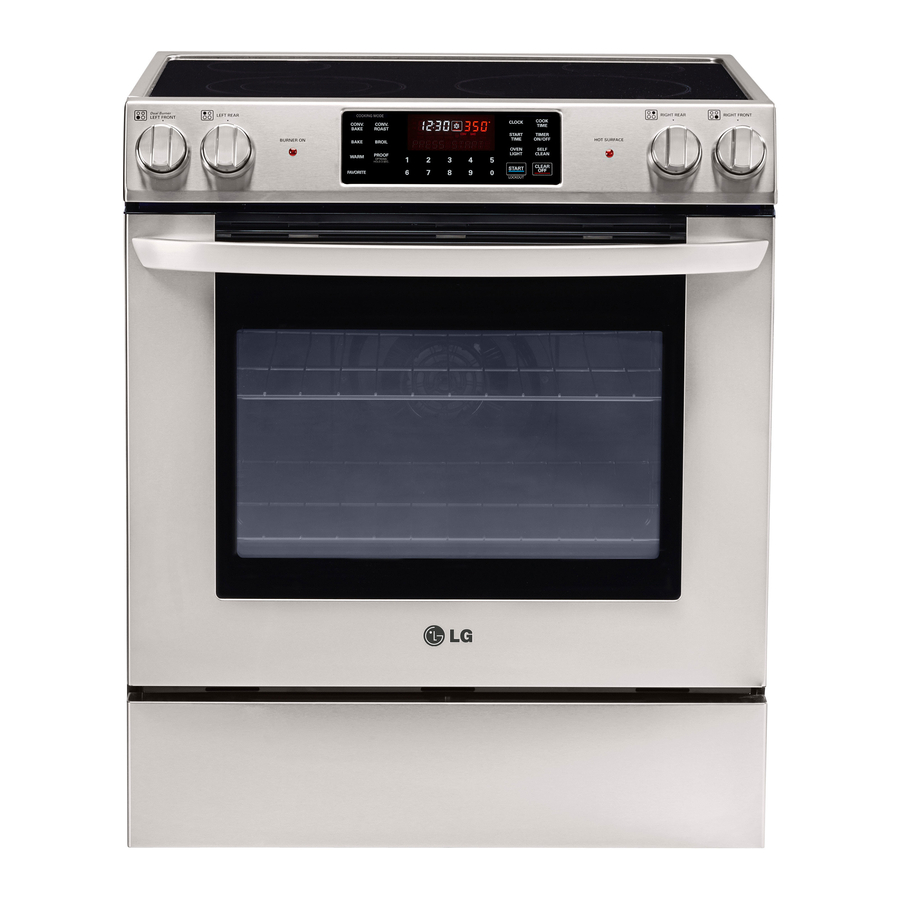
Page 11: 1 Range Overview
Heavy racks Broiler Pan Insert Gliding rack Split rack Oven door Anti-tip bracket Lower oven drawer Model and serial number plate For model : LSE3090ST Single element Single element Single element Dual element Ceramic glass Automatic oven light switch Gasket... -
Page 12: Control Panel Overview
F atur Wa rm 200˚F 250˚F 450˚F 300˚F 400˚F 350˚F Star L Butt For model : LSE3090ST ator ookt o trols F atur ookt Star L Butt NOTE ooktop t o trols ar t up i t... -
Page 13: Features
FEATURES Minimum & Maximum default settings FEATURES All of the features listed have a minimum and a maximum time or temperature setting that may be entered into the CLOCK control. An entry acceptance beep will sound each time a control button is pressed. The clock must be set to the correct time of day in order for the automatic oven timing functions to work properly. -
Page 14: Timer On/Off
FEATURES TIMER ON/OFF NOTE serves as an extra timer in the If the remaining time is not in the display, recall the kitchen that will beep when the set time has run out. It does not start or stop cooking. feature can be used during any of the other oven control functions. -
Page 15: Oven Temperature Adjustment
FEATURES OVEN TEMPERATURE PREHEATING ALARM LIGHT ADJUSTMENT When the oven reaches its set temperature the preheating alarm light will flash until the oven door is opened. the one it replaced. Use your new oven for a few weeks to become more familiar with it before changing the 1. -
Page 16: Lockout
FEATURES LOCKOUT NOTE The Lockout feature automatically locks the oven door and prevents most oven and cooktop controls from being button at any time. turned on. It does not disable the clock, timer or the interior oven light. press the button. -
Page 17: Cook Time
FEATURES The oven will continue to cook for the set amount of time COOK TIME (TIMED COOK) and then turn off automatically. When the cooking time has elapsed: cook for a specific length of time. This feature can only be and the time of day will show in the display. -
Page 18: Using The Cooktop
SINGLE ZONE Wa rm 200˚F 250˚F 450˚F TRIPLE DUAL 300˚F 400˚F 350˚F For model : LSE3090ST Hot surface indicator light For model : LSE3090ST SINGLE SINGLE SINGLE DUAL Hot surface indicator (On some models) NOTE surfa ato ig ill low s surfa too ot to tou . - Page 19 USING THE COOKTOP To turn on the DUAL element (left front element): NOTE There is one dual element located in the left front position. The dual element can be used as either a dual or a single element. + or – buttons to quickly scroll 1.
-
Page 20: Using The Proper Cookware
USING THE COOKTOP Recommended surface cooking settings USING THE PROPER COOKWARE Using the proper cookware can prevent many problems, such as food taking longer to cook or achieving Dual inconsistent results. Proper pans will reduce cooking Triple times and cook food more evenly. Stainless steel is recommended. -
Page 21: Using The Oven
USING THE OVEN Rack and Pan Placement USING THE OVEN (On Some Models) REMOVING AND REPLACING THE OVEN RACKS Split-r CAUTION for tur pr v r s. N T ov foil, or a at rial, or pla . Doi g so will r sult i poor ak g ool. -
Page 22: Bake
USING THE OVEN Tips for baking BAKE Follo r s r ratur s. T rogr ratur ratur r ratur ” t ” Setting the BAKE function (example, 375°F): walls. BAKE. ratur Pr 3, 7 atpr START. PREHEATING ay A ratur ratur NOTE PREHEATING... -
Page 23: Dual Convection Bake (On Some Models)
T fa will stop w oor is will tur off. I (LSE3092ST, LSES302ST) (LSE3090ST) It is or al for air fro ool g fa to CONV. BAKE o tr us , it will r... -
Page 24: Convection Roast
USING THE OVEN Roasting Rack Instructions (On Some Models) CONVECTION ROAST f atur t giv r k. T rfor f atur pr v att s. T ry. T avors risp ov r . Setting the CONVECTION ROAST function (example, 375°F): CONV. -
Page 25: Healthier Roast (On Some Models)
USING THE OVEN HEALTHIER ROAST NOTE (On Some Models) cooling fan will operate to cool the control panel. The Healthier Roast function is designed to lower the fat This is normal operation. content of meat and poultry. Healthier Roast can reduce fat up to 20% compared to regular roasting. -
Page 26: Broil
USING THE OVEN Smoking BROIL atur t worry I y follo NOTE Alway f t r Before Broiling. ratur a ook g. ALWAY ookt v tila Follo L f ov z s B ook g. Low r Low r awa r NOTE If t oor is op... -
Page 27: Recommended Broiling Guide
USING THE OVEN RECOMMENDED BROILING GUIDE The size, weight, thickness, starting temperature, and your preference of doneness will affect broiling times. This guide is based on meats at refrigerator temperature. Broiling Chart 7–9 3–5 Well Done ½ to ¾” thick broiled at once. -
Page 28: Favorite
USING THE OVEN Broiling Tips (On Some Models) FAVORITE a ov f atur t r or favorit r s. T f atur k g. s. T Favorit S f atur Alway f atur . T f atur foil f atur . FAVORITE M at ratur... -
Page 29: Warm
USING THE OVEN WARM PROOF The warm function will maintain an oven temperature The Proof feature maintains a warm environment for rising yeast leavened products before baking. To avoid hours after cooking has finished. The Warm function may lowering the oven temperature and lengthening proofing be used without any other cooking operations or can time, do not open the oven door unnecessarily. -
Page 30: Meat Probe (On Some Models)
USING THE OVEN To change the Meat Probe temperature during MEAT PROBE (On some models) cooking: The meat probe accurately measures the internal 1. Press temperature of meat, poultry and casseroles. It should not be used during broiling, self clean, warming or 2. -
Page 31: Lower Oven Controls (On Some Models)
LOWER OVEN CONTROLS The lower oven uses less energy than a standard oven. LOWER OVEN CONTROLS It takes more time for preheating than a standard oven. (On Some Models) Allow the following approximate times for preheating: USING THE LOWER OVEN The purpose of the lower oven is to bake foods using the Warm same cooking times and temperatures you would in a... -
Page 32: Care And Cleaning
CARE AND CLEANING Burned-On Residue CARE AND CLEANING ookt r t- CLEANING THE GLASS/CERAMIC COOKTOP orat CAUTION ooktop. rasiv ookt rfa . For your saf ty, w ar a ov t or p rfa . ookt ooktop NOTE ookt rfa . ooktop To pr v ur s, w ar a ov... -
Page 33: Self Clean
CARE AND CLEANING IMPORTANT: SELF CLEAN I a y r r fo o tai r pr rv s t up, ratur to ato sau l s u y syrups o olat avity. W ooktop r r. T at r orat v tilat t av f ty... - Page 34 . Cycle Setting If ov r ks ar l ft i t avity uri g Soil Level y will olor LSE3092ST LSE3090ST LSES302ST ul t out. r wit avity soapy wat r i w l. avity gask t. T...
- Page 35 CARE AND CLEANING During Self Clean After the Self Clean Cycle to clean the oven cavity. While running the Self Clean temperature has cooled. cycle, you may notice smoking or an odor. This is normal; especially if the oven is heavily soiled. the oven cools.
-
Page 36: Cleaning The Exterior
CARE AND CLEANING CLEANING THE EXTERIOR Broiler Pan and Grid (On Some Models) Painted and Decorative Trim p wat r l L av ry D rasiv Stainless Steel Surfaces (on some models) To avoid scratches, do not use steel wool pads. tow l. -
Page 37: Removing And Replacing The Oven Door And Lower Oven Drawer
CARE AND CLEANING Replacing the oven door REMOVING AND REPLACING THE OVEN DOOR AND LOWER OVEN DRAWER CAUTION Bottom edge of slot Hinge arm object. Indentation may weaken its structure, causing an increased risk of breakage at a later time. 2. - Page 38 CARE AND CLEANING Removing the Lower Oven Drawer Replacing the Lower Oven Drawer 1. Pull the bearing glides to the front of the chassis WARNING glide. Disconnect the electrical power to the range at the 2. Align the glide on each side of the drawer with the main fuse or circuit breaker panel before removing glide slots on the range.
-
Page 39: Faqs
FAQs FAQs What types of cookware are recommended Can I leave my racks in the oven when for use with my cook top? running a Self Clean cycle? No. Although it will not damage the racks, it will discolor them and may make them hard to slide in and out during What should I do if my racks are sticky and have become hard to slide in and out? Why does “HS”... -
Page 40: Troubleshooting
TROUBLESHOOTING TROUBLESHOOTING BEFORE REQUESTING SERVICE Review this Troubleshooting section before calling for service. This section contains common occurrences that are not a result of defective workmanship or materials. Range is not level. Adjust leveling legs at base of range until the oven rack is level. and have sufficient room for range clearance. - Page 41 TROUBLESHOOTING Problem Possible Causes / Solutions work r gr o tr Allo ratur . rat . S rvi o ta y rvi . Changing Oven Light r’ work. o tr rly Follo Setting Oven Controls, M a t r g. pr v r g.
- Page 42 TROUBLESHOOTING Problem Possible Causes / Solutions roil Using the Oven ow v Broiling Guide ratur too ratur F atur S rat ookt ookt ookt at r ookt CLEANING THE GLASS/CERAMIC COOKTOP CARE AND CLEANING ookt ookt surfa ookt rks. CLEANING THE GLASS/CERAMIC COOKTOP CARE AND CLEANING Boilov CLEANING THE GLASS/CERAMIC COOKTOP...
- Page 43 TROUBLESHOOTING Problem Possible Causes / Solutions CLEAR/OFF ow t r Allo ool. o tr Self Clean ratur ratur . CLEAR/OFF Allo ool. Self Clean v r- olor tow l. t Allo ft S ay . o tr Moistur v t.
-
Page 44: Warranty
1. Service calls to correct the installation of your appliance, to instruct you how to use your appliance, to replace house products not approved by LG Corporation. 5. Repairs to parts or systems resulting from unauthorized modifications made to the appliance.