DeWalt DW705 Instruction Manual
Hide thumbs
Also See for DW705:
- Instruction manual (52 pages) ,
- Manual (116 pages) ,
- Quick start manual (2 pages)
Table of Contents
Advertisement
Quick Links
Advertisement
Table of Contents

Related Manuals for DeWalt DW705


Summary of Contents for DeWalt DW705
- Page 1 WALT Industrial Tool Company, P.O. Box 158, 626 Hanover Pike, Hampstead, MD 21074 Printed in U.S.A. (NOV95-CD-8) Form No. 158698-02 For information call toll free between 8:00 a.m. and 8:00 p.m. ET, seven days a week: 1-800-4-D WALT (1-800-433-9258). DW705 Copyright 1993, 1995...
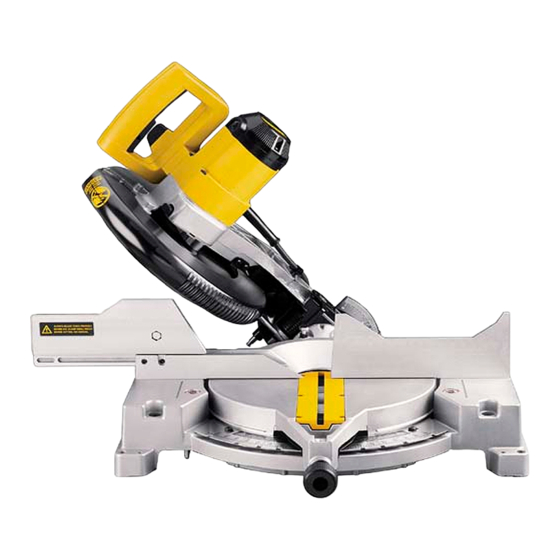
- Page 2 INSTRUCTION MANUAL DW705 12" Compound Miter Saw...
- Page 3 IF YOU HAVE ANY QUESTIONS OR COMMENTS ABOUT THIS, OR ANY D WALT TOOL, CALL US TOLL FREE AT 1-800-4-D WALT (1-800-433-9258). Serial Number from Nameplate Date of Purchase Save this information for future reference. WALT…BUILT JOBSITE TOUGH WALT high performance industrial tools are made for America’s toughest industrial and construction applications.
-
Page 4: Table Of Contents
Table of Contents SAFETY INSTRUCTIONS …………………………………………………………….1 BRUSHES………………………………………………………………………………10 DOUBLE INSULATION/POLARIZED PLUG INSTRUCTIONS ......1 OPERATION……………………………………………………………………………10 SWITCH…………………………………………………………………………………10 ADDITIONAL SAFETY RULES ……………………………………………………….2 ELECTRICAL CONNECTION …………………………………………………………4 CUTTING WITH YOUR SAW…………………………………………………………10 CROSSCUTS……………………………………………………………………………10 EXTENSION CORDS …………………………………………………………………4 UNPACKING YOUR SAW ……………………………………………………………4 BEVEL CUTS……………………………………………………………………………10 FAMILIARIZATION………………………………………………………………………4 QUALITY OF CUT………………………………………………………………………10 SPECIFICATIONS ………………………………………………………………………4 BODY AND HAND POSITION…………………………………………………………11 OPTIONAL ACCESSORIES……………………………………………………………4 CLAMPING THE WORKPIECE………………………………………………………11... -
Page 5: Safety Instructions
Important Safety Instructions • KEEP CHILDREN AWAY. All visitors should be kept at a safe distance from work area. WARNING: When using electric tools, basic safety precautions should always be • MAKE WORKSHOP KID PROOF with padlocks, master switches, or followed to reduce risk of fire, electric shock, and personal injury, including the by removing starter keys. -
Page 6: Additional Safety Rules
Additional Safety Rules For Miter Saws • NEVER LEAVE TOOL RUNNING UNATTENDED. TURN POWER OFF. Don’t leave tool until it comes to a complete stop. • CAUTION: FAILURE TO HEED THESE WARNINGS MAY RESULT • DO NOT OPERATE ELECTRIC TOOLS NEAR FLAMMABLE IN PERSONAL INJURY AND SERIOUS DAMAGE TO THE SAW. - Page 7 • DON’T-Reach around or behind saw blade. • DON’T-Place hands closer than 6 inches from the saw blade. • DO NOT - Reach underneath the saw unless it is turned off and ON GUARD: unplugged. The saw blade is exposed on the underside of the saw. DANGER –...
-
Page 8: Electrical Connection
In addition to this 45 degree bevel instruction manual, the carton should contain: Max. Height 2.7" Result Width 5.9" 1. One No. DW705 miter saw. Max. Width 7.9" Result Height 1.7" 2. One No. 340285-01 32 tooth D WALT 12" dia. saw... - Page 9 SELF-TAPPING Crown Molding Fence: DW7054 REAR STUD LOWER Used for precision cutting of crown molding. GUARD Kit Box: DW7056 LOCKNUTS STOP Used to store and transport DW705 accessories. LEFT WASHER SIDE AND SCREW FENCE CLAMPING BRACKET DW7050 MITER END PLATE...
-
Page 10: Accessories
SAW BLADES: ALWAYS USE 12" SAW BLADES WITH 1" ARBOR Installing a New Saw Blade HOLES. SPEED RATING MUST BE AT LEAST 4800 RPM. (UNPLUG THE MITER SAW) APPLICATION BLADE NO. OF TYPE DO NOT CUT FERROUS METAL (THAT WITH AN IRON DESCRIPT. -
Page 11: Cutting The Kerf
Cutting the Kerf FIG. 5 FIG. 8 In order to adjust and use your miter saw, you must cut a slot through the kerf plate to allow for blade clearance. To cut the kerf plate, set the saw at 0 degrees miter. Place a piece of scrap wood on the saw at least 1"x6"x12". -
Page 12: Miter Scale Adjustment
MITER SCALE ADJUSTMENT – screws have been tightened properly to secure the FIG. 11A BEVEL adjustment against movement. Place a square against the saw’s fence and blade, as HOUSING shown in Figure 8. (Do not touch the tips of the blade teeth BEVEL STOP with the square. -
Page 13: Automatic Electric Brake
should be worn at all times when viewing through the FIG. 14 louvers. AUTOMATIC ELECTRIC BRAKE Your saw is equipped with an electric blade brake which FIG. 12 stops the saw blade within 5 seconds of trigger release. GUIDE GROOVE BEVEL STOP This is automatic and requires no adjustment. -
Page 14: Cutting With Your Saw
CUTTING WITH YOUR SAW NOTE: Although this saw will cut wood and many non- ferrous materials, we will limit our discussion to the cutting of wood only. The same guidelines apply to the other materials. DO NOT CUT FERROUS (IRON AND STEEL) MATERIALS OR MASONRY WITH THIS SAW. -
Page 15: Body And Hand Position
For varied cutting applications, refer to the list of FIG. 17 recommended saw blades for your saw and select the one FIG. 21 that best fits your needs. BODY AND HAND POSITION (SEE FIG. 16) Proper positioning of your body and hands when operating the miter saw will make cutting easier, more accurate and safer. -
Page 16: Cutting Trim Molding And Other Frames
CUTTING COMPOUND MITERS miter angles to the nearest 1/4 degree (15 minutes). To FIG. 22 use the vernier scale follow the steps listed below. A compound miter is a cut made using a miter angle and a bevel angle at the same time. This is the type of cut used (As an example, let’s assume that the angle you want to miter is 24 1/4 degree right). -
Page 17: Cutting Crown Molding
All cuts made with the back of the molding against the OUTSIDE CORNER: FIG. 23 fence and bottom of the molding against the base Left side INSIDE CORNER: 1. Position molding with bottom of molding against the base of the saw Left side 2. - Page 18 angle (the section that fits flat against the ceiling) of 52 degrees and a bottom rear angle (the part that fits flat TABLE 1 COMPOUND MITER CUT against the wall) of 38 degrees. Your miter saw has special pre-set miter latch points at 31.62 degrees left and right for cutting crown molding at the proper angle.
-
Page 19: Special Cuts
ALTERNATIVE METHOD FOR CUTTING CROWN MOLDING Place the molding on the table at an angle between the fence and the saw table, as shown in Figure 26. Use of the crown molding fence accessory (DW7054) is highly recommended because of its degree of accuracy and convenience. -
Page 20: Trouble Shooting Guide
Trouble Shooting Guide Important To assure product SAFETY and RELIABILITY, repairs, maintenance and adjustment should be performed by BE SURE TO FOLLOW SAFETY RULES AND INSTRUCTIONS Black & Decker (U.S.) Inc. industrial tool service centers or other qualified service organizations. These service TROUBLE! SAW WILL NOT START organizations service D WALT tools always using...