Table of Contents
Advertisement
Quick Links
Advertisement
Table of Contents

Related Manuals for Bernafon PRIO


Summary of Contents for Bernafon PRIO
- Page 1 PRIO Behind-the-ear hearing instruments INSTRUCTIONS FOR USE...
-
Page 3: Table Of Contents
Summary Operating Instructions for BTE (Behind-the-Ear) Hearing Instruments Features Inserting/Removing Instrument with Earmold Inserting/Removing Instrument with SPIRA tube flex ON/OFF Volume Control Volume Control Indicator Push Button Telecoil Battery Indicator Battery Replacement Battery Information FM and Direct Audio Input shoe Tracker Safety Guidelines International Warranty... - Page 4 The following hearing instruments are covered in these operating instructions: PRIO 112 VC PRIO 105 DM VC PRIO 105 DM Congratulations on the purchase of your new hearing instruments. These advanced devices are fully digital, and have been adjusted by your hearing care profession al with the aid of a computer and specially developed software.
-
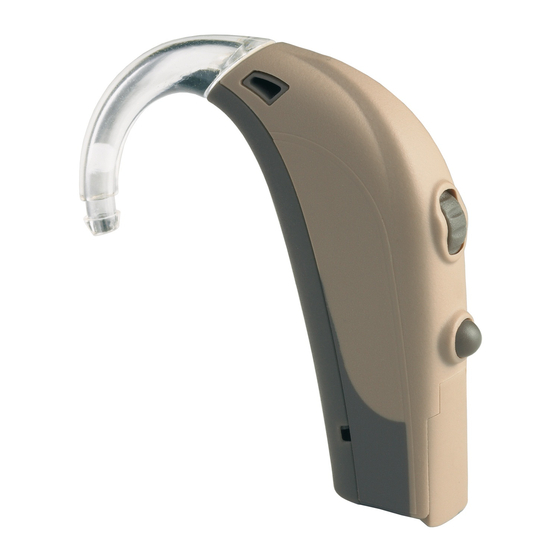
Page 5: Features
PRIO 105 DM VC 1 Push button 2 Microphone 2a Second microphone (105 styles only) 3 Earhook 4 Sound outlet towards earmold 5 Battery drawer 6 Direct Audio Input 7 Programming port 8 Volume Control (PRIO 105 DM VC and PRIO 112 VC) - Page 6 1 Push button 6 Direct Audio Input 7 Programming port 2 Microphone 8 Volume Control 2a Second microphone (PRIO 105 DM VC and (105 styles only) 3 SPIRA Sound Tube PRIO 112 VC) flex 9 Concha Clip 4 Sound outlet...
-
Page 7: Inserting/Removing Instrument With Earmold
Inserting your hearing instrument with an earmold Inserting your earmold correctly, takes practice, patience and perseverance. If you are having difficulty inserting your earmolds, please consult your hearing care professional. Insert your earmold first, then position the hearing ins- trument over your ear. •... - Page 8 • Lift the earmold up to your ear. Push the canal part of the earmold into the ear canal opening twisting slightly to ease the helix portion into position. The helix part should be pointing straight up and should slip into position. •...
- Page 9 To position the hearing instrument • Once the earmold is inserted correctly, lift the hearing instrument up and position it behind the ear. Take care not to twist the tubing of the hearing instrument. Removing your earmold and hearing instrument •...
-
Page 10: Inserting/Removing Instrument
Inserting your hearing instrument with a SPIRA flex Sound Tube Inserting your SPIRA Sound Tube correctly every flex time, takes practice, patience and perseverance. • Lift the hearing instrument up and position it behind your ear. • Grasp the bend of the tube between your thumb and index finger. - Page 11 Removing your hearing instrument with a SPIRA flex Sound Tube To remove the SPIRA Sound Tube, grasp the bend of flex the sound tube between your thumb and index finger. Gently pull the sound tube and dome out of your ear. Important Do not take the sound tube and dome out of your ear by pulling the hearing instrument.
- Page 12 2. Attach the new sound tube by pushing the sound tube into the hearing instrument's connector. Exchanging the dome 1. Remove the dome by grasping the dome between your thumb and index finger. 2. Attach the new dome by pushing the dome as far as possible onto the sound tube.
-
Page 13: On/Off
ON/OFF function Close the battery door completely. The hearing instrument will make one long beep. Open the battery door slightly with your finger until a click is felt. It is also possible to turn off the hearing instrument by placing the base on a flat surface and then gently pressing and dragging the hearing instrument as illustrated. -
Page 14: Volume Control
Volume Control Louder (PRIO 112 VC, 105 DM VC) If your hearing instrument has a Softer volume control then the following instructions apply: To increase the volume: Turn the volume control up To decrease the volume: Turn the volume control down The volume control has no mechanical stop. -
Page 15: Volume Control Indicator
Volume Control Indicator Your hearing instrument will beep every time you reach the programmed maximum or minimum levels with the volume control. Push Button function Your hearing instrument can be programmed with up to 2 different listening programs. Use the push button to change between these programs. -
Page 16: Telecoil
Mute function Press the push button and hold for 2 to 3 seconds to mute the hearing instrument. Give a short press to the push button to unmute. Telecoil function (in Program 2) If the telecoil in your instrument is activated, then the following instructions apply: The telecoil enables you to hear better when using a telephone or in places where inductive loop systems... - Page 17 Your instrument (Program 2) has been programmed for: ❑ Microphone and telecoil (M+T) ❑ Telecoil only (T) Note: Not all telephones are hearing instrument compatible. This symbol or a similar sign should be displayed whe- rever a permanent loop has been installed. Please ask your hearing care professional for further information.
-
Page 18: Battery Indicator
Battery Indicator When the battery is about to run out, the instrument will beep at regular intervals. This warning indicates that the battery should be replaced immediately. Optional tamper-resistant battery drawer With the hearing instrument in the off position, insert the end of a ballpoint pen into the small recess as shown. -
Page 19: Battery Replacement
Battery Replacement • Your hearing instrument uses a size 13 battery. To insert a new battery • Use your fingernail to gently swing the battery drawer fully open, but do not force it. • Take out the used battery. • Remove the colored sticker from the new battery (if applica- ble). -
Page 20: Battery Information
Battery Information • Battery life will vary with conditions of use. Ask your hearing care professional for more information. • Always keep spare batteries on hand. These are available from your hearing care professional. • A used battery should be replaced immediately. •... - Page 21 • Used batteries should be returned to your battery supplier or hearing care professional for disposal. • Never dispose of batteries by burning them. There is a risk that they may explode and cause injury. • Never dispose of batteries with household waste. They cause environmental pollution.
-
Page 22: Fm And Direct Audio Input Shoe
FM or Direct Audio Input (DAI) shoe An FM receiver enables the hearing instrument to recei- ve signals directly from an external wireless transmitter. Direct Audio Input (DAI) Direct Audio Input (DAI) enables the hearing instrument to receive signals directly from external sources such as T.V., personal stereo, etc. - Page 23 FMA 3 DAI 3 The hearing instrument will mix the signals from the shoe with the microphones so that you can listen to both sources. The hearing instrument will beep twice in this mode: one lower frequency beep followed by a higher frequency beep.
-
Page 24: Tracker
Note: The second regular program will not function with the FM or DAI shoe in place. To access these functions remove the FM or DAI shoe from the hearing instrument. Note: The safety of hearing instruments with DAI (Direct Audio Input) is determined by the external signal source. -
Page 25: Safety Guidelines
Safety Guidelines Hearing instruments and batteries can be dangerous if swallowed or improperly used. Such actions can result in severe injury, permanent hearing loss or even fatality. Familiarize yourself completely with the following general warnings and the full contents of this booklet before using your hearing instruments. - Page 26 • Discard batteries and keep them out of sight of infants, small children, persons of mental incapacity or pets. • Clean your hearing instruments and their parts on a regular basis only with products that are recommended by your hearing care professional. Microorganisms from unclean instruments may cause skin irritations.
-
Page 27: International Warranty
• Never insert cleaning tools into the sound outlet or microphone inlet. This could damage the hearing instruments. Environmental protection Help to protect the environment by not disposing of your hearing instruments or batteries with your unsorted household waste. Please recycle your hea- ring instruments and batteries or return them to your hearing care professional for disposal. -
Page 29: Push Button Configuration
Push Button Configuration Your hearing instruments are programmed in the following way: Program Beeps Function If your hearing instrument is connected to the Direct Audio Input (DAI) or an FM system: Program Beeps Function Hearing instrument microphone only DAI/FM + hearing (1 low + 1 high) instrument microphone... - Page 30 Notes...
- Page 32 Bernafon Australia Pty. Ltd. Bernafon Canada Ltd. Unit 12/97 Castlemaine Street 500 Trillium Drive Unit 15 Milton QLD 4064 Kitchener, Ontario N2R 1A7 Australia Canada Freecall 1800 809 111 Toll free 1 800 265 8250 Phone +61 7 3250 0300...