Bernafon Nevara Instructions For Use Manual
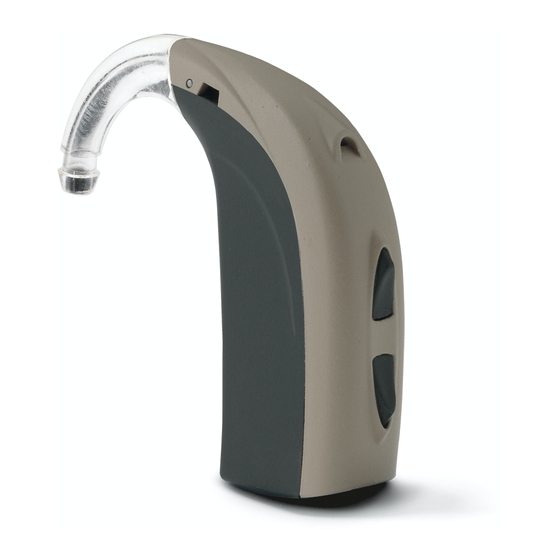
Compact power bte
Hide thumbs
Also See for Nevara:
- Instructions for use manual (60 pages) ,
- Fittings manual (16 pages) ,
- Instructions for use manual (52 pages)

Related Manuals for Bernafon Nevara


Summary of Contents for Bernafon Nevara
- Page 1 Instructions for Use BEHIND-THE-EAR HEARING AIDS Compact Power Plus BTE Compact Power BTE Nevara, Saphira, Juna, Carista, Acriva, Chronos, Inizia...
-
Page 4: Table Of Contents
Table of Contents Hearing Aid Description Step-by-Step Instructions for Using Your Hearing Aid Step 1: Inserting the Battery Step 2: Turning the Hearing Aid ON Step 3: Inserting Your Hearing Aid Step 4: Changing the Volume Step 5: Changing the Programs Step 6: Muting Your Hearing Aid Step 7: Removing Your Hearing Aid Step 8: Turning the Hearing Aid OFF... - Page 5 Accessories Warnings International Warranty Mobile Phone Technical Information Information and Explanation of Symbols...
- Page 6 The following Bernafon hearing aid models are covered within this booklet: Juna 9 | 7 JU9 CPx, with wireless functionality ■ ■ JU9 CP, with wireless functionality ■ ■ JU7 CPx, with wireless functionality ■ ■ JU7 CP, with wireless functionality ■...
- Page 7 CA3 CPx, with wireless functionality ■ ■ CA3 CP, with wireless functionality ■ ■ Inizia 3 | 1 IN3 CPx ■ ■ IN3 CP ■ ■ IN1 CPx ■ ■ IN1 CP ■ ■ Nevara 1 NE1 CPx, with wireless functionality ■ ■...
- Page 8 This booklet guides you on how to use and maintain your new hearing aid. Please read the booklet carefully including the warning section. This will help you to achieve the full benefit of your new hearing aid. Your hearing care professional has adjusted the hearing aid to meet your needs.
-
Page 9: Hearing Aid Description
Hearing Aid Description There are two different attachments and several different ear pieces which classify your hearing aid style. Please identify your attachment and ear piece. This will make it easier for you to navigate through this booklet. CPx/CP BTE with CPx/CP BTE with Thin Tube Earhook... - Page 10 Bernafon Veras IFU micro BTE CPx and CP Models i c r Option A: with earhook VR_ILU_microBTEwithHook_BW_HI Multi Control Earmold tubing Microphone Earmold 2a Second microphone Battery door Earhook Direct Audio Input (with an optional DAI adapter)
- Page 11 Bernafon Veras IFU micro BTE CPx and CP Models VR_ILU_microBTEwithSpira_BW_HI Option B: with thin tube system Multi Control Dome (Open Dome shown) Microphone Ear grip 2a Second microphone Battery door Adapter Direct Audio Input (with Thin tube an optional DAI adapter)
-
Page 12: Step-By-Step Instructions For Using Your Hearing Aid
Your hearing aid uses a size 13 battery. · Gently swing the battery door fully open, but do not force it (A) Bernafon Veras IFU micro BTE · Remove the sticker from the new battery (B) VR_ILU_BatteryReplacementMicroBTEin_BW_HI · Place the battery into the empty compartment. - Page 13 The MultiTool can be used for battery change. Use the magnetic end to remove and insert batteries. The MultiTool is provided by your hearing care professional. MultiTool I M P O R TA N T N O T I C E Your MultiTool has a built-in magnet.
-
Page 14: Step 2: Turning The Hearing Aid On
Step 2: Turning the Hearing Aid ON Close the battery door completely. You should notice a click. The hearing aid is now ON. Click “ON” ✼ Never use excessive force to open or close the battery door. -
Page 15: Step 3: Inserting Your Hearing Aid
Step 3: Inserting Your Hearing Aid Your hearing aid has been programmed individually Bernafon Veras IFU micro BTE for your right or left ear. VR_ILU_Left-rightEarMarkingMicroBTE_BW_HI You will see a color marking inside the battery door. This can help you to distinguish between the left and right hearing aid. - Page 16 Step 3a: Inserting Your Hearing Aid with an Earmold · When inserting the right earmold, hold it with the right hand. When inserting the left earmold, hold it with the left hand. · Hold the earmold so that the canal part is pointing at the ear canal entrance and the frame of the earmold is pointing straight up ·...
- Page 17 Bernafon Veras IFU micro BTE · Run your finger down the skin just in front of your ear. If you feel any plastic parts of the earmold, it is not inserted correctly. Gently push the plastic back and behind the top fold of your ear. The earmold VR_ILU_InsertingMicroBTEhook2_BW_HI should seal into all folds of the ear.
- Page 18 · If the thin tube is sticking out from your ear, insert the dome further. If the ear grip is sticking out, it Bernafon Veras IFU micro BTE Bernafon Veras IFU micro BTE has not been positioned correctly. Try adjusting it...
-
Page 19: Step 4: Changing The Volume
To increase the volume, press the upper button on the Multi Control (a short press: less than 1 second). Repeat until you reach the desired loudness. Bernafon Veras IFU micro BTE To decrease the volume, press the lower button on VR_ILU_MultiControlMicroBTE_BW_HI the Multi Control (a short press: less than 1 second). - Page 20 The hearing aid will click to confirm that the volume has been changed and then will beep when you reach the programmed maximum or minimum. You may hear a beep, when you return to the preset loudness level in your hearing aid. Please ask your hearing care professional for further information.
-
Page 21: Step 5: Changing The Programs
Step 5: Changing the Programs A medium press (about 1 second) on either the upper or lower button on the Multi Control will change Bernafon Veras IFU micro BTE the program. The number of beeps you hear will tell VR_ILU_MultiControlMicroBTE_BW_HI you which program you are in. - Page 22 Up to 4 listening programs can be configured by your hearing care professional depending on your hearing aid. Please ask your hearing care professional about the programs that are available with your hearing aid. Available Programs (to be filled in by your hearing care professional) Program Beeps Function...
-
Page 23: Step 6: Muting Your Hearing Aid
A long press (about 2 seconds) on either the upper or lower button on the Multi Control will cause your hearing aid to mute. Bernafon Veras IFU micro BTE VR_ILU_MultiControlMicroBTE_BW_HI To un-mute the hearing aid, give any control on the hearing aid a push. -
Page 24: Step 7: Removing Your Hearing Aid
Step 7: Removing Your Hearing Aid Step 7a: Removing Your Hearing Aid with an Earmold · Lift the hearing aid from your ear first · Push the back of your ear with your thumb to loosen the frame of the earmold, then use your index finger to remove it ·... -
Page 25: Step 8: Turning The Hearing Aid Off
Step 8: Turning the Hearing Aid OFF Open the battery door slightly until a click is felt. The hearing aid is now OFF. Click “OFF” Step 9: Changing the Battery When the battery is running out, the hearing aid will beep at regular intervals. -
Page 26: Tamper-Resistant Battery Door (Optional)
Use a small screwdriver to open the door. Insert the screwdriver into the slit in the bottom of the hearing aid and push the door to Bernafon Veras IFU micro BTE open. VR_ILU_TamperResitantBatteryDrawerCompactBTE_BW_HI I M P O R TA N T N O T I C E Avoid excessive force to open the battery drawer when in the locked position. -
Page 27: Features Of Your Hearing Aid
Features of Your Hearing Aid The following feature may be activated in your hearing aid. Please consult your hearing care professional to find out how your hearing aid is configured. Telecoil helps you hear better when using a ■ ■ telephone or in buildings where inductive loop systems are installed. - Page 28 Direct Audio Input (DAI) adapter allows your ■ ■ hearing aid to receive signals directly from external sources such as TV, personal stereos, etc. The DAI adapter is mounted to your hearing aid and via a cable connected to an external sound source.
-
Page 29: Caring For Your Hearing Aid
For further information on the care of your hearing aid, please consult your hearing care professional or watch our instructional videos, available on our website www.bernafon.com in the section “Our Products”. General Care Instructions Treat your hearing aid like any other delicate... - Page 30 Should your hearing aid come in contact with water and stop working, please follow these guidelines: · Gently wipe off any water on the outside of the hearing aid · Open the battery door and remove the battery · Gently wipe off any water in the battery door ·...
- Page 31 Daily Care Instructions · Check your hearing aid for ear wax and wipe it clean with a cloth or tissue · If necessary, use the cleaning tool to remove wax from the canal and vent openings on your earmold or dome ·...
- Page 32 Specific Care Instructions Clean your hearing aid (including parts) on a regular basis, as recommended by your hearing care professional. Microorganisms from an unclean hearing aid may cause skin irritations. A: How to Clean Your Earmold You should wash your earmold regularly. However, the hearing aid itself must never be washed or allowed to get wet! ·...
- Page 33 · Pull the tubing away from the earhook · Gently clean the earmold in warm soapy water · Rinse the earmold and allow it to dry completely · Use an air puffer to remove any remaining moisture in the tubing (B) ·...
- Page 34 B: How to Clean the Thin Tube If you have the thin tube system, make sure that the tube and dome are kept free of ear wax at all times. · Grasp the adapter firmly and disconnect the thin tube connector from the hearing aid adapter by pulling it off (A) ·...
- Page 35 Reattach the thin tube connector to the hearing aid adapter by pushing the thin tube connector into the hearing aid adapter (A) Hearing aid Thin tube connector adapter...
- Page 36 · If your hearing care professional has selected a vented dome for your hearing aid, use the cleaning wire to remove the wax from the vents (C) Clean_Spira exDome4 ✼ To avoid blocking the thin tube, do not use water to clean it.
- Page 37 C: How to Clean a Custom Mold The ear piece should be cleaned regularly. Use the brush of the MultiTool to clean the vent in your ear piece. · Press the brush through the hole · Twist the brush slightly to clean the vent The MultiTool is provided by your hearing care professional.
- Page 38 D: How to Exchange the Dome Inspect your hearing aid’s dome for yellowing, hardening and cracks. In the case of these changes, consider replacing your dome or contacting your hearing care professional. Spare domes may be obtained from your hearing care professional. ·...
- Page 39 E: How to Exchange the Thin Tube If the thin tube becomes discolored, stiff or brittle, it should be replaced. · Hold the hearing aid by the hearing aid adapter and grasp the thin tube close to the connector · Pull firmly to remove the old tube ·...
-
Page 40: Common Problems And Solutions
Common Problems and Solutions Hearing aid whistles or squeals Check that the earpiece is inserted correctly. If this is the case and the hearing aid still whistles or squeals, please consult your hearing care professional. No volume, level too soft or humming noise Check if the volume level is too soft and adjust by increasing the volume level with the control on your hearing aid. - Page 41 Whirring noise, fading, weak or motor-boating sounds Open and close the battery door several times or clean the battery contacts carefully with a dry cotton swab. If the problem still occurs, change the battery. If the problem still remains, contact your hearing care professional.
-
Page 42: Accessories
Accessories Bernafon offers a wide range of optional accessories that may be purchased to enhance your hearing aid. Depending on the hearing aid family and local regulations, the following accessories are available: Remote control ■ ■ SoundGate communication device (for wireless ■... -
Page 43: Remote Control
Phone Adapter TV Adapter SoundGate SN2_ILLU_SoundgateTopOfTelevisionAdapter_HI Call Bluetooth ® enabled SN2_ILLU_AudioCableTelevisionAdapterToTelevision_HI devices SN2_ILLU_SoundgateToMobileOneMeter_HI SoundGate Mic SN2_ILLU_WearingPositionNeck_HI Remote Control RC-N_ILLU_OperationHandHeld_BW... -
Page 44: Warnings
Warnings You should familiarize yourself fully with the following general warnings and the entire contents of this booklet before using your hearing aid to ensure personal safety and correct use. Consult your hearing care professional if you experience unexpected operations or events with your hearing aid. - Page 45 Usage of Hearing Aids · Hearing aids should be used only as directed and adjusted by your hearing care professional. Misuse can result in sudden and permanent hearing loss. · Never allow others to wear your hearing aid as incorrect usage could cause permanent damage to their hearing Choking Hazards and Risk of Swallowing Batteries...
- Page 46 Battery Use · Always use batteries recommended by your hearing care professional. Batteries of low quality may leak and cause bodily harm. · Never attempt to recharge your batteries and never dispose of batteries by burning them. There is a risk that the batteries will explode.
- Page 47 · Your Autophone magnet or MultiTool (which has a built-in magnet) should be kept more than 30 cm away from the implant, e.g. do not carry it in a breast pocket. In general, please follow the guidelines recommended by the manufacturer of implantable defibrillators and pacemakers on use with magnets.
- Page 48 X-ray, CT, MR, PET Scanning and Electrotherapy · Remove your hearing aid for example during X-ray, CT / MR / PET scanning electrotherapy or surgery as your hearing aid may be damaged when exposed to strong fields Avoiding Heat and Chemicals ·...
- Page 49 Possible Side Effects · Hearing aids, moulds or domes may cause an accelerated accumulation of ear wax · The otherwise non-allergenic materials used in hearing aids may in rare cases cause a skin irritation or other side effects Please seek consultation with a physician if these conditions occur.
-
Page 50: Safety Information
Safety Information · Hearing aids should be adjusted by a trained hearing care professional · Never insert cleaning tools into the sound outlet or microphone inlet. This could damage the hearing aid. · Remove your hearing aid before sleeping · Keep your hearing aid in the case for protection when you are not wearing it ·... -
Page 51: International Warranty
International Warranty Your hearing aid is covered by an international limited warranty issued by the manufacturer from the date of delivery. This limited warranty covers manufacturing and material defects in the hearing aid itself, but not accessories such as batteries, tubing, ear wax filters etc. - Page 52 Date: Model: Warranty period: Model L: Model R: Serial no.: Serial no.: Battery size: Battery size: Hearing Centre ✼ Do not attempt to repair your hearing aid yourself.
-
Page 53: Mobile Phone
Mobile Phone Some hearing aid users have reported a buzzing sound in their hearing aid when they are using mobile phones, indicating that the mobile phone and hearing aid may not be compatible. The ANSI C63.19 standard determines the prediction of compatibility between a specific hearing aid and a mobile phone by adding the numerical value of the rating for the hearing aid immunity to the numerical... - Page 54 The immunity of all Bernafon hearing instrument models covered by these instructions for use is at least M2/T2. I M P O R TA N T N O T I C E The performance of individual hearing instruments may vary with individual cell phones.
-
Page 55: Technical Information
Technical Information The hearing aid contains a radio transmitter using short range magnetic induction technology working at 3.84 MHz. The magnetic field strength of the transmitter is < –42 dBμA/m @ 10m. The emission power from the radio system is well below international emission limits for human exposure. - Page 56 CP, AR7 CPx; Carista hearing aid models: CA5 CP, CA5 CPx, CA3 CP, CA3 CPx; Saphira hearing aid models: SA CP/CPx Nevara hearing aid models: NE CPx FCC ID: U6XF2BTE02 IC: 7031A-F2BTE02 Chronos hearing aid models: CN9 CP, CN9 CPx,...
- Page 57 Hereby, Bernafon AG declares that the hearing aids covered in this booklet are in compliance with Directives 93/42/EEC, 1999/5/EC and 2011/65/EU. The full text of the declaration of conformity is available at the following internet address: http://www.bernafon.com 0543 0682 Waste from electronic...
-
Page 58: Information And Explanation Of Symbols
Information and Explanation of Symbols The CE marking indicates compliance to all applicable European Directives. The 4-digit numbers after the CE marking correspond to the identification number of notified bodies. This symbol indicates that the products described in these instructions for use adhere to the requirements for an applied part of Type B of EN 60601-1. - Page 59 The crossed-out wheeled bin indicates the European Directive 2011/65/EU on waste of electronic equipment applies. Please recycle your hearing aid and batteries according to your local regulations or return them to your hearing care professional for disposal. This symbol indicates to follow the instructions for use in this booklet EMC and Radio communications compliance label Australia and New Zealand...
- Page 60 Temperature Humidity Operating +1°C – +40°C Conditions 5% – 93% Non condensing Storage and –25°C – +60°C transportation conditions...
- Page 61 Notes...
- Page 62 160178/UK...
- Page 63 < > 8,15 mm Placeholder for FSC logo < 15 mm >...
- Page 64 Australia New Zealand Bernafon Australia Bernafon New Zealand 629 Nudgee Road Level 1, Building F Nundah QLD 4012 27-29 William Pickering Drive Freecall 1800 809 111 North Harbour, Albany Phone +61 7 3250 0300 Auckland 0632 info@bernafon.com.au Toll Free 0800 442 257...