Grizzly G8689 Owner's Manual
Hide thumbs
Also See for G8689:
- Parts breakdown (5 pages) ,
- Instruction manual (44 pages) ,
- Owner's manual (44 pages)
Table of Contents
Advertisement
Quick Links
Download this manual
See also:
Instruction Manual
MODEL G8689
MINI MILL
OWNER'S MANUAL
COPYRIGHT © MAY, 2005 BY GRIZZLY INDUSTRIAL, INC., REVISED MARCH, 2009 (TS)
WARNING: NO PORTION OF THIS MANUAL MAY BE REPRODUCED IN ANY SHAPE
OR FORM WITHOUT THE WRITTEN APPROVAL OF GRIZZLY INDUSTRIAL, INC.
(FOR MODELS MANUFACTURED SINCE 8/06) #PC7203 PRINTED IN CHINA
Advertisement
Table of Contents

Related Manuals for Grizzly G8689


Summary of Contents for Grizzly G8689
- Page 1 MODEL G8689 MINI MILL OWNER'S MANUAL COPYRIGHT © MAY, 2005 BY GRIZZLY INDUSTRIAL, INC., REVISED MARCH, 2009 (TS) WARNING: NO PORTION OF THIS MANUAL MAY BE REPRODUCED IN ANY SHAPE OR FORM WITHOUT THE WRITTEN APPROVAL OF GRIZZLY INDUSTRIAL, INC.
- Page 2 This manual provides critical safety instructions on the proper setup, operation, maintenance, and service of this machine/tool. Save this document, refer to it often, and use it to instruct other operators. Failure to read, understand and follow the instructions in this manual may result in fire or serious personal injury—including amputation, electrocution, or death.
-
Page 3: Table Of Contents
SECTION 3: SET UP ........11 Electrical Components ......... 32 Needed for Set Up ........11 Parts Breakdown.......... 33 Unpacking ............ 11 G8689 Table Assembly ....... 33 Inventory ............12 G8689 Head Assembly ........ 35 Hardware Recognition Chart ....... 13 G8689 Column Assembly ......37 Clean Up ............ -
Page 4: Introduction
Any updates to your model table movement—longitudinal (X-axis) and cross of machine will be reflected in these documents (Y-axis). -
Page 5: Machine Data Sheet
MACHINE DATA SHEET Customer Service #: (570) 546-9663 · To Order Call: (800) 523-4777 · Fax #: (800) 438-5901 MODEL G8689 MINI MILLING MACHINE Product Dimensions: Weight................................101 lbs. Width (side-to-side) x Depth (front-to-back) x Height..............20 x 20 x 30-1/4 in. - Page 6 The information contained herein is deemed accurate as of 2/18/2015 and represents our most recent product specifications. Model G8689 PAGE 2 OF 2 Due to our ongoing improvement efforts, this information may not accurately describe items previously purchased. G8689 Mini Mill (Mfg. 8/06+)
-
Page 7: Identification
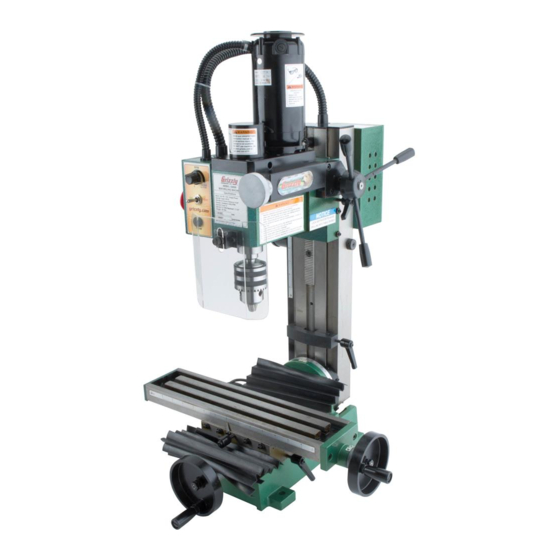
Identification Figure 1. The Model G8689 Mini Mill. Column A. Motor M. Limit Block B. Micro Downfeed Knob N. Chip Shield C. Rapid Downfeed Lever O. Spindle Cover D. Headstock P. System Power Light E. Longitudinal Handwheel Q. Spindle Power Light Table R. -
Page 8: Section 1: Safety
TIRED, OR UNDER THE INFLUENCE OF RESPIRATOR WHEN OPERATING DRUGS OR ALCOHOL. Be mentally alert MACHINERY THAT PRODUCES DUST. at all times when running machinery. Wood dust is a carcinogen and can cause cancer and severe respiratory illnesses. G8689 Mini Mill (Mfg. 8/06+) - Page 9 Make sure you know what 16. MAKE SURE GUARDS ARE IN PLACE type of metal and cutting fluid you will be AND WORK CORRECTLY BEFORE exposed to and how to avoid contamina- USING MACHINERY. tion. G8689 Mini Mill (Mfg. 8/06+)
-
Page 10: Additional Safety Instructions For Mini Mill
Like all machines there is danger associ- No list of safety guidelines can be complete. ated with the Model G8689. Accidents are Every shop environment is different. Always frequently caused by lack of familiarity or consider safety first, as it applies to your failure to pay attention. -
Page 11: Glossary Of Terms
The following is a list of common definitions, terms and phrases used throughout this manual as they relate to this mill and metalworking in general. Become familiar with these terms for assembling, adjusting or operating this machine. Your safety is VERY important to us at Grizzly! Arbor: A machine shaft that supports a cutting Facing: cutting across the face of a workpiece, tool. -
Page 12: Section 2: Circuit Requirements
50 feet in length! Minimum Circuit Size ......15 Amps • The extension cord must have a ground wire and plug pin. • A qualified electrician MUST size cords over 50 feet long to prevent motor damage. -10- G8689 Mini Mill (Mfg. 8/06+) -
Page 13: Section 3: Set Up
The Model G8689 was carefully packed when it left our warehouse. If you discover the machine is damaged after you have signed for delivery, please immediately call Customer Service at (570) 546-9663 for advice. -
Page 14: Inventory
Q. Spindle Locking Pin ........1 R. Drawbar ............1 S. Arbor MT#3-B16 ......... 1 Figure 3. Model G8689 Mini Mill. Figure 4. Bag contents. In the event that any nonproprietary parts are missing (e.g. a nut or a washer), we would be... -
Page 15: Hardware Recognition Chart
Hardware Recognition Chart -13- G8689 Mini Mill (Mfg. 8/06+) -
Page 16: Clean Up
Site Considerations Workbench Load The unpainted surfaces are coated with a waxy oil to prevent corrosion during shipment. Remove The Model G8689 weighs 101 lbs. and has a this protective coating with a solvent cleaner or base footprint of 8 ⁄... -
Page 17: Mounting To Workbench
Mounting to Installing Handwheel Workbench Handles The Model G8689 should be bolted to a work- The handwheels on the Model G8689 come bench to provide maximum rigidity and safety. installed, you will only need to install the handwheel handles. Components and Hardware Needed: Hex Bolts ⁄... -
Page 18: Drill Chuck Removal
DO NOT completely unscrew the drawbar before striking it with the hammer. You will The Model G8689 may have shipped with the chip damage the threads on the drawbar and the guard in place and the drill chuck installed in the arbor. -
Page 19: Section 4: Operations
It is vital that you become familiar with the control proper protective gear. Always wear safety panel before operating the Model G8689. Three glasses, a respirator, and hearing protection separate switches control the power on the mill when operating this machine. -
Page 20: Test Run And Spindle Break-In
10 minutes on a low speed. The mill should run smoothly with minimal noise and vibra- tion. The Model G8689 has two speed ranges: Low —If you suspect the mill is not working cor- range is 0–1100; high range is 0–2500 RPM. -
Page 21: Power Shutdown
It is important to shut the power OFF when the mill is not in use. Leaving the power ON keeps The Model G8689 spindle height is controlled by the circuit board cooling fan running. This will two methods. The rapid downfeed works similar cause unnecessary wear on the fan and electrical to a drill press. -
Page 22: Limit Block
Figure 15. Table locks. sibility make sure the head only makes gentle contact with the limit block. Both the rapid and micro downfeed controls can overpower the limit block if excessive force is used. -20- G8689 Mini Mill (Mfg. 8/06+) -
Page 23: Graduated Dials
For machining operations requiring an angle, the represents 0.001" of movement and one full revo- column of the Model G8689 can be adjusted up to lution of the micro-downfeed knob equals 0.060" 45° in either direction of the vertical axis. -
Page 24: Mt#3 Collets
MT#3 Collets The Model G8689 features an MT#3 spindle taper, which only accepts MT#3 collets. MT#3 collets come in many sizes, typically ranging from ⁄ " to ⁄ " and 2mm to 20mm. You will need a collet to match the diameter of the shank of the tool you want to hold. -
Page 25: Setting Rpm
Guidelines may threaten operator safety from ejected parts or broken tools. NOTICE Failure to follow RPM and Feed Rate Guidelines will put undue strain on mov- ing parts, shorten tool life, and create poor workpiece results. -23- G8689 Mini Mill (Mfg. 8/06+) -
Page 26: Section 5: Accessories
", 1", 1 ", 1 ", 1 ", 1 ", 1 ", and 1 ". H1414 H1413 H1412 Figure 22. G5641 1-2-3 Blocks and G9815 Parallel Set. Figure 20. Grizzly Cutting & Tapping Fluid. ® -24- G8689 Mini Mill (Mfg. 8/06+) - Page 27 Developed by Boeing engineers for aircraft appli- to the dial face. cations—this is the best! Figure 24. Test Indicator. Figure 26. Boeshield Spray. -25- G8689 Mini Mill (Mfg. 8/06+)
- Page 28 H5685—4" Rotary Table The perfect rotary table for all you model makers and those doing smaller precision work. Comes with clamping kit. Figure 28. G2861 Face mill. Figure 30. H5685 4" Rotary Table. -26- G8689 Mini Mill (Mfg. 8/06+)
-
Page 29: Section 6: Maintenance
SECTION 6: MAINTENANCE Cleaning Always disconnect power to the machine before Cleaning the Model G8689 is relatively easy. performing maintenance. Remove excess cutting fluid and chips, and wipe Failure to do this may off the remaining moisture with a dry cloth. Treat... -
Page 30: Lubrication
A & E lubrication points. Figure 32. Upper column lubrication points. NOTICE Lack of lubrication causes poor machine performance. Keep your mill lubricated to reduce wear on parts and discourage oxi- dation.. -28- G8689 Mini Mill (Mfg. 8/06+) -
Page 31: Section 7: Service
SECTION 7: SERVICE About Service This section is provided for your convenience—it is not a substitute for the Grizzly Service Department. If any adjustments arise that are not described in this manual, you need replacement parts, or you are unsure of how to perform the procedures in this section, then feel free to call our Technical Support line. -
Page 32: Adjusting Gibs
Move the table and slightly tighten each set screw. When properly adjusted, the gib should offer slight resistance without bind- ing. Tighten the lock nuts. Figure 34. Carbon brush removal. Figure 33. Gib adjustment. -30- G8689 Mini Mill (Mfg. 8/06+) -
Page 33: Fuse Replacement
(see Figure 35). This spring is under high tension! DO Replace the fuse cap. NOT remove the cover or the spring. THE SPRING WILL RAPIDLY UNCOIL CAUSING PERSONAL INJURY. Figure 35. Fuse replacement. -31- G8689 Mini Mill (Mfg. 8/06+) -
Page 34: Electrical Components
Fuse Power Light Printed Circuit Board E-Stop Button Cooling Fan Cooling Figure 36. G8689 Electrical box. Figure 38. G8689 Wiring diagram. ON/RPM Switch System ON Switch E-Stop Button Fuse Figure 37. G8689 Control box. Figure 39. G8689 Control panel. -32-... -
Page 35: Parts Breakdown
G8689 Table Assembly Parts Breakdown 17 13 -33- G8689 Mini Mill (Mfg. 8/06+) - Page 36 SET SCREW M6-1 X 22 P8689096 COVER P8689044 SCALE PS17M PHLP HD SCR M4-.7 X 6 P8689045 P8689098 DUST COVER SUPPORT P8689046 GEAR RACK PSB24M CAP SCREW M5-.8 X 16 PFH02M FLAT HD SCR M6-1 X 12 -34- G8689 Mini Mill (Mfg. 8/06+)
-
Page 37: G8689 Head Assembly
G8689 Head Assembly 55 54 81 83 86 85 86 88 142 143 134-1 -35- G8689 Mini Mill (Mfg. 8/06+) - Page 38 PW04M FLAT WASHER 10MM P8689140 TRANSMISSION GEAR P8689186 RIVET P8689141 P8689187 MOTOR BRUSH P8689142 LINKING BOARD P8689188 COOLING FAN PSS31M SET SCREW M5-.8 X 8 P8689212 DRAWBAR P8689144 SELF TAP SCR ST2.9 X 8 -36- G8689 Mini Mill (Mfg. 8/06+)
-
Page 39: G8689 Column Assembly
G8689 Column Assembly -37- G8689 Mini Mill (Mfg. 8/06+) - Page 40 -38- G8689 Mini Mill (Mfg. 8/06+)
- Page 41 Would you recommend Grizzly Industrial to a friend? _____ Yes _____No Would you allow us to use your name as a reference for Grizzly customers in your area? Note: We never use names more than 3 times. _____ Yes _____No 10.
- Page 42 FOLD ALONG DOTTED LINE Place Stamp Here GRIZZLY INDUSTRIAL, INC. P.O. BOX 2069 BELLINGHAM, WA 98227-2069 FOLD ALONG DOTTED LINE Send a Grizzly Catalog to a friend: Name_______________________________ Street_______________________________ City______________State______Zip______ TAPE ALONG EDGES--PLEASE DO NOT STAPLE...
-
Page 43: Warranty And Returns
WARRANTY AND RETURNS Grizzly Industrial, Inc. warrants every product it sells for a period of 1 year to the original purchaser from the date of purchase. This warranty does not apply to defects due directly or indirectly to misuse, abuse, negligence, accidents, repairs or alterations or lack of maintenance.