
Related Manuals for Oregon Scientific S+ARCK PS-L03


Summary of Contents for Oregon Scientific S+ARCK PS-L03
- Page 1 Full Weather Station with Radio Controlled Clock and AM/FM Radio (Model #: PS-L03 / PS-L03U) User Manual...
-
Page 3: Table Of Contents
Backlight ..............19 TABLE OF CONTENTS Reset system ............20 About this guide ............2 Safety and care ............20 Product overview ............3 Warnings ..............20 Getting started ............8 Troubleshooting ............21 Batteries .............. 8 Specifications ............23 AC power adapter .......... -
Page 4: About This Guide
In this box, you will find: ABOUT THIS GUIDE Congratulations on your selection of the Philippe Starck with • Main unit Oregon Scientific Full Weather Station with Radio- • Remote sensor Controlled Clock and AM/FM Radio (PS-L03 / PS-L03U). •... -
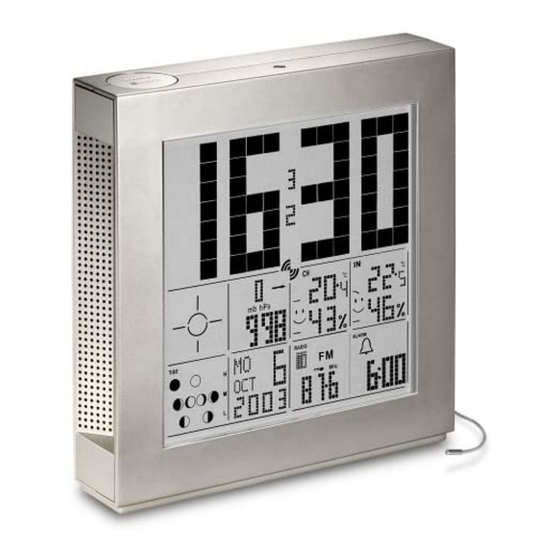
Page 5: Product Overview
PRODUCT OVERVIEW DESCRIPTIONS Snooze / Light button (→ 12, 19) TOP VIEW Light sensor (→ 19) - Page 6 LCD DISPLAY DESCRIPTIONS Low batteries icon (→ 8) Clock (→ 10) Barometer (→ 13) Weather forecast (→ 14) Moon phase (→ 13) Calendar (→ 12) Temperature and humidity (→ 14) Alarm (→ 11) Radio (→ 17)
- Page 7 BACK VIEW BUTTON DESCRIPTIONS Select – switch modes / change settings Up – increase setting / activate auto-synch (→ 10) Down – decrease setting / deactivate auto-synch (→ 10) Alarm –activate / deactivate alarm (→ 11) Channel – switch remote unit (→ 15) Radio –...
- Page 8 BOTTOM VIEW DESCRIPTIONS Battery compartment (→ 8) Light sensitivity knob (→ 19) Reset button (→ 8, 20) Backlight switch (→ 19) Antenna (→ 17) Headphone jack (→ 18) DC power input jack (→ 8) NOTE AC power adapter not shown.
- Page 9 REMOTE UNIT DESCRIPTIONS Temperature / Trend display Low battery icon Humidity / Trend / Comfort Level display °C / °F switches Channel switches Reset button Battery compartment Wall-mount hole Battery compartment lid...
-
Page 10: Getting Started
GETTING STARTED NOTE Insert the batteries in the remote unit before you set up the main unit. Do not use rechargeable BATTERIES batteries. Batteries for the remote and main units are supplied with this product. Replace them whenever the low AC POWER ADAPTER battery signal ( ) displays. -
Page 11: Change Settings
CHANGE SETTINGS INSTALLATION Press and hold SELECT for 2 seconds. Then, press Mount the remote unit on a flat surface using the recess UP or DOWN to change each setting. Press SELECT holes on the back of the unit. to switch options. For best results: •... -
Page 12: Clock
CLOCK NOTE For best results, place the unit away from metal This product can automatically synchronize the date and or electrical objects, and near a window with a clear time with official time-keeping organizations in Frankfurt, view to the sky. Germany (PS-L03) or Rugby, England (PS-L03U). -
Page 13: Alarm
The Radio alarm turns on the Radio automatically. It will SET OR CHANGE THE CLOCK turn off after 2 hours. Press SELECT to switch to the Clock Mode. The time will flash. SET ALARM Press and hold SELECT for 2 seconds to enter Press SELECT several times until the Alarm area the setting mode. -
Page 14: Calendar
CALENDAR If you choose , use the radio control buttons to select the AM/FM band, radio station SET DATE Clock auto-synchronization must be deactivated before and volume level (→ 18). you manually set the date. (→ 10) Press SELECT again when you are finished. Press SELECT several times until the calendar area flashes. -
Page 15: Moon Phase
MOON PHASE Description Pressure change Trend Press SELECT until the Calendar Area flashes. Then, (mb/hPa) press UP or DOWN to change the date and view the 1 hr 6 hr corresponding moon phase. Rising BAROMETER This product tracks barometric pressure changes over Steady Steady Steady... -
Page 16: Weather Forecast
SET UNIT AND ALTITUDE WEATHER FORECAST You can set the unit of measurement (mb/hPa or inHg) This product forecasts the next 12 to 24 hours of and altitude. Setting the altitude allows the product to weather within a 30 to 50 km (19 - 31 mile) radius with take more accurate barometric measurements. - Page 17 Outdoor measurements are collected by the remote SELECT REMOTE UNIT CHANNEL unit. While in the Temperature / Humidity Mode, press CHANNEL to switch between CH 1, 2, or 3, or press Temperature is give at the top; humidity is below. and hold CHANNEL for 2 seconds to enter Auto scan mode.
- Page 18 COMFORT ZONE Searching No sensor Sensor found The indoor and outdoor comfort zones are shown for the following conditions. Temperature Temperature Zone Relative Humidity NOTE Signals from household electrical appliances >70% such as doorbells and home security systems can cause temporary reception failures between the indoor and outdoor units.
-
Page 19: Radio
TRENDS SET UNIT The trend arrow for the last 30 minutes always displays. While in Temperature / Humidity Mode, press SELECT Indoor and outdoor temperature and humidity trends are for 2 seconds. Press UP or DOWN to switch between °C and °F. Press SELECT to confirm. shown separately. - Page 20 VOLUME STORE STATION TO MEMORY Press UP or DOWN. There are 8 volume levels. Press STATION for 2 seconds. The assigned number (1 – 8) will show in the Radio Area. SWITCH AM/FM BAND Press TUNING to enable auto-tuning. Press again to SLEEP TIMER switch AM/FM band.
-
Page 21: Backlight
The Light Sensitivity knob is located in the BACKLIGHT battery compartment. Rotate to adjust. Press SNOOZE/LIGHT to illuminate the backlight for 5 seconds. CONTINUOUS BACKLIGHT The AC power adapter must be plugged in to use this feature (→ 8). The BACKLIGHT switch is located in the battery When activated, the continuous backlight will be compartment. -
Page 22: Reset System
RESET SYSTEM WARNINGS The RESET buttons are located in the battery This product is designed to give you years of service if compartments for the main and remote units. Press handled properly. Observe the following guidelines: these buttons with the tip of a blunt object (such as a ball point pen) whenever you change the batteries, or •... -
Page 23: Troubleshooting
• Do not make any changes or modifications to this Problem Symptom Remedy product. Unauthorized changes may void your right to use the product. Backlight Plug in AC power continuous adapter. Check the • The content of this user manual are subject to backlight change without notice. - Page 24 Problem Symptom Remedy Problem Symptom Remedy Check batteries Cannot Remote 4. Place clock near locate (→ 8) unit window / away remote unit from electrical Check location devices, and wait (→ 9) 10 – 20 minutes. Cannot Check sensors. If it still fails, you may Only one sensor is change be too far from a...
-
Page 25: Specifications
Remote Unit: -20 ˚C to 60 ˚C (-4 ˚F SPECIFICATIONS to 140 ˚F) 0.1 °C (0.2° F) Resolution Main unit dimensions 20 °C to 25 °C (68 °F to 77 °F) Comfort L x W x H 181 x 45 x 185.3 mm (see also, Relative humidity) (7.1 x 1.77 x 7.3 inches) Memory... - Page 26 Barometer Channel No. 1, 2, or 3 °C or °F Unit mb/hPa or inHg Unit Range 500 to 1050mb (14.77 to 31.01 inHg) Radio-controlled clock Resolution 1mb (0.03 inHg) Synchronization Auto or disabled Altitude -100 to 2500 meters (-328 to 8202 Clock display HH:MM:SS feet)
-
Page 27: Additional Resources
Radio Remote unit 2 x UM-4 (AAA) 1.5V alkaline Type Digital tuning PLL (Phase Lock batteries Loop) stereo Band 531 to 1602 kHz (AM) ADDITIONAL RESOURCES 87.5 to 108.0 MHz (FM) Visit our website (www.oregonscientific.com) to learn Stations 8 AM / 8 FM more about your new product and other Oregon Volume 8 levels (0 –... - Page 28 RTT&E Compliant Countries: ETSI EN 301 489-1-3 (Ver. 1.4.1):2002-08 All EC Countries, Switzerland CH , Safety of information technology equipment and Norway (Article 3.1.a of the R&TTE directive) © 2003 Oregon Scientific. All rights reserved. applied standard(s) EN 60950:2000...