Sony PMW-F55 Operating Instructions Manual
Solid-state memory camcorder
Hide thumbs
Also See for PMW-F55:
- Operating instructions manual (131 pages) ,
- User manual (68 pages) ,
- Manual (60 pages)
Table of Contents

Related Manuals for Sony PMW-F55


Summary of Contents for Sony PMW-F55
-
Page 1: Operating Instructions
4-459-611-19(1) Solid-State Memory Camcorder PMW-F55 PMW-F5 Operating Instructions Software Version 6.0 Before operating the unit, please read this manual thoroughly and retain it for future reference. © 2013 Sony Corporation... -
Page 2: Table Of Contents
Table of Contents Overview Features ..................6 System Configuration ............... 9 Location and Function of Parts ..........11 On-Screen Indications ............17 Sub Display Screen ............17 Viewfinder Screen ............20 Preparations Power Supply ................23 Using a Battery Pack ............ 23 Using AC Power (DC IN Power) ......... - Page 3 Checking the Remaining Time ........32 Using an AXS-R5 ..............33 Attaching the AXS-R5 ..........33 Removing the AXS-R5 ..........33 Inserting an AXS Memory Card ........33 Removing an AXS Memory Card ........ 34 Recording to an AXS Memory Card ......34 Formatting an AXS Memory Card .......
- Page 4 Clip Operations ............... 48 Operations of the Thumbnail Menu ......48 Displaying the Detailed Information of a Clip ..... 49 Copying MPEG2 Proxy Data (PMW-F55 and PMW-F5 + CBKZ-55FX) ............49 Deleting Clips ............... 50 Changing Information on the Thumbnail Screen ..50 Settings Sub Display Operation ............
- Page 5 Appendices Important Notes on Operation ..........101 Formats and Limitations of Outputs ........104 Video Formats and Output Signals ......104 Error/Warning Indications ..........112 Error Indications ............112 Warning Indications ........... 112 Caution and Operation Confirmation Indications ..113 Items Saved in the File ............
-
Page 6: Overview
If you install the CBK-55PD to the PMW-F55/F5, with a traditional film camera. The camcorder you can record in the Apple ProRes and Avid adopts a color filter that emphasizes color DNxHD®... - Page 7 The hyper gamma can display the wide dynamic You can operate the camcorder easily by range images in smooth contrast without using assigning commonly-used functions to these the knee function. The PMW-F55/F5 provides the buttons. following six hyper gamma choices: Built-in ND filter...
- Page 8 Various input/output connectors Four types of SDI output The camcorder has four types of SDI output that allows you to output 4K 59.94P signal as four 3G- SDI. The SDI-1/2 and SDI-3/4 outputs are assignable as SDI-1/2 OUT to Main, and SDI-3/4 OUT to Sub.
-
Page 9: System Configuration
SCL-PK6/F, PK6/M (set of 6 lenses, 20 mm/25 mm/35 mm/50 mm/85 mm/135 mm) SCL-PK3/F, PK3/M (set of 3 lenses, 20 mm/25 mm/135 mm) SCL-P11X15 SCL-Z18X140 Lens mount adapter PMW-F55, PMW-F5 Mount adapter LA-FZB1, LA-FZB2 Optical 2K Filter CBK-55F2K Shoulder adaptor... - Page 10 QD-G128A, QD-G64A, QD-G32A (QDA-EX1 XQD ExpressCard adapter is required.) Battery pack Battery adaptor BP-FL75, BP-L80S AC adaptor Portable memory AC-DN2B, AC-DN10 recorder PMW-F55, PMW-F5 AXS-R5 AXS memory card AXS memory card AXS-512S24, AXS-A256S24, reader AXS-A512S24, AXS-A1TS24 AXS-CR1 Camera system adaptor...
-
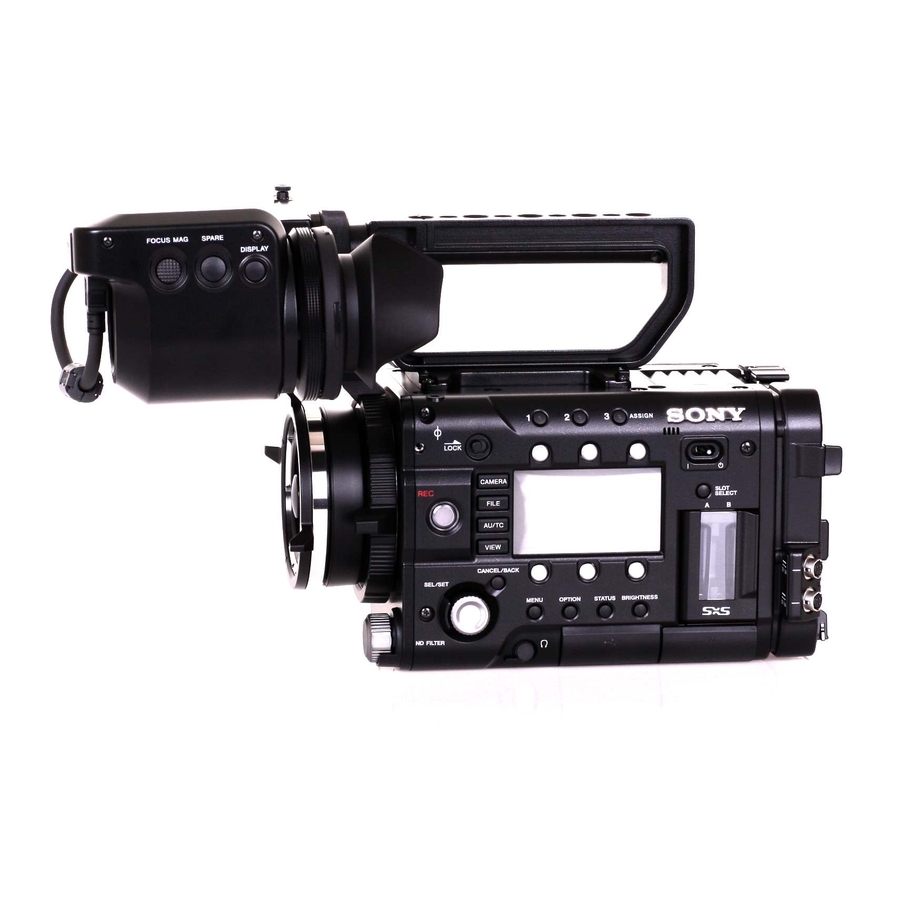
Page 11: Location And Function Of Parts
Location and Function of Parts For functions and usage, see the pages in parentheses. The following illustrations are with the battery adaptor (page 16) removed. For removing the battery adaptor, see “Removing a battery pack” (page 23). Sub display/Control buttons block (page 14) SxS memory card slot block (page 14) Right side connector... - Page 12 Picture Cache On/off setting of Picture Cache Rec MPEG2 Proxy On/off setting of MPEG2 Items in [ ] are displayed when the CBK-55BK is proxy (PMW-F55 and PMW- attached. F5 + CBKZ-55FX) Camera status screen Option Attached option Displays the electronic shutter settings or the Video output status screen status of the lens.
- Page 13 Voltage Voltage (V) Protect Manufacture Manufacture date of the information Date battery Remaining Remaining space and Power Source Power source available recording time Supplied Voltage Supplied voltage Life Estimated service life Media status screen OPTION button (page 48) Displays the remaining space, available MENU (menu display on/off) button (page recording time, and estimated service life of the recording media (SxS memory card A/SxS...
- Page 14 Sub display/Control buttons block (page Right side connector panel The USB connector and SD card slot are located behind the cover. Open the Open the cover. cover. Headphones connector (stereo mini jack) (page 40) USB connector (A) Sub display USB connector (Mini B) Function buttons ACCESS (SD card access) lamp (page 32) •...
- Page 15 Audio connector panel Attach the supplied audio connector panel as follows. AUDIO IN CH1/AUDIO IN CH2 (external audio input selection) switches Switch input signal (external microphone, external audio device, etc.). LINE: Line input audio equipment AES/EBU: AES/EBU format audio signal MIC: Microphone input AUDIO IN (CH-1, CH-1/2) /AUDIO IN Notes...
- Page 16 Lights when the overcurrent protection activates. In this case, disconnect any peripheral device from a DC OUT connector whose indicator is lit, then restart the PMW-F55/F5. Accessory mounting screw holes Type of screw: 1/4-20UNC (× 3) Type of screw: 3/8-16UNC (× 3)
-
Page 17: On-Screen Indications
On-Screen Indications Sub Display Screen When turning on the camcorder, the sub display appears and you can check the status of the camcorder and set the basic items. The screen is switched by pressing the function button on the left of the sub display (page 14). Item name/ Setting value/ Status screen... - Page 18 SDI (Sub) Disp. Turns the function that outputs the character Sets the timecode. information to the SDI (Sub) output on/off. Mode Sets the timecode mode. FILE-1 (page 53) 1. to 6. All File Load 1 to 6 Sets the condition for the timecode. Loads the All file (1 to 6) from the SD card.
- Page 19 Status screen Special recording/operation status Clip name indication (page 86) indication While recording: Displays “Clip: clip name” when “Mode” in zRec Recording in progress “Clip Naming” of the Media menu is set to Stby Standby for recording “Title,” or “Reel: Camera ID + Reel zS&Q Rec Slow &...
-
Page 20: Viewfinder Screen
Viewfinder Screen While recording, standing by to record, or playback, the statuses and settings of this unit are superimposed on the viewfinder screen. The statuses and settings of this unit can be turned on/off using the setup menu or by the assignable button. The statuses and settings of this unit can be independently turned on/off (page 82). - Page 21 Color temperature indications (page 59) A/B slot media status/remaining space indication (page 31) S&Q motion frame rate/Interval Rec When the left side of the icon is orange, indication (pages 66, 84) recording is possible. Displays the interval time setting or time until When the green lamp on the upper right of the the next recording, during Interval Rec.
- Page 22 Recording format (picture size) indication (page 28) Displays the picture size that is recorded on an SxS memory card. Displays the imager scan mode (2KF: 2K Full, 2KC: 2K Center) on the left side of the picture size. Displays imager scan mode only when recording only RAW format.
-
Page 23: Preparations
You can use a battery pack or AC power via an the slot on the rear of the camcorder (1), then AC adaptor. lower the ejection lever (2). For safety, use only the Sony battery packs and AC adaptors listed below: Lithium-ion Battery Pack BP-FL75... -
Page 24: Using Ac Power (Dc In Power)
Checking remaining battery charge Setting the Clock When recording or playback is in progress on the battery pack, an icon to show the current battery remaining time and battery voltage are displayed When you turn the camcorder on for the first time on the sub display screen (page 17) and after purchasing or replacing the backup battery, viewfinder screen (page 20). -
Page 25: Attaching Optional Devices
SCL-Z18X140 Note For details about available lenses for the camcorder, Turn the PL mount lever counterclockwise to the contact a Sony service representative. stopper position. Caution Insert the lens into the lens mount by matching the concave part of the lens to Do not leave the lens facing the sun. -
Page 26: Attaching A Viewfinder
For details regarding CBK-DCB01 that can be used You can adjust the flange focal length by turning with the camcorder, contact a Sony service the screw for the flange focal length (page 11). representative. -
Page 27: Setting The Basic Action
Notes Setting the Basic Action • Attach/remove the viewfinder while the camcorder is turned off. • When using the camcorder with the DVF-L700 attached, turn the camcorder on while the POWER Before recording, make the basic settings, as switch of the DVF-L700 is set to ON. required. -
Page 28: Color Space
(DCIP3). only) S-Gamut3/Slog3: Wide color gamut optimized by DNxHD 220x HD i** Sony’s original image distortion correction DNxHD 145 HD i** technology, and adaptable to the color gamut ProRes 422 HQ HD i** that will be standardized in the future. -
Page 29: Using Sxs Memory Cards
About SxS Memory Cards Use the following Sony SxS memory cards or XQD memory cards*. * When using an XQD memory card, the XQD ExpressCard adapter (QDA-EX1) is required. -
Page 30: Inserting An Sxs Memory Card
• SxS, SxS PRO, and SxS-1 are trademarks of Switching Between SxS Memory Sony Corporation. Cards • XQD is a trademark of Sony Corporation. • The ExpressCard word mark and logo are owned by Personal Computer Memory Card When SxS memory cards are loaded in both card... -
Page 31: Checking The Remaining Time Available For Recording
When restoration is completed, the completion Checking the Remaining Time message is displayed, then press the MENU dial Available for Recording to disappear the message. If restoration fails While recording (or standing by to record), you • A write-protected SxS memory card, or one on can check the remaining space for the SxS which an error occurred, cannot be restored. -
Page 32: Using An Sd Card
Formatting an SD Memory Card Using an SD Card When you use an SD memory card with this camcorder, it must be formatted using the format You can store the setting value file of the camera function of this camcorder. on an SD card (optional). -
Page 33: Using An Axs-R5
• Before lowering the ejection lever, make sure that the four hooks are attached securely. If the four Using an AXS-R5 hooks are not attached securely, it may cause the connection to be poor or damage the camcorder and AXS-R5. You can record image/audio (RAW format) data Removing the AXS-R5 to the AXS (Access Memory Card System) -
Page 34: Removing An Axs Memory Card
Removing an AXS Memory Card Checking the Remaining Time Available for Recording Open the cover of the AXS-R5, press the EJECT button and remove the AXS While recording (or standing by to record), you memory card. can check the time remaining for the AXS memory cards on the AXS memory status/ Note remaining space indication of the sub display... -
Page 35: Using A Usb Wireless Lan Module
To update the managerial file Using a USB Wireless If clips cannot be played back, updating the LAN Module managerial file on the card may improve the situation. For this operation, use “Update Media” (page 86) of the Media menu. You can make the Wi-Fi connection between the camcorder and a device such as a smartphone, tablet, etc., by attaching the supplied IFU-WLM3... -
Page 36: Making A Wi-Fi Connection
This function is useful for setting the camcorder setting: model name “pmw-f5” or in a remote place, such as the top of a crane, etc. “pmw-f55”) For details about the menu settings and entering a Note character string, see “Setup Menu Operations”... - Page 37 Tablet Playback screen Main screen • Wi-Fi connecting status (Connected/ Disconnected) • Status indication • Playback operation button: F Rev, Play/Pause, F Fwd, Prev, Stop, Next • Wi-Fi connecting status (Connected/Disconnected) • Status indication: operating status, time data, audio level meter, clip Cursor screen name, recording format, media status/remaining space, battery remaining charge/DC IN voltage...
- Page 38 • Wi-Fi connecting status (Connected/Disconnected) Compatible devices • Status indication • Assignable button indication The following devices, using the specified • Cursor operation button, menu/status indication: versions or higher, can be used as Wi-Fi remote Up, Left, Set, Right, Down, Cancel/Back, Menu, commanders.
- Page 39 You can set/display the following items of the Recording menu setup menu on the Wi-Fi remote display (tablet) Interval Rec (a: compatible, –: not compatible). Picture Cache Rec Camera menu MPEG2 Proxy White Rec Control Offset White SDI Rec Control Black Media menu Flare...
-
Page 40: Recording
Recording Basic Operation Procedure Basic recording can be performed with the Playback operation is performed by the buttons following procedures. on the sub display. Play/Pause button: Pauses playback. To resume Make sure that the necessary devices playback, press this button again. are attached to the camcorder and F Fwd button/F Rev button: Plays fast. - Page 41 Note When storing the clip name by the “Title” When connecting the camcorder and AXS-R5, only EE* naming mode (page 86), the clip name is is output from the AUX OUT connector of the AXS-R5. created from characters that are set in “Title Playback picture is not output.
-
Page 42: Changing Basic Settings
Camera menu to “On,” the shutter speed that 1600EI, 2000EI, 2500EI, 3200EI, 4000EI, you specified with “Shutter” is turned on. 5000EI, 6400EI, 8000EI PMW-F55: 320EI, 400EI, 500EI, 640EI, 800EI, Note 1000EI, 1250EI, 1600EI, 2000EI, 2500EI, When the viewfinder double speed drive function (page... -
Page 43: Audio
Audio Useful Functions To adjust the audio levels When “CH-1 Audio Select/CH-2 Audio Select” Assignable Buttons in “Audio Level” (page 75) of the Audio menu is set to “Auto,” the audio recording levels are The camcorder has four assignable buttons (pages automatically adjusted. -
Page 44: Slow & Quick Motion
automatically whenever you select Interval Rec or Function name Function Picture Cache mode. VF High Contrast Enhancing the contrast of the pictures on the viewfinder. Recording Time-lapse Video Color Bars Turning the color bar on/off. (Interval Rec Function) Slow & Quick Motion The camcorder’s Interval Rec function allows you to capture time-lapse videos to the When “Main Operation”... -
Page 45: Starting To Record From Pre-Stored Video (Picture Cache Function)
Time). memory card – MPEG2 Proxy function The Picture Cache function is available for either For the PMW-F55, set “Setting” in “MPEG2 of the following settings. Proxy” (page 84) of the Recording menu to “On” • The system frequency is set to 29.97/25/24/ while the recording format is set to XAVC 4096 23.98, and the recording format is set to XAVC... -
Page 46: Rec Review
• The MLUT setting is locked to “MLUT On” for the False Color Display MPEG2 Proxy video that is recorded simultaneously when in the Cine EI mode. You can perform the false color display on the Recording on the AXS and SxS memory viewfinder by pressing the SPARE button of the simultaneously viewfinder (DVF-EL100, DVF-L700) that is... -
Page 47: Thumbnail Screens
Thumbnail Screens Thumbnail Screens When you press the Thumbnail button of the sub display (page 17), clips recorded on the SxS memory card are displayed as thumbnails on the screen. You can start playback from the clip selected on the thumbnail screen. The playback picture can be seen on the viewfinder screen and external monitors. -
Page 48: Playing Clips
Displays the detailed information of a clip screen (page 49). Copy MPEG2 Proxy (PMW-F55 and PMW-F5 + CBKZ-55FX) Copy All Clips: Copies all the MPEG2 Proxy data to the destination media as a clip (page 49). -
Page 49: Displaying The Detailed Information Of A Clip
Select “Display Clip Properties” from the thumbnail menu. Image of the current clip Copying MPEG2 Proxy Data Timecode (PMW-F55 and PMW-F5 + CBKZ- TC Index: Timecode of the displayed frame 55FX) Start: Timecode at the recording starting point End: Timecode at the recording ending point... -
Page 50: Deleting Clips
Deleting Clips You can delete clips from the SxS memory card. Select “Select Clip” from “Delete Clip” on the thumbnail menu. You can select multiple clips to be deleted. Press the OPTION button (page 13) after selecting the clip to be deleted. Changing Information on the Thumbnail Screen You can change information of the clip/frame that... -
Page 51: Settings
Settings Sub Display Operation You can check the status of the camcorder, set Setting the basic items basic settings for the camcorder, and operate playback on the sub display. Press the function button to select the • CAMERA screen: Basic settings of the screen of the function to be set. -
Page 52: Sub Display Setting Items
Sub Display Setting Items The item names and its settings are listed below. Note When the CBK-55BK (EFP Style Buildup Kit) is attached to the camcorder, some operations and settings are limited. CAMERA Screen CAMERA-1 Item name Setting S&Q FPS On: Turns the Slow &... -
Page 53: File Screen
Item name Setting Sensitivity/Gain/ Sets the sensitivity/gain. Exposure Index The item name (Sensitivity/Gain) and setting value differ, depending on the “Mode” setting in “Gain” (page 61). (See page 61 for the selectable item.) The item name becomes “Exposure Index” and sets the EI value when “Shooting Mode” (page 91) is set to “Cine EI.”... -
Page 54: Au/Tc (Audio/Timecode) Screen
FILE-3 Item name Setting Lens Recall 1 to 6 Loads the Lens file (1 to 6) from the internal memory. AU/TC (audio/timecode) Screen AU/TC-1 Item name Setting MIC CH1 Ref Select the reference input level when the AUDIO IN CH1 switch is set to MIC from –60 dB/–50 dB/–40 dB. - Page 55 AU/TC-2 Item name Setting Monitor CH Selects the audio channel that is output to the headphones and speaker. (See page 75 for the selectable item.) When the CBK-55BK is attached The status of the MONITOR switch on the CBK-55BK is displayed. Monitor Level Adjusts the monitor volume from 0 to 99.
-
Page 56: Setup Menu Operations
• When you select “Execute” for an execution item, the corresponding function is executed. Setup Menu Operations • When you select an item that you must confirm before execution, the menu display temporarily disappears, and a confirmation message is The Setup menu allowing you to perform various displayed. -
Page 57: User Menu
The following 10 items are registered for the User Menu default setting. • System Setting (System menu) The User Menu consists of the items that are • Base Setting (System menu) copied from the Camera, Paint, Audio, Video, • Rec Format (System menu) VF, TC/UB, Recording, Media, File, •... - Page 58 Return the User Menu registration to the default setting Select the User Menu > “Edit User Menu” > “Customize Reset.” Select “Reset” > “Execute.” Setup Menu Operations...
-
Page 59: Setup Menu List
Setup Menu List The functions and available settings of menus are listed below. The default settings set at the factory are shown in bold face (example: Preset 3200K Note If the CBK-55BK (EFP Style Buildup Kit) is attached to the camcorder, some items are added, and some operations and settings are limited. - Page 60 Camera Menu items Sub items and setting values Contents R Gain Sets the R gain value of white balance that is stored in the –99 to +99 (±0) memory. (This setting is available only when “White Switch” is set to “Memory A/Memory B.”) When the CBK-55BK is attached This item is available only when “Shooting Mode”...
- Page 61 When “Mode” in “Gain” is set to “ISO,” and “Gamma Category” is set to “S-Log2” or “S-Log3” ISO 2000 to ISO 16000 • PMW-F55 When “Mode” in “Gain” is set to “ISO,” and “Gamma Category” is set to “STD” or “HG (HG1/HG2/ HG3/HG4)”...
- Page 62 (This setting is available only when “Shooting Mode” in 500EI to 8000EI (2000EI) “Base Setting” of the System menu is set to “Cine EI.”) • PMW-F55 Note 320EI to 5000EI (1250EI) The Highlight Latitude values for each EI value are follows: •...
- Page 63 Camera Menu items Sub items and setting values Contents Remote Gain L Sets the gain switch L level for RM (such as RM-B150, etc.). –3dB / 0dB / 3dB / 6dB / 9dB / (This setting is available only when “Shooting Mode” in 12dB / 18dB “Base Setting”...
- Page 64 Camera Menu items Sub items and setting values Contents Shutter Setting Turns the electronic shutter function on/off. On / Off Specifying When the CBK-55BK is attached operating The setting value that follows the position of the SHUTTER conditions of the switch on the CBK-55BK is displayed.
- Page 65 Camera Menu items Sub items and setting values Contents Slow Shutter Setting Turns the slow shutter function on/off. On / Off (You cannot change the on/off setting while recording.) Setting the slow shutter Number of Frames Sets the number of frames to accumulate for the slow shutter. 2 / 3 / 4 / 5 / 6 / 7 / 8 Auto Exposure Level...
- Page 66 Camera Menu items Sub items and setting values Contents S&Q Motion Setting Turns the Slow & Quick Motion function on/off. On / Off This setting is not available when “Rec Format” of the System Setting the Slow & menu is set to a setting other than the following. Quick Motion •...
- Page 67 Camera Menu items Sub items and setting values Contents Noise Setting Turns the noise suppression function on/off. On / Off (The default settings is “Off” when “Shooting Mode” in Suppression “Base Setting” of the System menu is set to “Cine EI.”) Setting the noise suppression Level...
-
Page 68: Paint Menu
Paint Menu The Paint menu settings are available only when “Shooting Mode” in “Base Setting” (page 91) of the System menu is set to “Custom.” Paint Menu items Sub items and setting values Contents Gamma Setting Turns the gamma compensation function on/off. On / Off Adjusting the gamma... - Page 69 Paint Menu items Sub items and setting values Contents Knee Setting Turns the knee compensation function on/off. On / Off (This setting is available only when “Gamma Category” in Adjusting the knee “Gamma” is set to “STD.”) compensation Point Sets the knee point. 75% to 109% (90%) Slope Sets the knee slope.
- Page 70 Paint Menu items Sub items and setting values Contents Detail Setting Turns the detail adjusting function on/off. On / Off Setting the detail adjusting Level Adjusts the detail level. –99 to +99 (±0) H/V Ratio Adjusts the ratio between the H detail level and V detail level. –99 to +99 (±0) Crispening Adjusts the crispening level.
- Page 71 • PMW-F5: Standard / High Saturation / FL Light / Cinema / F55 709 Like • PMW-F55: 1: SMPTE240M / 2: ITU-709 / 3: SMPTE Wide / 4: NTSC / 5: EBU / 10: S-Gamut3.Cine Like / 11: S-Gamut3 Like User Matrix Turns the user matrix correction function on/off.
- Page 72 Paint Menu items Sub items and setting values Contents Multi Matrix Setting Turns on/off the multi-matrix correction, which allows On / Off specific colors to be selected for saturation correction in a 16- Settings for the axis hue space. multi-matrix correction Area Indication Displays a zebra pattern in the areas of the specified color for...
-
Page 73: Audio Menu
Audio Menu Audio Menu items Sub items and setting values Contents Audio Input Front MIC Select Selects the front microphone sound from either monaural and (Only when the CBK-55BK is stereo. Setting for audio attached) inputs Mono / Stereo Note Rear XLR Auto Turn on/off the function that detects audio cable connection This item cannot... - Page 74 Audio Menu items Sub items and setting values Contents Limiter Mode Selects the limiter level when a loud signal is input while Off / –6dB / – 9dB / –12dB / setting audio input level manually. –15dB / –17dB When you do not use the limiter, select “Off.” 1KHz Tone on Color Bars Turn the 1-kHz reference tone signal on/off.
- Page 75 Audio Menu items Sub items and setting values Contents Audio CH4 Level Select the knob for adjusting the audio level of sound (Only when the CBK-55BK is recorded to channel 4. attached) Side4: LEVEL CH-4 knob on the audio operating section Side4 / Front / Front+Side4 Front: MIC LEVEL knob on the operating section (front) Front+Side4: LEVEL CH-4 knob and MIC LEVEL knob...
- Page 76 Audio Menu items Sub items and setting values Contents Reference Out Sets the output level for the reference input level of the LIVE (Only when the CBK-55BK is AUDIO OUT connector on the CBK-55BK. attached) +4dB / 0dB / –3dB / EBUL WRR Setting WRR Valid CH Sel Selects whether to enable channels 1 and 2 of the wireless...
-
Page 77: Video Menu
Video Menu Video Menu items Sub items and setting values Contents Output On/Off SDI (Sub) Turns the SDI (Sub) output on/off. On / Off Setting the video output HDMI Turns the HDMI output on/off. On / Off Output Format SDI (Main) Selects the SDI (Main) output format. - Page 78 Video Menu items Sub items and setting values Contents Monitor LUT Category Selects the type of Look for Monitor LUT. LUT / Look Profile / LUT: Outputs images using Preset LUT or User LUT. Setting for the User 3D LUT Look Profile: Outputs images that are suited for the start point monitor LUT of color grading or images that are close to print quality by...
- Page 79 Video Menu items Sub items and setting values Contents SDI (Sub) & HDMI Selects whether to apply Monitor LUT to the image that is MLUT On / MLUT Off output from SDI (Sub) and HDMI. (This setting is in accord with the “SDI (Main) & Internal Rec”...
-
Page 80: Vf Menu
VF Menu When there is a button or dial that corresponds to the menu item on the attached viewfinder, that item is not available. Menu items Sub items and setting values Contents VF Setting Color Adjusts the color of pictures on the viewfinder. –99 to +99 (±0) Setting the viewfinder... - Page 81 Menu items Sub items and setting values Contents Marker Setting Turns all marker indications on the viewfinder on/off. All / VF / SDI/HDMI / Off Setting the marker indications Color Sets the marker color. White / Yellow / Cyan / Green / Magenta / Red / Blue Center Marker Selects the center marker type when displaying the center...
- Page 82 Menu items Sub items and setting values Contents Display On/Off Setting Turns all the indications of the viewfinder GUI on/off. On / Off Selecting the items to be displayed Shutter Setting Selects the item to be displayed on the viewfinder. On / Off Notes ND Filter Position...
-
Page 83: Tc/Ub Menu
Menu items Sub items and setting values Contents Focus Area Marker On / Off Clip Number On / Off Notice Message On / Off WRR RF Level On / Off TC/UB Menu TC/UB Menu items Sub items and setting values Contents Timecode Mode Selects the timecode mode. -
Page 84: Recording Menu
“XAVC 2048 × 1080P”/“XAVC 1920 × 1080P.”) MPEG2 Proxy Setting Turns the MPEG2 proxy function on/off. On / Off (PMW-F55: Setting the This setting is available only when “Frequency” in “System MPEG2 proxy Setting” of the System menu is set to “29.97”/“25”/“23.98”... - Page 85 Recording Menu items Sub items and setting values Contents Rec Control Setting Selects the recording target (only external recording (AXS SxS & AXS / AXS memory), or both external recording (AXS memory) and Setting the recording to an SxS memory card in the camcorder) when recording control “Main Operation”...
-
Page 86: Media Menu
Media Menu This menu is not available when the media is not loaded. Media Menu items Sub items and setting values Contents Update Media Media (A) Updates the managerial file on the SxS memory card in the Execute / Cancel slot A. -
Page 87: File Menu
When using the user gamma file that is created on CvpFileEditorTM V4.2, store the file on the following directory of an SD card. PRIVATE\SONY\PRO\CAMERA\HD_CAM Reset Resets the user gamma file on the internal memory to the 1 / 2 / 3 / 4 / 5 / All default value. - Page 88 “Format” to “Resolve.” Store the created user 3D LUT file on the following directory of an SD card. PRIVATE\SONY\PRO\CAMERA\PMWF55_F5 Reset Resets the user 3D LUT data in the internal memory to the 1 / 2 / 3 / 4 / All default value of “LC-709.”...
- Page 89 File Menu items Sub items and setting values Contents Lens File Recall Internal Memory Loads the lens file from the internal memory. Setting for the lens Store Internal Memory Stores the lens file on the internal memory. file Load SD Card Loads the lens file from the sub memory card.
-
Page 90: Maintenance Menu
Maintenance Menu Maintenance Menu items Sub items and setting values Contents Executes APR (Auto Pixel Restoration: auto adjusting of the Execute / Cancel image sensor). Executing APR Test Saw Setting Turns the test signal on/off. On / Off Setting the test signal output Camera Config RM Common Memory... -
Page 91: System Menu
System Menu System Menu items Sub items and setting values Contents System Frequency Selects the system frequency. Setting 59.94 / 50 / 29.97 / 25 / 24 / 23.98 Base Setting Shooting Mode Selects the shooting mode. Custom / Cine EI Main Operation Sets the operation mode for recording mainly. - Page 92 System Menu items Sub items and setting values Contents Rec Format Format Sets the video format to be recorded on the SxS memory card. XAVC 4096 × 2160P (PMW- The settable format for recording differs depending on the Setting the F55 or PMW-F5 + CBKZ-55FX setting of “Frequency”...
- Page 93 System Menu items Sub items and setting values Contents Genlock Reference Displays the genlock status. When genlocked, the signal type Internal / External (HD) / is displayed. Setting Genlock External (SD) Internal: Not genlocked. operation External (HD): Genlocked by the HD signal. External (SD): Genlocked by the SD signal.
- Page 94 11.0V to 14V (in steps of 0.1V) generated. Detected Battery Displays the type of power supply. Sony Info Battery / Sony Battery / Other Battery / DC IN DC Voltage DC Low Voltage1 Sets the DC IN voltage at which the low input voltage 11.5V to 17.0V...
- Page 95 Set a desired user name in 1 to 31 alphanumeric characters. Authentication (admin) Setting for the Password Sets a password in 1 to 31 alphanumeric characters. basic (pmw-f5 or pmw-f55) authentication of the network Wi-Fi Wi-Fi Select whether to enable or disable Wi-Fi connection. Enable / Disable...
- Page 96 System Menu items Sub items and setting values Contents All Reset Reset Resets the camcorder to the factory status. Execute/Cancel Execute: Executes resetting. Resetting to the factory status Option DNxHD/ProRes When the expansion codec board CBK-55PD (optional) is a / × attached, “a”...
-
Page 97: External Devices Connection
External Devices Connection Connecting External Monitors and Recording Devices To display recording/playback pictures on an HDMI OUT connector (Type A connector) external monitor, select the output signal and use an appropriate cable for the monitor to be Set the on/off setting of the output, and output connected. -
Page 98: Operating Clips With A Computer
Sony Professional products web site. • The following operations must be avoided when the ACCESS lamp is lit in red. —Turning the power off or disconnecting the power Sony Professional products web site homepage: cord U.S.A. http://pro.sony.com —Removing the SxS memory card Canada http://www.sonybiz.ca... -
Page 99: External Synchronization
Using a nonlinear editing system External Synchronization For a nonlinear editing system, optional editing software that corresponds to the recording formats used with this camcorder is required. When multiple units of the camcorder are used in Store the clips to be edited on the HDD of your the same shooting location, synchronized computer in advance, using the dedicated recording can be made with a specific reference... - Page 100 Synchronizing the timecode of your camcorder with that of another unit Set the unit that supplies the timecode to a mode in which the timecode output keeps advancing (Free Run mode). Set “Timecode” in the TC/UB menu as follows: Mode: Preset (Ext-Lk) Run: Free Run Confirm that the TC IN/OUT switch (page 16) is set to IN, then supply an HD...
-
Page 101: Appendices
• If sending the unit by truck, ship, air or other usable lifetime. transportation service, pack it in the shipping Contact a Sony service or sales representative for carton of the unit. more information about inspections. Care of the unit... - Page 102 To prevent electromagnetic interference from Phenomena specific to CMOS image portable communications devices sensors The use of portable telephones and other communications devices near this unit can result The following phenomena that may appear in in malfunctions and interference with audio and images are specific to CMOS (Complementary video signals.
- Page 103 “Format Media” (page 86) in the Media menu. Notes on security • SONY WILL NOT BE LIABLE FOR DAMAGES OF ANY KIND RESULTING FROM A FAILURE TO IMPLEMENT PROPER SECURITY MEASURES ON...
-
Page 104: Formats And Limitations Of Outputs
When outputting one type of SDI output by using the SDI OUT 1 to 4 connectors while “Main Operation” in “Base Setting” is set to “YPbPr” (PMW-F55 and PMW-F5 + CBKZ-55FX only) The “Frequency” setting The “Format”... - Page 105 System menu System menu 59.94/50 XAVC 4096 × 2160P 2048 × 1080 YPbPr 59.94P/ 1920 × 1080 YPbPr 59.94P/ (PMW-F55 and PMW-F5 + 50P 3.0G 50P 3.0G CBKZ-55FX only) 1920 × 1080 YPbPr 59.94i/ 50i 1.5G 1920 × 1080 YPbPr 59.94P/ 1920 ×...
- Page 106 ProRes 422 HD i (When the CBK-55PD is installed) 29.97/25 XAVC 4096 × 2160P 2048 × 1080 YPbPr 1920 × 1080 YPbPr (PMW-F55 and PMW-F5 + 29.97PsF/25PsF 1.5G 29.97PsF/25PsF 1.5G CBKZ-55FX only) 1920 × 1080 YPbPr 29.97PsF/25PsF 1.5G XAVC 3840 × 2160P 1920 ×...
- Page 107 SDI (Sub) the System menu System menu 23.98 XAVC 4096 × 2160P 2048 × 1080 YPbPr 1920 × 1080 YPbPr (PMW-F55 and PMW-F5 + 23.98PsF 1.5G 23.98PsF 1.5G CBKZ-55FX only) 1920 × 1080 YPbPr XAVC 2048 × 1080P 23.98PsF 1.5G XAVC 3840 ×...
- Page 108 Serial digital signals from the HDMI OUT connector are output depending on the settings of the setup menu and format of the clip being played. When the output format of SDI (MAIN) is 4096 × 2160P or 3480 × 2160P (PMW-F55 and PMW-F5 + CBKZ- 55FX only) The “Frequency”...
- Page 109 Output format the System menu System menu 59.94/50 XAVC 4096 × 2160P 1920 × 1080 59.94P/50P (PMW-F55 and PMW-F5 + 1920 × 1080 59.94i/50i CBKZ-55FX only) XAVC 3840 × 2160P (PMW-F55 and PMW-F5 + CBKZ-55FX only) XAVC 2048 × 1080P 1920 ×...
- Page 110 Output format the System menu System menu 23.98 XAVC 4096 × 2160P 1920 × 1080 23.98P (PMW-F55 and PMW-F5 + CBKZ-55FX only) XAVC 3840 × 2160P (PMW-F55 and PMW-F5 + CBKZ-55FX only) XAVC 2048 × 1080P XAVC 1920 × 1080P MPEG 1920 ×...
- Page 111 (Main) (Sub) the System menu 59.94/50 4096 × 2160 59.94P/50P × HD SYNC (PMW-F55 and PMW-F5 + 1920 × 1080 59.94i/50i CBKZ-55FX only) 3840 × 2160 59.94P/50P (PMW-F55 and PMW-F5 + CBKZ-55FX only) 2048 × 1080 59.94P/50P 1920 × 1080 59.94P/50P HD SYNC 1920 ×...
-
Page 112: Error/Warning Indications
Turn off the power and check the connected equipment, cables, and media. If they are not defective, turn on the power again. If the error persists, consult Sony service personnel. (If power cannot be turned off by setting the power switch to OFF, remove both the battery pack or the DC IN source.) -
Page 113: Caution And Operation Confirmation Indications
The fan in the AXS-R5 that is connected to the camcorder has stopped. Avoid use under high temperature conditions. Remove the AXS-R5 from the camcorder and contact a Sony service representative. Abnormal Lens Communication The type of the connected lens does not match with the camcorder’s setting. - Page 114 Indication Cause and measures Please Execute APR The auto adjusting of the image sensor (APR) has not been executed for a certain period. Execute APR by pressing the Menu dial. Invalid setting value was reset: The setting value of “Clip Naming” is reset because an incorrect All file is Media/Clip Naming/Camera loaded.
-
Page 115: Items Saved In The File
Items Saved in the File LEVEL 1 LEVEL 2 LEVEL 3 All File Scene File Lens File User Menu Customize Data Camera White Auto White Balance White Switch Color Temp. Color Temp. Balance R Gain B Gain Shockless White Filter White Memory Offset White Setting Offset <Memory>... - Page 116 LEVEL 1 LEVEL 2 LEVEL 3 All File Scene File Lens File Color Bars Setting Type Noise Suppression Setting Level Flicker Reduce Mode Frequency Image Inversion Setting Lens Interface Setting Zoom Limit Paint Gamma Setting Step Gamma Master Gamma R Gamma G Gamma B Gamma Gamma Category...
- Page 117 LEVEL 1 LEVEL 2 LEVEL 3 All File Scene File Lens File Matrix Setting Preset Matrix Preset Select User Matrix Level Phase User Matrix R-G User Matrix R-B User Matrix G-R User Matrix G-B User Matrix B-R User Matrix B-G Multi Matrix Setting Area Indication...
- Page 118 LEVEL 1 LEVEL 2 LEVEL 3 All File Scene File Lens File Audio Output Output CH Monitor CH Headphone Out Monitor Level Reference Out WRR Setting WRR Valid CH Sel WRR CH Select WRR Delay Comp TX Audio Peak TX Input Level TX ATT Level TX LCF Frequency TX System Delay...
- Page 119 LEVEL 1 LEVEL 2 LEVEL 3 All File Scene File Lens File Marker Setting Color Center Marker Safety Zone Safety Area Aspect Marker Aspect Select Aspect Mask Aspect Safety Zone Aspect Safety Area User Box User Box Width User Box Height User Box H Position User Box V Position 100% Marker...
- Page 120 LEVEL 1 LEVEL 2 LEVEL 3 All File Scene File Lens File TC/UB Timecode Mode Setting Reset TC Format TC Display Display Select Recording Interval Rec Setting Interval Time Number of Frames Picture Cache Rec Setting Cache Rec Time MPEG2 Proxy Setting Rec Control Setting...
- Page 121 LEVEL 1 LEVEL 2 LEVEL 3 All File Scene File Lens File LENS File Recall Internal Memory Store Internal Memory Load SD Card Save SD Card File ID File Source Clear Lens Offset Lens Auto Recall Lens Serial Number Lens Name Lens Manufacturer Lens Center H Lens Center V...
- Page 122 Menu Dial Scroll Menu Dial Direction Set Key on Thumbnail Fan Control Setting Battery Alarm Near End:Info Battery End:Info Battery Near End:Sony Battery End:Sony Battery Near End:Other Battery End:Other Battery Detected Battery DC Voltage Alarm DC Low Voltage1 DC Low Voltage2...
-
Page 123: Licenses
NO LICENSE IS GRANTED OR SHALL BE IMPLIED FOR ANY OTHER USE. Licenses ADDITIONAL INFORMATION INCLUDING THAT RELATING TO PROMOTIONAL, INTERNAL AND COMMERCIAL USES AND MPEG-2 Video Patent Portfolio LICENSING MAY BE OBTAINED FROM License MPEG LA, LLC. SEE HTTP:// WWW.MPEGLA.COM ANY USE OF THIS PRODUCT OTHER THAN MPEG LA is offering licenses for... -
Page 124: On Accessing Software To Which The Gpl/Lgpl Applies
0°C to 40°C (32°F to 104°F) Open software licenses Storage Temperature –20°C to +60°C (–4°F to +140°F) On the basis of license contracts between Sony and the software copyright holders, this product Mass uses open software. Approx. 2.2 kg (4 lb 14 oz) (without... - Page 125 24-bit, 48-kHz When SBS-64G1A/B is used Recording Frame Rate MPEG2 HD: Approx. 120 min When SBP-32 is used PMW-F55 XAVC 4K: 4096 × 2160, 23.98P/24P/ XAVC HD 23.98P: Approx. 36 min 25P/29.97P/50P/59.94P XAVC HD 25P: Approx. 35 min XAVC QFHD: 3840 × 2160, 23.98P/ XAVC HD 29.97P: Approx.
-
Page 126: Camera Section
DNxHD 220x 23.98P: Approx. 38 min DNxHD 220x 25P: Approx. 36 min Sensitivity (2000 lx, 89.9% reflectance) DNxHD 220x 29.97P: Approx. 31 min PMW-F55 When SBP-64B/C is used Video Gamma: T12@24p (3200K Light XAVC 4K 25P: Approx. 24 min source) XAVC 4K 29.97P: Approx. -
Page 127: Input/Output
Screws for the audio input connector (4) HD SDI: SMPTE ST292 compliant Tape measure hook (1) SD SDI: SMPTE-259M compliant USB wireless LAN module IFU-WLM3 (1) PMW-F55 USB extension cable (1) HD mode: Before Using this Unit (1) Operating Instructions (CD-ROM) (1) -
Page 128: Optional Accessories
EFP style buildup kit Optional Accessories CBK-55BK Sensor upgrade kit PL mount wide angle zoom lens CBK-55UK SCL-P11X15 Additional codec board PL lens CBK-55PD SCL-PK6/F, PK6/M (set of 6 lenses, 20 mm/ 4K upgrade license (for PMW-F5) 25 mm/35 mm/50 mm/85 mm/135 mm) CBKZ-55FX SCL-PK3/F, PK3/M (set of 3 lenses, 20 mm/ 25 mm/135 mm) - Page 129 Dimensions Unit: mm (inches) 119.4 (4 115.9 (4 103.4 (4 90.9 (3 78.4 (3 65.9 (2 53.4 (2 44.4 (1 40.9 (1 in internal thread (body) 28.4 (1 in internal thread (handle) 15.9 ( in internal thread (body) in internal thread (handle) in internal thread (body) 116.4 (4 169.9 (6...
- Page 130 • SONY WILL NOT BE LIABLE FOR CLAIMS OF ANY KIND MADE BY USERS OF THIS UNIT OR MADE BY THIRD PARTIES. • SONY WILL NOT BE LIABLE FOR THE LOSS, REPAIR, OR REPRODUCTION OF ANY DATA RECORDED ON THE INTERNAL STORAGE SYSTEM,...
-
Page 131: Index
Cueing up Index DC IN Power DC Voltage Alarm Detail AC Adaptor Display Clip Properties AC Power 30, 32 Display On/Off ACCESS lamp All File All Reset Electronic Shutter Aperture Error Indications 43, 93 ExpressCard slot Assignable Button External Monitor AU/TC screen 40, 43 External Synchronization... - Page 132 Language S&Q Motion Lens SBAC-US30/UT100 Lens File Scene File Lens Interface SD memory card SDHC memory card 97, 104 SDI OUT connector Main recorded signal SDI Rec Control 51, 56 Maintenance menu SEL/SET dial Marker Sensitivity Matrix Setting value file 56, 59 Media Full Setup menu...
- Page 133 User Menu User Menu Item Version VF menu VF Setting Video format Video menu 20, 26 Viewfinder Viewfinder double speed drive function Warning Indications White White balance White Clip Wi-Fi Wi-Fi remote commander WRR Setting Zebra Index...