
Related Manuals for Nespresso Essenza EF 347


Summary of Contents for Nespresso Essenza EF 347
- Page 1 Service Manual Coffee Machine Essenza EF 347 / C99 Essenza EF 348 / D99 Version 1.0...
-
Page 2: Table Of Contents
______________________________________________ 3 Replacing pump______________________________________ 24 General _____________________________________________ 3 Replacing electronic control board with button prints _________ 25 Nespresso technical website_____________________________ 3 Replacing compact brewing unit _________________________ 26 Content updates ______________________________________ 3 Wiring diagram 220V - 240V IEC_________________________ 27 General Safety Notes... -
Page 3: Preface
General Nespresso technical website Content updates The purpose of this service manual is to Visit the Nespresso technical website periodi- The version number of this service provide the service personnel with all neces- cally to check for upgrades, technical modifi-... -
Page 4: General Safety Notes
General Safety Notes Risk of fatal electrical shock and fire! Example illustrations of typical devices: Mains voltage inside the coffee machine. • Unplug appliance before cleaning. • Never clean wet or immerse plug, cord or appliance in any fluid. • Disconnect the mains plug before RE SE T disassembly - the appliance must be... -
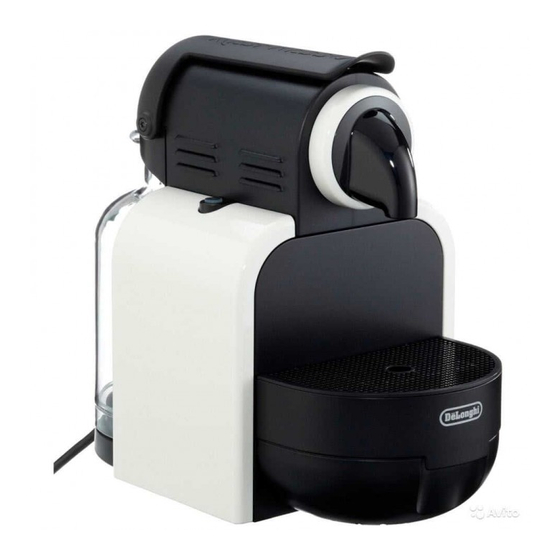
Page 5: Main Components
Main Components Overview 1) Closing handle 2) Cover 3) Compact brewing unit (TCBU) 4) Capsule inlet 5) Side panel 6) Espresso button, back lighted 7) Coffee outlet 8) Lungo button, back lighted 9) Container for used capsules 10) Drip grid 11) Drip tray 12) Lower chassis 13) Thermoblock... -
Page 6: Overview Of Rating Plates
Main Components Overview of rating plates The rating plate can be found at the underside of the coffee machine. It is of varying design depending on the brand and carries the following information: 1. Brand name 2. Voltage and power rating 3. -
Page 7: Rating Plates - Essenza Machine Partners
Main Components Rating Plates - Essenza machine partners Service Manual EF 347 / EF 348 Version 1.0... -
Page 8: Water Circuit
Main Components Water circuit 1) Water tank 2) Water tank valve and connector 3) Pump 4) Thermoblock 5) Flowmeter 6) Coffee outlet 7) Compact brewing unit (TCBU) Service Manual EF 347 / EF 348 Version 1.0... -
Page 9: Technical Data
Technical Data Mains Energy consumption EF 347 (CECED / FEA 2009 method) 230V / 50 Hz USA / CAN 120V / 60 Hz Energy efficiency class level A - 40% Approvals SEV, CENELEC, CE-conform Daily energy consumption 63.8 Wh UL, CUL, MITI Annual energy consumption 23.3 kWh Cable length... -
Page 10: Operation
3. Lift the lever completely and insert a Nespresso capsule. 4. Close the lever and place a cup under the coffee outlet. 5. Press the Espresso (40 ml) or the Lungo (110 ml) button to start. -
Page 11: Programming The Water System
1. Turn the machine on and wait for it to be in ready mode (steady lights). 2. Fill the water tank with potable water and insert a Nespresso capsule. 3. Place a cup under the coffee outlet. 4. Press and hold the Espresso or Lungo button. -
Page 12: Emptying The Water System
Operation Emptying the water system The machine will be blocked for 10 minutes after emptying mode. 1. To enter the emptying mode, press both the Espresso and Lungo button to turn the machine off. 2. Remove the water tank and open the lever. -
Page 13: Energy Saving Mode
Operation Energy saving mode This machine is equipped with an energy saving feature. The machine will automatically enter power off mode after 9 minutes. 1. To turn the machine on either press the Espresso or Lungo button. 2. To turn the machine off before automatic Power Off mode, press both the Espresso and Lungo button simultaneously. -
Page 14: Reset To Factory Settings
Operation Reset to factory settings 1. With machine being turned off, press and hold down the Lungo button for 5 seconds. 2. LEDS will blink fast 3 times to confirm machine has been reset to factory settings. 3. LEDs will then continue to blink normally, as heating up, until ready. -
Page 15: Coffee Machine Status (1)
Operation Coffee machine status (1) Operating mode Small cup Big cup signal signal After pressing the On/Off button, an automatic self test is performed to check if the NTC is connected, the NTC is short circuited, the thermoblock reaches the standby Ready temperature within 2 minutes. -
Page 16: Coffee Machine Status (2)
Operation offee machine status (2) Operating mode Small cup Big cup signal signal Blinking small cup - 1x for 9 min. (factory setting) Power off Program - 2 x for 30 min. - 3 x for deactivated Blinking fast Emptying Blinking fast Descaling ready D. -
Page 17: Troubleshooting
Troubleshooting Check Machine on receipt Follow the check procedure. Repair any faults found and check if the The receipt check enables you to rapidly machine is operating perfectly. locate faults on the machine and to initiate appropriate repair action. Check procedure Symptoms Action / repair work Further action / repair work... - Page 18 Troubleshooting Check procedure Symptoms Action / repair work Further action / repair work YES - Go to point b) YES - a) Check if mains cable is functional NO - Replace it YES - c) Check if pump is working (press coffee YES - Go to point f) button) NO - Go to point d)
- Page 19 Troubleshooting Check procedure Symptoms Action / repair work Further action / repair work YES - Replace TCBU (see page 26) 6.1 Leakage at extraction system NO - Go to point 6.2 6 Check for leaks and check flow YES - Replace defective tube and seal 6.2 Leakage at tubes connection rate (see pages 28 and following) NO - Go to point 6.3...
-
Page 20: Repair
Repair Safety instructions Risk of fatal electrical shock! Mains voltage inside the coffee machine. Disconnect the mains plug before disassembly - the coffee machine must be free of voltage. Danger of burns! Hot parts and water under pressure inside the coffee machine (ther- moblock in particular). -
Page 21: General Disassembly
Repair General disassembly Tool: Oval screwdriver Procedure: 1. Remove water tank (33) and drip tray (8) together with drip grid (7) and capsule container (6). 2. Remove 2 screws (2) on the front side of the machine. 3. Place machine on the repairing/service holder device (see page 42). -
Page 22: Replacing Ntc
Repair Replacing NTC Tools: Torx screwdriver Pin-TX10 Open-ended spanner 9 mm AF Torque wrench Procedure: 1. Follow general disassembly (see page 21). 2. Unplug NTC connector from electronic control board (A). 3. Unscrew 3 screws (23) from thermobloc cover. 4. Unscrew the screw fixing the cover to the thermobloc and remove the cover. -
Page 23: Replacing Thermoblock
Repair Replacing thermoblock Tools: Torx screwdrivers Pin-TX10, TX20 Open-ended spanner 9 mm AF Torque wrench Procedure: 1. Follow general disassembly (see page 21). 2. Remove 3 screws (23) and separate ther- moblock assembly from upper chassis (1). 3. Unplug NTC connector from electronic control board (28). -
Page 24: Replacing Pump
Repair Replacing pump Tools: Torx screwdriver Pin-TX10 Long-nose pliers Blade screwdriver, no. 7 Procedure: T 128°C 1. Follow general disassembly (see page 21). 2. Remove clip (14) and O-ring (15). 3. Remove pump (17). 4. Remove electrical connections from pump. 5. -
Page 25: Replacing Electronic Control Board With Button Prints
Repair Replacing electronic control board with button prints Tools: Torx screwdriver Pin-TX10 The service engineer must be earthed using an earthing strap! Only touch button prints with dedi- cated gloves to avoid oxydation. Procedure: 1. Follow general disassembly (see page 21). -
Page 26: Replacing Compact Brewing Unit
Repair Replacing compact brewing unit Tools: Torx screwdriver Pin-TX10 Blade screwdriver no. 4 Long-nose pliers Torque wrench Procedure: 1. Remove water tank (33) and drip tray (8) together with drip grid (7) and capsule container (6). 2. Place machine on the repairing/service holder device (see page 42). -
Page 27: Wiring Diagram 220V - 240V Iec
Repair Wiring diagram 220V - 240V IEC Service Manual EF 347 / EF 348 Version 1.0... -
Page 28: Wiring Diagram 120V - 127V Iec
Repair Wiring diagram 120V - 127V IEC Service Manual EF 347 / EF 348 Version 1.0... -
Page 29: Function Tests
Function Tests Safety instructions Some function tests are performed with an energized, partly opened coffee machine. Danger of electrocution! Mains voltage inside the coffee machine. Do not touch any live part while performing tests. Danger of burns! Hot parts and water under pressure inside the coffee machine. -
Page 30: Measuring Flow Rate (1)
Function Tests Measuring flow rate (1) Procedure: 1. Fill and insert water tank. 2. Open closing handle. 3. Insert connecting unit of pressure adapter into capsule bay. 4. Push back sealing cone into capsule cage. 5. Insert fixation unit of pressure adapter into capsule bay. -
Page 31: Measuring Flow Rate (2)
Function Tests Measuring flow rate (2) 30 sec Procedure (continued): 7. Connect pressure hose to pressure tester. 8. Position measuring beaker underneath exit tube of pressure tester. 9. Switch on machine. 10. Press coffee button after heating-up. 11. Open valve fully till water begins to flow. 12. -
Page 32: Checking For Leaks And Pump Pressure (1)
Function Tests Checking for leaks and pump pres- sure (1) The following components are checked for leaks: Compact brewing unit (TCBU) Hose connections Thermoblock Pump Preparation (unplug machine from mains): 1. Remove right side panel. 2. Open closing handle. 3. Insert connecting and fixation unit of pres- sure adapter into capsule bay (refer to page 30). -
Page 33: Checking For Leaks And Pump Pressure (2)
Function Tests Checking for leaks and pump pres- 10 sec sure (2) Procedure (continued): 8. Press any button to start the coffee machine. Press coffee button after heating-up. 9. Open valve and leave water to run out for approx. 10 sec. 10. -
Page 34: Measuring Coffee Temperature
Function Tests Measuring coffee temperature 10 sec Procedure: 1. Press any button for start the coffee machine. 2. Position measuring beaker underneath coffee outlet. 3. After warming up, press coffee button. 4. Preheat coffee outlet for 10 sec. with hot water. -
Page 35: Protective Earth Continuity Test (1)
Function Tests Protective earth continuity test (1) Description Test report Protective earth continuity measurements are For legal reasons a repair or test report should made between the protective earth terminal of be prepared and filed with following informa- What coffee machine model has to be test- the power plug and tion ed and when? -
Page 36: Protective Earth Continuity Test (2)
Function Tests Protective earth continuity test (2) Test sequence (continued): 1. Connect black measuring cable to ground pin of power plug with an alligator clip (example shown: Swiss power plug). 2. Switch on test equipment and select protective earth continuity test. Symbolic illustration of test equip- ment. -
Page 37: Protective Insulation Test (1)
Function Tests Protective insulation test (1) requirements after a repair, Test report rates the insulation capability of the coffee For legal reasons a repair or test report should Perform the protective earth conti- machine, be prepared and filed with following informa- nuity test at first, if it is mandatory. -
Page 38: Protective Insulation Test (2)
Function Tests Protective insulation test (2) Test sequence (continued): 1. Connect the phase and neutral pin of the power plug together with a test adapter (procured by the repair centre). A Swiss power plug is shown here as an example. 2. -
Page 39: Protective Insulation Test (3)
Function Tests Protective insulation test (3) Test sequence (continued): 4. Touch closing handle screw with red test probe. Do not scratch surface of closing handle with probe tip. 5. Press "measure" button. 6. Read off displayed insulation resistance or test result. The insulation resistance must be higher than 300 kOhm (300,000 Ohm). -
Page 40: Maintenance
1. Remove the capsule and close the lever. 2. Empty the drip tray and used capsule container. 3. Fill the water tank with 0.5 L of potable water and add 1 Nespresso descaling liquid. Service Manual EF 347 / EF 348 Version 1.0... -
Page 41: Descaling (2)
Maintenance Descaling (2) Procedure (continued): 4. Place a container (min. volume 1 l) under the coffee outlet. 5. To enter the descaling mode, while the machine is turned on, press both the Espresso and Lungo button for 3 seconds. 6. Both LEDs blink. 7. -
Page 42: Spare Parts
0004878 Oval bit 64373 Spare part seal G4 * Repair accessories only available at Nespresso. Please ask your Nespresso technical contact person. Manometer and pressure adapter are avail- able at Eugster Frismag AG. Service Manual EF 347 / EF 348... -
Page 43: Spare Parts Ef 347 / C99
Spare Parts Spare parts EF 347 / C99 Service Manual EF 347 / EF 348 Version 1.0... - Page 44 Spare Parts Draw. No. Art. Nr. Part Description 0077828 Holder 473 black V3 0024863 Screw safety KST/PT 3.0x12 bl galvan oval head (SFS-Remform) 0079793 Outlet 0075782 Side wall 347 taupe earth high gl. 0059106 Capsule container 0077819 Drip grid 347 black V2 0075915 Drip tray 0005238...
- Page 45 0060988 Water tank 0065019 Spare extract unit 473 cpl. TCBU, packed 0077829 Hood 473 black V2 gravure: Nespresso capsules only 0076213 Screw KST/PT 4.0x16 blk galvan rd head Torx-20 0075784 Lock rod 347 0079581 Thermobl 2010/L 230V/1200W...
-
Page 46: Spare Parts Ef 348 / D99
Spare Parts Spare parts EF 348 / D99 Service Manual EF 347 / EF 348 Version 1.0... - Page 47 Spare Parts Draw. No. Art. Nr. Part Description 0077856 Holder 474 black V3 0024863 Screw safety KST/PT 3.0x12 bl galvan oval head (SFS-Remform) 0079587 Outlet 347 TCBU cpl black 0075783 Side wall 348 white sand high gl. 0059105 Caps contain 471 V2 black 0077854 Drip grid 348 black V2 0077855...
- Page 48 0060991 Water tank 471 cpl transp V2 0079580 Spare extract unit 473 cpl TCBU 0077851 Hood 474 black V2 gravure: Nespresso capsules only 0076213 Screw KST/PT 4.0x16 blk galvan rd head Torx-20 0075784 Lock rod 347 0079581 Thermobl 2010/L 230V/1200W...