Advertisement
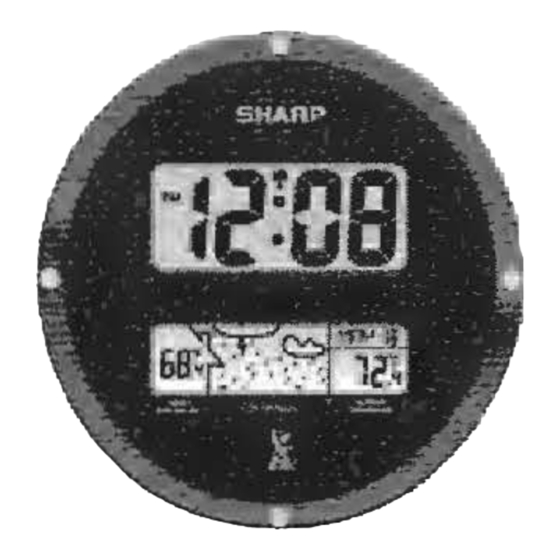
SHARP
ATOMIC DIGITAL WALL CLOCK
with WIRELESS WEATHER DISPLAY
Instruction
manual
.
..
•
RlEJ
ii
ftlliil
~
•
Thank you for your
purchase.
The utmost
care has
gone into the design and
manufacture of your clock. Please read these instructions carefully and keep
them for future
reference.
This clock automatically synchronizes itself to the US Government's National
Institute of Standards and Technology radio signal from Fort Collins,
Colorado.
The
WWVB radio signal daily broadcast ensures that the atomic clock will always
display the most accurate date and time. This clock
never needs
setting.
The weather station is equipped with many functions providing weather
information to you. The receiver unit has a clear, easy-to-read display that
shows the weather
forecast,
indoor temperature, time,
month,
date, as
well as the outdoor temperature measured and transmitted from the outdoor
sensor.
The 433 MHz technology means no wire installation is required and you can
place the sensor anywhere you like within 100 feet.
ht
Quick Start Set
Up:
Outdoor Sensor
1.
Pick a sheltered place out of direct rain, snow or sunlight
2.
Insert 2 x
AA
batteries
3. Replace battery door
2nd
Quick Start Set Up: Weather Station
1. Insert 2 x
AA
batteries
2. Press re-set button on the back of the clock with a oin or paperclip to re-start
the clock. The clock will synchronize with the transmitter set automatically.
3. The antenna •
'f
"
flashes when the clock receives outdoor sensor signal.
NOTE
:
When the antenna is
flashing,
it
is searching for the atomic signal. Please wait
until the flashing stops before you try to setup the
clock.
The
weather
station is
disabled while searching for the atomic or the outdoor signal.
PLEASE NOTE:
·
1. Start
this-
clock at night and let the clock receieve the
signal
automatically
past midnight.
2. Always place the unit away from interfering sources such as TV
set,
computer, metal objects and electrical appliances.
3. Areas with access to windows is recommended for better reception.
MAIN FEATURES:
WEATHER STATION
•
'Sl-1.C.RP
•
~
•
~--··~n
~
•
1.
12 H/24H button
Press it to switch 12 hour/ 24
hour.
Press and hold it for 2 second to enter the receiving humidity and
temperature data from the transmitter.
·
2.
°
C/°F button
·
Press it to switch between Celsius and Fahrenheit.
Press and hold it for 2 second to rece ive the time signal
manually.
3.
SET button
Press and hold it for 2 seconds to enter the time setting mode.
Press it to switch between
hour/minute/year/month/date/DST.
4. UP button
In setting mode, press it to increase the setting value.
5. DOWN button
In setting mode, press it to decrease the setting value.
6.TIME ZONE SWITCH
Slide the time zone switch to display the time in the desired time
zone.
7.
WALL-MOUNTING HOLDER
Use it to support the main unit on the wall.
B.
RESET: .
Press it to reset all values to default values
.
In ·case of malfunction, the unit may be required to reset.
9.
BATTERY COMPARTMENT
Accommodates 2
x
AA
size batteries (alkaline batteries
recommended).
1
O.
TODAY'S FORECAST window
Shows the weather forecast for coming 12 hours.
11
.
OUTDOOR temperature window
Shows current outdoor temperature
.
12.
INDOOR temperature window
Shows current indoor temperature
.
13.
CLOCK window
Displays clock time
.
14.
CALENDAR window
Displays calendar
.
RECEPTION
This clock automatically synchronizes itself to the US Government's National
Institute of Standards and Technology in Fort Collins
,
Colorado.
The
WWVB
radio signal daily broadcast ensures that the atomic clock will always display
the most accurate date and time
.
In most areas, a signal can only be received at night. If your clock does-not receive
the WWVB signal
immediately,
just
wait overnight
and it will be set in the morning.
SETTING
up
THE WEATHER STATION !AFTER SETTING
up
OUTDOOR SENSOR\
1.
Remove the battery door and insert 2 x
AA
size batteries into the battery
compartment. Make sure
you insert them the right
way according to the
polarity information(+/-) marked on
the
battery compartment.
2. Replace the battery
door.
3. Press the "RESET" button on the
back
of
the
clock with a pin or paperclip
to re-start the
clock.
The clock will synchronize with the transmitter set
automatically.
4.
The antenna
"'f"
flashes when the clock receives outdoor sensor
signal.
RECEPTION OF RADIO CONTROLLED
TIME
SIGNAL
The time and date are radio-controlled
.
The current time and date are
automatically synchronized with the time signal transmitted from U.S.A
(WWVB).
When used for the first time (after inserting the batteries or pressing the
"RESET" key)
,
the clock will start to receive the transmitter signal. It will
start to receive RC signal 3 minutes after.
RC SIGNAL STRENGTH INDICATOR
The signal indicator displays signal strength in 4 levels
.
Wave segment
flashing means time signals
are
being received. The signal quality could be
classified into 4 types
:
'
no signal
weak
good
very good
If the RC clock receives signal successfully,
a
sync-time symbol
"f"
will
appear on the LCD
.
The unit has already synchronized with
the
time sign transmitter.Otherwise
the segment will disappear from the LCD
display.
TIME CALENDAR SETTING
If you are out of reach of the
Radio Controlled
transmitter or if the reception
is
poor, the time and calendar
can be set
manually. Once the signal of
transmitter is received again, the
clock will
automatically synchronize with
the exact time and calendar.
1. In normal time
mode,
press and
hold the
"SET" key for 2 seconds to enter
the time setting
mode.
2. Press the "UP" or "DOWN" key to change the
value
of the flashing Hour digit.
3. Repeat the above operations to set
time
and calendar in this order:
> Hour> Minute > Year>
Month
>
Date
>
DST.
4.
The time zone setting are represented by
the below
abbreviations:
P=Pacific M=Mountain C=Central
E=Eastem
5.
Press "SET" key to save and exit the setting
mode.
Or let it exit
automatically 30 Seconds later without pressing any
key.
DAYLIGHT SAVINGS TIME (DST)
The clock has been prog rammed to turn on DST as defaulted
.
Press
UP/DOWN key to change to OFJ= mode.during
the.tirT).
e settjng..
The DST will show when the clock receives the RC signal during the
summer.
FUTURE FORECAST
1.There are 6 weather icons to represent
different
weathers
:
'.
Sunny
Sunny Intervals
Cloudy
~C:::
•
f
I
f f
f
1-v11
1
'~
Rain
~~
·:.
":'·}
'
f
.
'
11
I
I
I
l"V/1
1
1
~
Rain+
Thunder
~B
.
·
.¥it ...
.
.
..
.
:
.
Snow
..__J
·
·.~
.. :rr·
.
.
.
.
.
~
:
..
Advertisement


