Table of Contents
Advertisement
Available languages
Available languages
Advertisement
Chapters
Table of Contents

Related Manuals for Samsung HT-J5500


Summary of Contents for Samsung HT-J5500
- Page 1 HT-J5500 HT-J5550W User manual 5.1CH Blu-ray™ Home Entertainment System imagine the possibilities Thank you for purchasing this Samsung product. To receive more complete service, please register your product at www.samsung.com/register...
-
Page 2: Safety Information
Safety Information ✎ The following also applies to the Wireless Receiver Module (SWA-7000). This symbol indicates that high voltage is CAUTION present inside. It is dangerous to make any kind of contact with any internal part RISK OF ELECTRIC SHOCK. DO NOT OPEN of this product. - Page 3 ~ To turn this apparatus off completely, you must 3D Precautions disconnect it from the wall outlet. Consequently, the wall outlet and power plug must be readily accessible IMPORTANT HEALTH AND SAFETY INFORMATION FOR at all times. 3D PICTURES. ~ Do not allow children to hang on the product. Read and understand the following safety information ~ Store the accessories (battery, etc.) in a location safely before using the 3D function.
-
Page 4: Table Of Contents
Contents GETTING STARTED PLAYING CONTENT Accessories 28 Switching the Source Device Speaker Components 28 Playing Commercial Discs Front Panel 28 Playing a Disc with User Recorded Content Rear Panel 29 Playing Files on a USB Device Remote Control 30 Controlling Video Playback 32 Playing a Pre-Recorded Commercial Audio Disc CONNECTIONS 32 Controlling Music Playback... -
Page 5: Getting Started
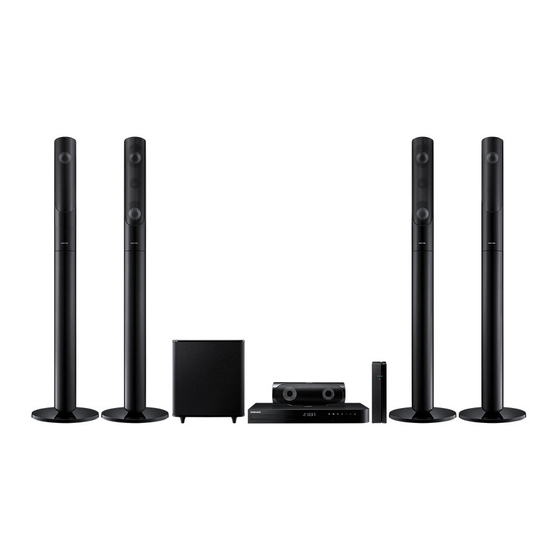
Check the box for the accessories and speaker components listed or shown below. Accessories ~ Remote Control ~ User Manual ~ Batteries (AAA size) Power Cable FM Antenna Speaker Components HT-J5500 Centre Front x 2 Surround x 2 Speaker Cable x 6 Subwoofer - English... -
Page 6: Front Panel
Getting Started HT-J5550W Screw (5x15) x 4 Front x 2 Screw (5x20) x 16 Centre Stand Base x 4 Wireless Receiver Surround x 2 Stand x 4 Subwoofer Speaker Cable x 6 Module (SWA-7000) Front Panel DISPLAY ICONS FUNCTION STOP PLAY/PAUSE OPEN/ VOLUME... -
Page 7: Rear Panel
Rear Panel * In case of HT-J5500 SURROUND AUX IN SURROUND * FM ANTENNA COOLING FAN HDMI OUT SPEAKER OUTPUT POWER CORD EXTERNAL DIGITAL LAN TERMINAL CONNECTORS AUDIO IN (OPTICAL) * Connecting the FM Antenna Connect the supplied FM antenna to the FM ANT Jack. -
Page 8: Remote Control
Getting Started Remote Control Tour of the Remote Control Press to select Home Cinema's Turn the product on and off. mode. (BD/DVD, D. IN, AUX, FUNCTION etc.). To open and close the disc tray. VOLUME MUTE Adjust the volume. Cut off the sound temporarily. RDS DISPLAY PTY - PTY SEARCH... -
Page 9: Connections
Connections This section describes various methods of connecting the product to other external components. Before moving or installing the product, be sure to turn off the power and disconnect the power cord. Connecting the Speakers Position of the product Place it on a stand or cabinet shelf, or under the TV stand. -
Page 10: Installing The Speakers On The Tallboy Stand
Connections Installing the Speakers on the Tallboy Stand * HT-J5550W only Turn the Stand Base upside-down and connect Stand Base it to the Stand. Use the driver to fasten the screws (5x20) on the 4 marked holes. Stand Straighten the provided speaker cable and run it through the centre hole of the Stand Base. - Page 11 HT-J5500 Front Speaker (L) Surround Speaker (L) Surround SURROUND Speaker (R) Centre Speaker SURROUND Front Speaker (R) SURROUND Subwoofer SURROUND HT-J5550W Front Speaker (L) Centre Speaker Wireless Receiver Module Subwoofer SURROUND SPEAKERS OUT ID SET Front Speaker (R) Surround Surround...
- Page 12 Connections ✎ If you place a speaker near your TV set, the screen colour may be distorted because of the magnetic field. ✎ Place the wireless receiver module at the rear of the listening position. If the wireless receiver module is too close to the product, sound from the speakers may be disrupted because of interference.
-
Page 13: Connecting To A Tv And External Devices
Connecting to a TV and External Devices White Method 1 Method 2 External Devices AUDIO OUT OPTICAL OUT HDMI IN (ARC) Connecting to a TV Connect an HDMI cable (not supplied) from the HDMI OUT jack on the back of the product to the HDMI IN jack on your TV. -
Page 14: Connecting To A Network Router
IP router is currently being used by policies may prevent the product from accessing another device nearby, it will result in interference Samsung's software update server. If this occurs, and communication failure. contact your Internet Service Provider (ISP) for ✎... -
Page 15: Settings
✎ If you use an HDMI cable to connect the product 16:9 Full - For widescreen TVs. Displays to an Anynet+ (HDMI-CEC)-compliant Samsung widescreen pictures in their original 16:9 format TV and 1.) You have set the Anynet+ (HDMI-CEC) and expands 4:3 pictures to fill the 16:9 screen. -
Page 16: The Home Screen At A Glance
Settings The Home Screen at a Glance 7 Change Device Displays a list of external devices connected to the main unit. Switch to the desired device. 8 Function PLAY DISC PHOTOS VIDEOS MUSIC Use for switching to an external device, and for radio and mode switching for a Bluetooth connection. -
Page 17: Settings Menu Functions
When you connect a Samsung product setting. and a Samsung TV with BD Wise to each other EXIT Button : Press to exit the current via HDMI, and BD Wise is on in both the product menu. - Page 18 Settings HDMI Colour Format Audio Return Channel Lets you set the colour space format for the HDMI Lets you direct the sound from the TV to the Home output to match the capabilities of the connected Cinema speakers. Requires an HDMI connection device (TV, monitor, etc).
- Page 19 Anynet+ feature and lets you control those Lets you connect a Wi-Fi Direct device to the products with one Samsung TV remote. To operate product using a peer-to-peer network, without the this function, you must connect this product to an need for a wireless router.
-
Page 20: Radio Setup
STEREO and MONO. For more information about this function, see page ~ In a poor reception area, select MONO for a clear, interference-free broadcast. Contact Samsung Presetting Stations Provides contact information for assistance with Example : Presetting FM 89.10 into memory. -
Page 21: About Rds Broadcasting
~ To tune in to a preset station, press the About RDS Broadcasting TUNING DOWN button. ✎ Using the RDS (Radio Data System) to receive To delete all Preset FM stations at once, press the TITLE MENU button for about 5 seconds in FM FM stations Manual mode until DEFAULT PRESET appears RDS allows FM stations to send an additional signal... -
Page 22: Network Setup
Settings To show the RDS signals - When pressing the buttons on the primary remote control, make sure that you have selected You can see the RDS signals the station sends on the the FM station using the primary remote control. display. - Page 23 Wired Network Select a parameter to enter (IP Address, for example), and then press E . Use the number Wired – Automatic keypad on your remote control to enter the numbers for the parameter. You can also enter After following Steps 1 to 3 above: numbers using the ▲▼...
- Page 24 Settings Enter your wireless network or wireless router's Network Settings name. ~ Enter numbers directly using the number Select your network type. buttons on your remote control. Network Type Wireless ~ Enter letters by selecting a letter with the Wireless network ▲▼◄►...
-
Page 25: Wi-Fi Direct
✎ You can get the Network parameter values from Wi-Fi Direct your Internet provider. 11. When finished, select Return ( ' ), and then The Wi-Fi Direct function allows you to connect Wi- press the E button. The Security Key screen Fi Direct devices to the product and each other using a peer-to-peer network, without a wireless router. -
Page 26: Upgrading Software
POWER button to turn on the updated product for your use. ~ The PBC and PIN procedures connect devices ~ Samsung Electronics takes no legal automatically. responsibility for product malfunction caused by an unstable Internet connection or consumer Through the Product Using PBC negligence during a software upgrade. -
Page 27: Setting Up Dlna
By USB Auto Upgrade Notification If your product is connected to the network and you Visit www.samsung.com. set Auto Upgrade Notification on, the product will Enter the product's model number into the notify you if a new software version is available with a search field. -
Page 28: Playing Content
Playing Content Press the button to close the disc tray. Your home cinema can play content located on Blu-ray/DVD/CD discs, USB devices, PCs, smart Playback starts automatically. phones, tablets, and in Apps. If playback does not start automatically, press To play content located on your PC or a mobile the 6 button on the remote. -
Page 29: Playing Files On A Usb Device
A screen appears listing the contents of the disc. If necessary, use the ▲▼◄► buttons to select a folder, and then press the E button. Depending on how the contents are arranged, you will see either folders, individual files, or Select a file to view or play, and then press the both. -
Page 30: Controlling Video Playback
Playing Content Controlling Video Playback 2 Using the disc menu, title menu, popup menu, and title list You can control the playback of video content located DISC MENU on a Blu-ray/DVD disc, USB device, mobile device, or PC. Depending on the disc or contents, some of During playback, press this button to display the the functions described in this manual may not be Disc menu. - Page 31 Menu selections that appear only when a Using the TOOLS Menu BD/DVD disc plays During playback, press the TOOLS button. Title Chapter If there is more than one title on a disk or device, Lets you move to a chapter that you want to lets you move to or select a desired title.
-
Page 32: Playing A Pre-Recorded Commercial Audio Disc
Playing Content Creating a Video Playlist Buttons on the Remote Control used for Music Playback You can create a playlist of video files in nearly the same way you create a playlist of music files. See RDS DISPLAY page 33 for instructions. Select video files instead of music files. - Page 33 Creating a Music Playlist Ripping If you are playing music from a commercial CD Insert a USB device into the USB jack on the or DVD, press the 5 or RETURN button. The front of the product. Music List Screen appears. If you are creating With the Playback screen displayed, use the ▲▼...
-
Page 34: Playing Photo Content
Playing Content Playing Photo Content Using Bluetooth You can play photo content located on a DVD, USB, You can use a Bluetooth device to enjoy music with mobile device, or PC. high quality stereo sound, all without wires! Using the Tools Menu ~ Pairing distance : max. - Page 35 To Connect the Home Cinema to a Bluetooth - If the Bluetooth device is turned off, not in place, or malfunctions. Device Note that such devices as microwave ovens, wireless LAN adapters, fluorescent lights, and gas stoves use the same frequency range as the Bluetooth device, and can cause electric interference.
-
Page 36: Using The Special Effects Remote Control Buttons
Playing Content Use TV SOUND: Using the Bluetooth Quick start 1) When you want to listen to the TV's audio When the home cinema is turned off, connecting through the home cinema speakers. your smart device to the product via a Bluetooth 2) When you want to listen to the audio from a connection can turn the home cinema on. -
Page 37: Network Services
Network Services On your home cinema, select Change Device. Using BD-LIVE™ Use the ▲▼ button to select your PC in the Device List. Connect the product to your network. Select the kind of file you want to view or play, (See page 14) PHOTOS, VIDEOS, or MUSIC and then press Configure the network settings. -
Page 38: Using Apps
Network Services Using Apps Using Opera TV Store The first time you access any one of the apps, the At the Opera TV Store, you will find high-quality home cinema displays two agreements. You must Internet video streaming, social network, and music accept both agreements to download and use any streaming services. -
Page 39: Screen Mirroring
The TV displays a connecting message (for Deleting Apps from MY APPS example, Connecting to Android_92gb...) and Highlight the MENU button on the top of the My then displays the connected message. Apps screen, and then press the E button on In a few moments, the screen of your device your remote. -
Page 40: Appendix
~ This function is not available if the HDMI cable does not support CEC. ~ Depending on the disc type, some aspect ratios ~ If your Samsung TV has an Anynet+ logo, then it may not be available. supports the Anynet+ function. -
Page 41: Disk And Format Compatibility
Playing JPEG files Speaker Settings ~ You can’t enlarge the subtitle and PG graphics in ~ When Speaker Selection is set to TV Speaker, the full screen mode. audio is produced by the TV speakers. Playing Content HDMI audio ~ When HDMI audio is output to the TV speakers, it is Using the TOOLS button while playing pictures... -
Page 42: Logos Of Discs The Product Can Play
✎ The Region Number for this product is displayed on the Samsung cannot guarantee that this product will rear panel of the product. play every disc bearing the Blu-ray Disc, DVD, or CD... -
Page 43: Supported Formats
Matsushita Electronic Industrial Co., Ltd. and Sony socket. If the problem continues, contact the USB Corporation. HDD manufacturer. ✎ Some AVCHD format discs may not play, depending ~ SAMSUNG is not responsible for any data file damage on the recording conditions. or data loss. - English... - Page 44 Appendix Video File Support File Extension Container Video Codec Audio Codec Resolution DivX 3.11/4/5/6 MP3, Dolby Digital, DTS, *.avi MP4v3 WMA, PCM H.264 BP/MP/HP VC-1 AP, DivX 5/6 *.mkv MP3, Dolby Digital, DTS H.264 BP/MP/HP VC-1 AP *.wmv 1920x1080 (wmv9) VC-1 SM MP4 (mp4v) *.mp4...
- Page 45 Digital Output Selections Bitstream Bitstream Bitstream Setup (Re-encoded (Unprocessed) (Re-encoded DTS) Dolby D) Connection HDMI supported AV receiver Up to PCM 7.1ch Dolby Digital Up to PCM 5.1ch Dolby Digital Dolby Digital Up to PCM 5.1ch Dolby Digital Plus Plus Audio Dolby TrueHD Up to PCM 5.1ch...
-
Page 46: Troubleshooting
Refer to the table below when this product does not function properly. If the problem you are experiencing is not listed below or if the instructions below do not help, turn off the product, disconnect the power cord and contact the nearest authorized dealer or Samsung Electronics Service Centre. Symptom... - Page 47 Symptom Check/Remedy ~ Is there "Dolby Digital 5.1 CH" mark on the disc? Dolby Digital 5.1 CH Surround Dolby Digital 5.1 CH Surround Sound is not Sound is produced only if the disc is recorded with 5.1 channel sound. produced. ~ Is the audio language correctly set to Dolby Digital 5.1-CH in the information display? ~ Are you operating the remote within its operational range and within the proper...
- Page 48 Appendix Symptom Check/Remedy ~ The feature is unavailable or the action cannot be completed at this time because: "Not Available" appears on screen. 1. The Blu-ray/DVD disc's software restricts it. 2. The Blu-ray/DVD disc's software doesn’t support the feature (e.g., angles) 3.
-
Page 49: Specifications
Hereby, Samsung Electronics, declares that this equipment is in compliance with the essential requirements and other relevant provisions of Directive 1999/5/EC. The original Declaration of Conformity may be found at http://www.samsung.com, go to Support > Search Product Support and enter the model name. - Page 50 4.43 ✎ Network speeds equal to or below 10Mbps are not supported. ✎ Samsung Electronics Co., Ltd reserves the right to change the specifications without notice. ✎ Weight and dimensions are approximate. ✎ Design and specifications are subject to change without prior notice.
-
Page 51: Licences
Licences Manufactured under licence from Dolby Laboratories. Dolby and the double-D symbol are trademarks of Dolby Laboratories. For DTS patents, see http://patents.dts.com. Manufactured under licence from DTS Licencing Limited. DTS, DTS-HD, the Symbol, & DTS and the Symbol together are registered trademarks, and DTS-HD Master Audio | Essential is a trademark of DTS, Inc. - Page 52 UNITED KINGDOM EIRE This Samsung product is warranted for the period of This product is not considered to be defective twelve (12) months from the original date of purchase, in materials nor workmanship by reason that against defective materials and workmanship. In the...
- Page 53 © 2015 Samsung Electronics Co., Ltd. All rights reserved. Contact SAMSUNG WORLD WIDE If you have any questions or comments relating to Samsung products, please contact the SAMSUNG customer care centre. Contact Centre Contact Centre Area Web Site...
- Page 54 HT-J5500 HT-J5550W Manuel d'utilisation 5.1CH Blu-ray™ Système audiovisuel imaginez les possibilités Merci d'avoir choisi cet appareil Samsung. Pour recevoir une assistance plus complète, veuillez enregistrer votre produit sur www.samsung.com/register...
- Page 55 Consignes de Sécurité ✎ Ce qui suit s'applique également au module de réception sans fil (SWA-7000). ATTENTION Ce symbole indique la présence d'une tension dangereuse dans l'appareil. RISQUES D'ÉLECTROCUTION. NE PAS OUVRIR. Ne touchez jamais les composants internes du produit. ATTENTION : POUR LIMITER LES RISQUES DE DÉCHARGE ÉLECTRIQUE, NE RETIREZ JAMAIS LE Ce symbole indique que ce produit est...
- Page 56 • Pour éteindre complètement l'appareil, vous devez Consignes relatives au débrancher le cordon d'alimentation de la prise murale. visionnage 3D C'est pourquoi le cordon d'alimentation doit être facilement accessible à tout moment. CONSIGNES IMPORTANTES RELATIVES À LA SANTÉ • Ne laissez jamais les enfants jouer avec l'appareil. ET LA SÉCURITÉ...
- Page 57 Sommaire MISE EN ROUTE LIRE UN CONTENU Accessoires 28 Changement du dispositif source Accessoires des enceintes 28 Lecture de disques disponibles dans le commerce Façade 28 Lecture d’un disque dont le contenu est Face arrière enregistré par l’utilisateur Télécommande 29 Lecture de fichiers sur un périphérique USB BRANCHEMENTS 30 Contrôle de la lecture Vidéo 32 Lecture d'un disque audio commercial pré-...
-
Page 58: Mise En Route
Vérifiez que tous les accessoires et tous les composants des enceintes figurant ci-dessous sont inclus. Accessoires • Télécommande • Manuel d’utilisation • Piles (taille AAA) Câble d'alimentation Antenne FM Accessoires des enceintes HT-J5500 Enceinte centrale Enceinte avant X 2 Enceinte d'ambiance X 2 Câble de l'enceinte X 6 Caisson de basse - Français... -
Page 59: Façade
Mise en Route HT-J5550W Vis (5 x 15) x 4 Enceinte avant x 2 Vis (5 x 20) x 16 Enceinte centrale Socle x 4 Module de réception Enceinte sans fil Pied x 4 Caisson de basse Câble de l'enceinte X 6 d'ambiance x 2 Module (SWA-7000) Façade... -
Page 60: Face Arrière
Face arrière * Pour les modèles HT-J5500 SURROUND ENTRÉE AUX SURROUND * ANTENNE FM VENTILATEUR SORTIE HDMI CORDON PRISES DE SORTIE ENTRÉE AUDIO NUMÉRIQUE PRISE LAN D'ALIMENTATION DES ENCEINTES EXTERNE (OPTIQUE) * Connexion de l'antenne FM Branchez l'antenne FM fournie dans la prise FM ANT (ANTENNE FM). -
Page 61: Télécommande
Mise en Route Télécommande Boîtier de la télécommande Permet d'allumer et d'éteindre Appuyez ici pour sélectionner le l'appareil. mode du Home cinéma. FUNCTION (BD/DVD, D. IN, AUX, etc.). Permet d'ouvrir et de fermer le VOLUME MUTE tiroir disque. Permet de régler le volume. Permet de couper le son RDS DISPLAY momentanément. -
Page 62: Branchements
Branchements Dans ce chapitre, vous trouverez plusieurs méthodes vous expliquant comment connecter votre appareil à d’autres composants externes. Avant de déplacer ou d'installer l’appareil, mettez-le hors tension et débranchez le cordon d’alimentation. Connexion des enceintes Position de l'appareil Posez-le sur un support, sur une étagère ou sous un meuble TV. - Page 63 Branchements Installation des enceintes sur le pied type Tallboy * HT-J5550W uniquement Retournez le socle et emboîtez-le sur le pied. Socle Utilisez un tournevis pour serrer les vis (5 x 20) dans les 4 orifices marqués. Pied Redressez le câble pour enceinte fourni et insérez-le dans l’orifice central de la base du socle.
- Page 64 HT-J5500 Enceinte avant (G) Enceinte d'ambiance (G) Enceinte SURROUND d'ambiance (D) Enceinte centrale SURROUND SURROUND Enceinte avant (D) Caisson de basse SURROUND HT-J5550W Enceinte avant (G) Enceinte centrale Module de réception sans fil SURROUND SPEAKERS OUT Caisson de ID SET...
- Page 65 Branchements ✎ Si vous placez une enceinte à proximité de votre téléviseur, la couleur des images peut être déformée en raison du champ magnétique. ✎ Placez le module de réception sans fil en arrière de la position d'écoute. Si le module de réception sans fil est situé...
-
Page 66: Connexion À Un Téléviseur Et Des Périphériques Externes
Connexion à un téléviseur et des périphériques externes Rouge Blanche Méthode 1 Méthode 2 Périphériques externes AUDIO OUT OPTICAL OUT HDMI IN (ARC) Connexion de l'appareil à un téléviseur À l'aide d'un câble HDMI (non fourni), connectez la prise SORTIE HDMI située à l'arrière de l'appareil à la prise ENTRÉE HDMI de votre téléviseur. -
Page 67: Connexion À Un Routeur Réseau
IP sans fil est en cours d'utilisation l'appareil au serveur de mise à jour du logiciel par un autre périphérique à proximité, il pourra Samsung. Si cela se produit, contactez votre en résulter des interférences et un échec de fournisseur de services Internet pour plus communication. -
Page 68: Paramètres
✎ Si vous utilisez un câble HDMI pour connecter 16:9 Plein écran - Pour les téléviseurs grand l'appareil à un téléviseur Samsung conforme à écran. Permet d'afficher les images en grand la fonctionnalité Anynet+ (HDMI-CEC) et que : écran dans leur format original 16.9 et d'étirer les images 4:3 pour remplir l'écran 16:9. -
Page 69: Présentation De L'écran D'accueil
Paramètres 7 Changer périph. Présentation de l'écran d'accueil Affiche la liste des périphériques externes connectés à votre appareil. Permet de sélectionner le périphérique souhaité. LIRE LE DISQUE PHOTOS VIDÉOS MUSIQUE 8 Fonction Permet de sélectionner un périphérique externe, d'activer la radio et de changer de mode pour passer en Bluetooth. -
Page 70: Paramètres Fonctions Du Menu
: Appuyez sur ce bouton pour connectez un appareil Samsung et un téléviseur quitter le menu actuellement sélectionné. Samsung doté de la fonction BD Wise via l'interface HDMI et que la fonction BD Wise est activée sur Informations détaillées sur les fonctions l'appareil et le téléviseur, le produit émet des images... - Page 71 Paramètres Format couleur HDMI Fonct. Retour Audio Vous pouvez régler le format de l'espace chromatique Cette option vous permet de diriger le son du pour la sortie HDMI afin qu'il corresponde aux capacités téléviseur vers les haut-parleurs du Home cinéma. de l'appareil branché...
- Page 72 Wi-Fi Direct des commandes liées entre plusieurs produits Permet de connecter un périphérique Wi-Fi Direct Samsung compatibles Anynet+ et vous permet de à l'appareil via un réseau peer-to-peer, sans qu'il contrôler ces produits via une télécommande de soit nécessaire de recourir à un routeur sans fil.
-
Page 73: Configuration Radio
Pour obtenir plus d'informations sur la fonction, reportez-vous en page 26. Préréglage des stations Exemple : Préréglage de FM 89.10 dans la mémoire. Contacter Samsung Appuyez sur le bouton FUNCTION pour Permet d'obtenir les informations de contact pour sélectionner FM. - Page 74 • Pour écouter une station préréglée, appuyez A propos de la radiodiffusion RDS sur le bouton TUNING UP, DOWN. ✎ Pour supprimer toutes les stations FM préréglées, Utilisez la fonction RDS (Système de appuyez sur le bouton TITLE MENU pendant radiocommunication de données) pour environ 5 secondes en mode Manuel FM jusqu'à...
-
Page 75: Configuration Réseau
Paramètres Pour afficher les signaux RDS - Lorsque vous appuyez sur les boutons de la télécommande principale, assurez-vous d'avoir Vous pouvez visualiser les signaux RDS envoyés par sélectionné la station FM à l'aide de cette la station sur l'écran. télécommande principale. Appuyez sur le bouton RDS DISPLAY lorsque que... - Page 76 Réseau câblé Sélectionnez un paramètre à saisir (ex. :Adresse IP), puis appuyez sur E . Utilisez le clavier ❏ Câble – Automatique numérique de votre télécommande pour saisir le paramètre. Vous pouvez également saisir les Après avoir suivi les étapes 1 à 3 ci-dessus : chiffres en utilisant les boutons ▲▼.
- Page 77 Paramètres Saisissez le nom de votre réseau sans fil ou de Paramètres réseau votre routeur sans fil. • Saisissez directement les nombres en utilisant Sélectionnez type de réseau. les boutons numériques de la télécommande. Type de réseau Sans fil • Sélectionnez les lettres à l'aide des boutons Réseau sans fil ▲▼◄►, puis appuyez sur le bouton E .
-
Page 78: Wi-Fi Direct
✎ Vous pouvez obtenir les valeurs du réseau auprès Wi-Fi Direct de votre fournisseur d'accès Internet. La fonction Wi-Fi Direct vous permet de connecter 11. Lorsque vous avez terminé, sélectionnez Retour ( ' ), puis appuyez sur le bouton E . L'écran Clé les périphériques Wi-Fi Direct à... -
Page 79: Mise À Niveau Du Logiciel
MARCHE/ARRÊT pour allumer l'appareil que connecté. mis à jour pour une utilisation ultérieure. • Samsung Electronics n'accepte aucune • Les procédures PBC et PIN connectent les responsabilité légale concernant un périphériques automatiquement. dysfonctionnement de l'appareil provoqué par une connexion Internet instable ou une négligence de la part de l'utilisateur durant la... -
Page 80: Configuration De La Fonction Dlna
Notif. mise à jour auto Si votre appareil est connecté au réseau et si vous Rendez-vous sur le site www.samsung.com. avez activé Notif. mise à jour auto, l'appareil Entrez le numéro de modèle de l'appareil dans vous notifiera si une nouvelle version logicielle est le champ de recherche. -
Page 81: Lire Un Contenu
Lire un Contenu Appuyez sur le bouton ^ pour fermer le tiroir Votre Home cinéma peut lire le contenu situé sur des disques Blu-ray/DVD/CD, des périphériques USB, disque.La lecture commence automatiquement. des ordinateurs, des smartphones, des tablettes et Si la lecture ne commence pas automatiquement, dans des applications. -
Page 82: Lecture De Fichiers Sur Un Périphérique Usb
Un écran listant le contenu du disque apparaît. Si nécessaire, servez-vous des boutons ▲▼◄► En fonction de la manière dont le contenu est pour sélectionner un dossier, et appuyez ensuite sur le bouton E . classé vous allez voir soit des documents, soit des fichiers individuels, ou les deux. -
Page 83: Contrôle De La Lecture Vidéo
Lire un Contenu Contrôle de la lecture Vidéo 2 Utilisation du menu du disque, du menu des titres, du menu contextuel et de la liste des titres Vous pouvez commander la lecture du contenu vidéo DISC MENU stocké sur un disque Blu-ray/DVD, un périphérique USB, un périphérique mobile, ou un ordinateur. - Page 84 La sélection des menus apparaît uniquement Utilisation du menu TOOLS lorsque les disques BD/DVD sont lus. Durant la lecture, appuyez sur le bouton TOOLS. Titre Chapitre S'il y a plusieurs titres sur un disque ou un appareil, Sélectionnez cette option pour accéder à un passez au titre souhaité...
-
Page 85: Lecture D'un Disque Audio Commercial Pré-Enregistré
Lire un Contenu Création d’une liste de lecture des Boutons de la télécommande servant à vidéos l'écoute de musique Vous pouvez créer une liste de lecture des fichiers RDS DISPLAY vidéo presque de la même façon que vous créez PTY - PTY SEARCH PTY + une liste de lecture des fichiers musicaux. - Page 86 Création d’une liste de lecture de musiques Extraction En cas de lecture de musiques sur CD ou Insérez un périphérique USB dans la prise USB DVD commercial, appuyez sur le bouton 5 située à l'avant de l'appareil. ou RETURN. L’écran Liste des musiques Lorsque l'écran Lecture est affiché...
-
Page 87: Visionnage Des Photos
Lire un Contenu Visionnage des photos Utilisation du système Bluetooth Vous pouvez visionner les photos contenues dans un Vous pouvez utiliser un périphérique Bluetooth pour DVD, une mémoire USB, un périphérique mobile ou écouter de la musique avec un son stéréo de haute un ordinateur. - Page 88 Pour connecter le Home cinéma à un - Si le périphérique Bluetooth est éteint, mal positionné ou s'il connaît des périphérique Bluetooth dysfonctionnements. Notez que les appareils tels que les fours à micro- ondes, les adaptateurs LAN sans fil, les lampes fluorescentes et les fours à...
-
Page 89: Utilisation Des Boutons Spécifiques De La Télécommande
Lire un Contenu Utilisation du Démarrage rapide du ❏ Utilisez SON DU TÉLÉVISEUR : Bluetooth 1) Lorsque vous voulez écouter le son du téléviseur à travers les enceintes du Home Lorsque le home cinéma est éteint, connecter votre cinéma. appareil intelligent à l'appareil via connexion Bluetooth 2) Lorsque vous voulez écouter le son d'une clé... -
Page 90: Services Réseau
Services Réseau Sur le Home cinéma, sélectionnez Changer Utilisation de BD-LIVE™ périph.. Utilisez les boutons ▲ % pour sélectionner votre ordinateur dans la liste des périphériques. Connectez l'appareil au réseau (reportez-vous à la page 14). Sélectionnez le type de fichier que vous voulez afficher ou lire, PHOTOS, VIDÉOS ou Configurez les paramètres réseau MUSIQUE, puis appuyez sur le bouton E . -
Page 91: Utilisation D'opera Tv Store
Services Réseau Utilisation de Applications Utilisation d'Opera TV Store Lorsque vous accédez pour la première fois à l'une Dans Opera TV Store, vous trouverez des services de ces applications, le Home cinéma affiche deux pour visionner des vidéos en streaming sur Internet contrats d'utilisation. -
Page 92: Screen Mirroring
Le téléviseur affiche un message de connexion Suppression d'applications dans MES APPS en cours (par exemple, Connecting to Sélectionnez le bouton MENU situé en haut de Android_92gb... (Connexion à Android_92gb…)) l'écran Mes Apps, puis appuyez sur le bouton puis il affiche le message Connecté. E de la télécommande. -
Page 93: Annexes
• La fonction sera indisponible si le câble HDMI ne Format TV prend pas en charge CEC. • Si votre téléviseur Samsung dispose d'un logo • Selon le type de disque utilisé, certains formats Anynet+, cela signifie qu'il est compatible Anynet+. - Page 94 Paramètre haut-parleur Lecture des fichiers JPEG • Lorsque l'option Sélect. haut-parleur est définie • Vous ne pouvez pas agrandir les sous-titres et les graphiques PG pour les afficher en mode plein écran. sur Haut-parleur TV, le son est émis depuis les enceintes du téléviseur.
- Page 95 ✎ Samsung ne peut garantir que cet appareil pourra Amérique du Nord, Amérique lire tous les disques portant les logos Blu-ray, DVD centrale, Amérique du Sud, ou CD car les formats évoluent et des problèmes et Corée, Japon, Taïwan, Hong...
- Page 96 Si le problème persiste, contactez le fabricant du disque dur USB. • SAMSUNG ne peut être tenu pour responsable de la corruption de fichiers de données ou de la perte de données.
- Page 97 Annexes Prise en charge des fichiers vidéo Extension de fichier Conteneur Codec vidéo Codec audio Résolution DivX 3.11/4/5/6 MP3, Dolby Digital, *.avi MP4v3 DTS, H.264 BP/MP/HP WMA, PCM MP3, Dolby Digital, VC-1 AP, DivX 5/6 *.mkv DTS, H.264 BP/MP/HP *.wmv 1920 x 1080 WMV (wmv9) VC-1 AP, VC-1 SM...
- Page 98 Sélections des sorties numériques Train de bits Train de bits (non Train de bits Configuration (Dolby D. traités) (DTS Réencodé) Réencodé) Connexion Récepteur AV prenant en charge l'interface HDMI Jusqu'à PCM 7,1 ca Dolby Digital Jusqu'à PCM 5,1 ca Dolby Digital Dolby Digital Jusqu'à...
- Page 99 Reportez-vous au tableau ci-dessous lorsque cet appareil ne fonctionne pas correctement. Si le problème que vous rencontrez n’est pas répertorié ci-dessous ou si les consignes ne vous sont d’aucune aide, éteignez l’appareil, débranchez le cordon d’alimentation et contactez le revendeur agréé le plus proche ou un centre de dépannage Samsung Electronics. Problème Vérification/Solution Le disque ne peut pas être...
- Page 100 Problème Vérification/Solution Le son ambiophonique • Le disque porte-t-il l’indication « Dolby Digital 5.1 CH » ? Le son ambiophonique Dolby Digital 5.1 CH n’est Dolby Digital 5.1 CH est produit uniquement si le disque est enregistré au format 5.1. pas produit.
- Page 101 Annexes Problème Vérification/Solution « Non disponible » apparaît • Les fonctions ou les commandes ne peuvent être exécutées pour le moment car : à l'écran. 1. Le logiciel du disque Blu-ray/DVD les limite. 2. Le logiciel du disque Blu-ray/DVD ne prend pas en charge la fonction en question (par ex.
-
Page 102: Caractéristiques Techniques
Par la présente, Samsung Electronics déclare que cet équipement est conforme aux exigences principales et autres dispositions relatives à la Directive 1999/5/EC. La déclaration de conformité originale se trouve sur le site http://www.samsung.com, allez sur Support (Assistance) > Search Product Support (Recherche assistance produit) et saisissez le nom du modèle. - Page 103 Les vitesses de réseau égales ou inférieures à 10 Mbps ne sont pas prises en charge. ✎ Samsung Electronics Co., Ltd se réserve le droit de modifier les caractéristiques sans préavis. ✎ Le poids et les dimensions figurent à titre approximatif.
-
Page 104: Licences
Licences Fabriqué sous licence par Dolby Laboratories. Dolby et le symbole représentant deux D sont des marques de commerce de Dolby Laboratories. Pour consulter les brevets DTS, rendez-vous sur http://patents.dts.com. Fabriqué sous licence par DTS Licensing Limited. DTS, DTS-HD, le symbole, et DTS-HD et le symbole qui lui est associé... - Page 105 © 2015 Samsung Electronics Co., Ltd. Tous droits réservés. Comment contacter Samsung dans le monde Si vous avez des suggestions ou des questions concernant les produits Samsung, veuillez contacter le Service Consommateurs Samsung. Contact Centre Contact Centre Area...
- Page 106 HT-J5500 HT-J5550W Bedienungsanleitung 5.1CH Blu-ray™ Heimkino-System Unvorstellbare Möglichkeiten Vielen Dank, dass Sie sich für dieses Produkt von Samsung entschieden haben. Wenn Sie einen umfassenderen Service nutzen möchten, registrieren Sie bitte Ihr Produkt unter www.samsung.com/register...
- Page 107 Sicherheitsinformationen ✎ Das Folgende gilt ebenfalls für den Funkempfänger (SWA-7000). Dieses Symbol weist auf eine hohe ACHTUNG Spannung im Inneren des Geräts hin. Das Berühren von Teilen im STROMSCHLAGGEFAHR! NICHT ÖFFNEN! Geräteinneren ist gefährlich. ACHTUNG: ZUR VERMEIDUNG VON STROMSCHLÄGEN DARF DIESES GERÄT NICHT GEÖFFNET WERDEN. IM Dieses Symbol weist darauf hin, dass GERÄTEINNEREN BEFINDEN SICH KEINE VOM BENUTZER ZU diesem Gerät wichtige Anweisungen...
- Page 108 • Um das Gerät vollständig abzuschalten, muss der 3D Vorsichtsmaßnahmen Netzstecker aus der Steckdose gezogen werden. Aus diesem Grund muss die Steckdose und der WICHTIGE GESUNDHEITS UND Netzstecker jederzeit frei zugänglich sein. SICHERHEITSHINWEISE FÜR 3D BILDER. • Halten Sie Kinder vom Gerät fern. Lesen Sie die folgenden Sicherheitshinweise aufmerksam •...
- Page 109 Inhalt ERSTE SCHRITTE WIEDERGABE VON INHALTEN Zubehör 28 Umschalten des Wiedergabegeräts Lautsprecherkomponenten 28 Wiedergabe von kommerziellen Disks Vorderseite 28 Wiedergabe von selbst aufgenommenen Disks Rückseite 29 Wiedergabe von Dateien auf einem USB-Gerät Fernbedienung 30 Steuern der Videowiedergabe 32 Wiedergabe von kommerziellen Audio Disks ANSCHLÜSSE 32 Steuern der Musikwiedergabe Anschließen der Lautsprecher...
-
Page 110: Erste Schritte
Hausbesuch erfolgt. Prüfen Sie, ob die im Folgenden aufgeführten Zubehör- und Lautsprecherkomponenten dem Karton beiliegen. Zubehör • Fernbedienung • Bedienungsanleitung • Batterien (AAA) Netzkabel UKW-Antenne Lautsprecherkomponenten HT-J5500 Center Surround Frontlautsprecher 2x Lautsprecherkabel 6x Subwoofer Lautsprecher 2x - Deutsch... -
Page 111: Vorderseite
Erste Schritte HT-J5550W Schrauben (5x15) 4x Frontlautsprecher Schrauben (5x20) 16x Center Ständerfuß 4x Funkempfänger Surround Ständer 4x Subwoofer Lautsprecherkabel 6x Lautsprecher 2x Modul (SWA-7000) Vorderseite DISPLAY SYMBOLE WIEDERGABE/ FUNKTION STOPP PAUSE ÖFFNEN/ LAUTSTÄRKEREGLER NETZSCHALTER SCHLIESSEN ANZEIGE 5V 0.5A DISK-LADE FERNBEDIENUNGSSENSOR ✎... -
Page 112: Rückseite
Rückseite * Bei HT-J5500 SURROUND EINGANG SURROUND * UKW-ANTENNE LÜFTER HDMI-AUSGANG LAUTSPRECHER- NETZKABEL EXTERNER DIGITAL AUDIO AUSGÄNGE EINGANG (OPTISCH) NETZWERKANSCHLUSS * Anschließen der UKW-Antenne Schließen Sie die mitgelieferte UKW-Antenne an den FM ANT Anschluss an. Bewegen Sie den Antennendraht langsam hin und her, bis Sie einen guten Empfang haben. Befestigen Sie den Draht an der Wand oder einer festen Fläche. -
Page 113: Fernbedienung
Erste Schritte Fernbedienung Übersicht der Fernbedienung Drücken, um den Betriebsmodus Schaltet das Gerät ein und aus. des Heimkinos auszuwählen. (BD/DVD, D. IN, AUX, usw.). FUNCTION Zum Öffnen und Schließen des VOLUME MUTE Diskfachs. Lautstärke regeln. Damit schalten Sie den Ton RDS DISPLAY vorübergehend aus. -
Page 114: Anschlüsse
Anschlüsse In diesem Kapitel werden verschiedene Methoden erläutert, mit denen dieses Gerät an andere externe Komponenten angeschlossen werden kann. Bevor Sie das Hauptgerät installieren oder an einer anderen Stelle aufstellen, müssen Sie es ausschalten und den Netzstecker ziehen. Anschließen der Lautsprecher Platzierung des Hauptgeräts Platzieren Sie das Hauptgerät auf einem Regal, einer Kommode... - Page 115 Anschlüsse Zum Installieren der Lautsprecher auf dem Tallboy-Stand * Nur HT-J5550W Stellen Sie die Bodenplatte auf den Kopf, und Ständerfuß befestigen Sie den Ständer. Befestigen Sie die Schrauben (5x20) mithilfe eines Schraubenziehers in den 4 markierten Öffnungen. Ständer Ziehen Sie das mitgelieferte Lautsprecherkabel gerade und führen Sie es durch die Öffnung in der Mitte des Standfußes.
- Page 116 HT-J5500 Front- Lautsprecher (L) Surround- Lautsprecher (L) Surround- SURROUND Lautsprecher (R) Center-Lautsprecher SURROUND Front-Lautsprecher (R) SURROUND Subwoofer SURROUND HT-J5550W Front- Lautsprecher (L) Center-Lautsprecher Kabelloses Empfängermodul Subwoofer SURROUND SPEAKERS OUT ID SET Front-Lautsprecher (R) Surround- Surround- Lautsprecher (L) Lautsprecher (R) * Dieses Produkt sollte nur an einen SWA-7000 angeschlossen werden.
- Page 117 Anschlüsse ✎ Wenn Sie einen Lautsprecher in der Nähe des Fernsehers aufstellen, kann die Farbwiedergabe auf dem Bildschirm durch die von den Lautsprechern erzeugten magnetischen Felder gestört werden. ✎ Stellen Sie den Funkempfänger hinter der Hörerposition auf. Wenn sich der Funkempfänger zu nahe am Gerät befindet, kann der Klang aufgrund von Interferenzen beeinträchtigt werden.
-
Page 118: Anschließen An Ein Fernsehgerät Und Externes Gerät
Anschließen an ein Fernsehgerät und Externes Gerät Weiß Methode 1 Methode 2 Externe Geräte AUDIO OUT OPTICAL OUT HDMI IN (ARC) Anschluss an ein Fernsehgerät Verbinden Sie ein HDMI-Kabel (nicht mitgeliefert) über die HDMI OUT (HDMI AUSGANGS) -Buchse an der Rückseite des Geräts mit der HDMI Eingangsbuchse des Fernsehgeräts. -
Page 119: Anschließen An Einen Netzwerk Router
Router. Wenn der für den WLAN-Router gewählte ✎ Die Richtlinien Ihres Router oder Internetanbieters Kanal gerade von einem anderen Gerät in der lassen eventuell den Zugriff auf den Samsung Nähe verwendet wird, führt dies zu Interferenzen Software-Aktualisierungsserver nicht zu. Falls und einer Kommunikationsstörung. -
Page 120: Einstellungen
✎ Wenn Sie ein HDMI-Kabel verwenden, um das Gerät 4:3 Letterbox - Für ältere analog Fernsehgeräte an ein Anynet+ (HDMI-CEC)-kompatibles Samsung- mit Standardbildschirm. Zeigt Bilder im 4:3 Fernsehgerät anzuschließen und 1.) Die Anynet+ Format im Vollbildmodus und Bilder mit 16:9 (HDMI-CEC) Funktion am Fernsehgerät und dem... -
Page 121: Der Home Bildschirm Im Überblick
Einstellungen Der Home Bildschirm im Überblick 7 Gerät wechseln Zeigt eine Liste der an das Hauptgerät angeschlossenen Geräte an. Schalten Sie zu dem gewünschten Gerät. DISK WIEDERGEBEN FOTOS VIDEOS MUSIK 8 Funktion Dient zum Umschalten auf ein externes Gerät oder Radio und zum Umschalten des Modus für eine Bluetooth Verbindung. -
Page 122: Einstellungen Menüfunktionen
BD Wise ist Samsungs neueste Geräte- EXIT Taste : Verlassen des Menüs. Anschlussfunktion. Wenn Sie ein Samsung Gerät und ein Samsung-Fernsehgerät mit BD Wise über HDMI aneinander anschließen und BD Wise auf Ausführliche Funktionsinformationen beiden Geräten aktiviert ist, gibt das Gerät das Jede Einstellungen Funktion, Menüposition... - Page 123 Einstellungen HDMI-Farbformat Audioausgabekanal Hier kann das Farbraumformat für die HDMI- Hier können Sie einstellen, den Ton vom Wiedergabe an die Möglichkeiten des Fernsehgerät auf die Lautsprecher des Heimkinos angeschlossenen Geräts (Fernsehgerät, umzuleiten. Erfordert eine HDMI-Verbindung und ein Bildschirm, usw.) angepasst werden. Audioausgabekanal (ARC) kompatibles Fernsehgerät.
- Page 124 Bei Anynet+ handelt es sich um eine nützliche Funktion, die den vernetzten Betrieb mit anderen Wi-Fi-Direkt Samsung Geräten zur Verfügung stellt, die über Mit dieser Funktion können Sie ein Wi-Fi-Direkt die Anynet+ Funktion verfügen. Um diese Funktion Gerät an Ihr Gerät über ein Peer-to-Peer Netzwerk zu nutzen, müssen Sie dieses Gerät mithilfe eines...
-
Page 125: Radio Einrichten
Für weitere Informationen über diese Funktion • An Orten mit schlechtem Empfang, können Sie finden Sie auf Seite 26. MONO einstellen, einen klaren, rauschfreien Samsung kontaktieren Empfang zu erhalten. Sender voreinstellen Hier erhalten Sie Kontaktinformationen, wenn Sie Hilfe für Ihr Gerät benötigen. - Page 126 • Um einen gespeicherten Sender einzustellen, Über RDS-Sender TUNING DOWN Taste drücken. ✎ Verwenden von RDS (Radio Data System) für Um alle gespeicherten Radiosender zu lösen, die TITLE MENU im manuellen Radiomodus ca. für den Empfang von UKW-Sendern UKW-Sender 5 Sekunden drücken, bis DEFAULT PRESET auf RDS ermöglicht es Radiostationen ein zusätzliches der Anzeige erscheint.
-
Page 127: Konfiguration Des Netzwerks
Einstellungen Anzeigen der RDS-Signale - Wenn Sie eine Taste auf der Hauptfernbedienung drücken. Achten Sie darauf dass Sie Sie können die von der Station gesendeten RDS- für die Auswahl des UKW Senders die Signale auf dem display ablesen. Hauptfernbedienung benutzen. Betätigen Sie die Taste RDS DISPLAY während Sie... - Page 128 Kabelnetzwerk Wählen Sie einen einzugebenden Wert aus (z. B. IP-Adresse) und drücken Sie die E ❏ Kabel – Automatisch Taste. Verwenden Sie die Nummerntasten auf Fernbedienung, um die Ziffern für den Parameter Nachdem Sie die obigen Schritte 1 bis 3 befolgt haben: einzugeben.
- Page 129 Einstellungen Geben Sie den Namen des drahtlosen Netzwerkeinstellungen Netzwerks oder des Wi-Fi-Routers ein. • Geben Sie die Nummern direkt mithilfe der Wählen Sie einen Netzwerktyp. Tasten auf der Fernbedienung ein. Netzwerktyp Drahtlos • Geben Sie einen Buchstaben ein, indem Sie Wireless-Netzwerk ihn mithilfe der ▲▼◄►Tasten markieren und anschließend die E Taste drücken.
-
Page 130: Wi-Fi-Direkt
✎ Die Netzwerk Parameter können Sie bei ihrem Wi-Fi-Direkt Internetdienstanbieter erfragen. Die Wi-Fi-Direkt Funktion ermöglicht es Ihnen, Wi- 11. Wenn die Einstellungen abgeschlossen sind Zurück ( ' ) auswählen und anschließend die E Fi-Direkt Geräte und alle anderen, ein Peer-to-Peer Netzwerk verwendenden Geräte ohne einen WLAN- Taste drücken. -
Page 131: Aktualisieren Der Software
Taste, um das geschlossen wird, sollte das Gerät auf dem Wi- aktualisierte Gerät einzuschalten. Fi-Direkt Bildschirm als verbunden aufgelistet • Samsung Electronics haftet nicht für werden. Fehlfunktionen des Geräts, die auf eine instabile Internetverbindung oder fahrlässiges Handeln des Benutzers während der Software- •... -
Page 132: Dlna Einrichten
Per USB Automatische Update-Meldung Wenn Ihr Gerät an ein Netzwerk angeschlossen ist Besuchen Sie die Webseite www.samsung.com. und die Automatische Update-Meldung auf Ein Geben Sie die Modellnummer in das Suchfeld eingestellt ist, teilt Ihnen das Gerät über eine Popup- ein. Während der Eingabe der Modellnummer Meldung mit, dass eine neue Softwareversion erscheint eine Klappliste mit den Geräten, die... -
Page 133: Wiedergabe Von Inhalten
Wiedergabe von Inhalten Drücken Sie die ^ Taste, um die Disklade zu Ihr Heimkino kann Inhalte von Blu-ray/DVD/CD Disks, USB-Geräten, PCs, Smartphones, Tablets und in schließen. Die Wiedergabe wird automatisch Anwendungen wiedergeben. gestartet. Um auf Ihrem PC oder Mobilgeräten gespeicherte Wenn die Wiedergabe nicht automatisch startet, Inhalte wiederzugeben, müssen Sie den PC oder bitte die 6 Taste auf der Fernbedienung drücken. -
Page 134: Wiedergabe Von Dateien Auf Einem Usb-Gerät
Es wird ein Bildschirm mit dem Inhalt der Falls erforderlich, verwenden Sie die ▲▼◄► Disk angezeigt. Je nachdem, wie der Inhalt Tasten, um einen Ordner auszuwählen und drücken Sie die E Taste. angeordnet ist, sehen Sie entweder Ordner, einzelne Dateien oder beides. Wählen Sie eine wiederzugebende Datei aus und drücken Sie die E Taste. -
Page 135: Steuern Der Videowiedergabe
Wiedergabe von Inhalten Steuern der Videowiedergabe 2 Bedienen des Disk Menüs, Titel Menüs, Popup Menüs und der Titelliste Sie können die Wiedergabe von Videoinhalten auf DISC MENU Blu-ray-Disks/DVDs, USB-Geräten, mobilen Geräten oder dem PC steuern. Je nach Disk oder Inhalt Während der Wiedergabe diese Taste drücken, um können einige in dieser Anleitung beschriebenen das Disk Menü... - Page 136 Menüpositionen, die nur bei der Wiedergabe EXTRAS Menü verwenden einer BD/DVD Disk erscheinen. Drücken Sie während der Wiedergabe die TOOLS Taste. Titel Kapitel Wenn sich mehr als ein Titel auf der Disk oder dem Mit dieser Option können Sie zu dem Kapitel Gerät befindet, können Sie so dem gewünschten springen, dass Sie sich ansehen möchten.
-
Page 137: Wiedergabe Von Kommerziellen Audio Disks
Wiedergabe von Inhalten Eine Video Wiedergabeliste erstellen Tasten auf der Fernbedienung für die Musikwiedergabe Sie können eine Wiedergabeliste von Videodateien auf ähnliche Weise wie für Musiktitel erstellen. Die RDS DISPLAY Anleitung dazu finden Sie auf Seite 33. Wählen Sie anstelle der Musikdateien Videodateien aus. PTY - PTY SEARCH PTY +... - Page 138 Erstellen einer Musik Wiedergabeliste Rippen Wenn Sie Musiktitel von einer kommerziellen CD Schließen Sie ein USB-Gerät an den USB- oder DVD wiedergeben, die 5 oder Anschluss auf der Vorderseite des Geräts an. RETURN drücken. Die Musikliste wird angezeigt. Wenn Wenn der Wiedergabebildschirm angezeigt ist, Sie eine Wiedergabeliste von einer selbst mithilfe der ▲▼...
-
Page 139: Anzeigen Von Fotos
Wiedergabe von Inhalten Anzeigen von Fotos Bluetooth verwenden Sie können auf DVDs, USB-Geräten, mobilen Geräten Sie können von einem Bluetooth-Gerät Musik oder dem PC gespeicherte Fotos anzeigen. in bester Stereo Klangqualität ganz ohne Kabel genießen. Extras Menü verwenden • Abstand für Verbindungsaufbau ; max. 2m, Drücken Sie während der Wiedergabe die TOOLS Betriebsreichweite : max. - Page 140 Anschließen eines Bluetooth-Geräts - Wenn das Bluetooth-Gerät ausgeschaltet oder nicht angeschlossen ist oder nicht richtig an das Heimkino funktioniert. Beachten Sie, dass Geräte, wie Mikrowellenherde, WLAN-Geräte, Leuchtstoffröhren und Gasöfen den selben Frequenzbereich wie Bluetooth-Geräte verwenden, wodurch es zu Interferenzen kommen Verbindungsaufbau kann.
-
Page 141: Verwenden Der Tasten Für Spezialeffekte Auf Der Fernbedienung
Wiedergabe von Inhalten Verwenden von Bluetooth Schnellstart ❏ TV SOUND verwenden: 1) Wenn Sie den Ton des Fernsehgeräts über Wenn das Heimkinosystem ausgeschaltet ist, kann die Heimkinolautsprecher hören möchten. durch Anschließen Ihres Smart Device an das Gerät über eine Bluetooth-Verbindung das Heimkinosystem 2) Wenn Sie den Ton von Audiodateien eines eingeschaltet werden. -
Page 142: Netzwerkdienste
Netzwerkdienste Wählen Sie an Ihrem Heimkinosystem Gerät Verwenden von BD-LIVE™ wechseln. Mithilfe der ▲ % Taste Ihren PC in der Geräteliste auswählen. Schließen Sie das Gerät an das Netzwerk an. Wählen Sie die Art der anzuzeigenden oder (Siehe Seite 14) wiederzugebenden Dateien aus (FOTOS, Konfigurieren Sie die Netzwerkeinstellungen. -
Page 143: Den Opera Tv Store Nutzen
Netzwerkdienste Anwendungen verwenden Den Opera TV Store nutzen Wenn Sie das Erste Mal eine dieser Anwendungen Im Opera TV Store finden Sie Internet Video aufrufen, werden vom Heimkinosystem zwei Streaming mit hoher Qualität, Soziale Netzwerke und Zustimmungsaufforderungen angezeigt. Sie müssen Musik Streaming Dienste. -
Page 144: Screen Mirroring
Das Fernsehgerät zeigt eine Verbindungsmeldung Anwendungen aus MEINE APPS entfernen an (z. B. Verbindungsaufbau zu Android 92gb...) Markieren Sie die MENÜ Taste am oberen Rand und anschließend eine Meldung, dass die des Meine Apps Bildschirms und drücken Sie Verbindung hergestellt wurde. anschließend die E Taste auf Ihrer Fernbedienung. -
Page 145: Anhang
Balken auf der linken oder rechten Seite bzw. auf • Diese Funktion steht nicht zur Verfügung wenn CEC beiden Seiten angezeigt werden. vom HDMI-Kabel nicht unterstützt wird. • Wenn sich ein Anynet+ Logo auf Ihrem Samsung- TV-Format Fernsehgerät befindet, wird die Anynet+-Funktion unterstützt. -
Page 146: Disk Und Format Kompatibilität
Lautsprechereinstellung Wiedergabe von JPEG-Dateien • Wenn Lautsprecher auswählen auf TV- • Sie können den Untertitel und die PG-Grafik im Lautsprecher eingestellt ist, wird der Ton über die Vollbildschirmmodus nicht vergrößern. Lautsprecher des Fernsehgeräts wiedergegeben. Wiedergabe von Inhalten HDMI Audio Verwenden der TOOLS Taste während der •... - Page 147 Die Nummer der Region für dieses Gerät um einen Defekt des Geräts. befindet sich auf der Rückseite dieses Geräts. ✎ Samsung kann nicht garantieren, dass dieses Gerät jede Disk mit einem Blue Ray-Disk, DVD- oder CD- Disktyp Regionalcode Region Logo wiedergibt, da sich die Diskformate ständig...
- Page 148 ✎ Einige Disk im AVCHD DivX-Format können bestehen bleibt, setzen Sie sich mit dem USB- aufgrund der Aufnahmebedingungen eventuelle nicht Festplattenhersteller in Verbindung. wiedergegeben werden. • SAMSUNG über nimmt keine Haftung für die Beschädigung von Dateien oder Datenverlust. - Deutsch...
- Page 149 Anhang Unterstützte Videodatei Dateierweiterung Container Video Codec Audio Codec Auflösung DivX 3.11/4/5/6 MP3, Dolby Digital, DTS, *.avi MP4v3 WMA, PCM H.264 BP/MP/HP VC-1 AP, DivX 5/6 *.mkv MP3, Dolby Digital, DTS H.264 BP/MP/HP *.wmv WMV (wmv9) VC-1 AP, VC-1 SM 1920 ×...
- Page 150 Auswahl des Digitalausgangs Bitstream Bitstream Bitstream (Dolby D Einrichten (Unverarbeitet) (DTS Re-encoded) Re-encoded) Verbindung HDMI-fähiger AV Receiver Bis zu PCM 7.1ch Dolby Digital Bis zu PCM 5.1ch Dolby Digital Dolby-Digital- Bis zu PCM 5.1ch Dolby-Digital-Plus Plus Audiostream Dolby TrueHD Bis zu PCM 5.1ch Dolby TrueHD Dolby D.
-
Page 151: Fehlerbehebung
Schlagen Sie in der nachfolgenden Liste nach, wenn das Gerät nicht ordnungsgemäß funktioniert. Falls ihr Problem unten nicht aufgelistet oder die Problemlösung nicht hilfreich ist, das Gerät abschalten, den Netzstecker ziehen und setzen Sie sich mit dem nächstgelegenen autorisierten Händler oder dem Samsung Electronics-Servicecenter in Verbindung. - Page 152 Symptom Überprüfen/Beheben Dolby Digital 5.1-Kanal- • Ist die Disk mit Dolby Digital 5.1 CH" gekennzeichnet? Dolby Digital 5.1 CH Raumklang wird nicht Surround Sound wird nur wiedergegeben, wenn die Disk mit 5.1 Kanal Surround ausgegeben. Sound aufgenommen wurde. • Wird die Audio-Sprache auf der Informationsanzeige richtig als Dolby Digital 5.1-CH angezeigt? Die Fernbedienung •...
- Page 153 Anhang Symptom Überprüfen/Beheben "Nicht verfügbar" erscheint • Die Funktionen oder Option ist zur Zeit aus folgenden Gründen nicht verfügbar: auf dem Bildschirm. 1. Die Software der Blu-ray/DVD Disk lässt die Funktion oder Option nicht zu. 2. Die Blu-ray/DVD-Software unterstützt die Funktion (z. B. Kamerawinkel) nicht. 3.
-
Page 154: Technische Daten
Hiermit erklärt Samsung Electronics, dass dieses Gerät mit den wesentlichen Anforderungen und die relevanten Bestimmungen der Richtlinie 1999/5/EC übereinstimmt. Die original Übereinstimmungserklärung finden Sie auf http://www.samsung.com, unter Support > Produktsuche und geben Sie den Produktnamen oder die Artikelnummer ein. Dieses Gerät darf in allen EU-Ländern betrieben werden. - Page 155 255.0 x 297.0 x 255.0 4.43 ✎ Netzwerkgeschwindigkeiten von 10 Mbps oder weniger werden nicht unterstützt. ✎ Samsung Electronics Co., Ltd behält sich das Recht auf unangekündigte Änderungen vor. ✎ Gewicht und Abmessungen können von den Angaben abweichen. ✎ Gestaltung und Spezifikationen vorbehaltlich Änderungen.
-
Page 156: Lizenzen
Lizenzen Hergestellt unter Lizenz von Dolby Laboratories. Dolby sowie das Doppel-D-Symbol sind Warenzeichen der Dolby® Laboratories. Informationen zu DTS-Patenten finden Sie unter http://patents.dts.com. Hergestellt unter Lizenz von DTS Licensing Limited. DTS, DTS-HD, das Symbol, & DTS-HD und das Symbol zusammen sind registrierte Warenzeichen und DTS-HD Master Audio | Essential ist ein Warenzeichen der DTS, Inc. - Page 157 800 - SAMSUNG (800-726786) www.samsung.com/cz/support 0180 6 7267864* GERMANY www.samsung.com/de/support CZECH Samsung Electronics Czech and Slovak, s.r.o. V Parku 2343/24, 148 00 - (*0,20 €/Anruf aus dem dt. Festnetz, aus Praha 4 dem Mobilfunk max. 0,60 €/Anruf) CROATIA 072 726 786 www.samsung.com/hr/support...
- Page 158 HT-J5500 HT-J5550W Manuale utente Blu-ray™ 5.1CH Sistema Home Entertainment immagina le possibilità Grazie per avere acquistato questo prodotto Samsung. Per ricevere un servizio più completo, registrare il prodotto all'indirizzo www.samsung.com/register...
- Page 159 Informazioni Sulla sicurezza ✎ Quanto segue riguarda anche il modulo ricevitore wireless (SWA-7000). Questo simbolo indica che all'interno è ATTENZIONE presente alta tensione. Qualsiasi tipo di contatto con le parti interne del prodotto NON APRIRE: RISCHIO DI SCARICHE ELETTRICHE è pericoloso. ATTENZIONE: PER RIDURRE IL RISCHIO DI SCOSSA ELETTRICA, NON RIMUOVERE IL COPERCHIO (O IL Questo simbolo indica che il prodotto...
- Page 160 • Per spegnere completamente l'apparecchio, è necessario Precauzioni 3D scollegarlo dalla presa di rete. Di conseguenza, la spina di alimentazione e la presa di rete devono essere INFORMAZIONI IMPORTANTI SULLA SALUTE E LA prontamente accessibili in qualsiasi momento. SICUREZZA PER IMMAGINI 3D. Leggere e assimilare le •...
- Page 161 Indice GUIDA INTRODUTTIVA RIPRODUZIONE DEI CONTENUTI Accessori 28 Cambio del dispositivo sorgente Componenti dei diffusori 28 Riproduzione di dischi disponibili in commercio Pannello anteriore 28 Riproduzione di un disco con contenuti registrati dall'utente Pannello posteriore 29 Riproduzione di file su dispositivo USB Telecomando 30 Controllo della riproduzione video CONNESSIONI...
- Page 162 Controllare che la scatola contenga gli accessori e i componenti dei diffusori forniti. Accessori • Telecomando • Manuale utente • Batterie (formato AAA) Cavo di alimentazione Antenna FM Componenti dei diffusori HT-J5500 Centrale Anteriore x 2 Surround x 2 Cavo del diffusore x 6 Subwoofer - Italiano...
-
Page 163: Pannello Anteriore
Guida Introduttiva HT-J5550W Vite (5x15) x 4 Anteriori x 2 Vite (5x20) x 16 Centrale Basi dei supporti x 4 Ricevitore wireless Surround x 2 Supporti x 4 Subwoofer Cavo del diffusore x 6 Modulo (SWA-7000) Pannello anteriore ICONE DISPLAY RIPRODUZIONE/ FUNCTION STOP... -
Page 164: Pannello Posteriore
Pannello posteriore * Se si utilizza HT-J5500 SURROUND INGRESSO AUX SURROUND VENTOLA DI * ANTENNA FM RAFFREDDAMENTO USCITA HDMI CAVO DI CONNETTORI DI INGRESSO AUDIO DIGITALE TERMINALE LAN ALIMENTAZIONE USCITA DIFFUSORI ESTERNO (OTTICO) * Collegamento dell'antenna FM Collegare l'antenna FM fornita al jack FM ANT. - Page 165 Guida Introduttiva Telecomando Descrizione del telecomando Per selezionare il modo di Home Accende e spegne il prodotto. Cinema. (BD/DVD, D. IN, AUX, FUNCTION ecc.). Apre e chiude il vano del disco. VOLUME MUTE Per regolare il volume. RDS DISPLAY Per disattivare temporaneamente l'audio.
-
Page 166: Collegamento Dei Diffusori
Connessioni Questa sezione descrive vari metodi per collegare il prodotto ad altri componenti esterni. Prima di spostare o installare il prodotto, spegnere l'apparecchio e staccare il cavo di alimentazione. Collegamento dei diffusori Posizione del prodotto Sistemarlo su un supporto, sul ripiano di un mobile o nel mobile sotto la TV. - Page 167 Connessioni Installazione dei diffusori sul supporto a colonna * Solo HT-J5550W Capovolgere la base del supporto e collegarla al Base di supporto supporto. Utilizzare un cacciavite per serrare le viti (5x20) nei 4 fori indicati. Supporto Tendere il cavo del diffusore fornito e farlo passare attraverso il foro centrale della base di supporto.
- Page 168 HT-J5500 Diffusore anteriore (S) Diffusore surround (S) Diffusore SURROUND surround (D) Diffusore centrale SURROUND SURROUND Diffusore anteriore (D) Subwoofer SURROUND HT-J5550W Diffusore anteriore (S) Diffusore centrale Modulo ricevitore wireless Subwoofer SURROUND SPEAKERS OUT ID SET Diffusore anteriore (D) Diffusore Diffusore...
- Page 169 Connessioni ✎ Se si colloca un diffusore vicino alla TV, i colori dello schermo potrebbero apparire distorti a causa del campo magnetico. ✎ Posizionare il modulo ricevitore wireless dietro la posizione di ascolto. Se il modulo ricevitore wireless è troppo vicino al prodotto, il suono dei diffusori può risentire di interferenze. ✎...
-
Page 170: Collegamento A Un Televisore
Collegamento a una TV e dispositivi esterni Rosso Bianco Metodo 1 Metodo 2 Dispositivi esterni AUDIO OUT OPTICAL OUT HDMI IN (ARC) Collegamento a un televisore Collegare un cavo HDMI (non fornito) tra il connettore HDMI OUT sulla parte posteriore del prodotto e il connettore HDMI IN sul televisore. -
Page 171: Collegamento A Un Router Di Rete
Internet potrebbero impedire al prodotto utilizzato da un altro dispositivo nelle vicinanze, di accedere al server di aggiornamento del ciò provocherà interferenze e problemi di software Samsung. In questo caso, per ulteriori comunicazione. informazioni contattare il provider di servizi Internet ✎... -
Page 172: Procedura Di Impostazione Iniziale
✎ Se si utilizza un cavo HDMI per collegare il in 16:9 e espande le immagini in 4:3 per riempire prodotto a una TV Samsung compatibile Anynet+ lo schermo in 16:9. (HDMI-CEC) e 1). La funzione Anynet+ (HDMI- 4:3 Letter Box - Per vecchie TV analogiche con CEC) è... - Page 173 Impostazioni La schermata iniziale in breve 7 Cambia Dispositivo Visualizza un elenco di dispositivi esterni collegati all'unità principale. Passa al dispositivo desiderato. 8 Funzione RIPRODUCI DISCO FOTO VIDEO MUSICA Passa a un dispositivo esterno, e per una connessione Bluetooth imposta il modo e la radio.
-
Page 174: Funzioni Del Menu Impostazioni
BD Wise Tasto EXIT: premere per uscire dal menu BD Wise è la funzione di interconnettività Samsung corrente. di ultima generazione. Quando si collegano tra loro un prodotto Samsung e una TV Samsung Informazioni dettagliate sulle funzioni con BD Wise tramite HDMI, e BD Wise è... - Page 175 Impostazioni Formato colore HDMI Canale ritorno audio Consente di impostare il formato dello spazio Permette di direzionare il suono dalla TV ai diffusori dell'Home Cinema. Richiede una connessione colore per l'uscita HDMI in base alla capacità del HDMI e una TV compatibile con Canale ritorno dispositivo collegato (televisore, monitor, ecc.).
- Page 176 Consente di collegare un dispositivo Wi-Fi Direct Samsung. Per attivare questa funzione, è al prodotto attraverso una rete peer-to-peer, senza necessario collegare il prodotto a una TV Samsung utilizzare un router wireless. Tenere presente che Anynet+ utilizzando un cavo HDMI.
- Page 177 Per ulteriori informazioni su questa funzione vedere • Nelle zone con scarsa ricezione, selezionare a pagina 26. MONO per una trasmissione chiara e priva di interferenze. Contattare Samsung Memorizzazione delle stazioni Fornisce le informazioni di contatto per l'assistenza sul prodotto. Esempio: memorizzazione della stazione FM 89.10.
- Page 178 • Per sintonizzarsi su una stazione preimpostata, Trasmissione RDS premere il tasto TUNING UP, DOWN. ✎ Utilizzo di RDS (Radio Data System) per Per cancellare contemporaneamente tutte le stazioni FM preimpostate, premere il tasto TITLE ricevere Stazioni FM MENU per circa 5 secondi in modo FM manuale L'RDS consente alle stazioni FM di inviare un segnale finché...
- Page 179 Impostazioni Per visualizzare i segnali RDS - Prima di premere i tasti del telecomando principale, assicurarsi di aver selezionato la È possibile visualizzare sul display i segnali RDS inviati stazione FM usando il telecomando principale. dalle stazioni. Premere il tasto RDS DISPLAY durante l'ascolto di RDS DISPLAY...
- Page 180 Rete via cavo Selezionare un parametro da inserire (Indirizzo IP, ad esempio), e quindi premere E . Utilizzare ❏ Cavo – Automatico il tastierino numerico del telecomando per inserire i numeri per il parametro. È anche Dopo aver seguito i passi da 1 a 3 sopra riportati: possibile inserire i numeri utilizzando i tasti ▲▼.
- Page 181 Impostazioni Inserire il nome della rete o del router wireless. Impostazioni di rete • Inserire i numeri utilizzando direttamente i tasti numerici del telecomando. Selezionare il tipo di rete. • Inserire le lettere selezionandole con i tasti Tipo di rete Wireless ▲▼◄►, quindi premere il tasto E .
- Page 182 ✎ È possibile ottenere i valori dei parametri di rete Wi-Fi Direct dal provider Internet. 11. Al termine, selezionare Ritorna ( ' ), quindi La funzione Wi-Fi Direct consente di collegare premere il tasto E . Viene visualizzata la i dispositivi Wi-Fi Direct al prodotto e tra di loro attraverso una rete peer-to-peer, senza un router schermata Codice di Sicurezza.
-
Page 183: Aggiornamento Del Software
è stato effettuato l'aggiornamento e utilizzarlo. • Le procedure PBC e PIN collegano i dispositivi automaticamente. • Samsung Electronics non si assume alcuna responsabilità legale in caso di Attraverso il prodotto utilizzando PBC malfunzionamento del prodotto dovuto all'instabilità... - Page 184 Tramite USB Notifica aggiorn. autom. Se il prodotto è collegato alla rete e Notifica aggiorn. Accedere al sito www.samsung.com. autom. è attivo, per il prodotto verranno inviate Introdurre il codice di modello del prodotto nel notifiche se sarà disponibile una nuova versione del campo di ricerca.
- Page 185 Riproduzione dei Contenuti Premere il tasto ^ per chiudere il vano del disco. L'Home Cinema è in grado di riprodurre i contenuti che si trovano su dischi Blu-ray/DVD/CD, dispositivi La riproduzione si avvia automaticamente. USB, PC, smart phone, tablet e nelle app. Se la riproduzione non si avvia automaticamente, Per riprodurre i contenuti che si trovano sul PC o su premere il tasto 6 sul telecomando.
- Page 186 Viene visualizzata una schermata con l'elenco Se necessario, utilizzare i tasti ▲▼◄► per dei contenuti del disco. A seconda di come selezionare una cartella, quindi premere il tasto sono organizzati i contenuti, vengono visualizzati cartelle, singoli file o entrambi. Selezionare il file da visualizzare o riprodurre, quindi premere il tasto E .
-
Page 187: Controllo Della Riproduzione Video
Riproduzione dei Contenuti Controllo della riproduzione video 2 Utilizzo del menu disco, titoli e scelta rapida e dell'elenco dei titoli È possibile controllare la riproduzione dei contenuti DISC MENU video memorizzati su Blu-ray/DVD, supporti USB, dispositivi mobili o PC. A seconda del disco o dei Durante la riproduzione, premere questo tasto per contenuti, alcune funzioni descritte in questo manuale visualizzare il menu del disco. - Page 188 Selezioni menu che vengono visualizzate solo Utilizzo del menu degli strumenti durante la riproduzione di un disco BD/DVD Durante la riproduzione, premere il tasto TOOLS. Titolo Capitolo Se su un disco o dispositivo è presente più di un Permette di passare a un capitolo che si desidera titolo, permette di spostarsi o selezionare il titolo guardare.
-
Page 189: Controllo Della Riproduzione Musicale
Riproduzione dei Contenuti Creazione di una playlist Tasti del telecomando utilizzati per la riproduzione musicale Si può creare una playlist di file video nello stesso modo in cui si crea una playlist di file musicali. Vedere RDS DISPLAY a pagina 33 per le istruzioni. Selezionare dei file video invece dei file musicali. - Page 190 Creazione di una playlist musicale Ripping Se si riproducono file musicali da un CD o DVD Inserire un dispositivo USB nel connettore USB commerciale, premere il tasto 5 o RETURN. sul pannello anteriore del prodotto. Si apre la schermata dell'elenco dei file musicali. Con la schermata di riproduzione visualizzata, Se si sta creando una playlist musicale da un utilizzare i tasti ▲▼...
-
Page 191: Riproduzione Di Contenuti Fotografici
Riproduzione dei Contenuti Riproduzione di contenuti Utilizzo del Bluetooth fotografici È possibile utilizzare un dispositivo Bluetooth per ascoltare musica con audio stereo di alta qualità, È possibile riprodurre i contenuti fotografici tutto senza fili! memorizzati su DVD, supporti USB, dispositivi mobili o PC. - Page 192 Come collegare l'Home Cinema a un - Se il dispositivo Bluetooth è spento, non è in posizione o non funziona correttamente. dispositivo Bluetooth Tenere presente che tutti i dispositivi come forni a microonde, adattatori LAN wireless, luci a fluorescenza e fornelli a gas utilizzano la stessa gamma di frequenza del dispositivo Bluetooth e possono causare interferenze elettriche.
- Page 193 Riproduzione dei Contenuti Uso dell’Avvio rapido Bluetooth ❏ Utilizzare TV SOUND : Quando l'Home Cinema viene spento, il collegamento 1) Se si vuole ascoltare l'audio della TV attraverso i diffusori del sistema Home Cinema. del dispositivo smart al prodotto attraverso una connessione Bluetooth può...
-
Page 194: Servizi Di Rete
Servizi di Rete Sull'Home Cinema, selezionare Cambia Utilizzo di BD-LIVE™ Dispositivo. Utilizzare il tasto ▲ % per selezionare il PC Collegare il prodotto alla rete. nell'elenco dei dispositivi. (Vedere a pagina 14) Selezionare il tipo di file da visualizzare o Configurare le impostazioni di rete. - Page 195 Servizi di Rete Uso delle app Uso dell'Opera TV Store La prima volta che si accede a una qualsiasi app, Nell'Opera TV Store si possono trovare servizi di l'Home Cinema visualizza due accordi. È necessario streaming video, di social network e di streaming accettare entrambi gli accordi per scaricare e musicale di alta qualità.
- Page 196 La TV visualizza un messaggio di connessione Cancellazione delle app da LE MIE APP in corso (ad esempio, Connessione a Evidenziare il tasto MENU nella parte superiore Android_92gb...) e quindi visualizza il messaggio della schermata Le mie App, quindi premere il di connessione effettuata.
-
Page 197: Informazioni Aggiuntive
• Questa funzione non è disponibile se il cavo HDMI Formato TV non supporta CEC. • La TV Samsung supporta la funzione Anynet+ se su • A seconda del tipo di disco, è possibile che alcuni di essa è presente il logo Anynet+. - Page 198 Imposta altoparlanti Riproduzione di file JPEG • Se Selez. altoparlante è impostato su Altoparlante • Non è possibile ingrandire il campo dei sottotitoli e TV, l'audio viene emesso dai diffusori TV. della grafica PG nel modo schermo intero. Audio HDMI Riproduzione dei Contenuti •...
-
Page 199: Loghi Dei Dischi Riproducibili
Il codice regionale del prodotto è riproduzione. Si noti che non si tratta di un difetto del indicato sul pannello posteriore del prodotto. prodotto. ✎ Samsung non può garantire che il prodotto sia Tipo di Codice Area in grado di riprodurre tutti i dischi contrassegnati... - Page 200 Se il problema persiste, contattare il costruttore dell'HDD USB. • SAMSUNG non è responsabile per danni ai file o perdite di dati. - Italiano...
- Page 201 Appendice File video supportati Estensione file Contenitore Codec video Codec audio Risoluzione DivX 3,11/4/5/6 MP3, Dolby Digital, DTS, *.avi MP4v3 WMA, PCM H.264 BP/MP/HP VC-1 AP, DivX 5/6 *.mkv MP3, Dolby Digital, DTS H.264 BP/MP/HP *.wmv WMV (wmv9) VC-1 AP, VC-1 SM 1920x1080 MP4 (mp4v) *.mp4...
- Page 202 Selezioni uscita digitale Bitstream (non Bitstream (DTS Bitstream (Dolby Conf. elaborato) ricodificato) D ricodificato) Connessione Ricevitore AV con supporto HDMI Fino a PCM 7,1 can. Dolby Digital Fino a PCM 5,1 can. Dolby Digital Dolby Digital Fino a PCM 5,1 can. Dolby Digital Plus Plus Streaming...
-
Page 203: Risoluzione Dei Problemi
Se il prodotto non funziona correttamente, consultare la tabella che segue. Se il problema non è elencato nella tabella o se le istruzioni fornite non portano a una soluzione, spegnere il prodotto, scollegare il cavo di alimentazione e contattare il rivenditore autorizzato più vicino o il Centro di assistenza di Samsung Electronics. Sintomo... - Page 204 Sintomo Controlli/Rimedi Il suono Dolby Digital 5.1 • Il disco reca il marchio "Dolby Digital 5.1 CH"? Il suono Dolby Digital 5.1 canali canali Surround non viene Surround viene emesso soltanto se il disco è registrato con audio a 5.1 canali. emesso.
- Page 205 Appendice Sintomo Controlli/Rimedi Sullo schermo viene • In questo momento non è possibile completare le funzioni o le operazioni perché: visualizzato il messaggio 1. L'operazione non è consentita dal software del disco Blu-ray/DVD. "Non disponibile". 2. La funzione (ad es. di angolatura) non è supportata dal software del disco Blu-ray/DVD. 3.
- Page 206 Samsung Electronics dichiara che questa apparecchiatura è conforme ai requisiti essenziali e ad altre disposizioni rilevanti della direttiva 1999/5/CE. La dichiarazione di conformità originale è reperibile sul sito http://www.samsung.com, selezionando Supporto > Seleziona il tuo prodotto e inserendo il nome del modello.
- Page 207 4,43 ✎ Le velocità di rete uguali o inferiori a 10 Mbps non sono supportate. ✎ Samsung Electronics Co., Ltd si riserva il diritto di modificare le specifiche senza preavviso. ✎ Peso e dimensioni sono approssimativi. ✎ Le caratteristiche e le specifiche sono soggette a modifiche senza preavviso.
- Page 208 Licenze Prodotto su licenza di Dolby Laboratories. Dolby e il simbolo della doppia D sono marchi di Dolby Laboratories. Per i brevetti DTS, vedere http://patents.dts.com. Prodotto su licenza di DTS Licensing Limited. DTS, DTS-HD, il simbolo, & DTS e il simbolo sono insieme marchi registrati e DTS-HD Master Audio | Essential è...
- Page 209 © 2015 Samsung Electronics Co., Ltd. Tutti i diritti riservati. Contatta SAMSUNG WORLD WIDE Se hai commenti o domande sui prodotti Samsung, contatta il Servizio Clienti Samsung. Contact Centre Contact Centre Area Web Site Area Web Site ` Europe www.samsung.com/ch/support...